计算机视觉实验:边缘提取与特征检测
秋风阁——北溪入江流:https://focus-wind.com/
秋风阁——计算机视觉实验:边缘提取与特征检测
文章目录
- 一:实验内容
- 二:实验过程
-
- (一)边缘提取
-
- (1)卷积算子
-
- a:robert交叉算子
- b:prewitt算子
- c:sobel算子
- d:laplacian算子
- (2)实验代码
- (二)特征点检测
-
- (1)实验代码
- 三:实验结果及分析
-
- (一)边缘提取
-
- (1)实验原图
- (2)robert算子
- (3)prewitt算子
- (3)sobel算子
- (4)laplacian算子
- (5)综合对比
- (二)特征点检测
-
- (1)实验原图
- (2)susan特征点检测
- (3)harris特征点检测
- (4)sift特征点检测
- (5)综合对比
一:实验内容
- 掌握python进行图像处理、了解opencv-python库的使用
- 基于robert、prewitt、sobel算子完成图像边缘提取
- 了解SUSAN、Harris、SIFT算子的特征检测
二:实验过程
(一)边缘提取
(1)卷积算子
a:robert交叉算子

b:prewitt算子

c:sobel算子

d:laplacian算子

(2)实验代码
import cv2
import numpy as np


def _edge_extraction(img: np.ndarray, kernel_method='robert'):
    """
    边缘提取
    :param img: 需要进行边缘提取的图,COLOR:BGR
    :param kernel_method: 边缘提取算子名称,全小写
    :return: x方向(0.5x)和y方向(0.5y)边缘提取的加权和
    """
    # 转换为灰度图
    gray = cv2.cvtColor(img, cv2.COLOR_BGR2GRAY)
    # 边缘提取算子
    if 'robert' == kernel_method:
        kernel_x = np.array([[-1, 0], [0, 1]], dtype=int)
        kernel_y = np.array([[0, -1], [1, 0]], dtype=int)
    elif 'prewitt' == kernel_method:
        kernel_x = np.array([[-1, 0, 1], [-1, 0, 1], [-1, 0, 1]], dtype=int)
        kernel_y = np.array([[1, 1, 1], [0, 0, 0], [1, 1, 1]], dtype=int)
    elif 'sobel' == kernel_method:
        kernel_x = np.array([[-1, 0, 1], [-2, 0, -2], [-1, 0, 1]], dtype=int)
        kernel_y = np.array([[1, 2, 1], [0, 0, 0], [-1, -2, -1]], dtype=int)
    elif 'laplacian' == kernel_method:
        kernel_x = np.array([[0, -1, 0], [-1, 4, -1], [0, -1, 0]], dtype=int)
        kernel_y = np.array([[-1, -1, -1], [-1, 8, -1], [-1, -1, -1]], dtype=int)
    else:
        kernel_x = np.array([[-1, 0], [0, 1]], dtype=int)
        kernel_y = np.array([[0, -1], [1, 0]], dtype=int)
    # 进行边缘提取
    filter_x = cv2.filter2D(gray, ddepth=-1, kernel=kernel_x)
    filter_y = cv2.filter2D(gray, ddepth=-1, kernel=kernel_y)
    # x方向和y方向加权
    img_add_weight = cv2.addWeighted(filter_x, 0.5, filter_y, 0.5, 0)
    return img_add_weight


def image_show(img: np.ndarray, title='img'):
    """
    显示图片
    :param img:
    :param title:
    :return:
    """
    cv2.namedWindow(title)
    cv2.imshow(title, img)
    cv2.waitKey(0)


def edge_extraction(path: str, kernel_method='robert'):
    # 读取图片
    img = cv2.imdecode(np.fromfile(path, dtype=np.uint8), cv2.IMREAD_COLOR)
    # 边缘提取
    img_extraction = _edge_extraction(img, kernel_method=kernel_method)
    # 显示图片
    image_show(img_extraction, kernel_method)
(二)特征点检测
(1)实验代码
import cv2
import numpy as np


def feature_point_detection_susan(img: np.ndarray):
    """
    susan特征点检测
    :param img:
    :return:
    """
    # susan算子
    susan_operator = np.ones((7, 7))
    susan_operator[0, 0] = 0
    susan_operator[0, 1] = 0
    susan_operator[0, 5] = 0
    susan_operator[0, 6] = 0

    susan_operator[1, 0] = 0
    susan_operator[1, 6] = 0

    susan_operator[5, 0] = 0
    susan_operator[5, 6] = 0

    susan_operator[6, 0] = 0
    susan_operator[6, 1] = 0
    susan_operator[6, 5] = 0
    susan_operator[6, 6] = 0

    dst = img.astype(np.float64)
    # 检测阈值
    threshold = 37 / 2
    # 像素偏差阈值
    t = 10

    for i in range(3, dst.shape[0] - 3):
        for j in range(3, dst.shape[1] - 3):
            # ir:中心位置像素,ir0周边位置像素
            # 获取矩形区域
            ir = np.array(dst[i - 3:i + 4, j - 3:j + 4])
            # 使用susan算子截取圆形区域
            ir = ir[1 == susan_operator]
            ir0 = dst[i, j]
            # 平滑曲线相似变换:c = e的[-((ir - ir0)/6))的6次方]的次方,表示相似还是不相似
            similarity = np.sum(np.exp(-((ir - ir0) / t) ** 6))
            # 小于阈值,提取特征点
            if similarity < threshold:
                img[i, j, 2] = 255
    return img


def feature_point_detection_harris(img: np.ndarray):
    """
    harris特征点检测
    :param img:
    :return:
    """
    # 转换为灰度图
    gray = cv2.cvtColor(img, cv2.COLOR_BGR2GRAY)
    # Harris特征点检测
    # 检测窗口大小
    block_size = 2
    # Sobel的卷积核
    k_size = 3
    # 权重系数
    k = 0.04
    dst = cv2.cornerHarris(gray, block_size, k_size, k)
    # 在原图上绘制关键点
    img[dst > 0.01 * dst.max()] = [0, 0, 255]
    return img


def feature_point_detection_sift(img: np.ndarray):
    """
    sift特征点检测
    :param img:
    :return:
    """
    # 转换为灰度图
    gray = cv2.cvtColor(img, cv2.COLOR_BGR2GRAY)
    # 创建SIFT对象
    sift = cv2.SIFT_create()
    # SIFT关键点检测
    kernel_point = sift.detect(gray, None)
    # 在原图绘制关键点
    cv2.drawKeypoints(gray, kernel_point, img)
    return img


def image_show(img: np.ndarray, title='img'):
    """
    显示图片
    :param img:
    :param title:
    :return:
    """
    cv2.namedWindow(title)
    cv2.imshow(title, img)
    cv2.waitKey(0)


def feature_point(path: str, kernel_method='susan'):
    # 读取图片
    img = cv2.imdecode(np.fromfile(path, dtype=np.uint8), cv2.IMREAD_COLOR)
    # 特征检测
    if 'susan' == kernel_method:
        img_feature_point = feature_point_detection_susan(img)
    elif 'harris' == kernel_method:
        img_feature_point = feature_point_detection_harris(img)
    elif 'sift' == kernel_method:
        img_feature_point = feature_point_detection_sift(img)
    else:
        img_feature_point = feature_point_detection_susan(img)
    # 显示图片
    image_show(img_feature_point, kernel_method)
三:实验结果及分析
(一)边缘提取
(1)实验原图

(2)robert算子
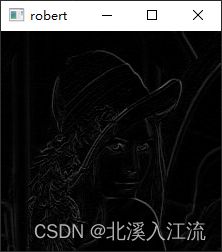
提取时间:0.0020003318786621094
(3)prewitt算子

提取时间:0.0010013580322265625
(3)sobel算子

提取时间:0.002001523971557617
(4)laplacian算子

提取时间:0.001997232437133789
(5)综合对比

robert提取时间:0.0020003318786621094
prewitt提取时间:0.0010013580322265625
sobel提取时间:0.002001523971557617
laplacian提取时间:0.001997232437133789
通过上图可以看出,laplacian二阶算子的边缘提取算子的提取效果明显优于robert,prewitt,sobel等一阶算子。且一阶算子和二阶算子在提取的时间上和算法的复杂度上相差不大,所以在实验中,如果有特征提取需求的话,可以尽量多采用二阶算子进行边缘提取。
(二)特征点检测
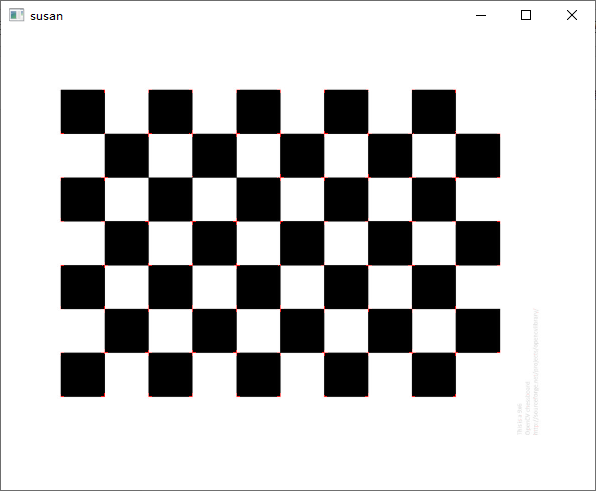
(1)实验原图

(2)susan特征点检测
(3)harris特征点检测

(4)sift特征点检测

(5)综合对比

在实验中,因为opencv不提供(或本人没有找到)有关susan的特征点检测的函数,所以susan特征点检测是自己写的,相比于其他特征点检测直接调用底层库较慢。在三个检测图片中,可以发现sift特征点检测检测到的特征点更多,其他检测是边缘特征点,二sift不仅检测了边缘特征点,也检测出了中心特征点。