【Anaconda】遇到的安装问题汇总
一、安装包相关
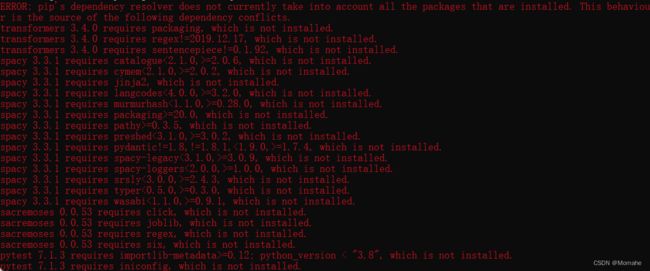
1、ERROR: pip’s dependency resolver does not currently take into account all the packages that are installed. This behaviour is the source of the following dependency conflicts.
这种很多的,可以把requires前的东西都按版本删了(比如transformers 3.4.0);
如果只有一两条,可以把requires后的东西按版本安装好
2、ModuleNotFoundError: No module named 'xxx’可能的解决方案大全:https://zhuanlan.zhihu.com/p/416872266
3、No module named torchcrf
pip uninstall torchcrf   #首先卸掉以前的torchcrf包
pip install pytorch-crf -i https://pypi.tuna.tsinghua.edu.cn/simple/   #再安装
# 再导入(from torchcrf import CRF)即可
4、pip install nltk 后仍有报错
先 pip install nltk;然后在github(https://github.com/nltk/nltk_data)上下载语料库;
下载后解压,把里面的packages文件名改成nltk_data,放在该放的路径下(错误提示里会给出路径,如上图最下,我放在了’D:\anaconda3\envs\pytorch_gpu\nltk_data’,这是我虚拟环境的路径)
5、pip install pyahocorasick==1.4.2 报错
在 https://pypi.org/project/pyahocorasick/ 下载对应版本,然后进到下载目录安装。
可能还是报错:Microsoft Visual C++ 14.0 or greater is required. Get it with “Microsoft C++ Build Tools”
用微软账号登录 https://my.visualstudio.com/Downloads/Featured?mkt=zh-cn 下载如图:
解压后双击其中的.exe文件,默认安装即可(我是自定义,也装到C盘了,唉3.12GB),再装就成功了。
6、TypeError: CharBiLSTH.forward: netunn type ‘cclass ‘torch.Tenson’>’ is not a 'class ‘NoneType’> ’
可以看到报错中,有环境里overrides文件夹下的问题,更改overrides版本为 3.1.0 即可(pip uninstall overrides、pip install overrides==3.1.0)
7、ValueError: tensorflow.__ spec__ is None 类似,以及下面这个报错
![]()
可以看到报错中,有提及transformers的问题,更改transformers版本为 3.4.0 即可(pip uninstall transformers、pip install --user transformers==3.4.0)
8、pip install dgl 后报错
 在官方网站(https://www.dgl.ai/pages/start.html)中寻找对应版本的命令,如cuda11.6对应的命令为:pip install dgl-cu116 dglgo -f https://data.dgl.ai/wheels/repo.html
二、OSError 等系统?问题
1、OSError: Windows requires Developer Mode to be activated, or to run Python
以管理员身份运行使用的代码编译器。
2、ERROR: Could not install packages due to an OSError: [WinError 5] 拒绝访问
把 pip install 改成 pip install --user
但是 pip uninstall 不能用这个办法,可以修改 anaconda安装目录 以及其中的 python.exe 的user权限(我修改了,但有时还是报错,未解决,,但似乎不管它也可以)
3、0verflowError : Python int too large to convert to c long
点击报错最后的蓝色部分,自动跳转到错误行,把其中的 “sys.maxsize” 改为 “2**31-1” 即可(系统默认的太大,改成可以接受的大小)。
三、pytorch相关
1、ERROR: pip’s dependency resolver does not currently take into account all the packages that are installed. This behaviour is the source of the following dependency conflicts.
报以上冲突,直接改版本号(看具体情况)比如 torchvision 0.12.0 requires torch==1.11.0, but you have torch 1.12.1 which is incompatible. 直接 pip install torch 1.11.0
这个版本是可以的:pytorch 1.11.0、torchvision 0.12.0、torchaudio 0.11.0、cudatoolkit 10.2/11.3
2、RuntimeError:‘lengths’ argument should be a 1D CPU int64 tensor,but got 10 cuda:0 Long tensor
点击报错最后的蓝色部分,自动跳转到错误行,把其中的 “lengths” 改为 “lengths.to(“cpu”)” 即可。
四、其他报错
1、无法启动bert-serving
之前都不知道只是啥东西,总体需要三步:
- 在 anaconda prompt 中进入当前使用的环境进行安装:pip install bert-serving-server、pip install bert-serving-client
- 下载模型并解压,如 cased_L-12_H-768_A-12
- 在所用编辑器的Terminal中启动:bert-serving-start -model_dir 模型所在目录 -cpu
tensorflow可以和pytorch共存?!!!
因为 bert-serving 支持版本较低(cuda11.不可),所以装cpu版本的 pip install tensorflow 1.15.0【要在命令后加-cpu】,配套需要 pip install numpy 1.16、scipy 1.4.1(不改也行,warning会很多)
bert-serving启动到一半没有反应:
使用绝对路径就没事了【注意目录要用 \ 而不是/ 】:
bert-serving-start -model_dir D:\JetBrains\PycharmProjects\XXX\tmp\cased_L-12_H-768_A-12 -max_seq_len NONE -pooling_strategy NONE -cpu


