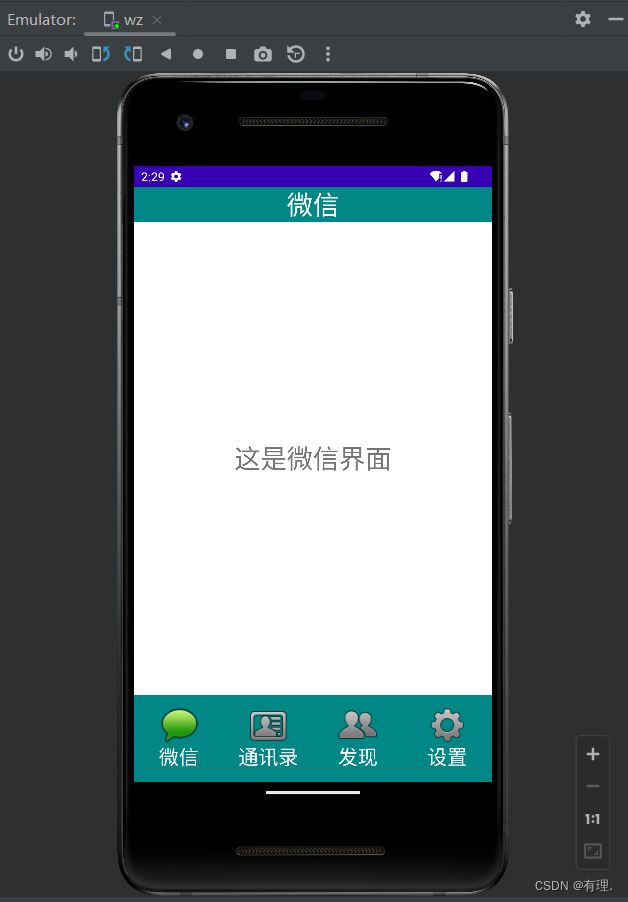
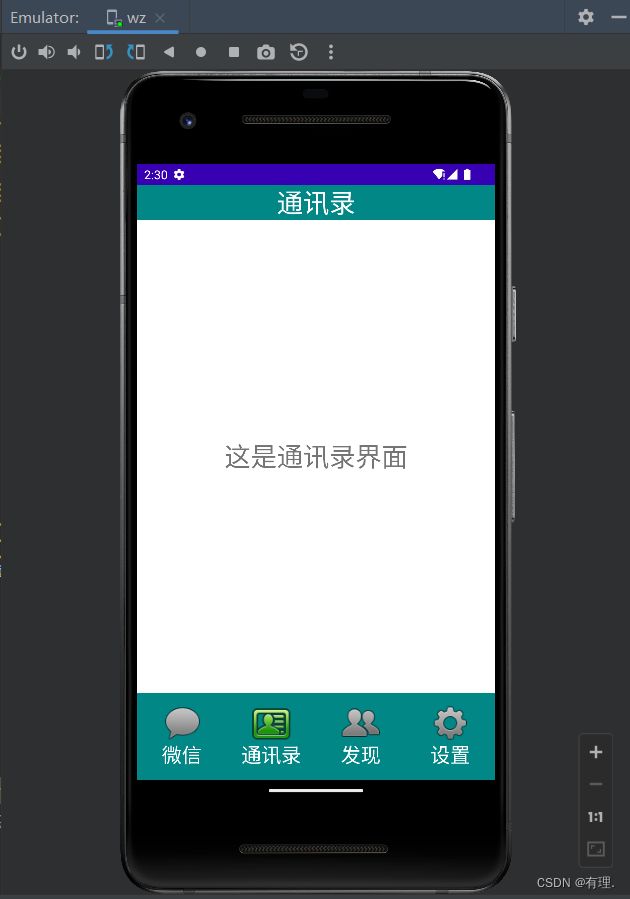
利用Android studio设计WeChat的门户界面
设计目标:实现APP门户界面框架设计,至少包含4个tab页,框架设计需要使用fragment,activity,不得使用UNIAPP技术进行开发(H5或者小程序),且能实现tab页之间的点击切换;
实现过程:
先设计页面,主页面分为三个部分,顶部(top)、内容(content)、底部(bottom)。
顶部和底部可以用基本的LinearLayout进行线性布局。
在res.layout包里new一个bottom.xml文件,来写底部的linearLayout。
在res.layout包里new一个top.xml文件,在其顶部的linearLayout中写一个TextView。
1. 制作底部按钮文件bottom.xml
bottom平均分成四块,每块由一个图片和一个文字构成。所以可以用水平的LinearLayout中再包裹一个竖直的LinearLayout,被包裹的每个LinearLayout里包含一个ImageButton和TextView控件。图片可放在res/drawable里。
bottom.xml代码如下:
2. 制作顶部按钮文件top.xml:
top.xml代码如下:
用来等比例地划分区域。最简单的用法为:要等比例划分,分谁,谁为0,weight按比例即可:android:layout_weight=“1”
为组件设置一个背景图片,或者直接用颜色覆盖,颜色有很多种,本博客实验选用的水蓝绿色:android:background="@color/teal_700"
表示textView中的文字相对于TextView的对齐方式:android:gravity=“center”
要显示的文字:android:text=“微信”
设置文字的颜色:android:textColor="@color/white"
设置文字的大小:android:textSize=“30sp” />
3. activity_main.xml文件的相关配置添加
activity_main.xml是app运行后显示的主页面,所以配置该文件,就是对主页面显示的内容布局。整个主页面使用竖直的LinerLayout,将top.xml和bottom.xml导入进来就好了,当然还有中间内容content,content是应对Fragment,所以要使用FrameLayout作为容器。
activity_main.xml代码如下:
4. 创建Fragment类
在java中的包里创建4个Fragment类,重写其中的onCreateView方法返回我们之前设计好的相应的视图(因为tabbar有四个,每个对应不同的内容):
在app/com.example.wechart目录下新建Fragment(blank)类,并根据情况创建四个,并分别命名为bottom.xml对应四个按钮的名称。
faxianFragment.java:
package com.example.wechart;

import android.os.Bundle;
import android.view.LayoutInflater;
import android.view.View;
import android.view.ViewGroup;

import android.app.Fragment;


public class faxianFragment extends Fragment {


    public faxianFragment() {
        // Required empty public constructor
    }

    @Override
    public View onCreateView(LayoutInflater inflater, ViewGroup container,
                             Bundle savedInstanceState) {
        // Inflate the layout for this fragment
        return inflater.inflate(R.layout.fragment_faxian, container, false);
    }
}
shezhiFragment.java:
package com.example.wechart;

import android.os.Bundle;
import android.view.LayoutInflater;
import android.view.View;
import android.view.ViewGroup;

import android.app.Fragment;


public class shezhiFragment extends Fragment {


    public shezhiFragment() {
        // Required empty public constructor
    }

    @Override
    public View onCreateView(LayoutInflater inflater, ViewGroup container,
                             Bundle savedInstanceState) {
        // Inflate the layout for this fragment
        return inflater.inflate(R.layout.fragment_shezhi, container, false);
    }
}
tongxunluFragment.java:
package com.example.wechart;

import android.os.Bundle;
import android.view.LayoutInflater;
import android.view.View;
import android.view.ViewGroup;

import android.app.Fragment;


public class tongxunluFragment extends Fragment {


    public tongxunluFragment() {
        // Required empty public constructor
    }

    @Override
    public View onCreateView(LayoutInflater inflater, ViewGroup container,
                             Bundle savedInstanceState) {
        // Inflate the layout for this fragment
        return inflater.inflate(R.layout.fragment_tongxunlu, container, false);
    }
}
weixinFragment.java:
package com.example.wechart;

import android.os.Bundle;

import android.app.Fragment;

import android.view.LayoutInflater;
import android.view.View;
import android.view.ViewGroup;


public class weixinFragment extends Fragment {


    public weixinFragment() {
        // Required empty public constructor
    }

    @Override
    public View onCreateView(LayoutInflater inflater, ViewGroup container,
                             Bundle savedInstanceState) {
        // Inflate the layout for this fragment
        return inflater.inflate(R.layout.fragment_weixin, container, false);
    }
}
5. 配置MainActivity.java文件
在MainActivity中“显示”我们的写的布局页面,实现我们的功能:点击监听、界面切换、按钮变化。
变量声明:
Fragment:对应创建的Fragment
FragmentManager:管理Fragment的类
ImageView:对应之前创建的ImageView
LinearLayout:对应之前创建的LinearLayout
    private Fragment weixinFragment=new weixinFragment();
    private Fragment tongxunluFragment=new tongxunluFragment();
    private Fragment faxianFragment=new faxianFragment();
    private Fragment shezhiFragment=new shezhiFragment();
    private FragmentManager fragmentManager;

    private View LinearLayout1,LinearLayout2,LinearLayout3,LinearLayout4;
    private ImageView imageWeixin,imagetongxunlu,imagefaxian,imageshezhi;
    private TextView textView;
点击监听:
实现View.OnClickListener接口中onClick(View v)方法。
@Override
    public void onClick(View v) {
        resetImage();
        switch (v.getId()){
            case R.id.tab_weixin:
                showfragment(0);
                break;
            case R.id.tab_tongxunlu:
                showfragment(1);
                break;
            case R.id.tab_faxian:
                showfragment(2);
                break;
            case R.id.tab_shezhi:
                showfragment(3);
                break;
            default:
                break;
        }

    }
界面切换:
借助FragmentManager对Fragment进行管理,用FragmentTransaction管理Fragment所有的展示交互以及回滚事件。我们要先将所有的Fragment添加进去:
private void initFragment(){
        fragmentManager=getFragmentManager();
        FragmentTransaction transaction=fragmentManager.beginTransaction();
        transaction.add(R.id.content,weixinFragment);
        transaction.add(R.id.content,tongxunluFragment);
        transaction.add(R.id.content,faxianFragment);
        transaction.add(R.id.content,shezhiFragment);
        transaction.commit();
    }
选择对应按钮后,页面的切换:
 private void showfragment(int i){
        FragmentTransaction transaction=fragmentManager.beginTransaction();
        hideFragment(transaction);
        switch (i){
            case 0:
                textView.setText("微信");
                transaction.show(weixinFragment);
                imageWeixin.setImageResource(R.drawable.tab_weixin_pressed);
                break;

            case 1:
                textView.setText("通讯录");
                transaction.show(tongxunluFragment);
                imagetongxunlu.setImageResource(R.drawable.tab_address_pressed);
                break;

            case 2:
                textView.setText("发现");
                transaction.show(faxianFragment);
                imagefaxian.setImageResource(R.drawable.tab_find_frd_pressed);
                break;

            case 3:
                textView.setText("设置");
                transaction.show(shezhiFragment);
                imageshezhi.setImageResource(R.drawable.tab_settings_pressed);
                break;

            default:
                break;
        }
        transaction.commit();
    }
此时查看app时,会发现所有Fragment都重叠起来,导致错误,因此我们要先将所有Fragment都隐藏,然后选择相应按钮时显示对应Fragment:
private void hideFragment(FragmentTransaction transaction){
        transaction.hide(weixinFragment);
        transaction.hide(tongxunluFragment);
        transaction.hide(faxianFragment);
        transaction.hide(shezhiFragment);
    }
按钮变化:
按钮通过设置ImageView的图像来源:点击后变为另外一个图标(以微信图标为例)。将该方法写入showfragment函数内,当点击微信的时候,展现微信页面的同时,微信图标也变为点击事件发生后的样子;在点击另外一个图标时,该微信图标要变回原来的样子。于是写了restImage函数,放入onClick函数里,随着事件的发生,调用该函数,实现按钮的变化。
public void resetImage(){
        imageWeixin.setImageResource(R.drawable.tab_weixin_normal);
        imagetongxunlu.setImageResource(R.drawable.tab_address_normal);
        imagefaxian.setImageResource(R.drawable.tab_find_frd_normal);
        imageshezhi.setImageResource(R.drawable.tab_settings_normal);

    }
OnCreate执行上面所写函数方法实现具体功能
在MainActivity中,执行OnCreate函数时执行初始化、监听等函数:
    @Override
    protected void onCreate(Bundle savedInstanceState) {
        super.onCreate(savedInstanceState);
        supportRequestWindowFeature(Window.FEATURE_NO_TITLE);
        setContentView(R.layout.activity_main);

        textView=findViewById(R.id.textView2);

        LinearLayout1=findViewById(R.id.tab_weixin);
        LinearLayout2=findViewById(R.id.tab_tongxunlu);
        LinearLayout3=findViewById(R.id.tab_faxian);
        LinearLayout4=findViewById(R.id.tab_shezhi);

        imageWeixin=findViewById(R.id.imageView);
        imagetongxunlu=findViewById(R.id.imageView1);
        imagefaxian=findViewById(R.id.imageView2);
        imageshezhi=findViewById(R.id.imageView3);

        LinearLayout1.setOnClickListener(this);
        LinearLayout2.setOnClickListener(this);
        LinearLayout3.setOnClickListener(this);
        LinearLayout4.setOnClickListener(this);

        initFragment();
        showfragment(0);

    }
运行结果:
初始界面:
双击通讯录:
源码仓库:https://gitee.com/wz1027/we-chat.git


