树莓派4学习记录(7)-实时MNIST手写数字识别
树莓派4学习记录(7)
-
-
- 1. 数据准备与模型训练
-
- 1.1 数据准备与框架选择
- 1.2 训练模型
- 2. 树莓派构建传输与识别框架
- 3. 移植模型到树莓派
- 4. 测试
- 5. 鸣谢与相关跳转
-
1. 数据准备与模型训练
1.1 数据准备与框架选择
很明显今天实现的是针对手写数字集(MNIST)的实时识别,那么很明显:
数据集为:标准MNIST数据集
因为我树莓派上安装的是tensorflow框架,理所当然我这里依旧选用了Tensorflow作为我的实现框架:
框架为:tensorflow 1.13.1
1.2 训练模型
直接上代码:
# codin: utf-8

# do not traing on raspberry
# the CPU occupication will go to 90%+
# boom!!!

import input_data
import tensorflow as tf

mnist = input_data.read_data_sets('MNIST_data', one_hot=True)
# sess = tf.InteractiveSession()

x = tf.placeholder("float", shape=[None, 784])
y_ = tf.placeholder("float", shape=[None, 10])

def weight_variable(shape):
  initial = tf.truncated_normal(shape, stddev=0.1)
  return tf.Variable(initial)

def bias_variable(shape):
  initial = tf.constant(0.1, shape=shape)
  return tf.Variable(initial)

def conv2d(x, W):
  return tf.nn.conv2d(x, W, strides=[1, 1, 1, 1], padding='SAME')

def max_pool_2x2(x):
  return tf.nn.max_pool(x, ksize=[1, 2, 2, 1],
                        strides=[1, 2, 2, 1], padding='SAME')

x_image = tf.reshape(x, [-1,28,28,1])

# layer one
W_conv1 = weight_variable([5, 5, 1, 32])
b_conv1 = bias_variable([32])

h_conv1 = tf.nn.relu(conv2d(x_image, W_conv1) + b_conv1)
h_pool1 = max_pool_2x2(h_conv1)

# layer two
W_conv2 = weight_variable([5, 5, 32, 64])
b_conv2 = bias_variable([64])

h_conv2 = tf.nn.relu(conv2d(h_pool1, W_conv2) + b_conv2)
h_pool2 = max_pool_2x2(h_conv2)

# fc layer
W_fc1 = weight_variable([7 * 7 * 64, 1024])
b_fc1 = bias_variable([1024])

h_pool2_flat = tf.reshape(h_pool2, [-1, 7*7*64])
h_fc1 = tf.nn.relu(tf.matmul(h_pool2_flat, W_fc1) + b_fc1)

# drop out
keep_prob = tf.placeholder("float")
h_fc1_drop = tf.nn.dropout(h_fc1, keep_prob)

# softmax
W_fc2 = weight_variable([1024, 10])
b_fc2 = bias_variable([10])

y_conv=tf.nn.softmax(tf.matmul(h_fc1_drop, W_fc2) + b_fc2)

# loss function
cross_entropy = -tf.reduce_sum(y_*tf.log(y_conv))
# train step
train_step = tf.train.AdamOptimizer(1e-4).minimize(cross_entropy)
# correct number
correct_prediction = tf.equal(tf.argmax(y_conv,1), tf.argmax(y_,1))
# accuracy
accuracy = tf.reduce_mean(tf.cast(correct_prediction, "float"))
# initiate all variables
init = tf.global_variables_initializer()
sess = tf.Session()
sess.run(init)
# start training
steps = 2500
for i in range(steps):
    # generate a batch of images
    batch = mnist.train.next_batch(50)
    # every 100 step, training accuracy
    if i%100 == 0:
        train_accuracy = accuracy.eval(session=sess, feed_dict={
            x:batch[0], y_: batch[1], keep_prob: 1.0})
        print("step %d/%d, training accuracy %g" %(i, steps, train_accuracy))
    sess.run(train_step, feed_dict={x: batch[0], y_: batch[1], keep_prob: 0.5})

saver = tf.train.Saver()
saver.save(sess, "model/model.ckpt")

print("test accuracy %g" %accuracy.eval(session=sess, feed_dict={x: mnist.test.images, y_: mnist.test.labels, keep_prob: 1.0}))
大概最后的准确率稳定到:
test accuracy 0.9783
有点低,但是还是够用了。
这个代码中使用到了一个input_data的脚本,其实可以在tensorflow的repo中找到:
input_data.py
当然,也可以改为下面的这个代码,以导入MNIST数据集:
from tensorflow.examples.tutorials.mnist import input_data
在训练之后得到一个Tensorflow的模型:
模型不大,在树莓派上运行绰绰有余。
将模型下载到本地,等待移植到树莓派中。
2. 树莓派构建传输与识别框架
基于之前的实时UDP传输脚本,构建我们自己的实时UDP传输与数字识别功能。
还是话不多说,直接上代码:
# coding: utf-8

import cv2
import numpy as np
import socket
import struct
import input_data
import tensorflow as tf

# 导入MNIST数据集
mnist = input_data.read_data_sets('MNIST_data', one_hot=True)

x = tf.placeholder("float", shape=[None, 784])
y_ = tf.placeholder("float", shape=[None, 10])

# cnn section
def weight_variable(shape):
	initial = tf.truncated_normal(shape, stddev=0.1)
	return tf.Variable(initial)

def bias_variable(shape):
	initial = tf.constant(0.1, shape=shape)
	return tf.Variable(initial)

def conv2d(x, W):
	return tf.nn.conv2d(x, W, strides=[1, 1, 1, 1], padding='SAME')

def max_pool_2x2(x):
	return tf.nn.max_pool(x, ksize=[1, 2, 2, 1],
                        strides=[1, 2, 2, 1], padding='SAME')

x_image = tf.reshape(x, [-1,28,28,1])

# layer one
W_conv1 = weight_variable([5, 5, 1, 32])
b_conv1 = bias_variable([32])
h_conv1 = tf.nn.relu(conv2d(x_image, W_conv1) + b_conv1)
h_pool1 = max_pool_2x2(h_conv1)

# layer two
W_conv2 = weight_variable([5, 5, 32, 64])
b_conv2 = bias_variable([64])
h_conv2 = tf.nn.relu(conv2d(h_pool1, W_conv2) + b_conv2)
h_pool2 = max_pool_2x2(h_conv2)

# fc layer
W_fc1 = weight_variable([7 * 7 * 64, 1024])
b_fc1 = bias_variable([1024])
h_pool2_flat = tf.reshape(h_pool2, [-1, 7*7*64])
h_fc1 = tf.nn.relu(tf.matmul(h_pool2_flat, W_fc1) + b_fc1)

# drop out
keep_prob = tf.placeholder("float")
h_fc1_drop = tf.nn.dropout(h_fc1, keep_prob)

# softmax
W_fc2 = weight_variable([1024, 10])
b_fc2 = bias_variable([10])

y_conv=tf.nn.softmax(tf.matmul(h_fc1_drop, W_fc2) + b_fc2)

cross_entropy = -tf.reduce_sum(y_*tf.log(y_conv))
train_step = tf.train.AdamOptimizer(1e-4).minimize(cross_entropy)
correct_prediction = tf.equal(tf.argmax(y_conv,1), tf.argmax(y_,1))
accuracy = tf.reduce_mean(tf.cast(correct_prediction, "float"))
# 创建session
sess = tf.Session()
# 初始化全局变量
sess.run(tf.initialize_all_variables())

# 导入模型
saver = tf.train.Saver()
saver.restore(sess, "model/model.ckpt")

# 建立套接字
s = socket.socket(socket.AF_INET, socket.SOCK_DGRAM)
s.bind(("192.168.1.7", 6000))

print("UDP bound on port 6000...")
print('now starting to send frames...')

# 创建视频抓取对象
capture=cv2.VideoCapture(0)
# 一个小trick,用于等待接收客户端连接
data, addr = s.recvfrom(1024)
# 设置分辨率
capture.set(3, 256)
capture.set(4, 256)

# 预热tensorflow
print("preparing tensorflow...")
for i in range(10):
	test_batch = mnist.test.next_batch(1)
	predict_result = sess.run(y_conv, feed_dict={x: test_batch[0], y_: test_batch[1], keep_prob: 1.0})
	number = np.where(predict_result == np.max(predict_result))
	print("for the %d time "%(i+1), number[1].tolist())

# 假装向模型输入了label(笑)
tmp_array = np.array([[0., 0., 0., 0., 0., 0., 0., 0., 0., 1.]])

# 主循环
print("start rec and trans....")
while True:
	success,frame=capture.read()
	while not success and frame is None:
		success,frame=capture.read() #获取视频帧

    # 减少周围的环境影响,保留中心
	frame = frame[36:220, 36:220]
    # 裁剪到(28*28)
	test_image = cv2.resize(frame, (28, 28))
    # 灰度图化
	gray = cv2.cvtColor(test_image, cv2.COLOR_BGR2GRAY)
	# 二值化
	# 注意,具体的选择是cv2.THRESH_BINARY_INV还是cv2.THRESH_BINARY一定要根据实际情况:
	# cv2.THRESH_BINARY:适合黑底白字输入
	# cv2.THRESH_BINARY_INV:适合白底黑字输入
	ret, binary = cv2.threshold(gray,0,255,cv2.THRESH_BINARY_INV | cv2.THRESH_OTSU)

    # 运行预测
	predict_result = sess.run(y_conv, feed_dict={x: np.reshape(binary, (1,784)), y_: tmp_array, keep_prob: 1.0})
    # 输出预测结果
	number = np.where(predict_result[0] == np.max(predict_result[0]))

    # 画面添加预测结果
	cv2.putText(frame, "num: "+str(number[0].tolist()[0]), (0,50), cv2.FONT_HERSHEY_COMPLEX, 0.8, (100, 200, 200), 1)

	result,imgencode=cv2.imencode('.jpg',frame,[cv2.IMWRITE_JPEG_QUALITY,50])

	s.sendto(struct.pack('i',imgencode.shape[0]), addr)
	s.sendto(imgencode, addr)

s.close()
客户端:
# coding: utf-8

import cv2
import numpy
import socket
import struct

s = socket.socket(socket.AF_INET, socket.SOCK_DGRAM)
addr = ("192.168.1.7", 6000)

# 建立连接
data = 'hello'
s.sendto(data.encode(), addr)

print('now waiting for frames...')
while True:
	data, addr = s.recvfrom(65535)
	if len(data)==1 and data[0]==1: #如果收到关闭消息则停止程序
		s.close()
		cv2.destroyAllWindows()
		exit()
	if len(data)!=4: #进行简单的校验,长度值是int类型,占四个字节
		length=0
	else:
		length=struct.unpack('i',data)[0] #长度值
	data,address=s.recvfrom(65535)
	if length!=len(data): #进行简单的校验
		continue
	data=numpy.array(bytearray(data)) #格式转换
	imgdecode=cv2.imdecode(data,1) #解码
	# print('have received one frame')
	cv2.imshow('frames', imgdecode) #窗口显示
	if cv2.waitKey(1)==27: #按下“ESC”退出
		break

s.close()
cv2.destroyAllWindows()
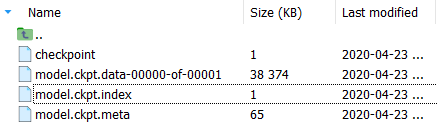
3. 移植模型到树莓派
其实这一步很简单,就是将模型上传到树莓派的相关路径中,并没有什么特别的处理,放置到:
./model/
这样就可以直接运行了,运行方式和之前的一样(先server,然后再client)。
4. 测试
测试结果:
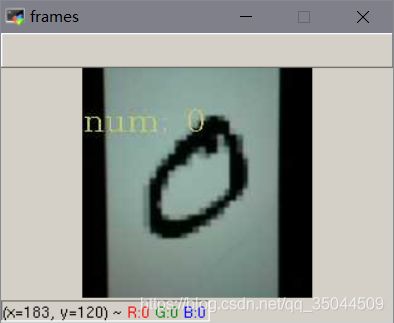
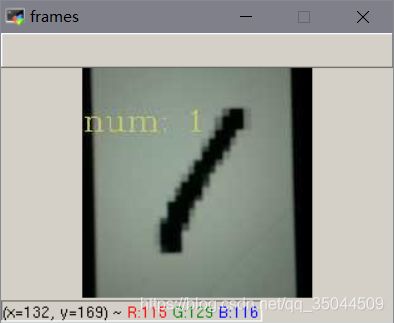
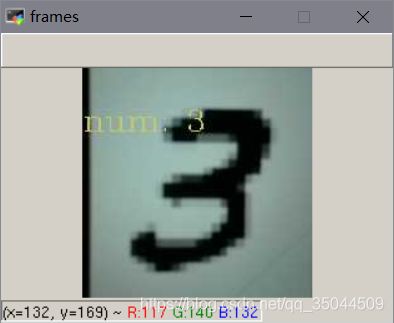
效果不错,再接再厉。
5. 鸣谢与相关跳转
关于图像二值化:
OpenCV—图像二值化
为什么MNIST需要黑底白字:
Mnist模型识别自己手写数字正确率低的原因
图像怎么部分截取:
python数组截取
感谢以上教程,让我少走了很多弯。