knn分类 knn
The best way to learn machine learning concepts is by doing a project. In this article, I am going to describe some key machine learning concepts using a project.
学习机器学习概念的最好方法是做一个项目。 在本文中,我将使用项目描述一些关键的机器学习概念。
In this article, I will explain a classification model in detail which is a major type of supervised machine learning. The model we will work on is called a KNN classifier as the title says.
在本文中,我将详细解释分类模型,这是监督型机器学习的主要类型。 如标题所示,我们将使用的模型称为KNN分类器。
The KNN classifier is a very popular and well known supervised machine learning technique. This article will explain the KNN classifier with a simple but complete project.
KNN分类器是一种非常流行且广为人知的监督式机器学习技术。 本文将通过一个简单但完整的项目来说明KNN分类器。
什么是监督学习模型? (What is a supervised learning model?)
I will explain it in detail. But here is what Wikipedia has to say:
我将详细解释。 但是,这是维基百科必须说的:
Supervised learning is the machine learning task of learning a function that maps an input to an output based on example input-output pairs. It infers a function from labeled training data consisting of a set of training examples.
监督学习是学习一个功能的机器学习任务,该功能基于示例输入-输出对将输入映射到输出。 它从标记的训练数据(由一组训练示例组成)中推断出功能。
Supervised learning models take input features (X) and output (y) to train a model. The goal of the model is to define a function that can use the input features and calculate the output.
监督学习模型采用输入特征(X)和输出(y)来训练模型。 该模型的目标是定义一个可以使用输入要素并计算输出的函数。
An example will make it more clear
一个例子将使其更加清晰
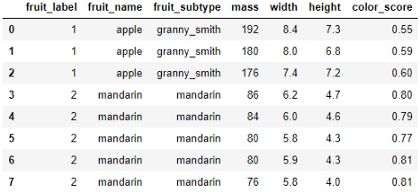
Here is a dataset that contains the mass, width, height, and color_score of some fruit samples.
这是一个数据集,其中包含一些水果样本的质量,宽度,高度和color_score。
The purpose of this dataset was to train a model so that if we input the mass, width, height, and color-score to the model, the model can let us know the name of the fruit. Like if we input the mass, width, height, and color_score of a piece of fruit as 175, 7.3, 7.2, 0.61 respectively, the model should output the name of the fruit as an apple.
该数据集的目的是训练模型,以便我们在模型中输入质量,宽度,高度和颜色分数时,模型可以让我们知道水果的名称。 就像如果我们将一块水果的质量,宽度,高度和color_score分别输入为175、7.3、7.2、0.61一样,模型应该将水果的名称输出为苹果。
Here mass, width, height, and color_score are the input features(X). And the name of the fruit is the output variable or label(y).
质量,宽度,高度和color_score是输入要素(X)。 水果的名称是输出变量或label(y)。
This example may sound silly to you. But this is the mechanism that is used in very high level supervised machine learning models.
这个例子听起来很愚蠢。 但这是在非常高级的有监督的机器学习模型中使用的机制。
I will show a practical example with a real dataset later.
稍后,我将展示带有实际数据集的实际示例。
KNN分类器 (KNN Classifier)
The KNN classifier is an example of a memory-based machine learning model.
KNN分类器是基于内存的机器学习模型的示例。
That means this model memorizes the labeled training examples and they use that to classify the objects it hasn’t seen before.
这意味着该模型可以存储标记的训练示例,并使用它们对以前从未见过的对象进行分类。
The k in KNN classifier is the number of training examples it will retrieve in order to predict a new test example.
KNN分类器中的k是为了预测新的测试示例而将检索到的训练示例的数量。
KNN classifier works in three steps:
KNN分类器分为三个步骤:
- When it is given a new instance or example to classify, it will retrieve training examples that it memorized before and find the k number of closest examples from it. 当给定一个新的实例或示例进行分类时,它将检索以前存储的训练示例,并从中找到k个最接近的示例。
- Then the classifier looks up the labels (the name of the fruit in the example above) of those k numbers of closest examples. 然后,分类器会查找最接近的k个数字的标签(上面示例中的水果名称)。
- Finally, the model combines those labels to make a prediction. Usually, it will predict the majority labels. For example, if we choose our k to be 5, from the closest 5 examples, if we have 3 oranges and 2 apples, the prediction for the new instance will be orange. 最后,该模型将这些标签结合起来进行预测。 通常,它将预测多数标签。 例如,如果我们从最接近的5个示例中选择k为5,则如果我们有3个橘子和2个苹果,则新实例的预测将是橙色。
资料准备 (Data Preparation)
Before we start, I encourage you to check if you have the following resources available in your computer:
在开始之前,建议您检查计算机中是否有以下可用资源:
Numpy Library
脾气暴躁的图书馆
Pandas Library
熊猫图书馆
Matplotlib Library
Matplotlib库
Scikit-Learn Library
Scikit学习图书馆
Jupyter Notebook environment.
Jupyter Notebook环境。
If you do not have Jupyter Notebook installed, use any other notebook of your choice. I suggest a Google Colaboratory notebook. Follow this link to start. Just remember one thing,
如果您尚未安装Jupyter Notebook,请使用您选择的任何其他笔记本。 我建议使用Google合作笔记本。 单击此链接开始。 只要记住一件事,
Google Colaboratory notebook is not private. So, do not do any professional or sensitive work there. But great for practice. Because lots of commonly used packages are already installed in it.
Google合作笔记本不是私有的。 因此,不要在那里做任何专业或敏感的工作。 但是非常适合练习。 因为已经安装了许多常用的软件包。
I suggest, download the dataset. I provided the link at the bottom of the page. Run every line of code yourself if you are reading to learn this.
我建议下载数据集。 我在页面底部提供了链接。 如果您正在阅读,请自己运行每一行代码。
First, import the necessary libraries:
首先,导入必要的库:
%matplotlib notebook
import numpy as np
import matplotlib.pyplot as plt
import pandas as pd
from sklearn.model_selection import train_test_split
For this tutorial, I will use the Titanic dataset from Kaggle. I have this dataset uploaded in the same folder as my notebook.
在本教程中,我将使用Kaggle的Titanic数据集。 我将此数据集上载到与笔记本相同的文件夹中。
Here is how I can import the dataset in the notebook using pandas.
这是我如何使用熊猫将数据集导入笔记本的方法。
titanic = pd.read_csv('titanic_data.csv')
titanic.head()

#titaninc.head() gives the first five rows of the dataset. We will    #print first five rows only to examine the dataset.
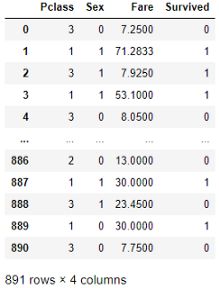
Look at the second column. It contains the information, if the person is survived or not. 0 means the person survived and 1 means the person did not survive.
看第二列。 它包含该信息(无论该人是否幸存)。 0表示该人幸存,1表示该人未幸存。
For this tutorial, our goal will be to predict the ‘Survived’ feature.
对于本教程,我们的目标是预测“生存”功能。
To make it simple, I will keep a few key features that are more important for the algorithm and get rid of the rest.
为简单起见,我将保留一些对算法更重要的关键功能,并去除其余的功能。
This dataset is very simple. Just from intuition, we can see that there are columns that cannot be important to predict the ‘Survived’ feature.
该数据集非常简单。 凭直觉,我们可以看到有些列对于预测“生存”功能并不重要。
For example, ‘PassengerId’, ‘Name’, ‘Ticket’ and, ‘Cabin’ does not seem to be useful to predict that if a passenger is survived or not.
例如,“ PassengerId”,“ Name”,“ Ticket”和“ Cabin”在预测乘客是否幸存时似乎没有用。
I will make a new DataFrame with a few key features and name the new DataFrame titanic1.
我将制作一个具有一些关键功能的新DataFrame并将其命名为新的DataFrame titanic1。
titanic1 = titanic[['Pclass', 'Sex', 'Fare', 'Survived']]The ‘Sex’ column has the string value and that needs to be changed. Because computers do not understand words. It only understands numbers. I will change the ‘male’ for 0 and ‘female’ for 1.
“性别”列具有字符串值,需要更改。 因为计算机不懂单词。 它只了解数字。 我将'male'更改为0,将'female'更改为1。
titanic1['Sex'] = titanic1.Sex.replace({'male':0, 'female':1})This is how the DataFrame titanic1 looks like:
这是DataFrame titanic1的样子:
Our goal is to predict the ‘Survived’ parameter, based on the other information in the titanic1 DataFram. So, the output variable or label(y) is ‘Survived’. The input features(X) are ‘P-class’, ‘Sex’, and, ‘Fare’.
我们的目标是根据titanic1 DataFram中的其他信息预测'Survived'参数。 因此,输出变量或label(y)为“生存”。 输入要素(X)是“ P级”,“性”和“票价”。
X = titanic1[['Pclass', 'Sex', 'Fare']]
y = titanic1['Survived']
KNN分类器模型 (KNN Classifier Model)
To start with, we need to split the dataset into two sets: a training set and a test set.
首先,我们需要将数据集分为两组:训练集和测试集。
We will use the training set to train the model where the model will memorize both the input features and the output variable.
我们将使用训练集来训练模型,其中模型将同时记住输入特征和输出变量。
Then we will use the test set to see that if the model can predict if the passenger survived using the ‘P-class’, ‘Sex’, and, ‘Fare’.
然后,我们将使用测试集查看模型是否可以使用“ P级”,“性别”和“票价”来预测乘客是否还幸存下来。
The method ‘train_test_split’ is going to help to split the data. By default, this function uses 75% data for the training set and 25% data for the test set. If you want you can change that and you can specify the ‘train_size’ and ‘test_size’.
方法“ train_test_split ”将有助于拆分数据。 默认情况下,此功能将75%的数据用于训练集,将25%的数据用于测试集。 如果需要,可以更改它,可以指定“ train_size”和“ test_size”。
If you put train_size 0.8, the split will be 80% training data and 20% test data. But for me the default value 75% is good. So, I am not using train_siz or test_size parameters.
如果将train_size设置为0.8,则拆分将是80%的训练数据和20%的测试数据。 但是对我来说,默认值75%是好的。 因此,我没有使用train_siz或test_size参数。
X_train, X_test, y_train, y_test = train_test_split(X, y, random_state=0)Remember to use the same value for ‘random_state’. That way, every time you will do this split, it will take the same data for the training set and test set.
请记住对“ random_state”使用相同的值。 这样,每次进行拆分时,训练集和测试集将使用相同的数据。
I chose random_state as 0. You can choose a number of your choice.
我选择random_state为0。您可以选择一个数字。
Python’s scikit -learn library, already have a KNN classifier model. I will import that.
Python的scikit -learn库已经具有KNN分类器模型。 我将导入。
from sklearn.neighbors import KNeighborsClassifierSave this classifier in a variable.
将此分类器保存在变量中。
knn = KNeighborsClassifier(n_neighbors = 5)Here, n_neighbors is 5.
在这里,n_neighbors为5。
That means when we will ask our trained model to predict the survival chance of a new instance, it will take 5 closest training data.
这意味着当我们要求训练有素的模型预测新实例的生存机会时,它将采用5个最接近的训练数据。
Based on the labels of those 5 training data, the model will predict the label of the new instance.
基于这5个训练数据的标签,模型将预测新实例的标签。
Now, I will fit the training data to the model so that model can memorize them.
现在,我将训练数据拟合到模型中,以便模型可以记住它们。
knn.fit(X_train, y_train)You may think that as it memorized that training data it can predict the label of 100% of the training features correctly. But that’s not certain. Why?
您可能会认为,它记住训练数据可以正确预测100%训练功能的标签。 但这还不确定。 为什么?
Look, whenever we give input and ask it to predict the label it will take a vote from the 5 closest neighbors even if it has the exact same feature memorized.
看,只要我们提供输入并要求其预测标签,即使它记忆的功能完全相同,它也会从5个最近的邻居那里进行投票。
Let’s see how much accuracy it can give us on training data
让我们看看它可以在训练数据上给我们带来多大的准确性
knn.score(X_train, y_train)The training data accuracy I got is 0.83 or 83%.
我得到的训练数据准确性为0.83或83%。
Remember, we have a test dataset that our model has never seen. Now check, how much accurately it can predict the label of the test dataset.
记住,我们有一个模型从未见过的测试数据集。 现在检查,它可以准确地预测测试数据集的标签。
knn.score(X_test, y_test)The accuracy came out to be 0.78 or 78%.
准确性为0.78或78%。
Congrats! You developed a KNN classifier!
恭喜! 您开发了KNN分类器!
Notice, the training set accuracy is a bit higher than the test set accuracy. That’s overfitting.
注意,训练集的准确性比测试集的准确性高一点。 那太合身了。
What is Overfitting?
什么是过度拟合?
Sometimes the model learns the training set so well that it can predict the training dataset labels very well. But when we ask the model to predict with a test dataset or a dataset that it did not see before, it does not perform as well as the training dataset. This phenomenon is called overfitting.
有时,模型会很好地学习训练集,因此可以很好地预测训练数据集标签。 但是,当我们要求模型使用测试数据集或之前从未见过的数据集进行预测时,它的性能不如训练数据集。 这种现象称为过度拟合。
In a single sentence, when the training set accuracy is higher than the test set accuracy, we call it overfitting.
在单句话中,当训练集精度高于测试集精度时,我们称其为过度拟合。
预测 (Prediction)
If you want to see the predicted output for the test dataset, here is how to do that:
如果要查看测试数据集的预测输出,请执行以下操作:
Input:
输入:
y_pred = knn.predict(X_test)y_predOutput:
输出:
array([0, 0, 0, 1, 1, 0, 0, 0, 1, 1, 0, 1, 0, 1, 1, 1, 0, 1, 0, 0, 0, 0,
       0, 1, 0, 1, 0, 1, 1, 0, 0, 1, 0, 0, 0, 0, 0, 0, 0, 0, 0, 0, 0, 0,
       1, 0, 0, 1, 0, 0, 1, 0, 1, 0, 1, 0, 1, 0, 0, 0, 0, 0, 1, 1, 1, 0,
       1, 0, 1, 1, 1, 0, 1, 0, 0, 0, 0, 0, 0, 0, 0, 0, 1, 0, 0, 1, 0, 1,
       1, 1, 0, 0, 0, 1, 0, 0, 1, 0, 1, 1, 0, 0, 0, 0, 0, 0, 1, 1, 0, 1,
       0, 1, 1, 0, 1, 1, 1, 0, 0, 1, 1, 0, 0, 0, 0, 1, 0, 0, 0, 0, 1, 0,
       0, 0, 1, 0, 0, 1, 0, 0, 0, 1, 0, 1, 0, 0, 0, 1, 1, 0, 1, 1, 1, 0,
       1, 0, 0, 0, 1, 1, 0, 0, 1, 1, 0, 0, 0, 0, 0, 0, 0, 1, 0, 0, 1, 0,
       1, 0, 0, 1, 0, 1, 0, 0, 0, 0, 1, 0, 0, 1, 0, 0, 1, 1, 0, 1, 0, 1,
       1, 0, 0, 0, 0, 1, 0, 0, 0, 0, 1, 0, 0, 0, 0, 1, 0, 0, 1, 0, 0, 1,
       0, 1, 1], dtype=int64)
Or you can just input one single example and find the label.
或者,您可以只输入一个示例并找到标签。
I want to see when a person is traveling in ‘P-class’ 3, ‘Sex’ is female that means 1, and, paid a ‘Fare’ of 25, if she could survive as per our model.
我想看看一个人何时以“ P级” 3旅行,“性”是女性,即1,如果按照我们的模型可以生存,则支付25的“车费”。
Input:
输入:
knn.predict([[3, 1, 25]])Remember to use two brackets, because it requires a 2D array
请记住使用两个括号,因为它需要一个2D数组
Output:
输出:
array([0], dtype=int64)The output is zero. That means as per our trained model the person could not survive.
输出为零。 这意味着根据我们训练有素的模型,该人无法生存。
Please feel free try wth more different inputs like this one!
请随意尝试更多类似这样的输入!
如果您想进一步了解KNN分类器 (If You Want to See Some Further Analysis of KNN Classifier)
KNN classifier is highly sensitive to the choice of ‘k’ or n_neighbors. In the example above I used n_neighors 5.
KNN分类器对'k'或n_neighbors的选择非常敏感。 在上面的示例中,我使用了n_neighors 5。
For different n_neighbors, the classifier will perform differently.
对于不同的n_neighbors,分类器将执行不同的操作。
Let’s check how it performs on the training dataset and test dataset for different n_neighbors value. I choose 1 to 20.
让我们检查一下它在不同n_neighbors值的训练数据集和测试数据集上的表现。 我选择1到20。
Now, we will calculate the training set accuracy and the test set accuracy for each n_neighbors value from 1 to 20,
现在,我们将计算从1到20的每个n_neighbors值的训练集精度和测试集精度,
training_accuracy  = []
test_accuracy = []
for i in range(1, 21):
    knn = KNeighborsClassifier(n_neighbors = i)
    knn.fit(X_train, y_train)
    training_accuracy.append(knn.score(X_train, y_train))
    test_accuracy.append(knn.score(X_test, y_test))
After running this code snippet, I got the training and test accuracy for different n_neighbors.
运行此代码段后,我得到了不同n_neighbors的训练和测试准确性。
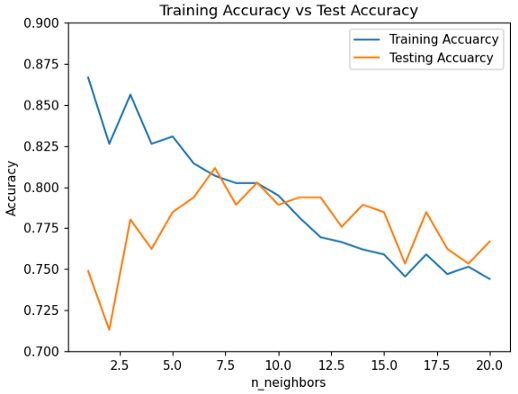
Now, let’s plot the training and test set accuracy against n_neighbors in the same plot.
现在,让我们在同一图中绘制针对n_neighbors的训练和测试集精度。
plt.figure()
plt.plot(range(1, 21), training_accuracy, label='Training Accuarcy')
plt.plot(range(1, 21), test_accuracy, label='Testing Accuarcy')
plt.title('Training Accuracy vs Test Accuracy')
plt.xlabel('n_neighbors')
plt.ylabel('Accuracy')
plt.ylim([0.7, 0.9])
plt.legend(loc='best')
plt.show()
Analyze the Graph Above
分析上面的图
In the beginning, when the n_neighbors were 1, 2, or 3, training accuracy was a lot higher than test accuracy. So, the model was suffering from high overfitting.
开始时,当n_neighbors为1、2或3时,训练精度比测试精度高很多。 因此,模型存在过度拟合的问题。
After that training and test accuracy became closer. That is the sweet spot. We want that.
在那之后,培训和测试准确性变得更加接近。 那是最好的地方。 我们想要那个。
But when n_neighbors was going even higher, both training and test set accuracy was going down. We do not need that.
但是,当n_neighbors越来越高时,训练和测试集的准确性都将下降。 我们不需要那个。
From the graph above, the perfect n_neighbors for this particular dataset and model should be 6 or 7.
从上图可以看出,此特定数据集和模型的理想n_neighbors应该为6或7。
That is a good classifier!
这是一个很好的分类器!
Look at the graph above! When n_neighbors is about 7, both training and testing accuracy was above 80%.
看上面的图! 当n_neighbors约为7时,训练和测试的准确性均高于80%。
结论 (Conclusion)
This article’s purpose was to show a KNN classifer with a project. If you are a machine learning beginner this should help you learn some key concepts of machine learning and the workflow. There are so many different machine leaning models out there. But this is the typical workflow of a supervised machine learning model.
本文的目的是展示带有项目的KNN分类器。 如果您是机器学习的初学者,这应该可以帮助您学习机器学习和工作流程的一些关键概念。 那里有很多不同的机器学习模型。 但这是监督机器学习模型的典型工作流程。
Here is the titanic I used in the article:
这是我在文章中使用的泰坦尼克号:
更多阅读: (More Reading:)
翻译自: https://towardsdatascience.com/clear-understanding-of-a-knn-classifier-with-a-project-for-the-beginners-865f56aaf58f
knn分类 knn


