c++版模板匹配与特征金字塔结构
先来了解一些基础性的知识,如何读取原始图片和小图,对其进行处理。这里肯定是要用到opencv的,opencv的安装和使用教程之前也有写到,这里重新梳理以下:
目录:
一、环境安装
二、基础知识
三、模板匹配+特征金字塔完整demo
一、环境安装
首先在网上搜索c++官网安装社区版Visual Studio
安装完成之后点击c++桌面开发进行下一步
然后在opencv官网下载opencv
https://opencv.org/releases/
选择合适版本下载即可。
然后在系统环境变量中加入opencv的路径,D:\opencv\build\x64\vc15\bin
然后我们可以打开VS软件进行项目创建
Debug x64
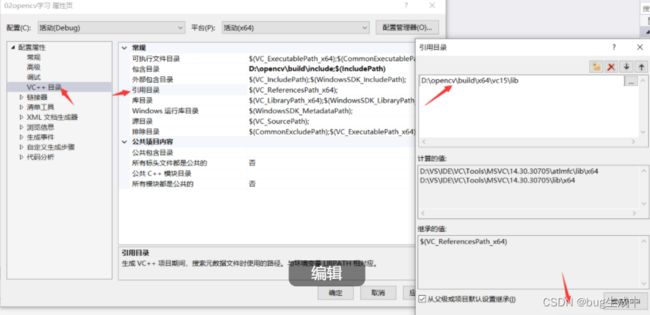
然后在项目属性中配置opencv路径
在其中找到VC++ 目录 点击包含目录 编辑添加路径 D:\opencv\build\include
 然后在VC++ 目录 点击引用目录 编辑添加路径 D:\opencv\build\x64\vc15\lib
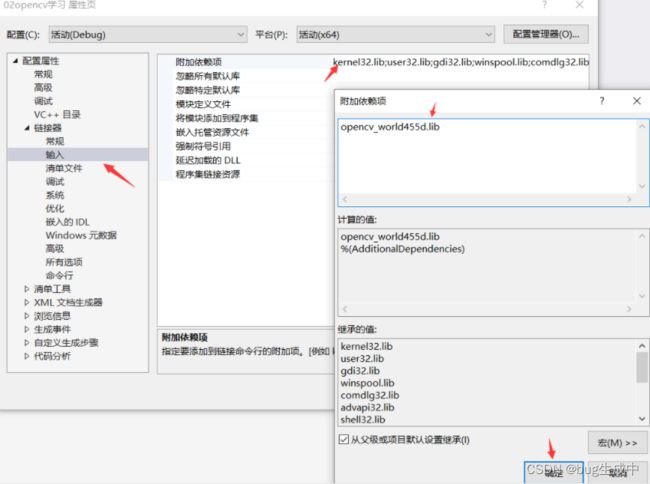
然后在链接器中,附加依赖项中编辑加入名称,opencv_world455d.lib(根据自己下载的opencv版本调整)一般是vs15文件夹下的opencv_world455d.dll后缀名dll变为lib
完成c++的opencv环境配置
如果运行出现报错的话,比如提示以下错误
严重性 代码 说明 项目 文件 行 禁止显示状态
错误 LNK1104 无法打开文件“opencv_world455d.lib” 02opencv学习 D:\csdn\c++\02opencv学习\02opencv学习\LINK 1
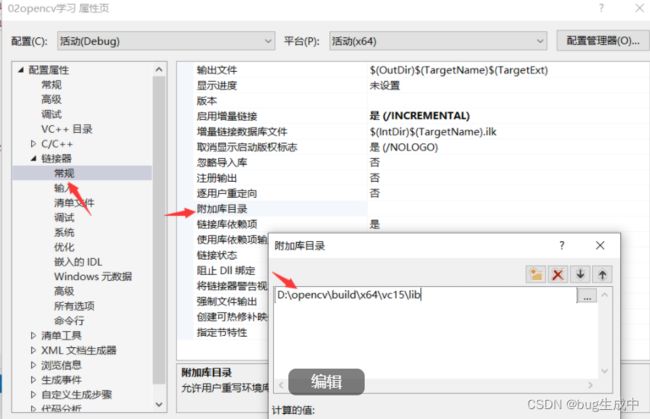
我们可以在链接器,常规中添加附加库目录,路径D:\opencv\build\x64\vc15\lib
然后用个测试代码进行测试看能否运行,在解决方案资源管理器中,点击源文件,添加新建项,
输入以下demo进行测试:
#include
#include
#include
#include

using namespace cv;
using namespace std;

int main() {
	string path = "Resources/test.png";
	Mat img = imread(path);
	imshow("Image", img);
	waitKey(0);
	return 0;
}
以上测试没有问题之后,我们就可以进行c++版本的模板匹配测试了。
二、基础知识
先是基础的图像读取,我们可以尝试输出图像的尺寸。
直接上demo
// 当使用预编译的头时,需要使用此源文件,编译才能成功。
#include
#include
#include
#include

using namespace cv;
using namespace std;

int main()
{
	Mat src = imread("./original.jpg", 0);   //读取待检测的图像并灰度化
	Mat temp = imread("./template.jpg", 0);   //读取匹配小图并灰度化
	int temp_width = temp.cols;    //获取图像的宽
	int temp_height = temp.rows;     //获取图像的高
	int src_width = src.cols;    //获取图像的宽
	int src_height = src.rows;     //获取图像的高
	cout << "src_width:" << src_width << endl;
	cout << "src_height:" << src_height << endl;
	cout << "temp_width:" << temp_width << endl;
	cout << "temp_height:" << temp_height << endl;
}
显示的结果如下:
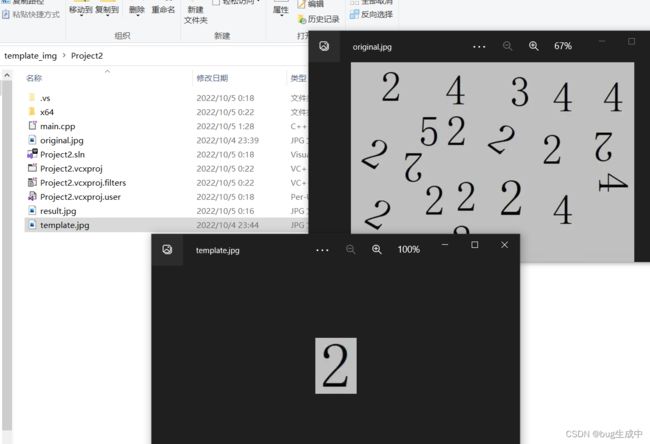
可以看到读取的是本地的original.jpg图片表示待匹配的原始图片,template.jpg图片表示模板图片。他们的尺寸分别是805*567和79*107。这两张图片如下:
然后就是本文最重要的知识点,也就是模板匹配。
我们可以定义一个模板匹配函数,传入参数为原图、匹配小图、金字塔层数、匹配阈值,
返回检测到的pos点pt。
pt = pyramidMatch(src, temp, thresh); //进行模板匹配,传入参数 原图、匹配小图、金字塔层数、匹配阈值,返回检测到的pos点
主函数我们可以写成这个样子
int main()
{
	Mat src = imread("./original.jpg", 0);   //读取待检测的图像并灰度化
	Mat temp = imread("./template.jpg", 0);   //读取匹配小图并灰度化
	int temp_width = temp.cols;    //获取图像的宽
	int temp_height = temp.rows;     //获取图像的高
	int src_width = src.cols;    //获取图像的宽
	int src_height = src.rows;     //获取图像的高
	cout << "src_width:" << src_width << endl;
	cout << "src_height:" << src_height << endl;
	cout << "temp_width:" << temp_width << endl;
	cout << "temp_height:" << temp_height << endl;
	double thresh = 0.9;//bear:thresh 0.9,nLevels 2;   设置匹配阈值
	vector pt;         //集合
	pt = pyramidMatch(src, temp, thresh);    //进行模板匹配,传入参数 原图、匹配小图、金字塔层数、匹配阈值,返回检测到的pos点
	cout << "检测到的点为" << pt << endl;

}
接下来是对pyramidMatch函数的定义,我们先从简单的单模板匹配做起,
c++的模板匹配少不了封装好的函数matchTemplate
函数的原型如下:
void matchTemplate( InputArray image, InputArray templ,OutputArray result, int method, InputArray mask = noArray());
参数解释:
参数1image待检测的原图,
参数2templ欲搜索的图像。
参数3result 比较结果的映射图像, 它应该是单通道、8-比特或32-比特 浮点数图像,匹配小图不能大于输入图像,如果原图(待搜索图像)尺寸为W x H, 而templ尺寸为 w x h, 则result尺寸一定是(W-w+1)x(H-h+1)。
参数4method: 指定的匹配方法, 有如下6种:
CV_TM_SQDIFF——平方差匹配法(最好匹配0)
CV_TM_SQDIFF_NORMED——归一化平方差匹配法(最好匹配0)
CV_TM_CCORR——相关匹配法(最坏匹配0)
CV_TM_CCORR_NORMED——归一化相关匹配法(最坏匹配0)
CV_TM_CCOEFF——系数匹配法(最好匹配1)
CV_TM_CCOEFF_NORMED——化相关系数匹配法(最好匹配1) CV_TM_CCOEFF_NORMED :化相关系数匹配法,最好匹配为1;
这里我们直接使用第6种匹配方法CV_TM_CCOEFF_NORMED。
写好的代码如下:
// 当使用预编译的头时,需要使用此源文件,编译才能成功。
#include
#include
#include
#include

using namespace cv;
using namespace std;


Mat CalculateNcc(Mat src, Mat temp)
{
	Mat result;
	int result_w = src.cols - temp.cols + 1;    //结果图像的尺寸
	int result_h = src.rows - temp.rows + 1;
	result.create(result_h, result_w, CV_32FC1);    //结果图像是单通道32位浮点型
	matchTemplate(src, temp, result, TM_CCOEFF_NORMED); //模板匹配,参数1待检测的原图, 欲搜索的图像。它应该是单通道、8-比特或32-比特 浮点数图像,temp是匹配小图不能大于输入图像,参数3比较结果的映射图像   CV_TM_CCOEFF_NORMED  :化相关系数匹配法,最好匹配为1;
	imshow("result", result);
	normalize(result, result, 0, 1, NORM_MINMAX, -1);//归一化0到1
	return result;
}

vector pyramidMatch(Mat src, Mat temp, double thresh)//模板匹配的主要函数,传入参数 原图、匹配小图、金字塔层数、匹配阈值,返回检测到的pos点
{

	Mat imgNcc = CalculateNcc(src, temp);//top-result 使用缩放后的图像作为参数传入,一个原图,一个模板图片,计算Ncc

	double minValue, maxValue;
	Point minLoc, maxLoc;
	minMaxLoc(imgNcc, &minValue, &maxValue, &minLoc, &maxLoc);//获得矩阵中的最大值和最小值及其位置

	cout << "minValue:" << minValue << endl;
	cout << "maxValue:" << maxValue << endl;

	rectangle(src, maxLoc, Point(maxLoc.x + temp.cols, maxLoc.y + temp.rows), Scalar(0, 255, 0), 2, 8);
	imshow("src", src);
	waitKey(0);
	vector pt;//存储结果
	pt.push_back(maxLoc);
	return pt;

}


int main()
{
	Mat src = imread("./original.jpg", 0);   //读取待检测的图像并灰度化
	Mat temp = imread("./template.jpg", 0);   //读取匹配小图并灰度化
	int temp_width = temp.cols;    //获取图像的宽
	int temp_height = temp.rows;     //获取图像的高
	int src_width = src.cols;    //获取图像的宽
	int src_height = src.rows;     //获取图像的高
	cout << "src_width:" << src_width << endl;
	cout << "src_height:" << src_height << endl;
	cout << "temp_width:" << temp_width << endl;
	cout << "temp_height:" << temp_height << endl;
	double thresh = 0.9;//bear:thresh 0.9,nLevels 2;   设置匹配阈值
	vector pt;         //集合
	pt = pyramidMatch(src, temp, thresh);    //进行模板匹配,传入参数 原图、匹配小图、金字塔层数、匹配阈值,返回检测到的pos点
	//cout << "检测到的点为" << pt << endl;

}
这里我们打印了以下可视化图片
从中你能发现什么规律吗,是左边映射的白色是最大值么。
接下来就是对其进行多模板的匹配方式。多模板匹配的方法就需要我们把result的映射结果挨个像素遍历,将符合阈值要求的保留。
代码如下:
// 当使用预编译的头时,需要使用此源文件,编译才能成功。
#include
#include
#include
#include

using namespace cv;
using namespace std;


Mat CalculateNcc(Mat src, Mat temp)
{
	Mat result;
	int result_w = src.cols - temp.cols + 1;    //结果图像的尺寸
	int result_h = src.rows - temp.rows + 1;
	result.create(result_h, result_w, CV_32FC1);    //结果图像是单通道32位浮点型
	matchTemplate(src, temp, result, TM_CCOEFF_NORMED); //模板匹配,参数1待检测的原图, 欲搜索的图像。它应该是单通道、8-比特或32-比特 浮点数图像,temp是匹配小图不能大于输入图像,参数3比较结果的映射图像   CV_TM_CCOEFF_NORMED  :化相关系数匹配法,最好匹配为1;
	normalize(result, result, 0, 1, NORM_MINMAX, -1);//归一化0到1
	return result;
}


vector pyramidMatch(Mat src, Mat temp, double thresh)//模板匹配的主要函数,传入参数 原图、匹配小图、金字塔层数、匹配阈值,返回检测到的pos点
{

	Mat imgNcc = CalculateNcc(src, temp);//top-result 使用缩放后的图像作为参数传入,一个原图,一个模板图片,计算Ncc

	double matchValue;
	int count0 = 0;
	int tempW = 0, tempH = 0;
	char matchRate[10];
	vector pt;//存储结果

	//将resultImage中的像素进行逐个判断
	for (int i = 0; i < imgNcc.rows; i++)
	{
		for (int j = 0; j < imgNcc.cols; j++)
		{
			//获取匹配系数
			matchValue = imgNcc.at(i, j);
			//往matchRate中输入此像素的matchValue
			sprintf(matchRate, "%0.2f", matchValue);
			//设置满足条件
			if (matchValue >= thresh && (abs(j - tempW) > 5) && (abs(i - tempH) > 5))
			{
				count0++;
				putText(src, matchRate, Point(j - 5, i - 5), FONT_HERSHEY_COMPLEX, 1, Scalar(0, 0, 255), 1);
				rectangle(src, Point(j, i), Point(j + temp.cols, i + temp.rows), Scalar(0, 255, 0), 2);
				pt.push_back(Point(j, i));
				tempW = j;
				tempH = i;
			}
		}
	}
	cout << "count=" << count0 << endl;
	imshow("resultImg", imgNcc);
	imshow("dst", src);
	waitKey(0);
	return pt;

}


int main()
{
	Mat src = imread("./original.jpg", 0);   //读取待检测的图像并灰度化
	Mat temp = imread("./template.jpg", 0);   //读取匹配小图并灰度化
	int temp_width = temp.cols;    //获取图像的宽
	int temp_height = temp.rows;     //获取图像的高
	int src_width = src.cols;    //获取图像的宽
	int src_height = src.rows;     //获取图像的高
	cout << "src_width:" << src_width << endl;
	cout << "src_height:" << src_height << endl;
	cout << "temp_width:" << temp_width << endl;
	cout << "temp_height:" << temp_height << endl;
	double thresh = 0.9;//bear:thresh 0.9,nLevels 2;   设置匹配阈值
	vector pt;         //集合
	pt = pyramidMatch(src, temp, thresh);    //进行模板匹配,传入参数 原图、匹配小图、金字塔层数、匹配阈值,返回检测到的pos点
	cout << "检测到的点为" << pt << endl;

}
最后的检测结果如下:
以上就是c++版本的多模板匹配的方法,干货满满,点赞收藏,下一期结合金字塔结构进行模板匹配。


