ATAC-seq分析:比对后处理(4)
1. 结果处理
现在我们已经处理了 Greenleaf ATACseq 双端数据,我们可以开始处理比对。
首先,我们将确定 ATACseq 数据的预期片段长度分布。我们使用 GenomicAlignments 包读取新对齐的数据。
这里我们只想要正确配对的读取,因此我们将使用 ScanBamParam() 和 scanBamFlag() 函数来控制将读入 R 的内容。
我们将 scanBamFlag() 函数参数 isProperPair 设置为 TRUE,以便仅读取在我们预设的最大片段长度 (2000bpp) 内对齐配对的读数
library(GenomicAlignments)
flags = scanBamFlag(isProperPair = TRUE)
我们现在可以将这些标志与 ScanBamParam() 函数一起使用,以仅读入正确配对的读数。
我们还使用 what 参数指定要读入 R 的信息。重要的是,我们指定插入大小信息 - isize。为了减少内存占用,我们通过指定 GRanges 对象的参数来只读取来自 20 号染色体的信息。
myParam = ScanBamParam(flag = flags, what = c("qname", "mapq", "isize"), which = GRanges("chr20",
    IRanges(1, 63025520)))
myParam

现在我们已经设置了 ScanBamParam 对象,我们可以使用 readGAlignmentPairs() 函数以类似于我们使用 readGAlignments() 函数读取单端 ChIP-seq 数据的方式读取我们的双端 ATACseq 数据。结果是一个 GAlignmentPairs 对象。
atacReads <- readGAlignmentPairs(sortedBAM, param = myParam)
class(atacReads)

2. GAlignmentPairs
GAlignmentPairs 对象包含有关我们配对读取的信息。它将每次读取的信息成对存储在并行的 GAlignments 对象中。
atacReads[1:2, ]

我们使用 first() 和 second() 访问器函数访问 GAlignments 对象,以分别获取有关第一次或第二次读取的信息。
read1 <- first(atacReads)
read2 <- second(atacReads)
read2[1, ]

3. MapQ 分数
我们可以做的第一件事是获取 read1 和 read2 的 MapQ 分数分布。我们可以使用 mcols() 函数为每次读取访问它,以访问每次读取的 GAalignments 对象的 mapq 槽。
read1MapQ <- mcols(read1)$mapq
read2MapQ <- mcols(read2)$mapq
read1MapQ[1:2]
4. MapQ 频率
然后我们可以使用 table() 函数来汇总每个成对读取的分数频率。
read1MapQFreqs <- table(read1MapQ)
read2MapQFreqs <- table(read2MapQ)
read1MapQFreqs

read2MapQFreqs

5. 可视化
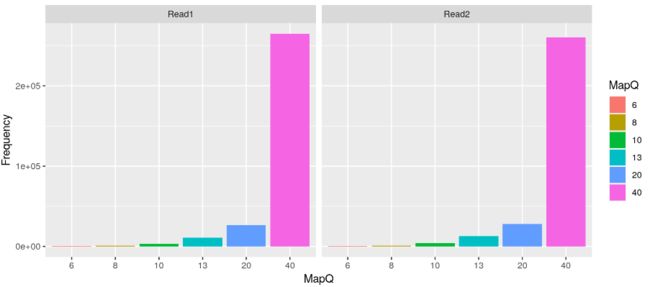
最后,我们可以使用 ggplot2 绘制成对读取的每个 MapQ 分布。
library(ggplot2)
toPlot <- data.frame(MapQ = c(names(read1MapQFreqs), names(read2MapQFreqs)), Frequency = c(read1MapQFreqs,
    read2MapQFreqs), Read = c(rep("Read1", length(read1MapQFreqs)), rep("Read2",
    length(read2MapQFreqs))))
toPlot$MapQ <- factor(toPlot$MapQ, levels = unique(sort(as.numeric(toPlot$MapQ))))
ggplot(toPlot, aes(x = MapQ, y = Frequency, fill = MapQ)) + geom_bar(stat = "identity") +
    facet_grid(~Read)

6. 插入大小
现在我们已经将配对的对齐数据读入 R,我们可以从附加到每个读取对的 GAlignments 对象的 elementMetadata() 中检索插入大小。由于正确配对的读取将具有相同的插入大小长度,因此我们从 read1 中提取插入大小。
atacReads_read1 <- first(atacReads)
insertSizes <- abs(elementMetadata(atacReads_read1)$isize)
head(insertSizes)
7. 可视化
ATACseq 应该代表对应于无核小体、单核小体和多核小体部分的片段长度的混合。我们可以使用 table() 函数来检索每个片段长度出现的向量。
fragLenSizes <- table(insertSizes)
fragLenSizes[1:5]

现在我们可以使用新获得的 20 号染色体插入长度来绘制所有片段长度的分布。
library(ggplot2)
toPlot <- data.frame(InsertSize = as.numeric(names(fragLenSizes)), Count = as.numeric(fragLenSizes))
fragLenPlot <- ggplot(toPlot, aes(x = InsertSize, y = Count)) + geom_line()
fragLenPlot + theme_bw()

我们可以对计数应用 log2 转换以阐明核小体模式。
fragLenPlot + scale_y_continuous(trans = "log2") + theme_bw()

我们现在可以像 Greenleaf 研究中那样注释我们的核小体游离 (< 100bp)、单核小体 (180bp-247bp) 和双核小体 (315-437)。
fragLenPlot + scale_y_continuous(trans = "log2") + geom_vline(xintercept = c(180,
    247), colour = "red") + geom_vline(xintercept = c(315, 437), colour = "darkblue") +
    geom_vline(xintercept = c(100), colour = "darkgreen") + theme_bw()

欢迎Star -> 学习目录
更多教程 -> 转录组测序分析教程合集
更多教程 -> 单细胞系列教程:合集
本文由 mdnice 多平台发布