CESM2环境搭建
文章目录
- 1. 学院服务器自带
-
- perl 5.26
- cmake-2.8.12 gmake-3.8.1
- 拷贝源码
-
- 前提条件
- downloading from Github
- 安装LAPACK和BLAS
-
- 1. install LAPACK and BLAS libraries
-
- 1.1 安装BLAS
- 1.2 安装LAPACK
- 2. 学院服务器上有,复制修改环境变量即可
- 安装mpich
-
- install MPICH
- 安装subversion
-
- 前提条件
- 1. 安装subversion-传统源码安装
-
- 1.1 install Apache Portable Runtime (APR) and the APR Utility (APR-util) libraries.
- 1.2 Zlib (REQUIRED)
- 1.3 OpenSSL (OPTIONAL)
- 1.4 serf 安装失败
- 1.4.1 先安装anaconda,利用anaconda安装serf
- 1.5 install sqlite
- 1.6 install subversion
- 2. 安装subversion 的简单方法-anaconda
- 安装python与git
-
- 1. python 3.7.9
- 2. git-2.3.2
- 安装netcdf与pnetcdf
-
- 1. install netcdf
-
- 1.1 install netcdf
- 附录1: install curl 7.18.0 or later
- 附录2: install hdf5 from source
- 附录2.1: install szip
- 2. install pnetcdf
-
- 2.1 install pnetcdf - 1.7.0 疯狂报错
- 2.1 install pnetcdf - 1.7.0 稀里糊涂成功了
- 2.2 installl pnetcdf-1.8.1 稀里糊涂成功了
- 3. 完整安装-支持并行,pnetcdf
-
- 3.1 install zlib
- 3.2 install szip
- 3.3 install curl --- 失败
- 3.3 install hdf5-- 支持szip,支持并行
- 3.4 install pnetcdf-1.8.1
-
- 3.4.1 prequistment
- 3.5 install netcdf-c
- Linux 编译器gcc与icc cmake make
-
- 1. install gcc
-
- 1.1 install gcc-10.1.0
- 1.2 install gcc-4.8.5 失败
- 1.3 install gcc 4.8.5
- 2. 切换编译器版本
-
- 2.1 版本内部切换
-
- - 例如从gcc-4切换到gcc-10
- 2.2 从gcc 切换到 icc
-
- 2.2.1 方法1
- 2.2.2 方法2
- 2.2.3 方法3
- 方法4
- 3 查询编译器版本
- 4. install cmake-3.12.3
- 5. install make 4.2
- 安装教程
-
- 1. 依赖清单
- 学院服务器自带的软件包
- 本地移植
-
- config_machines.xml
- perl5
-
- 1. local::lib
- 2. 安装cpam
- 3. 使用cpanm安装模块
-
- 3.1 cpanm
- 3.1 install XML::LibXML 失败
-
- error:
- 3.2 cpanm YAML::Tidy 失败
-
- 3.2.1 error
- 源码安装XML-LibXML 失败
- cpanm LWP
- 查看perl模块的安装目录
- 查看已经安装哪些perl模块
- install libxml2
目的:在学院超算上安装CESM2.1.3
1. 学院服务器自带
perl 5.26
cmake-2.8.12 gmake-3.8.1
gmake = GNU make = make
(base) [19fush@login sources]$ perl --version

This is perl, v5.10.1 (*) built for x86_64-linux-thread-multi

Copyright 1987-2009, Larry Wall

Perl may be copied only under the terms of either the Artistic License or the
GNU General Public License, which may be found in the Perl 5 source kit.

Complete documentation for Perl, including FAQ lists, should be found on
this system using "man perl" or "perldoc perl".  If you have access to the
Internet, point your browser at http://www.perl.org/, the Perl Home Page.

(base) [19fush@login sources]$ which perl
/usr/bin/perl
(base) [19fush@login sources]$


拷贝源码
前提条件
- svn
- git
downloading from Github
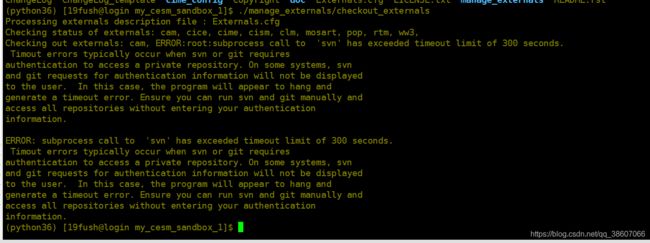
ERROR: subprocess call to  'svn' has exceeded timeout limit of 300 seconds.
Timout errors typically occur when svn or git requires authentication to access a private repository.
On some systems, svn and git requests for authentication information will not be displayed to the user.
In this case, the program will appear to hang and generate a timeout error.
Ensure you can run svn and git manually and access all repositories without entering your authentication information.

(python27) [xiaxsh3@login my_cesm_sandbox]$ svn ls https://svn-ccsm-models.cgd.ucar.edu/ww3/release_tags
Error validating server certificate for 'https://svn-ccsm-models.cgd.ucar.edu:443':
 - The certificate is not issued by a trusted authority. Use the
   fingerprint to validate the certificate manually!
Certificate information:
 - Hostname: *.cgd.ucar.edu
 - Valid: from Nov 18 00:00:00 2019 GMT until Nov 17 23:59:59 2021 GMT
 - Issuer: InCommon RSA Server CA, InCommon, Internet2, Ann Arbor, MI, US
 - Fingerprint: 1A:41:6E:31:C5:F7:99:DD:B7:72:CC:C6:30:B9:E1:C7:90:82:D3:C8
(R)eject, accept (t)emporarily or accept (p)ermanently? p
ww3_cesm2_0_rel_01/
ww3_cesm2_1_rel01/
ww3_cesm2_1_rel_01/
安装LAPACK和BLAS
1. install LAPACK and BLAS libraries
参考: https://www.jianshu.com/p/fe6c4f42aa0b
切换到sources目录下操作
cd ~/sources
1.1 安装BLAS
1、准备源码
wget http://www.netlib.org/blas/blas.tgz
tar -zxf blas.tgz
cd BLAS-3.8.0/
2、编译
如果是32位系统,使用GNU的g77或gfortran编译器来编译:
g77 -O2 -fno-second-underscore -c *.f
gfortran -O2 -std=legacy -fno-second-underscore -c *.f
如果是64位系统,使用GNU的g77或gfortran编译器来编译:
g77 -O3 -m64 -fno-second-underscore -fPIC -c *.f
gfortran -O3 -std=legacy -m64 -fno-second-underscore -fPIC -c *.f   # 本次采用 gfortran --version
如果使用的是Intel的Fortran编译器,则:
ifort -FI -w90 -w95 -cm -O3 -unroll -c *.f
注意:
- 请根据情况选择上述5个命令中的一个执行
- 在编译BLAS、LAPACK、NumPy和SciPy的时候,所选择的Fortran编译器必须要保持一致
- 在下述LAPACK的编译安装中,需要使用Fortran 90编译器,因此不应该使用g77来编译BLAS
3、后续工作
ar r libfblas.a *.o
ranlib libfblas.a
rm -rf *.o      # 清理文件

vi ~/.bash_profile
export BLAS=$HOME/sources/BLAS-3.8.0/libfblas.a # 导出BLAS环境变量
source ~/.bash_profile
echo $BLAS
1.2 安装LAPACK
1、准备源码
wget http://www.netlib.org/lapack/lapack.tgz
tar zxf lapack.tgz
cd lapack-3.9.0/
2、编译
cp INSTALL/make.inc.gfortran make.inc   # On Linux with lapack-3.2.1 or newer
vim make.inc
make lapacklib
注意:在执行make lapacklib之前,编辑make.inc文件,给OPTS和NOOPT这两个设置都加上-fPIC选项。如果是64位系统,还需要加上-m64选项。修改后,看起来像这样:
FORTRAN  = gfortran
OPTS     = -O2 -frecursive -fPIC -m64
DRVOPTS  = $(OPTS)
NOOPT    = -O0 -frecursive -fPIC -m64
LOADER   = gfortran

3、后续工作
make clean      # 清理文件
export LAPACK=/wind1/home/19fush/sources/lapack-3.9.0/   # 导出LAPACK环境变量

vi ~/.bash_profile
export LAPACK=$HOME/sources/lapack-3.9.0/   # 导出LAPACK环境变量
source ~/.bash_profile
2. 学院服务器上有,复制修改环境变量即可
# 1. 将/wind1/software/mathlib/blas-3.8.0/libblas.a复制到$HOME/app/blas/3.8.0/lib中,并修改权限
mkdir -p $HOME/app/blas/3.8.0/lib
cp /wind1/software/mathlib/blas-3.8.0/libblas.a $HOME/app/blas/3.8.0/lib
chmod 755 -R $HOME/app/blas/3.8.0/lib/

# 2. 将/wind1/software/mathlib/lapack/3.4.2/intel复制到$HOME/app/lapack/3.4.2/intel中,并修改权限
mkdir -p $HOME/app/lapack/3.4.2/
cp -r /wind1/software/mathlib/lapack/3.4.2/intel $HOME/app/lapack/3.4.2/
chmod 755 -R $HOME/app/lapack/3.4.2/

cp -r /wind1/software/mathlib/lapack/3.4.2/gnu $HOME/app/lapack/3.4.2/
chmod 755 -R $HOME/app/lapack/3.4.2/

# 3. lapack-3.4.2  and blas-3.8.0    environment variable begin
vim ~/.bash_profile
export LAPACK=$HOME/app/lapack/3.4.2/intel
export LD_LIBRARY_PATH=$LAPACK/lib:$LD_LIBRARY_PATH
export INCLUDE=$LAPACK/include:$INCLUDE
export BLAS=$HOME/app/blas/3.8.0
export LD_LIBRARY_PATH=$BLAS/lib:$LD_LIBRARY_PATH

source ~/.bash_profile
安装mpich
install MPICH
安装教程详细参考https://www.mpich.org/static/downloads/3.3.2/mpich-3.3.2-README.txt
或者https://www.mpich.org/documentation/guides/
tar -zxf mpich-3.3.2.tar.gz
cd mpich-3.3.2
./configure --prefix=/wind1/home/19fush/app/mpich
make
make install

# 加入环境变量
vi ~/.bash_profile
export PATH=/wind1/home/19fush/app/mpich/bin:$PATH
source ~/.bash_profile
echo $PATH

mpich --version

./configure --prefix=$HOME/app/mpich/3.2.1 2>&1 | tee c.txt
make -j 48 2>&1 | tee m.txt
make install 2>&1 | tee mi.txt

# 加入环境变量
vi ~/.bash_profile
# MPICH
export MPICH_PATH=$HOME/app/mpich/3.2.1
export PATH=$MPICH_PATH/bin:$PATH
export LD_LIBRARY_PATH=$MPICH_PATH/lib:$LD_LIBRARY_PATH
export INCLUDE=$MPICH_PATH/include:$INCLUDE
export LDFLAGS="-Wl,-rpath -Wl,${MPICH_PATH}/lib"

source ~/.bash_profile

安装subversion
前提条件
-
- Apache Portable Runtime (APR) and the APR Utility (APR-util) libraries
-
1. 安装subversion-传统源码安装
reference: https://www.jianshu.com/p/90f818d8b8d9
1.1 install Apache Portable Runtime (APR) and the APR Utility (APR-util) libraries.
- 下载源码安装包:http://apr.apache.org/download.cgi
- 上传至学院服务器
- 可参考:https://www.thegeekstuff.com/2012/05/install-apache-2-on-centos-6/
tar xzf apr-1.7.0.tar.gz
cd apr-1.7.0
./configure --prefix=/wind1/home/19fush/app/apr
make
make install

# 加入环境变量
vi ~/.bash_profile
export PATH=/wind1/home/19fush/app/apr/bin:$PATH
source ~/.bash_profile
echo $PATH
tar xzf apr-util-1.6.1.tar.gz
cd ../
cd apr-util-1.6.1
./configure --prefix=/wind1/home/19fush/app/apr-util --with-apr=/wind1/home/19fush/app/apr  # 注意,此处需要额外设置--with-apr选项,否则报错 Checking for APR... no    configure: error:
make
make install

# 加入环境变量
vi ~/.bash_profile
export PATH=/wind1/home/19fush/app/apr-util/bin:$PATH
source ~/.bash_profile
echo $PATH
注意:当安装subversion时,因为使用的不是默认的apr和apr-util库,因此需要指定–with-apr=和–with-apr-util=选项。
If you want to specify the location of the APR library, you can use the “–with-apr=” option of “./configure”. It should be able to find the apr-config script in the standard location under that directory (e.g. ${prefix}/bin).
Similarly, you can specify the location of APR-util using the “–with-apr-util=” option to “./configure”. It will look for the apu-config script relative to that directory.
1.2 Zlib (REQUIRED)
- 下载源码安装包:http://www.zlib.net/
- 上传至学院服务器
- 参考:http://tutorialspots.com/how-to-build-the-zlib-library-on-centos-3942.html
tar zxf zlib-1.2.11.tar.gz
cd zlib-1.2.11
# 必须指定prefix选项,选择安装路径,没有root权限
./configure --prefix=/wind1/home/19fush/software/zlib-1.2.11-install
make
make install

# 加入环境变量
vi ~/.bash_profile
export PATH=/wind1/home/19fush/app/zlib/bin:$PATH
source ~/.bash_profile
echo $PATH
1.3 OpenSSL (OPTIONAL)
- 安装包地址:https://www.openssl.org/source/
- reference: https://www.tecmint.com/install-openssl-from-source-in-centos-ubuntu/
tar -zxf openssl-1.1.1g.tar.gz
cd openssl-1.1.1g
./config --prefix=/wind1/home/19fush/app/openssl
make
make install

# 加入环境变量
vi ~/.bash_profile
export PATH=/wind1/home/19fush/app/openssl/bin:$PATH
source ~/.bash_profile
echo $PATH

1.4 serf 安装失败
mkdir scons
tar -zxf scons-local-2.3.0.tar.gz -C ./scons
cd scons
# When installed privately, simply create a symlink for 'scons' in your PATH to /path/to/scons/scons.py.
ln -s scons.py scons

~/sources/scons-4/scons APR=/wind1/home/19fush/app/apr/bin APU=/wind1/home/19fush/app/apr-util/bin OPENSSL=/wind1/home/19fush/app PREFIX=/wind1/home/19fush/app/serf


1.4.1 先安装anaconda,利用anaconda安装serf
- anaconda的安装方法参考:https://linuxize.com/post/how-to-install-anaconda-on-centos-7/#:~:text=Perform%20the%20following%20steps%20to%20install%20Anaconda%20on,to%20display%20information%20about%20current%20conda%20…%20
- anaconda的基础教程:https://www.jianshu.com/p/8e366a3eb53e
- https://developer.aliyun.com/article/603000
# anaconda的安装及基本使用
sha256sum Anaconda3-2020.07-Linux-x86_64.sh
bash Anaconda3-2020.07-Linux-x86_64.sh
source ~/.bashrc
conda create -n python36 python=3.6
conda activate python36
conda deactivate
利用anaconda安装scons和serf
conda search scons
conda search serf
conda install scons
conda install serf
1.5 install sqlite
tar -zxf sqlite-autoconf-3330000.tar.gz
cd sqlite-autoconf-3330000
./configure --prefix=/wind1/home/19fush/app/sqlite
make
make install

# 加入环境变量
vi ~/.bash_profile
export PATH=/wind1/home/19fush/app/sqlite/bin:$PATH
source ~/.bash_profile
echo $PATH
1.6 install subversion
官网下载sqlite-autoconf-3290000.tar.gz ,解压后将里面的所有文件复制到subversion-1.19.0/sqlite-amalgamation路径中,没有sqlite-amalgamation这个文件夹就自己创建
tar -zxf cd subversion-1.8.17.tar.gz
cd subversion-1.8.17
# 复制文件夹
cp -a /wind1/home/19fush/sources/sqlite-autoconf-3330000/* /wind1/home/19fush/app/sqlite-amalgamation

./configure --prefix=/wind1/home/19fush/app/subversion
make
make install

# 加入环境变量
vi ~/.bash_profile
export PATH=/wind1/home/19fush/app/subversion/bin:$PATH
source ~/.bash_profile
echo $PATH
2. 安装subversion 的简单方法-anaconda
- 安装anaconda
- 创建Python3.6环境
- 激活Python3.6环境,并安装svn 1.10
conda install -n python36 svn
source activate python36
python --version
安装python与git
1. python 3.7.9
tar -zxf Python-3.7.9.tgz   # 解压缩
cd Python-3.7.9   # 三部曲
./configure --prefix=/wind1/home/19fush/app/python
make
make install
# 加入环境变量
vi ~/.bash_profile
export PATH=/wind1/home/19fush/app/python/bin:$PATH
source ~/.bash_profile
echo $PATH
2. git-2.3.2
tar -zxf git-2.3.2.tar.gz   # 解压缩
cd git-2.3.2   # 三部曲
./configure --prefix=/wind1/home/19fush/app/git
make
make install
# 加入环境变量
vi ~/.bash_profile
export PATH=/wind1/home/19fush/app/git/bin:$PATH
source ~/.bash_profile
echo $PATH
安装netcdf与pnetcdf
背景:自NetCDF库4.2版本以后,Fortran的库和C的库就要分开build啦!而且要装Fortran的库必须先装好C的库。
建议:将依赖库都安装在同一目录下,避免添加过多的环境变量
1. install netcdf
1.1 install netcdf
前提条件
- For netCDF-4 support
- HDF5 1.8.9 or later.
- HDF5 1.10.1 or later. (必须)
- zlib 1.2.5 or later (for netCDF-4 compression) 必须
- curl 7.18.0 or later (for DAP remote access client support)
- For parallel I/O support on classic netCDF files
- PnetCDF 1.6.0 or later
备注:不支持szip和并行,没有安装szip和pnetcdf
NCDIR=$HOME/app/netcdf
# zlib
./configure --prefix=$NCDIR
make check
make install


# hdf5
./configure --with-zlib=${NCDIR} --prefix=$NCDIR
make
make check
make install


# 改用intel编译器,设置环境变量
vim ~/.bash_profile
# intel fortran c c++
module load compiler/intel/composer_xe_2016.3.210
export INTEL=/wind1/software/compiler/intel/composer_xe_2016.3.210
export PATH=$INTEL/bin/intel64:$PATH
export LD_LIBRARY_PATH=$INTEL/lib/intel64:$LD_LIBRARY_PATH
export MANPATH=$INTEL/man/en_US:MANPATH
export CC=icc
export CXX=icpc
export FC=ifort
source ~/.bash_profile

# netcdf-c
tar -zxf
cd
CPPFLAGS=-I${NCDIR}/include LDFLAGS=-L${NCDIR}/lib ./configure --prefix=${NCDIR} --disable-dap-remote-tests
make check
make install

# 在C的基础上安装Fortran版本,设置环境变量和动态库路径
vim ~/.bash_profile
export NETCDF=$HOME/app/netcdf
export PATH=$NETCDF/bin:$PATH
export LD_LIBRARY_PATH=$NETCDF/lib:$LD_LIBRARY_PATH
export INCLUDE=$NETCDF/include:$INCLUDE
source ~/.bash_profile


# netcdf-fortran
tar -zxf netcdf-fortran-4.5.3.tar.gz
cd netcdf-fortran-4.5.3
CPPFLAGS=-I${NCDIR}/include LDFLAGS=-L${NCDIR}/lib ./configure --prefix=${NCDIR}
make
make check
make install
netcdf-c安装成功:
Congratulations! You have successfully installed netCDF!    |
|                                                             |
| You can use script "nc-config" to find out the relevant     |
| compiler options to build your application. Enter           |
|                                                             |
|     nc-config --help                                        |
|                                                             |
| for additional information.                                 |
|                                                             |
| CAUTION:                                                    |
|                                                             |
| If you have not already run "make check", then we strongly  |
| recommend you do so. It does not take very long.            |
|                                                             |
| Before using netCDF to store important data, test your      |
| build with "make check".                                    |
|                                                             |
| NetCDF is tested nightly on many platforms at Unidata       |
| but your platform is probably different in some ways.       |
|                                                             |
| If any tests fail, please see the netCDF web site:          |
| http://www.unidata.ucar.edu/software/netcdf/                |
|                                                             |
| NetCDF is developed and maintained at the Unidata Program   |
| Center. Unidata provides a broad array of data and software |
| tools for use in geoscience education and research.         |
| http://www.unidata.ucar.edu
netcdf-fortran configure成功:
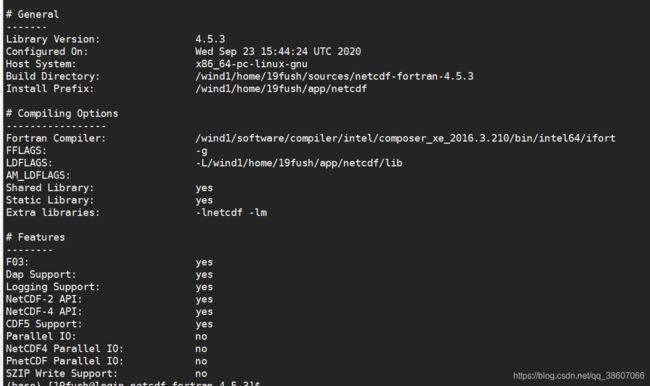
netcdf-fortran安装成功:
+-------------------------------------------------------------+
| Congratulations! You have successfully installed the netCDF |
| Fortran libraries.                                          |
|                                                             |
| You can use script "nf-config" to find out the relevant     |
| compiler options to build your application. Enter           |
|                                                             |
|     nf-config --help                                        |
|                                                             |
| for additional information.                                 |
|                                                             |
| CAUTION:                                                    |
|                                                             |
| If you have not already run "make check", then we strongly  |
| recommend you do so. It does not take very long.            |
|                                                             |
| Before using netCDF to store important data, test your      |
| build with "make check".                                    |
|                                                             |
| NetCDF is tested nightly on many platforms at Unidata       |
| but your platform is probably different in some ways.       |
|                                                             |
| If any tests fail, please see the netCDF web site:          |
| http://www.unidata.ucar.edu/software/netcdf/                |
|                                                             |
| NetCDF is developed and maintained at the Unidata Program   |
| Center. Unidata provides a broad array of data and software |
| tools for use in geoscience education and research.         |
| http://www.unidata.ucar.edu                                 |
+-------------------------------------------------------------+


附录1: install curl 7.18.0 or later
$ # Build and install curl
NCDIR=$HOME/app/netcdf
./configure --prefix=$NCDIR
make check
make install
附录2: install hdf5 from source
# Building hdf5 from source
tar -zxf hdf5-1.10.3.tar.gz
cd hdf5-1.10.3

$ # Build and install HDF5
NCDIR=$HOME/app/netcdf
./configure --with-zlib=${NCDIR} --with-szlib=${NCDIR} --prefix=${NCDIR} --enable-hl
make check
make install   # or sudo make install, if root permissions required

vi ~/.bash_profile
export PATH=$HOME/app/netcdf/bin:$PATH
export LD_LIBRARY_PATH=$HOME/app/netcdf/lib:$LD_LIBRARY_PATH
export INCLUDE=$HOME/app/netcdf/include:$INCLUDE
source ~/.bash_profile
echo $INCLUDE
echo $LD_LIBRARY_PATH
附录2.1: install szip
tar -zxf szip-2.1.1.tar.gz
cd szip-2.1.1

NCDIR=$HOME/app/netcdf
./configure --prefix=$SDIR
make
make check
make install         # or sudo make install, if root permissions required
2. install pnetcdf
2.1 install pnetcdf - 1.7.0 疯狂报错
# 设置环境变量和动态库路径
vim ~/.bash_profile
# mpich
export PATH=$HOME/app/mpich/bin:$PATH
export LD_LIBRARY_PATH=$HOME/app/mpich/lib:$LD_LIBRARY_PATH
source ~/.bash_profile

PNCDIR=$HOME/app/pnetcdf
./configure --prefix=${PNDIR} --with-mpi=$HOME/app/mpich
./configure --prefix=$HOME
make
make install
错误1:
Invalid MPI compiler specified or detected: "/wind1/software/compiler/intel/composer_xe_2016.3.210/bin/intel64/icc"
     A working MPI compiler is required. Please specify the location
     of one either with the MPICC environment variable or the
     --with-mpi configure flag
解决方案1:
./configure --prefix=${PNCDIR} MPICC=mpiicc MPICXX=mpiicpc MPIF77=mpiifort MPIF90=mpiifort --with-mpi=$HOME/app/mpich
错误2:
compilation aborted for ncmpi_notyet.cpp (code 2)
make[2]: *** [ncmpi_notyet.o] Error 2
make[2]: Leaving directory `/wind1/home/19fush/sources/parallel-netcdf-1.7.0/src/libcxx'
make[1]: *** [libcxx] Error 2
make[1]: Leaving directory `/wind1/home/19fush/sources/parallel-netcdf-1.7.0/src'
make: *** [all] Error 2
解决方案2:没有
2.1 install pnetcdf - 1.7.0 稀里糊涂成功了
tar -zxf parallel-netcdf-1.8.1.tar.gz
cd parallel-netcdf-1.8.1
pdir=$HOME/app/pnetcdf/1.8.1
./configure --prefix=$pdir
make
make install
+----------------------------------------------------------------------------+
|
|  PnetCDF has been successfully installed under /wind1/home/19fush/app/pnetcdf/1.7.0
|
|  * PnetCDF header files are installed in /wind1/home/19fush/app/pnetcdf/1.7.0/include
|  * PnetCDF library file is installed in /wind1/home/19fush/app/pnetcdf/1.7.0/lib
|  * PnetCDF utility programs are installed in /wind1/home/19fush/app/pnetcdf/1.7.0/bin
|  * PnetCDF man pages are installed in /wind1/home/19fush/app/pnetcdf/1.7.0/man/man1 and
|    /wind1/home/19fush/app/pnetcdf/1.7.0/man/man3
|
|  To compile your PnetCDF programs, please add the following to the command
|  line, so the compiler can find the PnetCDF header files:
|      -I/wind1/home/19fush/app/pnetcdf/1.7.0/include
|
|  Add the following line to link your program to PnetCDF library:
|      -L/wind1/home/19fush/app/pnetcdf/1.7.0/lib -lpnetcdf
|
|  PnetCDF is jointly developed by a team at Northwestern University and
|  Argonne National Laboratory.
|
|  Vist PnetCDF web sites for more information
|      http://cucis.ece.northwestern.edu/projects/PnetCDF
|      http://trac.mcs.anl.gov/projects/parallel-netcdf
|
+----------------------------------------------------------------------------+
2.2 installl pnetcdf-1.8.1 稀里糊涂成功了
tar -zxf parallel-netcdf-1.8.1.tar.gz
cd parallel-netcdf-1.8.1
pdir=$HOME/app/pnetcdf/1.8.1
./configure --prefix=$pdir
make
make install
+----------------------------------------------------------------------------+
|
|  PnetCDF has been successfully installed under /wind1/home/19fush/app/pnetcdf/1.8.1
|
|  * PnetCDF header files are installed in /wind1/home/19fush/app/pnetcdf/1.8.1/include
|  * PnetCDF library file is installed in /wind1/home/19fush/app/pnetcdf/1.8.1/lib
|  * PnetCDF utility programs are installed in /wind1/home/19fush/app/pnetcdf/1.8.1/bin
|  * PnetCDF man pages are installed in /wind1/home/19fush/app/pnetcdf/1.8.1/man/man1 and
|    /wind1/home/19fush/app/pnetcdf/1.8.1/man/man3
|
|  To compile your PnetCDF programs, please add the following to the command
|  line, so the compiler can find the PnetCDF header files:
|      -I/wind1/home/19fush/app/pnetcdf/1.8.1/include
|
|  Add the following line to link your program to PnetCDF library:
|      -L/wind1/home/19fush/app/pnetcdf/1.8.1/lib -lpnetcdf
|
|  PnetCDF is jointly developed by a team at Northwestern University and
|  Argonne National Laboratory.
|
|  Visit PnetCDF web sites for more information
|      http://cucis.ece.northwestern.edu/projects/PnetCDF
|      http://trac.mcs.anl.gov/projects/parallel-netcdf
|
+----------------------------------------------------------------------------+
3. 完整安装-支持并行,pnetcdf
3.1 install zlib
NCDIR=$HOME/app/netcdf4
# zlib
./configure --prefix=$NCDIR
make -j 48    # 加速
make check -j 48
make install -j 48
3.2 install szip
NCDIR=$HOME/app/netcdf
./configure --prefix=$NCDIR
make -j 48    # 加速
make check -j 48
make install -j 48
Libraries have been installed in:
   /wind1/home/xiaxsh3/app/netcdf4/lib

If you ever happen to want to link against installed libraries
in a given directory, LIBDIR, you must either use libtool, and
specify the full pathname of the library, or use the '-LLIBDIR'
flag during linking and do at least one of the following:
   - add LIBDIR to the 'LD_LIBRARY_PATH' environment variable
     during execution
   - add LIBDIR to the 'LD_RUN_PATH' environment variable
     during linking
   - use the '-Wl,-rpath -Wl,LIBDIR' linker flag
   - have your system administrator add LIBDIR to '/etc/ld.so.conf'

See any operating system documentation about shared libraries for
more information, such as the ld(1) and ld.so(8) manual pages.
----------------------------------------------------------------------
make[2]: Leaving directory `/wind1/home/xiaxsh3/sources/szip-2.1.1/src'
make[1]: Leaving directory `/wind1/home/xiaxsh3/sources/szip-2.1.1/src'
Making install in test
make[1]: Entering directory `/wind1/home/xiaxsh3/sources/szip-2.1.1/test'
make[2]: Entering directory `/wind1/home/xiaxsh3/sources/szip-2.1.1/test'
make[2]: Nothing to be done for `install-exec-am'.
make[2]: Nothing to be done for `install-data-am'.
make[2]: Leaving directory `/wind1/home/xiaxsh3/sources/szip-2.1.1/test'
make[1]: Leaving directory `/wind1/home/xiaxsh3/sources/szip-2.1.1/test'
make[1]: Entering directory `/wind1/home/xiaxsh3/sources/szip-2.1.1'
make[2]: Entering directory `/wind1/home/xiaxsh3/sources/szip-2.1.1'
make[2]: Nothing to be done for `install-exec-am'.
make[2]: Nothing to be done for `install-data-am'.
make[2]: Leaving directory `/wind1/home/xiaxsh3/sources/szip-2.1.1'
make[1]: Leaving directory `/wind1/home/xiaxsh3/sources/szip-2.1.1'
3.3 install curl — 失败
NCDIR=$HOME/app/netcdf
$ # Build and install curl
tar -zxf curl-7.38.0.tar.gz
cd curl-7.38.0

./configure --prefix=$NCDIR
make -j 48    # 加速
make check -j 48
make install -j 48
3.3 install hdf5-- 支持szip,支持并行
# hdf5
HDF5DIR=$HOME/app/netcdf4
MPICC=mpiicc MPICXX=mpiicpc MPIF77=mpiifort MPIF90=mpiifort ./configure --enable-parallel --with-zlib=${NCDIR} --with-szlib=${NCDIR} --prefix=$HDF5DIR
make -j 48    # 加速
make check -j 48
make install -j 48
General Information:
-------------------
                   HDF5 Version: 1.10.3
                  Configured on: Mon Sep 28 15:22:05 CST 2020
                  Configured by: xiaxsh3@login
                    Host system: x86_64-unknown-linux-gnu
              Uname information: Linux login 2.6.32-642.el6.x86_64 #1 SMP Tue May 10 17:27:01 UTC 2016 x86_64 x86_64 x86_64 GNU/Linux
                       Byte sex: little-endian
             Installation point: /wind1/home/xiaxsh3/app/netcdf4

Compiling Options:
------------------
                     Build Mode: production
              Debugging Symbols: no
                        Asserts: no
                      Profiling: no
             Optimization Level: high

Linking Options:
----------------
                      Libraries: static, shared
  Statically Linked Executables:
                        LDFLAGS:
                     H5_LDFLAGS:
                     AM_LDFLAGS:  -L/wind1/home/xiaxsh3/app/netcdf4/lib -L/wind1/home/xiaxsh3/app/netcdf4/lib
                Extra libraries: -lsz -lz -ldl -lm
                       Archiver: ar
                       AR_FLAGS: cr
                         Ranlib: ranlib

Languages:
----------
                              C: yes
                     C Compiler: /wind1/home/xiaxsh3/app/mpi/mpich/3.2.1/bin/mpicc ( MPICH version 3.2.1 built with icc version 16.0.3 (gcc version 4.4.7 compatibility))
                       CPPFLAGS:
                    H5_CPPFLAGS: -D_GNU_SOURCE -D_POSIX_C_SOURCE=200112L   -DNDEBUG -UH5_DEBUG_API
                    AM_CPPFLAGS:  -I/wind1/home/xiaxsh3/app/netcdf4/include -I/wind1/home/xiaxsh3/app/netcdf4/include
                        C Flags:
                     H5 C Flags:   -std=c99 -Wcheck -Wall -Wcomment -Wdeprecated -Wextra-tokens -Wformat -Wformat-security -Wmain -Wmissing-declarations -Wmissing-prototypes -Wp64 -Wpointer-arith -Wreturn-type -Wshadow -Wstrict-prototypes -Wtrigraphs -Wuninitialized -Wunknown-pragmas -Wunused-function -Wunused-variable -Wwrite-strings  -Wl,-s  -O3
                     AM C Flags:
               Shared C Library: yes
               Static C Library: yes


                        Fortran: no

                            C++: no

                           Java: no


Features:
---------
                   Parallel HDF5: yes
Parallel Filtered Dataset Writes: yes
              Large Parallel I/O: yes
              High-level library: yes
                    Threadsafety: no
             Default API mapping: v110
  With deprecated public symbols: yes
          I/O filters (external): deflate(zlib),szip(encoder)
                             MPE:
                      Direct VFD: no
                         dmalloc: no
  Packages w/ extra debug output: none
                     API tracing: no
            Using memory checker: no
 Memory allocation sanity checks: no
             Metadata trace file: no
          Function stack tracing: no
       Strict file format checks: no
    Optimization instrumentation: no
3.4 install pnetcdf-1.8.1
3.4.1 prequistment
vim ~/.bash_profile
# MPI   需提前安装好,并设置环境变量
export MPICH=$HOME/app/mpi/mpich/3.2.1
export PATH=$MPICH/bin:$PATH
export LD_LIBRARY_PATH=$MPICH/lib:$LD_LIBRARY_PATH
export INCLUDE=$MPICH/include:$INCLUDE

# 改用intel编译器,设置环境变量
# intel fortran c c++
module load compiler/intel/composer_xe_2016.3.210
export INTEL=/wind1/software/compiler/intel/composer_xe_2016.3.210
export PATH=$INTEL/bin/intel64:$PATH
export LD_LIBRARY_PATH=$INTEL/lib/intel64:$LD_LIBRARY_PATH
export MANPATH=$INTEL/man/en_US:MANPATH
export CC=icc
export CXX=icpc
export FC=ifort

# NETCDF   zlib sizp  hdf5的安目录均相同,都位于netcdf目录下
export NETCDF=$HOME/app/netcdf
export PATH=$NETCDF/bin:$PATH
export LD_LIBRARY_PATH=$NETCDF/lib:$LD_LIBRARY_PATH
export INCLUDE=$NETCDF/include:$INCLUDE

source ~/.bash_profile
./configure --prefix=${pdir} MPICC=mpiicc MPICXX=mpiicpc MPIF77=mpiifort MPIF90=mpiifort --with-mpi=$HOME/app/mpi/mpich/3.2.1

make -j 48    # 加速
make check -j 48
make install -j 8


# PNETCDF的环境变量
vim ~/.bash_profile
export PNETCDF=$HOME/app/pnetcdf/1.8.1
export PATH=$PNETCDF/bin:$PATH
export LD_LIBRARY_PATH=$PNETCDF/lib:$LD_LIBRARY_PATH
export INCLUDE=$PNETCDF/include:$INCLUDE

source ~/.bash_profile
相关信息:
(base) [xiaxsh3@login parallel-netcdf-1.8.1]$ pnetcdf-config --all

This parallel-netcdf 1.8.1 has been built with the following features:

  --cc                -> /wind1/home/xiaxsh3/app/mpi/mpich/3.2.1/bin/mpicc
  --cflags            -> -g -O2
  --cppflags          ->
  --ldflags           ->
  --libs              ->

  --has-c++           -> yes
  --cxx               -> /wind1/home/xiaxsh3/app/mpi/mpich/3.2.1/bin/mpicxx
  --cxxflags          -> -g -O2
  --cxxppflags        ->

  --has-fortran       -> yes
  --f77               -> /wind1/home/xiaxsh3/app/mpi/mpich/3.2.1/bin/mpif77
  --f77flags          -> -g
  --fppflags          ->

  --f90               -> /wind1/home/xiaxsh3/app/mpi/mpich/3.2.1/bin/mpif90
  --f90flags          -> -g

  --erange-fill       -> enabled
  --subfiling         -> disabled
  --relax-coord-bound -> disabled
  --in-place-swap     -> enabled
  --debug             -> disabled

  --prefix            -> /wind1/home/xiaxsh3/app/pnetcdf/1.8.1
  --includedir        -> /wind1/home/xiaxsh3/app/pnetcdf/1.8.1/include
  --libdir            -> /wind1/home/xiaxsh3/app/pnetcdf/1.8.1/lib
  --version           -> parallel-netcdf 1.8.1
  --release-date      -> 28 Jan 2017
  --config-date       -> Mon Sep 28 11:35:15 CST 2020
(base) [xiaxsh3@login parallel-netcdf-1.8.1]$ pnetcdf_version
PnetCDF Version:    	1.8.1
PnetCDF Release date:	28 Jan 2017
PnetCDF configure: 	--prefix=/wind1/home/xiaxsh3/app/pnetcdf/1.8.1 MPICC=mpiicc MPICXX=mpiicpc MPIF77=mpiifort MPIF90=mpiifort --with-mpi=/wind1/home/xiaxsh3/app/mpi/mpich/3.2.1
MPICC:  /wind1/home/xiaxsh3/app/mpi/mpich/3.2.1/bin/mpicc -g -O2
MPICXX: /wind1/home/xiaxsh3/app/mpi/mpich/3.2.1/bin/mpicxx -g -O2
MPIF77: /wind1/home/xiaxsh3/app/mpi/mpich/3.2.1/bin/mpif77 -g
MPIF90: /wind1/home/xiaxsh3/app/mpi/mpich/3.2.1/bin/mpif90 -g
(base) [xiaxsh3@login parallel-netcdf-1.8.1]$
3.5 install netcdf-c
$ # Build, test, and install netCDF-4 with PnetCDF support
$ CC=mpicc CPPFLAGS="-I H 5 D I R / i n c l u d e − I {H5DIR}/include -I H5DIR/include−I{PNDIR}/include"
LDFLAGS="-L H 5 D I R / l i b − L {H5DIR}/lib -L H5DIR/lib−L{PNDIR}/lib" ./configure
–enable-pnetcdf --enable-parallel-tests
–prefix=${NCDIR}
$ make check
$ make install
./configure --prefix=你的安装路径/netcdf LDFLAGS="-L H D F 5 / l i b " C P P F L A G S = " − I HDF5/lib" CPPFLAGS="-I HDF5/lib"CPPFLAGS="−IHDF5/include" CC=mpiicc --disable-dap
# netcdf-c
tar -zxf
cd
PNDIR=$HOME/app/pnetcdf/1.8.1
CPPFLAGS="-I${NCDIR}/include -I${PNDIR}/include"  LDFLAGS="-L${NCDIR}/lib -L${PNDIR}/lib" ./configure --prefix=${NCDIR}   --enable-pnetcdf  --enable-parallel-tests --disable-dap-remote-tests

make -j 48    # 加速
make check -j 48
make install -j 8
make check
make install


# 在C的基础上安装Fortran版本,设置环境变量和动态库路径
vim ~/.bash_profile
export NETCDF=$HOME/app/netcdf
export PATH=$NETCDF/bin:$PATH
export LD_LIBRARY_PATH=$NETCDF/lib:$LD_LIBRARY_PATH
export INCLUDE=$NETCDF/include:$INCLUDE
source ~/.bash_profile


# netcdf-fortran
tar -zxf netcdf-fortran-4.5.3.tar.gz
cd netcdf-fortran-4.5.3
CPPFLAGS=-I${NCDIR}/include LDFLAGS=-L${NCDIR}/lib ./configure --prefix=${NCDIR}
make
make check
make install
Linux 编译器gcc与icc cmake make
linux系统主要有两种编译器,分别为Intel(icc)和gnu(gcc)

1. install gcc
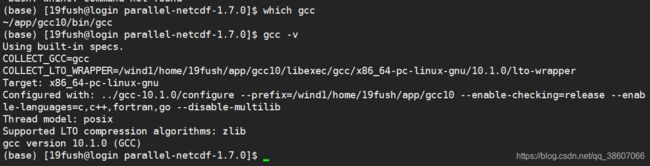
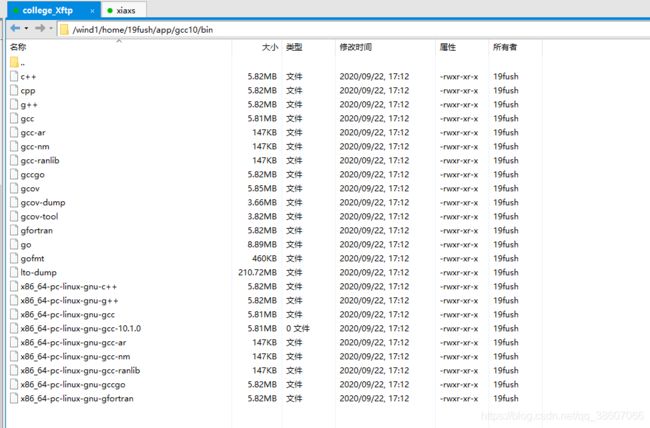
1.1 install gcc-10.1.0
注意:不需要事先单个安装GMP、MPFR、MPC等依赖包,直接执行./contrib/download_prerequisites
声明:$HOME目录下有sources和app目录,gcc-10.1.0.tar.gz和gcc-build-10.1.0位于sources目录,gcc10位于app目录
友情提醒:编译时间超长,6小时,建议晚上睡觉前编译
前提条件:系统已有gcc较低版本
tar xzf gcc-10.1.0.tar.gz
cd gcc-10.1.0
./contrib/download_prerequisites      # 自动下载gmp、mpfr、mpc依赖包
cd ../
mkdir gcc-build-10.1.0    # gcc安装包的源目录之外新建一个新目录,执行configure
cd gcc-build-10.1.0

../gcc-10.1.0/configure --prefix=$HOME/app/gcc10 --enable-checking=release --enable-languages=c,c++,fortran,go --disable-multilib
make
make install

# 更新使用gcc版本
vi ~/.bash_profile
PATH=$HOME/app/gcc10/bin:$PATH
source ~/.bash_profile
echo $PATH
Libraries have been installed in:
   /wind1/home/19fush/app/gcc10/lib/../lib64

If you ever happen to want to link against installed libraries
in a given directory, LIBDIR, you must either use libtool, and
specify the full pathname of the library, or use the `-LLIBDIR'
flag during linking and do at least one of the following:
   - add LIBDIR to the `LD_LIBRARY_PATH' environment variable
     during execution
   - add LIBDIR to the `LD_RUN_PATH' environment variable
     during linking
   - use the `-Wl,-rpath -Wl,LIBDIR' linker flag
   - have your system administrator add LIBDIR to `/etc/ld.so.conf'

See any operating system documentation about shared libraries for
more information, such as the ld(1) and ld.so(8) manual pages.
----------------------------------------------------------------------
 /bin/mkdir -p '/wind1/home/19fush/app/gcc10/share/info'
 /usr/bin/install -c -m 644 ./libitm.info '/wind1/home/19fush/app/gcc10/share/info'
 install-info --info-dir='/wind1/home/19fush/app/gcc10/share/info' '/wind1/home/19fush/app/gcc10/share/info/libitm.info'
make[4]: Leaving directory `/wind1/home/19fush/sources/gcc-build-10/x86_64-pc-linux-gnu/libitm'
make[3]: Leaving directory `/wind1/home/19fush/sources/gcc-build-10/x86_64-pc-linux-gnu/libitm'
make[2]: Leaving directory `/wind1/home/19fush/sources/gcc-build-10/x86_64-pc-linux-gnu/libitm'
make[1]: Leaving directory `/wind1/home/19fush/sources/gcc-build-10'

1.2 install gcc-4.8.5 失败
./configure --prefix=/wind1/home/xiaxsh3/app/gcc --with-gmp=/wind1/home/xiaxsh3/app/gmp --with-mpfr=/wind1/home/xiaxsh3/app/mpfr --with-mpc=/wind1/home/xiaxsh3/app/mpc
make
error:
configure: error: cannot compute suffix of object files: cannot compile
See `config.log' for more details.
make[2]: *** [configure-stage1-target-libgcc] Error 1
make[2]: Leaving directory `/wind1/home/xiaxsh3/sources/gcc-4.8.5'
make[1]: *** [stage1-bubble] Error 2
make[1]: Leaving directory `/wind1/home/xiaxsh3/sources/gcc-4.8.5'
make: *** [all] Error 2
solution:
https://stackoverflow.com/questions/11502045/gcc-compilation-cannot-compute-suffix-of-object-files-cannot-compile

vi ~/.bash_profile

export LD_LIBRARY_PATH="/wind1/home/xiaxsh3/app/gmp/lib/:$LD_LIBRARY_PATH"
# export LD_LIBRARY_PATH=$LD_LIBRARY_PATH:/path/to/mpc/lib/
export LD_LIBRARY_PATH="/wind1/home/xiaxsh3/app/mpc/lib/:$LD_LIBRARY_PATH"
export LD_LIBRARY_PATH="/wind1/home/xiaxsh3/app/mpfr/lib/:$LD_LIBRARY_PATH"

source ~/.bash_profile
echo $LD_LIBRARY_PATH
![]()
error:
In file included from /usr/include/features.h:399:0,
from /usr/include/stdio.h:27,
from ../../.././libgcc/../gcc/tsystem.h:87,
from ../../.././libgcc/libgcc2.c:27:
/usr/include/gnu/stubs.h:7:27: fatal error: gnu/stubs-32.h: No such file or directory
# include 
1.3 install gcc 4.8.5
tar -zxf gcc-4.8.5.tar.gz
cd gcc-4.8.5
./contrib/download_prerequisites
cd ../
mkdir gcc-build-4.8.5
cd gcc-build-4.8.5/
../gcc-4.8.5/configure --prefix=$HOME/app/gcc/4.8.5 --enable-checking=release --enable-languages=c,c++,fortran,go --disable-multilib
make -j 48
make install -j 48

vim ~/.bash_profile
# gcc-4.8.5  environment setting
export GNU=$HOME/app/gcc/4.8.5
export PATH=$GNU/bin:$PATH
export LD_LIBRARY_PATH=$GNU/lib:$LD_LIBRARY_PATH
export INCLUDE=$GNU/include:$INCLUDE

source ~/.bash_profile
(base) [xiaxsh3@login gcc-build-4.8.5]$ which gcc
~/app/gcc/4.8.5/bin/gcc
(base) [xiaxsh3@login gcc-build-4.8.5]$ gcc --version
gcc (GCC) 4.8.5
Copyright (C) 2015 Free Software Foundation, Inc.
This is free software; see the source for copying conditions.  There is NO
warranty; not even for MERCHANTABILITY or FITNESS FOR A PARTICULAR PURPOSE.
----------------------------------------------------------------------
Libraries have been installed in:
   /wind1/home/xiaxsh3/app/gcc/4.8.5/lib/../lib64

If you ever happen to want to link against installed libraries
in a given directory, LIBDIR, you must either use libtool, and
specify the full pathname of the library, or use the `-LLIBDIR'
flag during linking and do at least one of the following:
   - add LIBDIR to the `LD_LIBRARY_PATH' environment variable
     during execution
   - add LIBDIR to the `LD_RUN_PATH' environment variable
     during linking
   - use the `-Wl,-rpath -Wl,LIBDIR' linker flag
   - have your system administrator add LIBDIR to `/etc/ld.so.conf'

See any operating system documentation about shared libraries for
more information, such as the ld(1) and ld.so(8) manual pages.
2. 切换编译器版本
2.1 版本内部切换
- 例如从gcc-4切换到gcc-10
更新环境变量即可
# 更新使用gcc版本
vi ~/.bash_profile
PATH=$HOME/app/gcc10/bin:$PATH
export LD_LIBRARY_PATH=$HOME/app/gcc10/lib:$LD_LIBRARY_PATH
source ~/.bash_profile
echo $PATH
2.2 从gcc 切换到 icc
2.2.1 方法1
# 改用intel编译器,设置环境变量
vim ~/.bash_profile
# ntel fortran c c++
module load compiler/intel/composer_xe_2016.3.210
export INTEL=/wind1/software/compiler/intel/composer_xe_2016.3.210
export PATH=$INTEL/bin/intel64:$PATH
export LD_LIBRARY_PATH=$INTEL/lib/intel64:$LD_LIBRARY_PATH
export MANPATH=$INTEL/man/en_US:MANPATH
export CC=icc
export CXX=icpc
export FC=ifort
source ~/.bash_profile
2.2.2 方法2
https://software.intel.com/content/www/us/en/develop/articles/performance-tools-for-software-developers-building-netcdf-with-the-intel-compilers.html
# 改用icc编译
# source /bin/compilervars.sh ia32
# source /bin/compilervars.sh intel64
source /wind1/software/compiler/intel/composer_xe_2016.3.210/bin/compilervars.sh intel64
export CC=icc
export CXX=icpc
export CFLAGS='-O3 -xHost -ip -no-prec-div -static-intel'
export CXXFLAGS='-O3 -xHost -ip -no-prec-div -static-intel'
export F77=ifort
export FC=ifort
export F90=ifort
export FFLAGS='-O3 -xHost -ip -no-prec-div -static-intel'
export CPP='icc -E'
export CXXCPP='icpc -E'
2.2.3 方法3
https://www.cpc.ncep.noaa.gov/products/wesley/wgrib2/compile_questions.html
# 1. 使用gcc和gfortran
export CC=gcc
export FC=gfortran
# 2. 使用icc
export CC=icc
export FC=ifort
export COMP_SYS=intel_linux
方法4
https://blog.csdn.net/iteye_20478/article/details/82141297
# Setting compilers variables
export CC="/opt/intel/Compiler/11.1/046/bin/intel64/icc" #"/usr/bin/gcc"
export CXX="/opt/intel/Compiler/11.1/046/bin/intel64/icpc" #"/usr/bin/g++"
export FC=ifort
export F90=ifort
export F77=ifort
export PERL=/usr/bin/perl
export BIN=Linux2_x86_64ifort

# Setting code generation options
export CPPFLAGS="-O2 -DNDEBUG -DpgiFortran"
export CFLAGS="-g -O2"
export CXXFLAGS="-g -O2"
export FFLAGS='-g -O2 -mp -recursive'

# Setting ifort environmental variables
source /opt/intel/Compiler/11.1/046/bin/iccvars.sh intel64
source /opt/intel/Compiler/11.1/046/bin/ifortvars.sh intel64
3 查询编译器版本
- which icc and icc -v
which icc
icc -v


which gcc
gcc -v
-
查看内核版本
uname -a -
查看操作系统版本号]
lsb_release -a -
查看Linux服务器gcc版本中有哪些库
strings /usr/lib64/libstdc++.so.6|grep CXXABI
4. install cmake-3.12.3
# 1、官网下载:CMake。
我下载的是cmake-3.12.3.tar.gz

# 2、解压cmake-3.8.2.tar.gz
tar -zxf cmake-3.12.3.tar.gz

# 3、指定安装路径进行安装
cd cmake-3.12.3
./bootstrap --prefix=$HOME/app/cmake/3.12.3
make -j 48
make install -j 48

vim ~/.bash_profile
# cmake-3.12.3  enviroment setting
export CMAKE=$HOME/app/cmake/3.12.3
export PATH=$CMAKE/bin:$PATH
source ~/.bash_profile

# 4、进行测试
cmake -version
(base) [xiaxsh3@login cmake-3.12.3]$ cmake -version
cmake version 3.12.3
5. install make 4.2
wget http://ftp.gnu.org/gnu/make/make-4.2.tar.gz
tar -zxf make-4.2.tar.gz
cd make-4.2
./configure --prefix=$HOME/app/make/4.2
make -j 56
make check -j 56
make install -j 56

vim ~/.bash_profile
# make-4.2  enviroment setting
export MAKE=$HOME/app/make/4.2
export PATH=$MAKE/bin:$PATH
source ~/.bash_profile

安装教程
1. 依赖清单
-
UNIX style operating system such as CNL, AIX or Linux
-
python >= 2.7 yes
-
perl 5 -anaconda yes
-
subversion client (version 1.8 or greater but less than v1.11) for downloading CAM, POP, and WW3 -anaconda yes
-
git client (1.8 or greater) -anaconda yes
-
Fortran compiler with support for Fortran 2003
-
C compiler
-
MPI (although CESM does not absolutely require it for running on one processor) yes
-
NetCDF 4.3 or newer. no
-
ESMF 5.2.0 or newer (optional). no
-
pnetcdf 1.7.0 is required and 1.8.1 is optional but recommended no
-
Trilinos may be required for certain configurations no
-
LAPACK and BLAS (lapack-3.9.0 BLAS-3.8.0) yes
-
CMake 2.8.6 or newer (自带2.8.12) yes
学院服务器自带的软件包
vi ~/.bash_profile
# NetCDF 4.3 or newer
export PATH=/wind1/software/mathlib/netcdf-4.6.1/intel/bin:$PATH
# nc-config --all   # 查看版本

# intel fortran c c++
module load compiler/intel/composer_xe_2016.3.210
export INTEL=/wind1/software/compiler/intel/composer_xe_2016.3.210
export PATH=$INTEL/bin/intel64:$PATH
export LD_LIBRARY_PATH=$INTEL/lib/intel64:$LD_LIBRARY_PATH
export MANPATH=$INTEL/man/en_US:MANPATH
export CC=icc
export CXX=icpc
export FC=ifort

# mpich
export PATH=$HOME/app/mpich/bin:$PATH
export LD_LIBRARY_PATH=$HOME/app/mpich/lib:$LD_LIBRARY_PATH
export INCLUDE=$HOME/app/mpich/include:$INCLUDE
export CPPFLAGS=-I$HOME/app/mpich/include
export LDFLAGS=-L$HOME/app/mpich/lib

# openmpi
export PATH=/wind1/software/mathlib/netcdf-4.6.1/intel/bin:$PATH
export LD_LIBRARY_PATH=/wind1/software/mathlib/netcdf-4.6.1/intel/lib:$LD_LIBRARY_PATH
export INCLUDE=/wind1/software/mathlib/netcdf-4.6.1/intel/include:$INCLUDE
export CPPFLAGS=-I/wind1/software/mathlib/netcdf-4.6.1/intel/include
export LDFLAGS=-L/wind1/software/mathlib/netcdf-4.6.1/intel/lib


source ~/.bash_profile
# User specific environment and startup programs
PATH=$PATH:$HOME/bin
export PATH=$HOME/app/git/bin:$PATH
export PATH=$HOME/app/apr/bin:$PATH
export PATH=$HOME/app/apr-util/bin:$PATH
# export PATH=/wind1/home/19fush/app/python/bin:$PATH
# export PATH=/wind1/home/19fush/software/autoconf-2.69-install/bin:$PATH
# export PATH=/wind1/home/19fush/app/sqlite/bin:$PATH
# export PATH=/wind1/home/19fush/app/subversion/bin:$PATH
export BLAS=$HOME/sources/BLAS-3.8.0/libfblas.a  # 导出BLAS环境变量
export LAPACK=$HOME/sources/BLAS-3.8.0/lapack-3.9.0/   # 导出LAPACK环境变量
export PATH=$HOME/app/mpich/bin:$PATH
# export scons=/wind1/home/19fush/sources/scons/scons.py
export PATH=$HOME/app/openssl/bin:$PATH
export PATH=$HOME/app/pcre/bin:$PATH

export PATH=$HOME/app/gcc10/bin:$PATH

# netcdf-c-4
export LD_LIBRARY_PATH=$HOME/app/zlib/lib:$LD_LIBRARY_PATH
export INCLUDE=$HOME/app/zlib/include:$INCLUDE
export CPPFLAGS=-I$HOME/app/zlib/include
export LDFLAGS=-L$HOME/app/zlib/lib

export LD_LIBRARY_PATH=$HOME/app/szip/lib:$LD_LIBRARY_PATH
export INCLUDE=$HOME/app/szip/include:$INCLUDE
export CPPFLAGS=-I$HOME/app/szip/include
export LDFLAGS=-L$HOME/app/szip/lib

export LD_LIBRARY_PATH=$HOME/app/hdf5/lib:$LD_LIBRARY_PATH
export INCLUDE=$HOME/app/hdf5/include:$INCLUDE
export PATH=$HOME/app/hdf5/bin:$PATH
export CPPFLAGS=-I$HOME/app/hdf5/include
export LDFLAGS=-L$HOME/app/hdf5/lib

export LD_LIBRARY_PATH=$HOME/app/curl/lib:$LD_LIBRARY_PATH
export INCLUDE=$HOME/app/curl/include:$INCLUDE
export PATH=$HOME/app/curl/bin:$PATH
export CPPFLAGS=-I$HOME/app/curl/include
export LDFLAGS=-L$HOME/app/curl/lib

rpm -q netcdf

本地移植
config_machines.xml
-
- PROXY: optional http proxy for access to the internet

- PROXY: optional http proxy for access to the internet
-
- PROJECT: a project or account number used for batch jobs; can be overridden in environment or in $HOME/.cime/config

- PROJECT: a project or account number used for batch jobs; can be overridden in environment or in $HOME/.cime/config
-
- 这几个是不是可提交作业有关系

perl5
1. local::lib
# 1 下载源码包,解压
wget https://cpan.metacpan.org/authors/id/H/HA/HAARG/local-lib-2.000024.tar.gz
tar -zxf local-lib-2.000024.tar.gz
cd local-lib-2.000024

# 2 引导安装
perl Makefile.PL --bootstrap
make test -j 48 && make install -j 48

# 3 设置环境变量
echo 'eval "$(perl -I$HOME/perl5/lib/perl5 -Mlocal::lib)"' >>~/.bash_profile
source ~/.bash_profile

# 3. 也可以一劳永逸,直接在.bash_profile写入以下内容
PATH="/wind1/home/xiaxsh3/perl5/bin${PATH:+:${PATH}}"; export PATH;
PERL5LIB="/wind1/home/xiaxsh3/perl5/lib/perl5${PERL5LIB:+:${PERL5LIB}}"; export PERL5LIB;
PERL_LOCAL_LIB_ROOT="/wind1/home/xiaxsh3/perl5${PERL_LOCAL_LIB_ROOT:+:${PERL_LOCAL_LIB_ROOT}}"; export PERL_LOCAL_LIB_ROOT;
PERL_MB_OPT="--install_base \"/wind1/home/xiaxsh3/perl5\""; export PERL_MB_OPT;
PERL_MM_OPT='INSTALL_BASE=/wind1/home/xiaxsh3/perl5'; export PERL_MM_OPT;


or 不会改
export PATH=/wind1/home/xiaxsh3/perl5/bin:${PATH}
export PERL5LIB=/wind1/home/xiaxsh3/perl5/lib/perl5:${PERL5LIB}
export PERL_LOCAL_LIB_ROOT=/wind1/home/xiaxsh3/perl5:${PERL_LOCAL_LIB_ROOT}
export PERL_MB_OPT="--install_base \"/wind1/home/xiaxsh3/perl5\"";
# 激活环境变量后,PERL_MB_OPT,PERL_MM_OPT,PERL5LIB,PATH,PERL_LOCAL_LIB_ROOT应当如下所示:
PERL_MB_OPT='--install_base /wind1/home/xiaxsh3/perl5'; export PERL_MB_OPT;
PERL_MM_OPT='INSTALL_BASE=/wind1/home/xiaxsh3/perl5'; export PERL_MM_OPT;
PERL5LIB="/wind1/home/xiaxsh3/perl5/lib/perl5"; export PERL5LIB;
PATH="/wind1/home/xiaxsh3/perl5/bin:$PATH"; export PATH;
PERL_LOCAL_LIB_ROOT="/wind1/home/xiaxsh3/perl5:$PERL_LOCAL_LIB_ROOT"; export PERL_LOCAL_LIB_ROOT;
执行代码,也会出现如下部分路径。
perl -Mlocal::lib


(base) [xiaxsh3@login local-lib-2.000024]$ perl -Mlocal::lib
PERL_MB_OPT="--install_base \"/wind1/home/xiaxsh3/perl5\""; export PERL_MB_OPT;
PERL_MM_OPT="INSTALL_BASE=/wind1/home/xiaxsh3/perl5"; export PERL_MM_OPT;

2. 安装cpam
wget https://cpan.metacpan.org/authors/id/M/MI/MIYAGAWA/App-cpanminus-1.7043.tar.gz
tar -zxf App-cpanminus-1.7043.tar.gz
cd App-cpanminus-1.7043
perl Makefile.PL
make test -j 48 && make install -j 48

# 使用国内镜像,提高下载速度
echo 'alias cpanm="cpanm --mirror http://mirrors.163.com/cpan --mirror-only"' >>~/.bash_profile
3. 使用cpanm安装模块
3.1 cpanm
# cpanm -h
  -v,--verbose              Turns on chatty output
  -q,--quiet                Turns off the most output
  --interactive             开启交互配置(required for Task:: modules)
  -f,--force                强制安装
  -n,--notest               Do not run unit tests
  --test-only               只测试不安装
  -S,--sudo                 sudo to run install commands
  --installdeps             只安装依赖模块
  --showdeps                只显示依赖信息
  --reinstall               重新安装
  --mirror                  指定镜像url (e.g. http://cpan.cpantesters.org/)
  --mirror-only             只从镜像下载
  --prompt                  Prompt when configure/build/test fails
  -l,--local-lib            Specify the install base to install modules
  -L,--local-lib-contained  Specify the install base to install all non-core modules
  --self-contained          Install all non-core modules, even if they're already installed.
  --auto-cleanup            Number of days that cpanm's work directories expire in. Defaults to 7


Examples:
  cpanm Test::More                                          # install Test::More
  cpanm MIYAGAWA/Plack-0.99_05.tar.gz                       # full distribution path
  cpanm http://example.org/LDS/CGI.pm-3.20.tar.gz           # install from URL
  cpanm ~/dists/MyCompany-Enterprise-1.00.tar.gz            # install from a local file
  cpanm --interactive Task::Kensho                          # Configure interactively
  cpanm .                                                   # install from local directory
  cpanm --installdeps .                                     # install all the deps for the current directory
  cpanm -L extlib Plack                                     # install Plack and all non-core deps into extlib
  cpanm --mirror http://cpan.cpantesters.org/ DBI           # use the fast-syncing mirror

# 使用镜像
cpanm --mirror http://mirrors.163.com/cpan --mirror-only MongoDB


# 删除模块
pm-uninstall MongoDB

# 重新安装
cpanm --reinstall XML::LibXML
perl -e "use XML::LibXML"
3.1 install XML::LibXML 失败
cpanm XML::LibXML
error:
Building and testing XML-LibXML-2.0206 ... FAIL
! Installing XML::LibXML failed. See /wind1/home/xiaxsh3/.cpanm/work/1601565316.806/build.log for details. Retry with --force to force install it.

3.2 cpanm YAML::Tidy 失败
3.2.1 error
! Installing the dependencies failed: Module 'YAML::LibYAML::API' is not installed, Module 'YAML::LibYAML::API::XS' is not installed
! Bailing out the installation for YAML-Tidy-0.002.
18 distributions installed
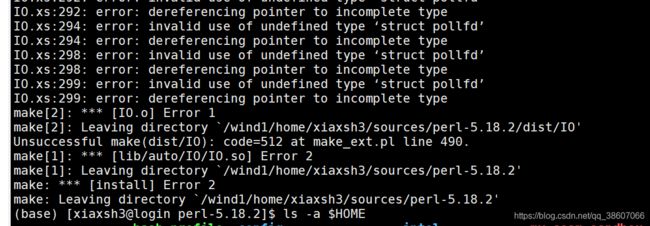
源码安装XML-LibXML 失败
perl Makefile.PL
make
make test
make install (if all tests are successful)
Warning (mostly harmless): No library found for -lxml2


make: *** [Av_CharPtrPtr.o] Error 127
make: *** Waiting for unfinished jobs....
/bin/sh: /tmp/build/80754af9/perl_1527832170752/_build_env/bin/x86_64-conda_cos6-linux-gnu-gcc: No such file or directory
make: *** [Devel.o] Error 127
/bin/sh: /tmp/build/80754af9/perl_1527832170752/_build_env/bin/x86_64-conda_cos6-linux-gnu-gcc: No such file or directory
make: *** [LibXML.o] Error 127
/bin/sh: /tmp/build/80754af9/perl_1527832170752/_build_env/bin/x86_64-conda_cos6-linux-gnu-gcc: No such file or directory
make: *** [dom.o] Error 127
cpanm LWP
==> Found dependencies: HTTP::Headers
! Installing the dependencies failed: Module 'HTTP::Headers' is not installed
! Bailing out the installation for HTTP-Negotiate-6.01.
! Installing the dependencies failed: Module 'HTTP::Request::Common' is not installed, Module 'HTML::Entities' is not installed, Module 'HTTP::Daemon' is not installed, Module 'HTTP::Cookies' is not installed, Module 'HTTP::Negotiate' is not installed, Module 'HTML::HeadParser' is not installed, Module 'HTTP::Response' is not installed, Module 'HTTP::Status' is not installed, Module 'HTTP::Request' is not installed
! Bailing out the installation for libwww-perl-6.49.
17 distributions installed
mkdir -p $HOME/perl_modules/bin
mkdir -p $HOME/perl_modules/man
mkdir -p $HOME/perl_modules/man/man1
mkdir -p $HOME/perl_modules/lib


(base) [xiaxsh3@login perl_modules]$ vim perl_local_config
PREFIX=$HOME/perl_modules \
INSTALLSCRIPT=$HOME/perl_modules/bin \
INSTALLBIN=$HOME/perl_modules/bin \
INSTALLMAN1DIR=$HOME/perl_modules/man1 \
INSTALLSITELIB=$HOME/perl_modules/lib

chmod 755 perl_local_config
./Configure -des -Dprefix=$HOME/app/perl5/5.18.2
./Configure -des -Dprefix=/usr/local/perl
./Configure -des -Dusethreads -Dprefix=/usr/local/perl
make -j 48
make test -j 48
make install -j 48
错误1:

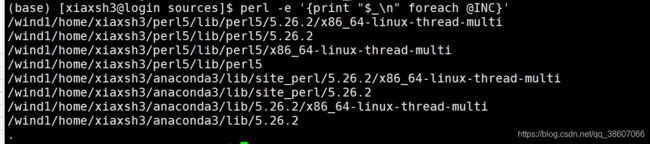
查看perl模块的安装目录
这里指的是查看那些被添加到了环境变量的perl模块安装目录,
理论上你可以在如何文件夹里面安装一个perl模块,
但是如果不添加到环境变量,意义不大,
因为大多数perl程序只会在环境变量里面搜索安装的perl模块,
其它地方的模块它们无法调用。
主要就是@INC这个默认变量 ,可以用下面的代码查看:
perl -e '{print "$_\n" foreach @INC}'
查看已经安装哪些perl模块
不管你有没有root权限,进入 cpan 然后install ExtUtils::Installed模块
这样就可以执行 instmodsh 这个命令了,可以查看当前环境下所有的模块!
为什么可以直接使用呢,因为模块安装的时候就顺便把instmodsh给你添加到了环境变量,你可以用 which instmodsh 查看它被安装到哪里了。
cpanm ExtUtils::Installed
which instmodsh
instmodsh
(base) [xiaxsh3@login sources]$ which instmodsh
~/anaconda3/bin/instmodsh
find / -name LibXML.pm
/wind1/home/xiaxsh3/sources/perl_modules/XML-LibXML-2.0206/LibXML.pm
/wind1/home/xiaxsh3/sources/perl_modules/XML-LibXML-2.0206/blib/lib/XML/LibXML.pm
/wind1/home/xiaxsh3/.cpan/build/XML-LibXML-2.0206-0/LibXML.pm
/wind1/home/xiaxsh3/.cpan/build/XML-LibXML-2.0206-0Xeqmv/LibXML.pm
/wind1/home/xiaxsh3/.cpan/build/XML-LibXML-2.0206-0Xeqmv/blib/lib/XML/LibXML.pm
/wind1/home/xiaxsh3/.cpan/build/XML-LibXML-2.0206-ehbIqE/LibXML.pm
/wind1/home/xiaxsh3/.cpanm/work/1601452444.7732/XML-LibXML-2.0206/LibXML.pm
/wind1/home/xiaxsh3/.cpanm/work/1601452444.7732/XML-LibXML-2.0206/blib/lib/XML/LibXML.pm
/wind1/home/xiaxsh3/.cpanm/work/1601565316.806/XML-LibXML-2.0206/LibXML.pm
/wind1/home/xiaxsh3/.cpanm/work/1601565316.806/XML-LibXML-2.0206/blib/lib/XML/LibXML.pm
/wind1/home/xiaxsh3/.cpanm/work/1601610119.15529/XML-LibXML-2.0206/LibXML.pm
/wind1/home/xiaxsh3/.cpanm/work/1601610119.15529/XML-LibXML-2.0206/blib/lib/XML/LibXML.pm
/wind1/home/xiaxsh3/.cpanm/work/1601614226.24623/XML-LibXML-2.0206/LibXML.pm
/wind1/home/xiaxsh3/.cpanm/work/1601614226.24623/XML-LibXML-2.0206/blib/lib/XML/LibXML.pm
/wind1/home/xiaxsh3/.cpanm/work/1601617402.31086/XML-LibXML-2.0206/LibXML.pm
/wind1/home/xiaxsh3/.cpanm/work/1601617402.31086/XML-LibXML-2.0206/blib/lib/XML/LibXML.pm
/wind1/home/xiaxsh3/.cpanm/work/1601624469.2399/XML-LibXML-2.0206/LibXML.pm
/wind1/home/xiaxsh3/.cpanm/work/1601624469.2399/XML-LibXML-2.0206/blib/lib/XML/LibXML.pm
/wind1/home/xiaxsh3/.cpanm/work/1601624995.3550/XML-LibXML-2.0206/LibXML.pm
/wind1/home/xiaxsh3/.cpanm/work/1601624995.3550/XML-LibXML-2.0206/blib/lib/XML/LibXML.pm
install libxml2
./configure --prefix=$HOME/app/libxml2/2.7.1
make -j 56
make check -j 56
make install -j 56

# libxml2  2.7.1   environmental setting
vim ~/.bash_profile
export LIBXML2=$HOME/app/libxml2/2.7.1
export PATH=$LIBXML2/bin:$PATH
export LD_LIBRARY_PATH=$LIBXML2/lib:$LD_LIBRARY_PATH
export INCLUDE=$LIBXML2/include:$INCLUDE

source ~/.bash_profile