个人java学习路线-SpringMVC
SpringMVC
- 一、SpringMVC
-
- 介绍
- 依赖
- 二、first SpringMVC
-
- 1. 先看看需要依赖
- 2.定义DispatcherServlet
- 3.创建Spring MVC配置文件(自定义的springmvc-servlet.xml)
- 4.创建Controller
- 5.创建View
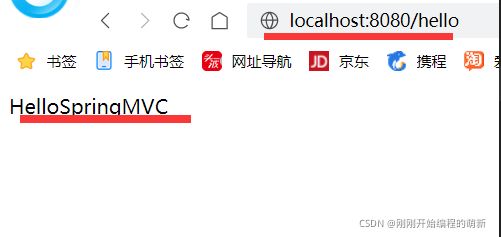
- 6.部署查看
- 三、controller注解
-
- controller类使用注解
- @Controller注解
- 四、控制器Controller
-
- Controller的配置方式:第一种方法
- Controller的配置方式:第二种方法
- 第二种方法扩展
- 五、RestFul风格
-
- 对比测试
- RestFul的请求方式method
- 六、跳转
-
- ServletAPI
- Servlet重定向
- 用SpringMVC来实现转发和重定向-无需视图解析器
- 七、处理提交数据
-
- 1.提交的域名称和处理方法的参数名一致
- 2.提交的域名称和处理方法的参数名不一致
- 3.提交的是一个对象
- 八、数据显示到前端
-
- 第一种:通过ModelAndView
- 第二种:通过ModelMap
- 第三种:通过Model
- 三者对比
- 九、乱码
-
- 实例
- 测试
- 解决方法1-自己写个过滤器
- 注意:\/*\,过滤所有页面包括jsp要用/*而不是/
- 解决方法2-用SpringMVC的乱码过滤器
- 万能解决方法
- 十、JSON
-
- Java生成json对象
- 乱码处理
- FastJson.jar
- 十一、springmvc拦截器
-
- 过滤器与拦截器的区别:拦截器是AOP思想的具体应用
- 拦截器简单介绍
- 十二、文件上传和下载
-
- 核心过程简介
- 完整实例
- 创建好了项目,网页打不开先看这!!
一、SpringMVC
介绍
-
回顾MVC
M:model 模型(dao,service)
V:view 视图(jsp)
C:controller 控制器(Servlet) -
MVVM
M:model 模型(dao,service)
V:view 视图(jsp)
VM:ViewModel :双向绑定(前后端分离的核心) -
Spring
我们可以将SpringMVC中所有要用到的bean,注册到Spring中! -
SpringMVC
- Spring MVC是Spring Framework的一部分,是基于Java实现MVC的轻量级Web框架
- Spring的web框架围绕DispatcherServlet设计,DispatcherServlet的作用是将请求分发到不同的处理器。
- Spring MVC框架像许多其他MVC框架一样,以请求为驱动,围绕一个中心Servlet分派请求及提供其他功能,DispatcherServlet是一个实际的Servlet(继承自HttpServlet)
- SpringMVC必须配置的三大件:
处理器映射器,处理器适配器,视图解析器
依赖
<dependency>
	<groupId>org.springframeworkgroupId>
		<artifactId>spring-webmvcartifactId>
	<version>5.3.9version>
dependency>
二、first SpringMVC
在使用springmvc后,我们在处理页面和后台交互时很多地方都可以简化了。
1. 先看看需要依赖
<dependencies>
        <dependency>
            <groupId>junitgroupId>
            <artifactId>junitartifactId>
            <version>4.12version>
        dependency>
        <dependency>
            <groupId>org.springframeworkgroupId>
            <artifactId>spring-webmvcartifactId>
            <version>5.3.9version>
        dependency>
        <dependency>
            <groupId>javax.servletgroupId>
            <artifactId>servlet-apiartifactId>
            <version>2.5version>
        dependency>
        <dependency>
            <groupId>javax.servlet.jspgroupId>
            <artifactId>jsp-apiartifactId>
            <version>2.2version>
        dependency>
        <dependency>
            <groupId>javax.servletgroupId>
            <artifactId>jstlartifactId>
            <version>1.2version>
        dependency>
    dependencies>
用idea一般都不要忘记加入输出配置
<build>
        <resources>
            <resource>
                <directory>src/main/resourcesdirectory>
                <includes>
                    <include>**/*.propertiesinclude>
                    <include>**/*.xmlinclude>
                includes>
            resource>
            <resource>
                <directory>src/main/javadirectory>
                <includes>
                    <include>**/*.propertiesinclude>
                    <include>**/*.xmlinclude>
                includes>
                <filtering>truefiltering>
            resource>
        resources>
    build>
2.定义DispatcherServlet
ps:springmvc-servlet.xml需要创建
<web-app xmlns="http://xmlns.jcp.org/xml/ns/javaee"
         xmlns:xsi="http://www.w3.org/2001/XMLSchema-instance"
         xsi:schemaLocation="http://xmlns.jcp.org/xml/ns/javaee http://xmlns.jcp.org/xml/ns/javaee/web-app_4_0.xsd"
         version="4.0">


    <servlet>
        <servlet-name>springmvcservlet-name>
        <servlet-class>org.springframework.web.servlet.DispatcherServletservlet-class>

        <init-param>
            <param-name>contextConfigLocationparam-name>
            <param-value>classpath:springmvc-servlet.xmlparam-value>
        init-param>

        <load-on-startup>1load-on-startup>
    servlet>


    <servlet-mapping>
        <servlet-name>springmvcservlet-name>
        <url-pattern>/url-pattern>
    servlet-mapping>

web-app>
3.创建Spring MVC配置文件(自定义的springmvc-servlet.xml)
<beans xmlns="http://www.springframework.org/schema/beans"
       xmlns:xsi="http://www.w3.org/2001/XMLSchema-instance"
       xsi:schemaLocation="http://www.springframework.org/schema/beans http://www.springframework.org/schema/beans/spring-beans.xsd">


    <bean class="org.springframework.web.servlet.handler.BeanNameUrlHandlerMapping" />

    <bean class="org.springframework.web.servlet.mvc.SimpleControllerHandlerAdapter" />

    <bean class="org.springframework.web.servlet.view.InternalResourceViewResolver" id="internalResourceViewResolver">

        <property name="prefix" value="/WEB-INF/jsp/" />

        <property name="suffix" value=".jsp" />
    bean>


beans>
4.创建Controller
在src的java下创建自己的包/com/person/controller,再创建文件FirstController
public class FirstController implements Controller {

    public ModelAndView handleRequest(HttpServletRequest httpServletRequest, HttpServletResponse httpServletResponse) throws Exception {
        //ModelAndView 模型和视图
        ModelAndView mv=new ModelAndView();

        //封装对象,放在ModelAndView中。Model、
        mv.addObject("msg","HelloSpringMVC");
        //封装要跳转的视图,放在ModelAndView中
        mv.setViewName("hello");//  : /WEB-INF/jsp/hello.jsp
        return mv;
    }
}
这时记得回到springmvc-servlet.xml加上配置
<bean id="/hello" class="com.person.controller.FirstController"/>
此时完整的springmvc-servlet.xml应该为(防遗忘)
<beans xmlns="http://www.springframework.org/schema/beans"
       xmlns:xsi="http://www.w3.org/2001/XMLSchema-instance"
       xsi:schemaLocation="http://www.springframework.org/schema/beans http://www.springframework.org/schema/beans/spring-beans.xsd">


    <bean class="org.springframework.web.servlet.handler.BeanNameUrlHandlerMapping" />

    <bean class="org.springframework.web.servlet.mvc.SimpleControllerHandlerAdapter" />

    <bean class="org.springframework.web.servlet.view.InternalResourceViewResolver" id="internalResourceViewResolver">

        <property name="prefix" value="/WEB-INF/jsp/" />

        <property name="suffix" value=".jsp" />
    bean>


    <bean id="/hello" class="com.person.controller.FirstController"/>
beans>
5.创建View
在“WEB-INF”下创建/jsp/hello.jsp
<%@ page contentType="text/html;charset=UTF-8" language="java" %>
<html>
<head>
    <title>Titletitle>
head>
<body>
${msg}
body>
html>
6.部署查看
三、controller注解
controller类使用注解
使用注解的情况下不需要
<bean id="/hello" class="com.person.controller.FirstController"/>
将controller包的类改为
@Controller
@RequestMapping("/hello")
public class HelloController v{
    @RequestMapping("/h1")
    public String hello(Model model){
        //  封装数据
        model.addAttribute("msg","AnnotationTest信息");
        return "hello";//会被视图解析器处理
    }
}
即可。
对应的springmvc-servlet.xml可以修改成
<beans xmlns="http://www.springframework.org/schema/beans"
       xmlns:xsi="http://www.w3.org/2001/XMLSchema-instance"
       xmlns:context="http://www.springframework.org/schema/context"
       xmlns:mvc="http://www.springframework.org/schema/mvc"
       xsi:schemaLocation="http://www.springframework.org/schema/beans
                           http://www.springframework.org/schema/beans/spring-beans.xsd
                           http://www.springframework.org/schema/context
                           http://www.springframework.org/schema/context/spring-context.xsd
                           http://www.springframework.org/schema/mvc
                           http://www.springframework.org/schema/mvc/spring-mvc.xsd">


    <context:component-scan base-package="com.person.controller" />

    <mvc:default-servlet-handler />

    <mvc:annotation-driven />


    <bean class="org.springframework.web.servlet.view.InternalResourceViewResolver" id="internalResourceViewResolver">
        <property name="prefix" value="/WEB-INF/jsp/" />
        <property name="suffix" value=".jsp" />
    bean>

beans>
网页访问hello方法
URL为:http://localhost:3306/项目地址/hello/h1
@Controller注解
-
@Controller注解类型用于声明Spring类的实例是一个控制器(在IOC时还学了另外三个注解:@Component,@Service,@Repository)
  @Component      组件
  @Service        service
  @Controller     controller
  @Repository     dao
四、控制器Controller
- 控制器复杂提供访问应用程序的行为,通常通过接口定义或注解定义两种方法实现
- 控制器负责解析用户的请求并将其转化为一个模型
- 在Spring MVC中的一个控制器类可以包含多个方法
- 在Spring MVC中,对于Controller的配置方式有很多种
Controller的配置方式:第一种方法
不需要配置自动扫描包,不处理映射文件,mvc注解驱动(处理器映射器,处理器适配器):
- 完整代码如下:
web.xml:
    <servlet>
        <servlet-name>SpringMVCservlet-name>
        <servlet-class>org.springframework.web.servlet.DispatcherServletservlet-class>
        <init-param>
            <param-name>contextConfigLocationparam-name>
            <param-value>classpath:spring-servlet.xmlparam-value>
        init-param>
        <load-on-startup>1load-on-startup>
    servlet>
    <servlet-mapping>
        <servlet-name>SpringMVCservlet-name>
        <url-pattern>/url-pattern>
    servlet-mapping>
spring-servlet.xml——springmvc配置文件
<beans xmlns="http://www.springframework.org/schema/beans"
       xmlns:xsi="http://www.w3.org/2001/XMLSchema-instance"
       xsi:schemaLocation="http://www.springframework.org/schema/beans
                           http://www.springframework.org/schema/beans/spring-beans.xsd">


    <bean class="org.springframework.web.servlet.view.InternalResourceViewResolver" id="internalResourceViewResolver">
        <property name="prefix" value="/WEB-INF/jsp/" />
        <property name="suffix" value=".jsp" />
    bean>

    <bean name="/t1" class="com.person.controller.ControllerTest1"/>

beans>
Controller类:
//只要实现类Controller接口的类,说明这就是一个控制器
public class ControllerTest1 implements Controller {
    public ModelAndView handleRequest(HttpServletRequest httpServletRequest, HttpServletResponse httpServletResponse) throws Exception {
        ModelAndView mv = new ModelAndView();
         mv.addObject("msg","ControllerTest1");
         mv.setViewName("test");
        return mv;
    }
}
View:
<%@ page contentType="text/html;charset=UTF-8" language="java" %>
<html>
<head>
    <title>Titletitle>
head>
<body>
${msg}
body>
html>
部署后网页搜索:前缀/t1(见spring-servlet.xml的bean)
Controller的配置方式:第二种方法
在类上使用@Controller注解
@Controller//代表这个类会被Spring接管,被这个注解的类中的所有方法,如果返回值为String,并且有具体的类可以跳转,那么就会被视图解析器解析
public class ControllerTest2 {
    @RequestMapping("/t2")
    public String test1(Model model){
        model.addAttribute("msg","ControllerTest2");
        return "test";//这里表示会去找/WEB-INF/jsp/test.jsp文件
    }

    @RequestMapping("/t3")
    public String test2(Model model){
        model.addAttribute("msg","test3");
        return "test";//这里表示会去找/WEB-INF/jsp/test.jsp文件
    }
}
然后只需在spring-servlet.xml加上扫描包即可
<beans xmlns="http://www.springframework.org/schema/beans"
       xmlns:xsi="http://www.w3.org/2001/XMLSchema-instance"
       xmlns:context="http://www.springframework.org/schema/context"
       xsi:schemaLocation="http://www.springframework.org/schema/beans
                           http://www.springframework.org/schema/beans/spring-beans.xsd
                           http://www.springframework.org/schema/context
                           http://www.springframework.org/schema/context/spring-context.xsd">


    <context:component-scan base-package="com.person.controller" />


    <bean class="org.springframework.web.servlet.view.InternalResourceViewResolver" id="internalResourceViewResolver">
        <property name="prefix" value="/WEB-INF/jsp/" />
        <property name="suffix" value=".jsp" />
    bean>

beans>
部署后网页搜索:
http://localhost:3306/项目地址/t2
http://localhost:3306/项目地址/t3
可见多个请求可以指向同一个视图,但是页面输出的结果是不一样的,从这里可以看出视图是被复用的,而控制器与视图之间是弱耦合关系
第二种方法扩展
使用第二种方法可见ControllerTest2中可以写多个方法
并且也可以对url进一步操作
@Controller
@RequestMapping("/c3")
public class ControllerTest3 {
    @RequestMapping("/t1")
    public String test3(Model model){
        model.addAttribute("msg","测试三");
        return "test";
    }
}
此时重新部署后在网页搜索:
http://localhost:3306/项目地址/c3/t1
五、RestFul风格
概念:
Restful就是一个资源定位及资源操作的风格,不是标准/协议,只是一种风格
例如:
原来URL:http://localhost:3306?item=xxx&id=sss
使用该风格后:http://localhost:3306/item/xxx/id/sss
传统方式操作资源:通过不同的参数来实现不同的效果!方法单一,post和get
RESTFul操作资源:可以通过不同的请求方式来实现不同的效果!(请求地址一样,但是功能可以不同)(GET POST PUT DELETE)
对比测试
1.之前
@Controller
public class RestFulController {
    @RequestMapping("/add")
    public String test(int a,int b,Model model){
        model.addAttribute("msg","结果为"+(a+b));
        return "test";
    }
}
网页输入:http://localhost:9527/add?a=1&b=2
输出结果为3
2.现在RestFul
在Spring中使用@PathVariable注解,让方法参数的值对应绑定到一个URL模板变量上
@Controller
public class RestFulController {
    @RequestMapping("/add/{a}/{b}")
    public String test(@PathVariable int a,@PathVariable int b, Model model){
        model.addAttribute("msg","结果为"+(a+b));
        return "test";
    }
}
URL:http://localhost:9527/add/1/2
输出结果为3
RestFul的请求方式method
RestFul风格下如果前端网页表单提交方式和后端不符,会出异常
@RequestMapping(value = "/add/{a}/{b}",method = RequestMethod.DELETE)
ps:这里value可以换成path(不能用name,name是mapping的名字,value和path互为别名)
也可以用请求方式对应的标签:
@RequestMapping(value = "/add/{a}/{b}",method = RequestMethod.GET)
@RequestMapping(value = "/add/{a}/{b}",method = RequestMethod.DELETE)
@DeleteMapping("/add/{a}/{b}")
@GetMapping("/add/{a}/{b}")
@Controller
public class RestFulController {
//    @RequestMapping(value = "/add/{a}/{b}",method = RequestMethod.GET)
//    @RequestMapping(value = "/add/{a}/{b}",method = RequestMethod.DELETE)
//    @GetMapping("/add/{a}/{b}")
//    @DeleteMapping("/add/{a}/{b}")
    @PostMapping("/add/{a}/{b}")
    public String test(@PathVariable int a,@PathVariable int b, Model model){
        model.addAttribute("msg","POST方法请求结果为"+(a+b));
        return "test";
    }

    @GetMapping("/add/{a}/{b}")
    public String test2(@PathVariable int a,@PathVariable int b, Model model){
        model.addAttribute("msg","GET方法返回结果为"+(a+b));
        return "test";
    }
}
六、跳转
设置ModelAndView对象后
页面:{视图解析器前缀} + viewName + {视图解析器后缀}
ServletAPI
通过设置ServletAPI,我们就不需要视图解析器了
- 1.通过HttpServletResponse进行输出
- 2.通过HttpServletResponse实现重定向
- 3.通过HttpServletResponse实现转发
Servlet重定向
用上面的‘四、控制器Controller’第二种方式模板
@Controller
public class ModelTest1 {
    @RequestMapping("/m1/t1")
    public String test(HttpServletRequest request, HttpServletResponse response){
        HttpSession session = request.getSession();
        System.out.println(session.getId());
        return "test";
    }
}
可以用HttpServlet中的跳转重定向(需要视图解析器)
用SpringMVC来实现转发和重定向-无需视图解析器
在spring-servlet.xml中去掉视图解析器
<beans xmlns="http://www.springframework.org/schema/beans"
       xmlns:xsi="http://www.w3.org/2001/XMLSchema-instance"
       xmlns:context="http://www.springframework.org/schema/context"
       xsi:schemaLocation="http://www.springframework.org/schema/beans
                           http://www.springframework.org/schema/beans/spring-beans.xsd
                           http://www.springframework.org/schema/context
                           http://www.springframework.org/schema/context/spring-context.xsd">


    <context:component-scan base-package="com.person.controller" />
beans>
测试实例:
@Controller
public class ModelTest1 {

    @RequestMapping("/m1/t1")
    public String test(HttpServletRequest request, HttpServletResponse response){

        HttpSession session = request.getSession();
        System.out.println(session.getId());

        return "test";
    }

    @RequestMapping("/m2/t1")
    public String test1(){
        //跳转
        return "/jumpTest.jsp";
    }

    @RequestMapping("/m2/t2")
    public String test2(){
        //跳转
        return "forward:/WEB-INF/jsp/test.jsp";
    }

    @RequestMapping("/m2/t3")
    public String test3(){
        //重定向
        return "redirect:/WEB-INF/jsp/test.jsp";
    }
}
七、处理提交数据
1.提交的域名称和处理方法的参数名一致
提交数据:http://localhost:9527/t1?name=lisi
public class ModelTest1 {
    @RequestMapping("/t1")
    public String test1(String name, Model model){
        //1.接受前端参数
        System.out.println("接收到前端的参数为:"+name);
        //2.将返回的结果传递给前端
        model.addAttribute("msg",name);
        return "test";
    }
}
后台输出:lisi
2.提交的域名称和处理方法的参数名不一致
使用@RequestParam(“username”)注解标注方法参数
提交数据:http://localhost:9527/t2?username=lisi
@Controller
public class ModelTest1 {
    @RequestMapping("/t2")
    public String test2(@RequestParam("username") String name, Model model){
        //1.接受前端参数
        System.out.println("接收到前端的参数为:"+name);
        //2.将返回的结果传递给前端
        model.addAttribute("msg",name);
        return "test";
    }
}
后台输出:lisi
3.提交的是一个对象
提交数据:http://localhost:9527/t3?id=1&name=lisi&age=18
@Controller
public class ModelTest1 {
    //前端接收的是一个对象
    /*
     1.接受前端用户传递的参数,判断参数的名字,假设名字直接在方法上,可以直接使用
     2.假设传递的是一个对象User,匹配User对象中的字段名,如果名字一致则OK,否则,匹配不到
     */
    @RequestMapping("/t3")
    public String test3(User user){
        System.out.println(user);
        return "test";
    }
}
后台输出:User(id=1, name=lisi, age=18)
如果前端提交的参数名和类的属性名不匹配
前端:http://localhost:9527/t3?id=1&username=lisi&age=18
后端输出:User(id=1, name=null, age=18)
八、数据显示到前端
第一种:通过ModelAndView
一开始的方法
public class HelloController implements Controller {
    public ModelAndView handleRequest(HttpServletRequest httpServletRequest, HttpServletResponse httpServletResponse) throws Exception {
        ModelAndView mv = new ModelAndView();
        mv.addObject("msg","SecondHello");
        mv.setViewName("testJsp");
        return mv;
    }
}
第二种:通过ModelMap
继承了LinkedMap,Model是ModelMap的精简版,主要使用Model,ModelMap目前使用和Model无区别
第三种:通过Model
上面的第二种方式的例子:
@Controller
public class ModelTest1 {
    @RequestMapping("/t2")
    public String test2(@RequestParam("username") String name, Model model){
        //1.接受前端参数
        System.out.println("接收到前端的参数为:"+name);
        //2.将返回的结果传递给前端
        model.addAttribute("msg",name);
        return "test";
    }
}
三者对比
Model 只有寥寥几个方法适合用于储存数据,简化了新手对于Model对象的操作和理解
ModelMap 继承了LinkedMap,除了实现自身的一些方法,同样的继承LinkedMap的方法和特性
ModelAndView可以在储存数据的同时,可以进行设置返回的逻辑视图,进行控制展示层的跳转
九、乱码
实例
web.xml
<web-app xmlns="http://xmlns.jcp.org/xml/ns/javaee"
         xmlns:xsi="http://www.w3.org/2001/XMLSchema-instance"
         xsi:schemaLocation="http://xmlns.jcp.org/xml/ns/javaee http://xmlns.jcp.org/xml/ns/javaee/web-app_4_0.xsd"
         version="4.0">

    <servlet>
        <servlet-name>SpringMVCservlet-name>
        <servlet-class>org.springframework.web.servlet.DispatcherServletservlet-class>
        <init-param>
            <param-name>contextConfigLocationparam-name>
            <param-value>classpath:spring-servlet.xmlparam-value>
        init-param>
        <load-on-startup>1load-on-startup>
    servlet>
    <servlet-mapping>
        <servlet-name>SpringMVCservlet-name>
        <url-pattern>/url-pattern>
    servlet-mapping>

web-app>
spring-servlet.xml
<beans xmlns="http://www.springframework.org/schema/beans"
       xmlns:xsi="http://www.w3.org/2001/XMLSchema-instance"
       xmlns:context="http://www.springframework.org/schema/context"
       xsi:schemaLocation="http://www.springframework.org/schema/beans
                           http://www.springframework.org/schema/beans/spring-beans.xsd
                           http://www.springframework.org/schema/context
                           http://www.springframework.org/schema/context/spring-context.xsd">


    <context:component-scan base-package="com.person.controller" />


    <bean class="org.springframework.web.servlet.view.InternalResourceViewResolver" id="internalResourceViewResolver">
        <property name="prefix" value="/WEB-INF/jsp/" />
        <property name="suffix" value=".jsp" />
    bean>
beans>
controller:
@Controller
public class ModelTest1 {

    @PostMapping("/t1")
    public String test1(String name, Model model){
        System.out.println(name);
        model.addAttribute("msg",name);
        return "test";
    }
}
前端页面(和index.jsp同级)
<%@ page contentType="text/html;charset=UTF-8" language="java" %>
<html>
<head>
    <title>Titletitle>
head>
<body>
<form action="/t1" method="post">
    <input type="text" name="name">
    <input type="submit" value="提交按钮">
form>
body>
html>
前端页面test.jsp(在/WEB-INF/jsp/下)
<%@ page contentType="text/html;charset=UTF-8" language="java" %>
<html>
<head>
    <title>Title</title>
</head>
<body>
${msg}
</body>
</html>
测试
测试说明
在jsp页面表单输入”无敌“
提交给Controller后
控制台输出:???
回显到网页页面”æ— æ•Œ“
可见在java获得页面提交数据时就已经乱码了
解决方法1-自己写个过滤器
在com.person.filter包下创建EncodingFilter类
public class EncodingFilter implements Filter {
    public void init(FilterConfig filterConfig) throws ServletException {

    }

    public void doFilter(ServletRequest request, ServletResponse response, FilterChain chain) throws IOException, ServletException {
        request.setCharacterEncoding("utf-8");
        request.setCharacterEncoding("utf-8");
        chain.doFilter(request,response);
    }

    public void destroy() {

    }
}
再去web.xml配置过滤器
    <filter>
        <filter-name>encodingfilter-name>
        <filter-class>com.person.filter.EncodingFilterfilter-class>
    filter>
    <filter-mapping>
        <filter-name>encodingfilter-name>
        <url-pattern>/*url-pattern>
    filter-mapping>
再次测试无误
注意:/* ,过滤所有页面包括jsp要用/*而不是/
解决方法2-用SpringMVC的乱码过滤器
直接配置就行
<filter>
    <filter-name>encodingfilter-name>
    <filter-class>org.springframework.web.filter.CharacterEncodingFilterfilter-class>
    <init-param>
        <param-name>encodingparam-name>
        <param-value>utf-8param-value>
    init-param>
filter>
<filter-mapping>
    <filter-name>encodingfilter-name>
    <url-pattern>/*url-pattern>
filter-mapping>
万能解决方法
解决网页传送数据给java乱码的万能解决方法:
因为网页传送数据是ISO-8859-1,把这个转化成中文就行
byte[] bytes=name.getBytes("ISO-8859-1");
name=new String(bytes,"UTF-8");
十、JSON
- 现在是前后端分离时代
后端部署后端,提供接口,提供数据:
前端独立部署,负责渲染后端的数据:
前后端传送数据最常用JSON数据格式
Java生成json对象
Maven导入JSON处理器jar包
<dependency>
    <groupId>com.fasterxml.jackson.coregroupId>
    <artifactId>jackson-databindartifactId>
    <version>2.11.0version>
dependency>
用jar包处理
public class A{
 @RequestMapping(value = "/j1",produces = "application/json;charset=utf-8")
    @ResponseBody//标注该注解就不会走视图解析器,会直接返回一个字符串
    public String json1(){

        //jackson. ObjectMapper
        ObjectMapper mapper=new ObjectMapper();

        //创建对象
        User user=new User(1,"王二",18);
        String str=null;
        try {
            str=mapper.writeValueAsString(user);
        } catch (JsonProcessingException e) {
            e.printStackTrace();
        }
        return str;
    }
}
@RestController用在类上,标注该注解就不会走视图解析器,会直接返回一个字符串,替代@Controlle
@ResponseBody用在方法上,标注该注解就不会走视图解析器,会直接返回一个字符串,配合@Controlle使用
produces用来处理乱码问题
乱码处理
可以通过spring配置统一指定编码
在springmvc中加上一段消息StringHttpMessageConverter转换配置
<mvc:annotation-driven>
    <mvc:message-converters register-defaults="true">
        <bean class="org.springframework.http.converter.StringHttpMessageConverter">
            <constructor-arg value="UTF-8"/>
        bean>
        <bean class="org.springframework.http.converter.json.MappingJackson2HttpMessageConverter">
            <property name="objectMapper">
                <bean class="org.springframework.http.converter.json.Jackson2ObjectMapperFactoryBean">
                    <property name="failOnEmptyBeans" value="false"/>
                bean>
            property>
        bean>
    mvc:message-converters>
mvc:annotation-driven>
FastJson.jar
fastjson.jar是阿里开发的一款用于Java开发的包,可以方便的实现json对象与JavaBean对象的转化,
实现JavaBean对象和json字符串的转化,实现json对象和json字符串的转化。
fastjson三个主要的类:
- JSONObject代表json对象
- JSONArray代表json对象数组
- JSON代表JSONObject和JSONArray的转化
导包
<dependency>
    <groupId>com.alibabagroupId>
    <artifactId>fastjsonartifactId>
    <version>1.2.75version>
dependency>
十一、springmvc拦截器
过滤器与拦截器的区别:拦截器是AOP思想的具体应用
过滤器:
- servlet规范中的一部分,任何java web工程都可以使用
- 在url-pattern中配置了/*之后,可以对所有要访问的资源进行拦截
拦截器:
- 拦截器是SpringMVC框架自己的,只有使用了SpringMVC框架的工程才能使用
- 拦截器只会拦截访问的控制器方法,如果访问的是jsp/html/css/image/js是不会进行拦截的
拦截器简单介绍
我们可以实现HandlerInterceptor接口来写自己的拦截器
public class MyInterceptor implements HandlerInterceptor {
    //return true;执行下一个拦截器,放行
    //return false;不执行下一个拦截器
    public boolean preHandle(HttpServletRequest request, HttpServletResponse response, Object handler) throws Exception {
        System.out.println("=======处理前======");
        return true;
    }

    //后面两个类似于日志
    public void postHandle(HttpServletRequest request, HttpServletResponse response, Object handler, ModelAndView modelAndView) throws Exception {
        //System.out.println("========处理后======");
    }

    public void afterCompletion(HttpServletRequest request, HttpServletResponse response, Object handler, Exception ex) throws Exception {
        //System.out.println("======清理======");
    }
}
然后在applicationContext.xml中配置拦截器即可
<mvc:interceptors>
    <mvc:interceptor>

        <mvc:mapping path="/**"/>
        <bean class="com.person.config.MyInterceptor"/>
    mvc:interceptor>
mvc:interceptors>
十二、文件上传和下载
核心过程简介
1.配置jar
<dependencies>

    <dependency>
        <groupId>commons-fileuploadgroupId>
        <artifactId>commons-fileuploadartifactId>
        <version>1.3.3version>
    dependency>

    <dependency>
        <groupId>javax.servletgroupId>
        <artifactId>javax.servlet-apiartifactId>
        <version>4.0.1version>
    dependency>
dependencies>
2.前端html
<form action="${pageContext.request.contextPath}/upload" enctype="multipart/form-data" method="post">
  <input type="file" name="file"/>
  <input type="submit" value="upload"/>
form>
3.applicationContext.xml配置
<bean id="multipartResolver" class="org.springframework.web.multipart.commons.CommonsMultipartResolver">

    <property name="defaultEncoding" value="utf-8"/>

    <property name="maxUploadSize" value="10485760"/>
    <property name="maxInMemorySize" value="40960"/>
bean>
4写fileController.java
完整实例
pom.xml导入依赖
    <dependencies>

        <dependency>
            <groupId>commons-fileuploadgroupId>
            <artifactId>commons-fileuploadartifactId>
            <version>1.3.3version>
        dependency>

        <dependency>
            <groupId>javax.servletgroupId>
            <artifactId>javax.servlet-apiartifactId>
            <version>4.0.1version>
        dependency>
    dependencies>
web.xml
    <servlet>
        <servlet-name>springmvcservlet-name>
        <servlet-class>org.springframework.web.servlet.DispatcherServletservlet-class>
        <init-param>
            <param-name>contextConfigLocationparam-name>
            <param-value>classpath:applicationContext.xmlparam-value>
        init-param>
        <load-on-startup>1load-on-startup>
    servlet>
    <servlet-mapping>
        <servlet-name>springmvcservlet-name>
        <url-pattern>/url-pattern>
    servlet-mapping>

    <filter>
        <filter-name>encodingfilter-name>
        <filter-class>org.springframework.web.filter.CharacterEncodingFilterfilter-class>
        <init-param>
            <param-name>encodingparam-name>
            <param-value>utf-8param-value>
        init-param>
    filter>
    <filter-mapping>
        <filter-name>encodingfilter-name>
        <url-pattern>/*url-pattern>
    filter-mapping>
applicationContext.xml
<beans xmlns="http://www.springframework.org/schema/beans"
       xmlns:xsi="http://www.w3.org/2001/XMLSchema-instance"
       xmlns:context="http://www.springframework.org/schema/context"
       xmlns:mvc="http://www.springframework.org/schema/mvc"
       xsi:schemaLocation="http://www.springframework.org/schema/beans
                           http://www.springframework.org/schema/beans/spring-beans.xsd
                           http://www.springframework.org/schema/context
                           https://www.springframework.org/schema/context/spring-context.xsd
                           http://www.springframework.org/schema/mvc
                           http://www.springframework.org/schema/mvc/spring-mvc.xsd">

    <context:component-scan base-package="com.person.controller"/>
    <mvc:default-servlet-handler />
    <mvc:annotation-driven/>


    <mvc:annotation-driven>
        <mvc:message-converters register-defaults="true">
            <bean class="org.springframework.http.converter.StringHttpMessageConverter">
                <constructor-arg value="UTF-8"/>
            bean>
            <bean class="org.springframework.http.converter.json.MappingJackson2HttpMessageConverter">
                <property name="objectMapper">
                    <bean class="org.springframework.http.converter.json.Jackson2ObjectMapperFactoryBean">
                        <property name="failOnEmptyBeans" value="false"/>
                    bean>
                property>
            bean>
        mvc:message-converters>
    mvc:annotation-driven>

    <bean class="org.springframework.web.servlet.view.InternalResourceViewResolver"
          id="internalResourceViewResolver">
        <property name="prefix" value="/WEB-INF/jsp/"/>
        <property name="suffix" value=".jsp"/>
    bean>


    <bean id="multipartResolver" class="org.springframework.web.multipart.commons.CommonsMultipartResolver">

        <property name="defaultEncoding" value="utf-8"/>

        <property name="maxUploadSize" value="10485760"/>
        <property name="maxInMemorySize" value="40960"/>
    bean>
beans>
在java.com.person.controller包下创建FileController类
@RestController
public class FileController {

//  @RequestParam("file")将name=file控件得到的文件封装成CommonsMultipartFile对象
//  批量上传CommonsMultipartFile则为数组即可
    @RequestMapping("/upload")
    public String fileUpload(@RequestParam("file") CommonsMultipartFile file, HttpServletRequest request) throws IOException {
        //获取文件名:file.getOriginalFilename();
        String uploadFileName=file.getOriginalFilename();

        //如果文件名为空,则返回首页
        if("".equals(uploadFileName)){
            return "redirect:/index.jsp";
        }
        System.out.println("上传文件名:"+uploadFileName);

        //上传路径保存设置
        String path=request.getServletContext().getRealPath("/upload");
        //如果路径不存在,创建一个
        File realPath=new File(path);
        if(!realPath.exists()){
            realPath.mkdir();
        }
        System.out.println("上传文件保存地址:"+realPath);

        InputStream is=file.getInputStream();//文件输入流
        OutputStream os=new FileOutputStream(new File(realPath,uploadFileName));//文件输出流

        //读取写出
        int len=0;
        byte[] buffer=new byte[1024];
        while ((len=is.read(buffer))!=-1){
            os.write(buffer,0,len);
            os.flush();
        }
        os.close();
        is.close();
        return "redirect:/index.jsp";
   }

   /*
        采用file.Transto来保存上传的文件
    */
   @RequestMapping("/upload2")
   public String fileUpload2(@RequestParam("file") CommonsMultipartFile file, HttpServletRequest request) throws IOException {
       //上传路径保存配置
       String path=request.getServletContext().getRealPath("/upload");
       File realPath=new File(path);
       if(!realPath.exists()){
           realPath.mkdir();
       }

       //上传文件地址
       System.out.println("上传文件保存地址:"+realPath);

       //通过CommonsMultipartFile的方法直接写文件(注意这个时候)
       file.transferTo(new File(realPath+"/"+file.getOriginalFilename()));

       return "redirect:/index.jsp";
   }


    @RequestMapping("/download")
    public String downloads(HttpServletResponse response,HttpServletRequest request) throws IOException {
       //要下载的图片地址
        String path=request.getServletContext().getRealPath("/upload");
        String fileName="1.png";

        //1.设置response 响应头
        response.reset();//设置页面不缓存,清空buffer
        request.setCharacterEncoding("UTF-8");//字符编码
        response.setContentType("multipart/form-data");//二进制传输数据
        //设置响应头
        response.setHeader("Content-Disposition","attachment;fileName="+ URLEncoder.encode(fileName,"UTF-8"));
        File file=new File(path,fileName);
        //2.读取文件--输入流
        InputStream input=new FileInputStream(file);
        //3.写出文件--输入流
        OutputStream out=response.getOutputStream();

        byte[] buffer=new byte[1024];
        int index=0;
        while ((index=input.read(buffer))!=-1){
            out.write(buffer,0,index);
            out.flush();
        }
        out.close();
        input.close();
        return null;
    }
}
index.jsp
<%@ page contentType="text/html;charset=UTF-8" language="java" %>
<html>
  <head>
    <title>$Title$title>
  head>
  <body>
<form action="${pageContext.request.contextPath}/upload" enctype="multipart/form-data" method="post">
  <input type="file" name="file"/>
  <input type="submit" value="upload"/>
form>
  body>
html>
这里提一下测试
此代码部署后,首页上传文件可以在out输出中看见
下载也必须是out/upload/1.png文件才可以使用/download下载

创建好了项目,网页打不开先看这!!
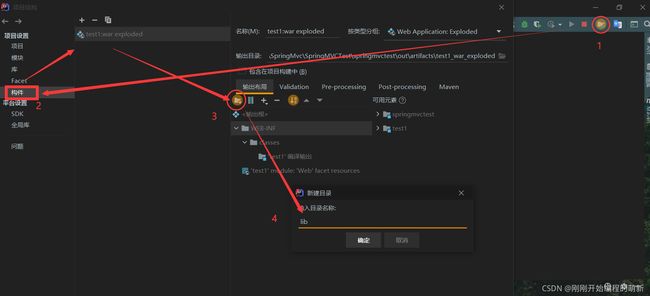
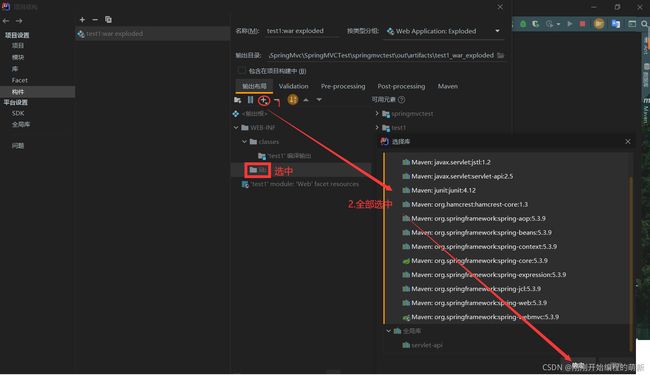
idea需要手动创建lib包(依赖)


应用就行,需要注意的是:
之后每次加入新的依赖必须重复操作以上步骤,否则依赖不会生效
