tensorflow 2.0+ 基于预训练BERT模型 的文本分类
简介
基于transformers的语言模型在许多不同的自然语言处理(NLP)基准任务测试上都取得了很大进展。迁移学习与大规模的transformers语言模型训练的结合正在成为现代NLP的一个标准。在这篇文章,我们对transformers体系结构和文本分类问题做一些必要的理论介绍。然后,我们将演示预训练BERT模型在文本分类任务的微调过程,这里运用的是TensorFlow 2.0+的 Keras API。
文本分类–问题及公式
一般来说, 分类是确定新样本的类别问题。我们有数据集D,在文档中包含文本序列,如
这里 Xi 是每一段文本 而N 是文本的个数。
实现分类的算法称为分类器。文本分类可以根据目标性质分为不同的任务:
-
多分类问题(multi-class classification)
-
多标签问题(multi-label classification)
多分类也称为单标签问题,例如,我们为每个样本分配一个标签。名称中的"多"表示我们处理至少 3 个类,对于 2 个类,我们可以使用术语二进制分类(binary classification)。另一方面,多标签任务更为一般,允许我们为每个样本分配多个标签,而不仅仅是一样本一标签。
为什么选择transformers?
在这篇文章中,我们不会详细讨论transformers架构。然而了解 NLP 中的一些难点还是很有用的。NLP 中有两个相辅相成的重要概念:
- word embeddings
- language model
transformers用于构建语言模型,而embeddings 是可以用于预训练的附属品。
基于 RNNs/LSTMs 的方法
大多数较旧的语言建模方法都基于 RNN(recurrent neural network)。简单的 RNN 存在梯度消失/梯度爆炸问题,所以无法对较长的上下文依赖关系进行建模。它们大多数被所谓的长短期记忆网络模型(LSTMs) 所取代, 该神经网络也是 RNN 的一个变种形式,但可以捕获文档中较长的上下文。然而,LSTM 只能单向处理序列,因此基于 LSTM 的最先进方法演变为双向 LSTM,此结构可以从左到右以及从右到左读取上下文。基于LSTM有非常成功的模型,如ELMO或 ULMFIT,这些模型仍然适用于现在的NLP任务。
基于transformers架构的方法
双向 LSTM 的主要限制之一是其顺序性,这使得并行训练非常困难, transformer 架构通过注意力机制(Vashvani et al. 2017) 完全取代LSTM来解决这一个问题。在注意力机制中,我们把整个序列看作一个整体, 因此并行训练要容易得多。我们可以对整个文档上下文进行建模,并使用大型数据集以无人监督学习的方式进行预训练,并微调下游任务。
最先进的transformers模型
有很多基于transformers的语言模型。最成功的是以下这些(截至2020年4月)
- Transformer (Google Brain/Research)
- BERT (Google Research)
- GPT-2 (OpenAI)
- XLNet (Google Brain)
- CTRL (SalesForce)
- Megatron (NVidia)
- Turing-NLG (Microsoft)
这些模型之间略有差异,而BERT一直被认为是许多 NLP 任务中最先进的模型。但现在看来,它已被同样来自谷歌的 XLNet 所超越。XLNet 利用置换语言建模,该模型对句子中所有可能的单词排列进行自动回归模型。我们将在本文中使用基于 BERT 的语言模型。
BERT
BERT (Bidirectional Encoder Representations from Transformers) (Devlint et al., 2018) 是一种预训练语言表示的方法。我们不会讨论太多细节,但与原始transformers (Vaswani et al., 2017) 的主要区别是, BERT没有解码器, 但在基本版本中堆叠了12个编码器,而且在更大的预训练模型中会增加编码器的数量。这种架构不同于 OpenAI 的 GPT-2,它是适合自然语言生成 (NLG) 的自回归语言模型。
Tokenizer
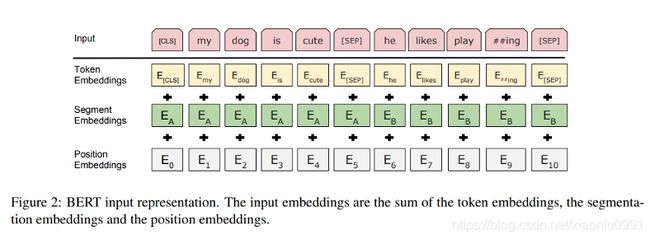
官方 BERT 语言模型是使用切片词汇预训练与使用, 不仅token 嵌入, 而且有区分成对序列的段嵌入, 例如问答系统。由于注意力机制在上下文评估中不考虑位置,因此需要把位置信息嵌入才能将位置感知注入 BERT 模型。
需要注意的是,BERT限制序列的最大长度为 512 个token。对于比最大允许输入短的序列,我们需要添加 [PAD],另一方面,如果序列更长,我们需要剪切序列。对于较长的文本段,您需要了解此对序列最大长度的 BERT 限制,请参阅此 GitHub issue 以了解进一步的解决方案。
非常重要的还有所谓的特殊token,例如 [CLS] token和 [SEP] token。[CLS] token将插入序列的开头,[SEP] token位于末尾。如果我们处理序列对,我们将在最后一个序列对的末尾添加额外的 [SEP] token。
使用transformers库时,我们首先加载要使用的模型的标记器。然后,我们将按如下方式进行:
from transformers import BertTokenizer

tokenizer = BertTokenizer.from_pretrained('bert-base-chinese')


max_length_test = 20
test_sentence = '曝梅西已通知巴萨他想离开'

# add special tokens
test_sentence_with_special_tokens = '[CLS]' + test_sentence + '[SEP]'
tokenized = tokenizer.tokenize(test_sentence_with_special_tokens)
print('tokenized', tokenized)

# convert tokens to ids in WordPiece
input_ids = tokenizer.convert_tokens_to_ids(tokenized)

# precalculation of pad length, so that we can reuse it later on
padding_length = max_length_test - len(input_ids)

# map tokens to WordPiece dictionary and add pad token for those text shorter than our max length
input_ids = input_ids + ([0] * padding_length)

# attention should focus just on sequence with non padded tokens
attention_mask = [1] * len(input_ids)

# do not focus attention on padded tokens
attention_mask = attention_mask + ([0] * padding_length)

# token types, needed for example for question answering, for our purpose we will just set 0 as we have just one sequence
token_type_ids = [0] * max_length_test
bert_input = {
    "token_ids": input_ids,
    "token_type_ids": token_type_ids,
    "attention_mask": attention_mask
}
print(bert_input)
OUTPUT:
tokenized ['[CLS]', '曝', '梅', '西', '已', '通', '知', '巴', '萨', '他', '想', '离', '开', '[SEP]']
{'token_ids': [101, 3284, 3449, 6205, 2347, 6858, 4761, 2349, 5855, 800, 2682, 4895, 2458, 102, 0, 0, 0, 0, 0, 0], 'token_type_ids': [0, 0, 0, 0, 0, 0, 0, 0, 0, 0, 0, 0, 0, 0, 0, 0, 0, 0, 0, 0], 'attention_mask': [1, 1, 1, 1, 1, 1, 1, 1, 1, 1, 1, 1, 1, 1, 1, 1, 1, 1, 1, 1, 0, 0, 0, 0, 0, 0]}
在实际编码中,我们将只使用encode_plus函数,它为我们完成所有这些步骤
bert_input = tokenizer.encode_plus(
                        test_sentence,
                        add_special_tokens = True, # add [CLS], [SEP]
                        max_length = max_length_test, # max length of the text that can go to BERT
                        pad_to_max_length = True, # add [PAD] tokens
                        return_attention_mask = True, # add attention mask to not focus on pad tokens
              )
print('encoded', bert_input)
预训练
预训练是BERT训练的第一阶段,它以无监督的方式完成,由两个主要任务组成:
- masked language modelling (MLM)
- next sentence prediction (NSP)
从高级别开始,在 MLM 任务中,我们用 [MASK] token替换序列中的一定数量的token。然后我们尝试预测掩蔽的token,MLM 有一些额外的规则,所以描述不完全精确,请查看原始论文(Devlin et al., 2018)以了解更多详细信息。
当我们选择句子对为下一个句子预测,我们将选择上一个句子之后的实际句子的50%标记为IsNext,其他 50% 我们从语料库中选择另一个句子, 与上一个句子无关,标记为NotNext。
这两个任务都可以在文本语料库上执行,而无需标记样本,因此作者使用了诸如BooksCorpus (800m words), English Wikipedia (2500m words)等数据集。
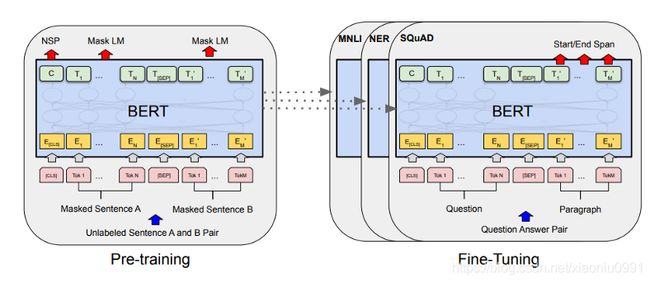
微调(Fine-tuning)
一旦我们自己预训练了模型,或者加载了已预训练过的模型(例如BERT-based-uncased、BERT-based-chinese),我们就可以开始对下游任务(如问题解答或文本分类)的模型进行微调。我们可以看到,BERT 可以将预训练的 BERT 表示层嵌入到许多特定任务中,对于文本分类,我们将只在顶部添加简单的 softmax 分类器。
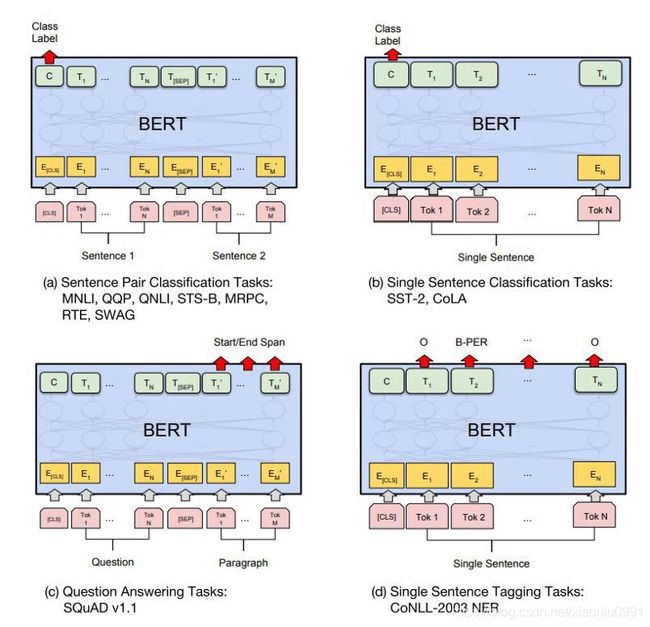
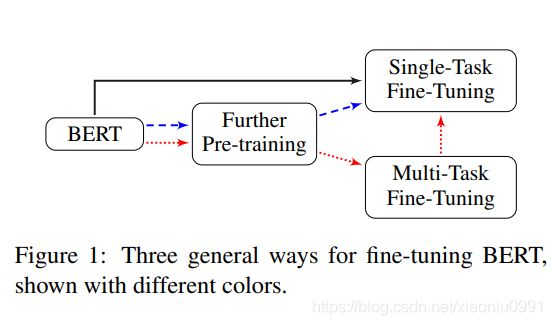
预训练阶段需要显著的计算能力 (BERT base: 4 days on 16 TPUs; BERT large 4 days on 64 TPUs)。所以保存预训练的模型,然后微调一个特定的数据集非常有用。与预训练不同,微调不需要太多的计算能力,即使在单个 GPU 上,也可以在几个小时内完成微调过程。当对文本分类进行微调时,我们可以选择几个方式,请参阅下图 (Sun et al. 2019)
数据集
使用THUCNews的一个子集进行训练与测试,数据集请自行到THUCTC:一个高效的中文文本分类工具包下载,请遵循数据提供方的开源协议。
本次训练使用了其中的10个分类,每个分类2W条数据。
类别如下:
财经、房产、股票、教育、科技、社会、时政、体育、游戏、娱乐
数据集在 data.txt
现将数据集按照层次抽样划分为训练集、验证集、测试集:
| 数据集 | 数据量 |
|---|---|
| 训练集 | 18万 |
| 验证集 | 1万 |
| 测试集 | 1万 |
from sklearn.model_selection import train_test_split
import pandas as pd

def split_dataset(df):
    train_set, x = train_test_split(df,
        stratify=df['label'],
        test_size=0.1,
        random_state=42)
    val_set, test_set = train_test_split(x,
        stratify=x['label'],
        test_size=0.5,
        random_state=43)

    return train_set,val_set, test_set


df_raw = pd.read_csv("data.txt",sep="\t",header=None,names=["text","label"])
# label
df_label = pd.DataFrame({"label":["财经","房产","股票","教育","科技","社会","时政","体育","游戏","娱乐"],"y":list(range(10))})
df_raw = pd.merge(df_raw,df_label,on="label",how="left")

train_data,val_data, test_data = split_dataset(df_raw)
使用TensorFlow 2.0+ keras API微调BERT
现在,我们需要在所有样本中应用 BERT tokenizer 。我们将token映射到词嵌入。这可以通过encode_plus完成。
def convert_example_to_feature(review):
    return tokenizer.encode_plus(review,
                                 add_special_tokens = True, # add [CLS], [SEP]
                                 max_length = max_length, # max length of the text that can go to BERT
                                 pad_to_max_length = True, # add [PAD] tokens
                                 return_attention_mask = True, # add attention mask to not focus on pad tokens
                                )

# map to the expected input to TFBertForSequenceClassification, see here
def map_example_to_dict(input_ids, attention_masks, token_type_ids, label):
    return {
      "input_ids": input_ids,
      "token_type_ids": token_type_ids,
      "attention_mask": attention_masks,
  }, label

def encode_examples(ds, limit=-1):
    # prepare list, so that we can build up final TensorFlow dataset from slices.
    input_ids_list = []
    token_type_ids_list = []
    attention_mask_list = []
    label_list = []
    if (limit > 0):
        ds = ds.take(limit)

    for index, row in ds.iterrows():
        review = row["text"]
        label = row["y"]
        bert_input = convert_example_to_feature(review)

        input_ids_list.append(bert_input['input_ids'])
        token_type_ids_list.append(bert_input['token_type_ids'])
        attention_mask_list.append(bert_input['attention_mask'])
        label_list.append([label])
    return tf.data.Dataset.from_tensor_slices((input_ids_list, attention_mask_list, token_type_ids_list, label_list)).map(map_example_to_dict)
我们可以使用以下函数对数据集进行编码:
# train dataset
ds_train_encoded = encode_examples(train_data).shuffle(10000).batch(batch_size)
# val dataset
ds_val_encoded = encode_examples(val_data).batch(batch_size)
# test dataset
ds_test_encoded = encode_examples(test_data).batch(batch_size)
创建模型
transformers 模块已经包含了分类模型的函数,直接使用即可
from transformers import TFBertForSequenceClassification
import tensorflow as tf

model = TFBertForSequenceClassification.from_pretrained('bert-base-chinese', num_labels=10)
编译与训练模型
# recommended learning rate for Adam 5e-5, 3e-5, 2e-5
learning_rate = 2e-5
# we will do just 1 epoch for illustration, though multiple epochs might be better as long as we will not overfit the model
number_of_epochs = 8

# model initialization
model = TFBertForSequenceClassification.from_pretrained('bert-base-chinese', num_labels=10)

# optimizer Adam recommended
optimizer = tf.keras.optimizers.Adam(learning_rate=learning_rate,epsilon=1e-08, clipnorm=1)

# we do not have one-hot vectors, we can use sparce categorical cross entropy and accuracy
loss = tf.keras.losses.SparseCategoricalCrossentropy(from_logits=True)
metric = tf.keras.metrics.SparseCategoricalAccuracy('accuracy')
model.compile(optimizer=optimizer, loss=loss, metrics=[metric])
# fit model
bert_history = model.fit(ds_train_encoded, epochs=number_of_epochs, validation_data=ds_val_encoded)
# evaluate test set
model.evaluate(ds_test_encoded)
以下是8个epochs的训练结果:
Epoch 1/8
1407/1407 [==============================] - 2012s 1s/step - loss: 1.5890 - accuracy: 0.8952 - val_loss: 1.5220 - val_accuracy: 0.9298
Epoch 2/8
1407/1407 [==============================] - 1998s 1s/step - loss: 1.5114 - accuracy: 0.9390 - val_loss: 1.5133 - val_accuracy: 0.9317
Epoch 3/8
1407/1407 [==============================] - 2003s 1s/step - loss: 1.4998 - accuracy: 0.9487 - val_loss: 1.5126 - val_accuracy: 0.9331
Epoch 4/8
1407/1407 [==============================] - 1995s 1s/step - loss: 1.4941 - accuracy: 0.9563 - val_loss: 1.5090 - val_accuracy: 0.9369
Epoch 5/8
1407/1407 [==============================] - 1998s 1s/step - loss: 1.4901 - accuracy: 0.9612 - val_loss: 1.5099 - val_accuracy: 0.9367
Epoch 6/8
1407/1407 [==============================] - 1995s 1s/step - loss: 1.4876 - accuracy: 0.9641 - val_loss: 1.5104 - val_accuracy: 0.9346
Epoch 7/8
1407/1407 [==============================] - 1994s 1s/step - loss: 1.4859 - accuracy: 0.9668 - val_loss: 1.5104 - val_accuracy: 0.9356
Epoch 8/8
1407/1407 [==============================] - 1999s 1s/step - loss: 1.4845 - accuracy: 0.9688 - val_loss: 1.5114 - val_accuracy: 0.9321

79/79 [==============================] - 37s 472ms/step - loss: 1.5037 - accuracy: 0.9437
[1.5037099123001099, 0.9437000155448914]
可以看到,训练集正确率96.88%,验证集正确率93.21%,测试集上正确率94.37%。
运行环境
linux: CentOS Linux release 7.6.1810

python: Python 3.6.10

packages:

tensorflow==2.3.0
transformers==3.02
pandas==1.1.0
scikit-learn==0.22.2
使用方式
git clone https://github.com/NZbryan/NLP_bert.git
cd NLP_bert

python3 tf2.0_bert_emb_ch_MultiClass.py
由于数据量较大,训练时间长,建议在GPU下运行,或者到colab去跑。
全部代码
参考:Text classification with transformers in Tensorflow 2: BERT