驱动程序开发:I2C设备驱动

目录

  • Linux下I2C知识点:
    • Linux下I2C驱动简介
    • I2C架构概述
    • I2C驱动架构图
    • I2C适配器
    • I2C设备(client)
    • I2C驱动(driver)
    • I2C 设备和驱动匹配过程
  • 编写AP3216C传感器I2C设备Linux驱动:
    • 设备树编写操作
    • i2c驱动基本框架编写
    • 在i2c驱动基本框架下添加字符设备框架
    • 使用以上搭建好的框架读取ap3216c传感器数值

Linux下I2C知识点:

Linux下I2C驱动简介

  利用linux的I2C驱动体系结构完成其驱动编写优点:①不需要工程师对I2C设备和I2C的适配器(I2C控制器)操作的熟悉。②编写出来的程序可移植性强。③ 对内核的资源可以直接直接使用,因为内核提供的所有I2C设备器以及设备驱动都是基于I2C子系统的格式。  但缺点就是:需要花时间去了解linux中复杂的I2C子系统的操作方法。

I2C架构概述

Linux的I2C体系结构分为3个组成部分:
  I2C核心:I2C核心提供了I2C总线驱动和设备驱动的注册,注销方法,I2C通信方法(”algorithm”)上层的,与具体适配器无关的代码以及探测设备,检测设备地址的上层代码等。
  I2C总线驱动:I2C总线驱动是对I2C硬件体系结构中适配器端的实现,适配器可由CPU控制,甚至可以直接集成在CPU内部。
  I2C设备驱动:I2C设备驱动(也称为客户驱动)是对I2C硬件体系结构中设备端的实现,设备一般挂接在受CPU控制的I2C适配器上,通过I2C适配器与CPU交换数据。

I2C驱动架构图

驱动程序开发:I2C设备驱动_第1张图片
架构层次分类详情描述:
  第一层:提供i2c adapter的硬件驱动,探测、初始化i2c adapter(如申请i2c的io地址和中断号),驱动soc控制的i2c adapter在硬件上产生信号(start、stop、ack)以及处理i2c中断。覆盖图中的硬件实现层。
  第二层:提供i2c adapter的algorithm,用具体适配器的xxx_xferf()函数来填充i2c_algorithm的master_xfer函数指针,并把赋值后的i2c_algorithm再赋值给i2c_adapter的algo指针。覆盖图中的访问抽象层、i2c核心层。
  第三层:实现i2c设备驱动中的i2c_driver接口,用具体的i2c device设备的attach_adapter()、detach_adapter()方法赋值给i2c_driver的成员函数指针。实现设备device与总线(或者叫adapter)的挂接。覆盖图中的driver驱动层。
  第四层:实现i2c设备所对应的具体device的驱动,i2c_driver只是实现设备与总线的挂接,而挂接在总线上的设备则是千差万别的,所以要实现具体设备device的write()、read()、ioctl()等方法,赋值给file_operations,然后注册字符设备(多数是字符设备)。覆盖图中的driver驱动层。

  第一层和第二层又叫i2c总线驱动(bus),第三第四属于i2c设备驱动(device driver)。
  在linux驱动架构中,几乎不需要驱动开发人员再添加bus,因为linux内核几乎集成所有总线bus,如usb、pci、i2c等等。并且总线bus中的(与特定硬件相关的代码)已由芯片提供商编写完成。
  第三第四层与特定device相干的就需要驱动工程师来实现了。


根据驱动分离与分层的思想“总线、设备和驱动模型”,在I2C设备驱动分别对应的结构体:i2c_adapter、i2c_client和i2c_driver。 其中i2c_client 就是描述设备信息的,i2c_driver 描述驱动内容,类似于 platform_driver。


I2C适配器

  I2C 总线驱动重点是 I2C 适配器(也就是 SOC 的 I2C 接口控制器)驱动,这里要用到两个重要的数据结构:i2c_adapter 和i2c_algorithm。
  Linux 内核将 SOC 的 I2C 适配器(控制器)抽象成i2c_adapter,如下:

struct i2c_adapter {
	 struct module *owner;//所属模块
	 unsigned int id;//algorithm的类型,定义于i2c-id.h,
	 unsigned int class;
	 const struct i2c_algorithm *algo; //总线通信方法结构体指针
	 void *algo_data;//algorithm数据
	 struct rt_mutex bus_lock;//控制并发访问的自旋锁
	 int timeout;
	 int retries;//重试次数
	 struct device dev; //适配器设备
	 int nr;
	 char name[48];//适配器名称
	 struct completion dev_released;//用于同步
	 struct list_head userspace_clients;//client链表头
};

  i2c_algorithm 类型的指针变量 algo,对于一个 I2C 适配器,肯定要对外提供读写 API 函数,设备驱动程序可以使用这些 API 函数来完成读写操作。i2c_algorithm 就是 I2C 适配器与 IIC 设备进行通信的方法,具体来说就是i2c_algorithm中提供的通信函数来控制适配器上产生特定的访问周期。缺少i2c_algorithm的i2c_adapter什么也做不了
  i2c_algorithm结构体,如下:

struct i2c_algorithm {
	int (*master_xfer)(struct i2c_adapter *adap,struct i2c_msg *msgs, int num);	//I2C传输函数指针
	int (*smbus_xfer) (struct i2c_adapter *adap, u16 addr, unsigned short flags,
	char read_write, u8 command, int size, union i2c_smbus_data *data);	//smbus传输函数指针
	/* To determine what the adapter supports */
	u32 (*functionality) (struct i2c_adapter *);	//返回适配器支持的功能
};

  master_xfer 就是 I2C 适配器的传输函数,用于产生i2c访问周期需要的start stop ack信号,以i2c_msg(即i2c消息)为单位。
  发送和接收通信数据。而i2c_msg也非常关键,调用驱动中的发送接收函数需要填充该结构体。
  smbus_xfer 就是 SMBUS 总线的传输函数。
functionality就是指适配器所支持的功能。

  因为I2C适配器驱动一般都是SOC等原厂家编写好的,所有具体想看I2C适配器驱动程序可以在 drivers/i2c/busses/i2c-imx.c目录找到IMX6ULL对应的I2C适配器驱动,这里不提供展示了。

I2C设备(client)

struct i2c_client {
	 unsigned short flags;//标志
	 unsigned short addr; //低7位为芯片地址
	 char name[I2C_NAME_SIZE];//设备名称
	 struct i2c_adapter *adapter;//依附的i2c_adapter
	 struct i2c_driver *driver;//依附的i2c_driver
	 struct device dev;//设备结构体
	 int irq;//设备所使用的结构体
	 struct list_head detected;//链表头
 };

  一个设备对应一个 i2c_client,每检测到一个 I2C 设备就会给这个 I2C 设备分配一个i2c_client。

I2C驱动(driver)

struct i2c_driver {
	unsigned int class;
	int (*attach_adapter)(struct i2c_adapter *);//依附i2c_adapter函数指针
	int (*detach_adapter)(struct i2c_adapter *);//脱离i2c_adapter函数指针
	int (*probe)(struct i2c_client *, const struct i2c_device_id *);
	int (*remove)(struct i2c_client *);
	void (*shutdown)(struct i2c_client *);
	int (*suspend)(struct i2c_client *, pm_message_t mesg);
	int (*resume)(struct i2c_client *);
	void (*alert)(struct i2c_client *, unsigned int data);
	int (*command)(struct i2c_client *client, unsigned int cmd, void*arg);//命令列表
	struct device_driver driver;
	const struct i2c_device_id *id_table;//该驱动所支持的设备ID表
	int (*detect)(struct i2c_client *, struct i2c_board_info *);
	const unsigned short *address_list;
	struct list_head clients;
};

  当 I2C 设备和驱动匹配成功以后 probe 函数就会执行,和 platform 驱动一样。
  device_driver 驱动结构体,如果使用设备树的话,需要设置 device_driver 的of_match_table 成员变量,也就是驱动的兼容(compatible)属性。
  id_table 是传统的、未使用设备树的设备匹配 ID 表。

  对于我们 I2C 设备驱动编写人来说,重点工作就是构建 i2c_driver,构建完成以后需要向Linux 内核注册这个 i2c_driver。

			示例代码 61.1.2.4 i2c_driver 注册流程
1 /* i2c 驱动的 probe 函数 */
2 static int xxx_probe(struct i2c_client *client, const struct i2c_device_id *id)
3 { 
4 		/* 函数具体程序 */
5 		return 0; 
6 } 
7 
8 /* i2c 驱动的 remove 函数 */
9 static int xxx_remove(struct i2c_client *client)
10 {
11 		/* 函数具体程序 */
12 		return 0;
13 }
14
15 /* 传统匹配方式 ID 列表 */
16 static const struct i2c_device_id xxx_id[] = {
17 		{"xxx", 0}, 
18 		{}
19 };
20
21 /* 设备树匹配列表 */
22 static const struct of_device_id xxx_of_match[] = {
23 		{ .compatible = "xxx" },
24 		{ /* Sentinel */ }
25 };
26
27 /* i2c 驱动结构体 */
28 static struct i2c_driver xxx_driver = {
29 		.probe = xxx_probe,
30 		.remove = xxx_remove,
31 		.driver = {
32 		.owner = THIS_MODULE,
33 		.name = "xxx",
34 		.of_match_table = xxx_of_match,
35 		},
36 		.id_table = xxx_id,
37 };
38 
39 /* 驱动入口函数 */
40 static int __init xxx_init(void)
41 {
42 		int ret = 0;
43
44 		ret = i2c_add_driver(&xxx_driver);
45 		return ret;
46 }
47
48 /* 驱动出口函数 */
49 static void __exit xxx_exit(void)
50 {
51 		i2c_del_driver(&xxx_driver);
52 }
53
54 module_init(xxx_init);
55 module_exit(xxx_exit);

i2c_adapter、i2c_client和i2c_driver三个结构体之间的关系 *i2c_driver和i2c_client:

  i2c_driver对应一套驱动方法,其主要函数是attach_adapter()和detach_client()。
  i2c_client对应真实的i2c物理设备device,每个i2c设备都需要一个i2c_client来描述。
  i2c_driver与i2c_client的关系是一对多。一个i2c_driver上可以支持多个同等类型的i2c_client。
i2c_adapter和i2c_client:
  i2c_adapter和i2c_client的关系与i2c硬件体系中适配器和设备的关系一致,即i2c_client依附于i2c_adapter,由于一个适配器上可以连接多个i2c设备,所以i2c_adapter中包含依附于它的i2c_client的链表。
  从i2c驱动架构图中可以看出,linux内核对i2c架构抽象了一个叫核心层core的中间件,它分离了设备驱动device driver和硬件控制的实现细节(如操作i2c的寄存器),core层不但为上面的设备驱动提供封装后的内核注册函数,而且还为小面的硬件事件提供注册接口(也就是i2c总线注册接口),可以说core层起到了承上启下的作用。


I2C 设备和驱动匹配过程

I2C 设备和驱动的匹配过程是由 I2C 核心来完成的,drivers/i2c/i2c-core.c 就是 I2C 的核心
部分,I2C 核心提供了一些与具体硬件无关的 API 函数,如:

1、i2c_adapter 注册/注销函数
int i2c_add_adapter(struct i2c_adapter *adapter)
int i2c_add_numbered_adapter(struct i2c_adapter *adap)
void i2c_del_adapter(struct i2c_adapter * adap)
2、i2c_driver 注册/注销函数
int i2c_register_driver(struct module *owner, struct i2c_driver *driver)
int i2c_add_driver (struct i2c_driver *driver)
void i2c_del_driver(struct i2c_driver *driver)

设备和驱动的匹配过程也是由 I2C 总线完成的的,I2C 总线的数据结构为 i2c_bus_type,定义在 drivers/i2c/i2c-core.c 文件,i2c_bus_type 内容如下:

		示例代码 61.1.2.5 i2c_bus_type 总线
struct bus_type i2c_bus_type = {
	.name = "i2c",
	.match = i2c_device_match,
	.probe = i2c_device_probe,
	.remove = i2c_device_remove,
	.shutdown = i2c_device_shutdown,
};

.match 就是 I2C 总线的设备和驱动匹配函数,在这里就是 i2c_device_match 这个函数,此函数内容如下:

		示例代码 61.1.2.6 i2c_device_match 函数
static int i2c_device_match(struct device *dev, struct device_driver *drv)
{
	struct i2c_client *client = i2c_verify_client(dev);
	struct i2c_driver *driver;

	if (!client)
	return 0;

	/* Attempt an OF style match */
	if (of_driver_match_device(dev, drv))
	return 1;

	/* Then ACPI style match */
	if (acpi_driver_match_device(dev, drv))
	return 1;

	driver = to_i2c_driver(drv);
	/* match on an id table if there is one */
	if (driver->id_table)
	return i2c_match_id(driver->id_table, client) != NULL;

	return 0;
}

  of_driver_match_device 函数用于完成设备树设备和驱动匹配。比较 I2C 设备节点的 compatible 属性和 of_device_id 中的 compatible 属性是否相等,如果相当的话就表示 I2C设备和驱动匹配。
  acpi_driver_match_device 函数用于 ACPI 形式的匹配。
  i2c_match_id 函数用于传统的、无设备树的 I2C 设备和驱动匹配过程。比较 I2C设备名字和 i2c_device_id 的 name 字段是否相等,相等的话就说明 I2C 设备和驱动匹配。

编写AP3216C传感器I2C设备Linux驱动:

硬件原理图:
驱动程序开发:I2C设备驱动_第2张图片

设备树编写操作

  由原理图可知,UART4_TXD、UART4_RXD分别作为I2C1的SCL和SDA。
在IMX6ULL参考手册可查询到其关系。
驱动程序开发:I2C设备驱动_第3张图片

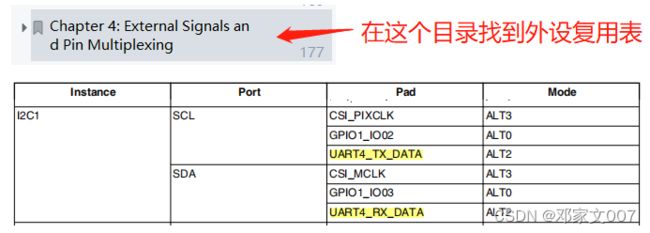
  因此需要将UART4_TXD、UART4_RXD这两个引脚分别复用为I2C1_SCL和I2C1_SDA。所以将设备树pinctrl_i2c1子节点设置为如下:

pinctrl_i2c1: i2c1grp {
	fsl,pins = <
		MX6UL_PAD_UART4_TX_DATA__I2C1_SCL 0x4001b8b0
		MX6UL_PAD_UART4_RX_DATA__I2C1_SDA 0x4001b8b0
	>;
};

这里对子节点下的第一个属性作为解释:
MX6UL_PAD_UART4_TX_DATA__I2C1_SCL等于“0x020E00B4U, 0x2U, 0x020E05A4U, 0x1U, 0x020E0340U”这一串东西,那么这一串东西又表示为什么呢?
①0x020E00B4U指的是SW_PAD_CTL_PAD_UART4_TX_DATA SW PAD Control Register寄存器地址。而0x2U为设置该寄存器的值,这里是指选择一种iomux模式用于pad,那么0x2U选择的是0010 ALT2 — Select mux mode: ALT2 mux port: I2C1_SCL of instance: i2c1
②0x020E05A4U指的是I2C1_SCL_SELECT_INPUT DAISY Register寄存器地址。而0x1U为设置该寄存器的值,这里选择的是01 UART4_TX_DATA_ALT2 — Selecting Pad: UART4_TX_DATA for Mode: ALT2
③0x020E0340U指的是SW_MUX_CTL_PAD_UART4_TX_DATA SW MUX Control Register寄存器,它是用于设置电器属性的,这里可以发现出,该寄存器地址后面没跟有寄存器设置值,因为这个寄存器设置值需要我们去配置,因此这个寄存器的设置值实质就是该子节点的属性值里的0x4001b8b0

  其次,需要在.dts设备树文件中的i2c1节点上追加i2c1子节点,如下:

&i2c1 {
	clock-frequency = <100000>;		/* I2C频率100KHz */
	pinctrl-names = "default";
	pinctrl-0 = <&pinctrl_i2c1>;
	status = "okay";

	ap3216c@1e {	/* 后面的'1e'为ap3216c器件地址 */
		compatible = "alientek,ap3216c";	/* 兼容属性 */
		reg = <0x1e>;	/* ap3216c器件地址 */
	};
};

  最后,使用“make dtbs”重新编译设备树,在/sys/bus/i2c/devices 目录下看到一个名为“0-001e”的子目录,使用“cat 0-001e/name”命令可以查看到其设备名字“ap3216c”,如下图:
在这里插入图片描述

i2c驱动基本框架编写

  这里参考在前面给出的“i2c_driver 注册流程”编写最基本的i2c驱动框架,编写后,如下:

/* 
 *  根据linux内核的程序查找所使用函数的对应头文件。 
 */  
#include        //MODULE_LICENSE,MODULE_AUTHOR  
#include          //module_init,module_exit  
#include        //printk  
#include            //struct file_operations  
#include          //kmalloc, kfree  
#include       //copy_to_user,copy_from_user  
#include            //ioremap,iounmap  
#include          //struct cdev,cdev_init,cdev_add,cdev_del  
#include        //class  
#include            //of_find_node_by_path  
#include       //of_get_named_gpio  
#include          //gpio_request,gpio_direction_output,gpio_set_number  
#include        //atomic_t  
#include        //irq_of_parse_and_map
#include     //request_irq
#include         //timer_list
#include       //jiffies
#include        //atomic_set
#include         //input
#include   //platform
#include 
#include "ap3216creg.h"

/* 1.6 probe函数 */
static int ap3216c_probe(struct i2c_client *client, const struct i2c_device_id *id) {
    printk("ap3216c_probe successful!\r\n");
    return 0;
}

/* 1.7 remove函数 */
static int ap3216c_remove(struct i2c_client *client) {
    return 0;
}

/* 1.4 传统的匹配表 */
static const struct i2c_device_id ap3216c_id[] = {
    {"alientek,ap3216c",0},
    {}
};

/* 1.5 设备树匹配表 */
static const struct of_device_id ap3216c_of_match[] = {
    { .compatible = "alientek,ap3216c" },
    {}
};

/* 1.3 i2c_driver结构体 */
static struct i2c_driver ap3216c_driver = {
    .probe = ap3216c_probe,
    .remove = ap3216c_remove,
    .driver = {
        .name = "ap3216c",
        .owner = THIS_MODULE,
        .of_match_table = of_match_ptr(ap3216c_of_match),
    },
    .id_table = ap3216c_id,
};
	  
/* 1.1 驱动模块入口函数 */  
static int __init ap3216c_init(void) {  
    int ret = 0;
    ret = i2c_add_driver(&ap3216c_driver);
    return 0;
} 

/* 1.2 驱动模块出口函数 */  
static void __exit ap3216c_exit(void) {  
    i2c_del_driver(&ap3216c_driver);
}  
	  
/* 驱动许可和个人信息 */ 
module_init(ap3216c_init);
module_exit(ap3216c_exit); 
MODULE_LICENSE("GPL");  
MODULE_AUTHOR("djw");  

  通过“make”命令编译生成.ko文件,然后加载驱动,在“cd /sys/bus/i2c/drivers/”目录下查找到名为“ap3216c”的驱动。

在i2c驱动基本框架下添加字符设备框架

ap3216c.c

/* 
 *  根据linux内核的程序查找所使用函数的对应头文件。 
 */  
#include        //MODULE_LICENSE,MODULE_AUTHOR  
#include          //module_init,module_exit  
#include        //printk  
#include            //struct file_operations  
#include          //kmalloc, kfree  
#include       //copy_to_user,copy_from_user  
#include            //ioremap,iounmap  
#include          //struct cdev,cdev_init,cdev_add,cdev_del  
#include        //class  
#include            //of_find_node_by_path  
#include       //of_get_named_gpio  
#include          //gpio_request,gpio_direction_output,gpio_set_number  
#include        //atomic_t  
#include        //irq_of_parse_and_map
#include     //request_irq
#include         //timer_list
#include       //jiffies
#include        //atomic_set
#include         //input
#include   //platform
#include 
#include "ap3216creg.h"

/* 设备结构体 */
struct ap3216c_dev {
    dev_t devid;            /* 设备号 */
    int major;              /* 主设备号 */
    int minor;              /* 主设备号 */
    int count;              /* 设备个数 */
    char* name;             /* 设备名字 */
    struct cdev cdev;       /* 注册设备结构体 */
    struct class *class;    /* 类 */
    struct device *device;  /* 设备 */
};
static struct ap3216c_dev ap3216c;  /* 实例ap3216c_dev结构体 */

/* 6.2 打开字符设备文件 */
static int ap3216c_open(struct inode *inde,struct file *filp) {
    /* 设置私有类数据 */
    filp->private_data = &ap3216c;
    printk("ap3216c_open\r\n");
    return 0;
}

/* 6.3 关闭字符设备文件 */
static int ap3216c_release(struct inode *inde,struct file *filp) {
    /* 提取私有类的属性 */
    struct ap3216c_dev *dev = (struct ap3216c_dev *)filp->private_data;
    printk("ap3216c_release\r\n");
    return 0;
}
/* 6.4  向字符设备文件读取数据 */
static ssize_t ap3216c_read(struct file *filp,char __user *buf,
			size_t count,loff_t *ppos) {
    printk("ap3216c_read\r\n");
    return 0;
}
/* 6.5 向字符设备文件写入数据 */
static ssize_t ap3216c_write(struct file *filp,const char __user *buf,
            size_t count,loff_t *ppos) {
    /* 提取私有类的属性 */
    struct ap3216c_dev *dev = (struct ap3216c_dev *)filp->private_data;
    printk("ap3216c_write\r\n");
    return 0;
}


/* ap3216c操作集合 */
static const struct file_operations ap3216c_fops = {
    .owner      =   THIS_MODULE,
    .open       =   ap3216c_open,
    .release    =   ap3216c_release,
    .read       =   ap3216c_read,
    .write      =   ap3216c_write,
};


/* 1.6 probe函数 */
static int ap3216c_probe(struct i2c_client *client, const struct i2c_device_id *id) {
    int ret = 0;
    printk("ap3216c_probe successful!\r\n");
    /*=== 2.1 搭建字符设备框架 ===*/
    /* 2.1.1 配置设备结构体的参数 */
    ap3216c.name = "ap3216c";   //设备名称
    ap3216c.major = 0;   //主设备号
    ap3216c.count = 1;
    /* 2.1.2 分配或定义设备号并注册设备号 */
    /* 如果主设备号不为0,否则为自定义设备号,否则为由系统分配设备号 */
    if(ap3216c.major) {
        ap3216c.devid = MKDEV(ap3216c.major,0); //整合设备号
        ret = register_chrdev_region(ap3216c.devid,ap3216c.count,ap3216c.name);   //注册设备号
    } else {
        alloc_chrdev_region(&ap3216c.devid,0,ap3216c.count,ap3216c.name);   //自动分配设备号
        ap3216c.major = MAJOR(ap3216c.devid);   //主设备号
        ap3216c.minor = MINOR(ap3216c.devid);   //次设备号
    }    
    if (ret < 0) {
        printk("ap3216c chrdev region failed!\r\n");
        goto fail_devid;    //注册设备号失败
    }
    printk("ap3216c major = %d, minor = %d \r\n",ap3216c.major,ap3216c.minor);  //打印主次设备号
    /* 2.1.3 添加字符设备 */
    cdev_init(&ap3216c.cdev, &ap3216c_fops);
    ret = cdev_add(&ap3216c.cdev, ap3216c.devid, ap3216c.count);
    if(ret < 0) {
        goto fail_cdev;
    }
    /* 2.1.4 自动创建设备节点 */
    ap3216c.class = class_create(THIS_MODULE,ap3216c.name); //创建类
    if(IS_ERR(ap3216c.class)) {
        ret = PTR_ERR(ap3216c.class);
        goto fail_class;
    }
    ap3216c.device = device_create(ap3216c.class,NULL,ap3216c.devid,NULL,ap3216c.name); //创建设备
    if(IS_ERR(ap3216c.device)) {
        ret = PTR_ERR(ap3216c.device);
        goto fail_device;
    }

    return 0;

fail_device:    //创建设备失败
    class_destroy(ap3216c.class); 
fail_class: //创建类失败
    cdev_del(&ap3216c.cdev);
fail_cdev:   //注册设备或者叫添加设备失败
    unregister_chrdev_region(ap3216c.devid,ap3216c.count);  
fail_devid:  //分配设备号失败
    return ret;
}

/* 1.7 remove函数 */
static int ap3216c_remove(struct i2c_client *client) {
    /* .4 摧毁设备 */
    device_destroy(ap3216c.class,ap3216c.devid);    
    /* .3 摧毁类 */
    class_destroy(ap3216c.class);  
    /* .2 注销字符设备 */
    cdev_del(&ap3216c.cdev);    
    /* .1 注销设备号*/
    unregister_chrdev_region(ap3216c.devid,ap3216c.count);  
    return 0;
}

/* 1.4 传统的匹配表 */
static const struct i2c_device_id ap3216c_id[] = {
    {"alientek,ap3216c",0},
    {}
};

/* 1.5 设备树匹配表 */
static const struct of_device_id ap3216c_of_match[] = {
    { .compatible = "alientek,ap3216c" },
    {}
};

/* 1.3 i2c_driver结构体 */
static struct i2c_driver ap3216c_driver = {
    .probe = ap3216c_probe,
    .remove = ap3216c_remove,
    .driver = {
        .name = "ap3216c",
        .owner = THIS_MODULE,
        .of_match_table = of_match_ptr(ap3216c_of_match),
    },
    .id_table = ap3216c_id,
};
	  
/* 1.1 驱动模块入口函数 */  
static int __init ap3216c_init(void) {  
    int ret = 0;
    ret = i2c_add_driver(&ap3216c_driver);
    return 0;
} 

/* 1.2 驱动模块出口函数 */  
static void __exit ap3216c_exit(void) {  
    i2c_del_driver(&ap3216c_driver);
}  

// /* 注册驱动模块 */  
// module_platform_driver(keyinput_driver);
	  
/* 驱动许可和个人信息 */ 
module_init(ap3216c_init);
module_exit(ap3216c_exit); 
MODULE_LICENSE("GPL");  
MODULE_AUTHOR("djw");  

测试APP(ap3216cAPP.c)

#include 
#include 
#include 
#include 
#include 
#include 
#include 
#include 
#include 

/*
 * argc:应用程序参数个数 
 * argv[]:具体打参数内容,字符串形式 
 * ./ap3216cAPP 
 * ./ap3216cAPP /dev/ap3216c
 */

/*
* @description : main 主程序
* @param - argc : argv 数组元素个数
* @param - argv : 具体参数
* @return : 0 成功;其他 失败
*/
int main(int argc, char *argv[])
{
    int fd, ret;
    char *filename;
    int data;

    /* 判断输入的元素个数 */
    if(argc != 2) {
        printf("ERROR USAGE!\r\n");
        return -1;
    }

    filename = argv[1];     //获取驱动文件的路径
    fd = open(filename,O_RDWR); //根据文件路径以读写方式打开文件
    if(fd < 0) {
        printf("file %s open failed!\r\n",filename);
        return -1;
    }
    ret = read(fd,&data,sizeof(data));

    close(fd);
    return 0;
}

操作命令测试:
~# depmod
~# modprobe ap3216c.ko
~# ls /dev/ap3216c -l
~# ./ap3216cAPP /dev/ap3216c
可查看现象

使用以上搭建好的框架读取ap3216c传感器数值

ap3216c.c

/* 
 *  根据linux内核的程序查找所使用函数的对应头文件。 
 */  
#include        //MODULE_LICENSE,MODULE_AUTHOR  
#include          //module_init,module_exit  
#include        //printk  
#include            //struct file_operations  
#include          //kmalloc, kfree  
#include       //copy_to_user,copy_from_user  
#include            //ioremap,iounmap  
#include          //struct cdev,cdev_init,cdev_add,cdev_del  
#include        //class  
#include            //of_find_node_by_path  
#include       //of_get_named_gpio  
#include          //gpio_request,gpio_direction_output,gpio_set_number  
#include        //atomic_t  
#include        //irq_of_parse_and_map
#include     //request_irq
#include         //timer_list
#include       //jiffies
#include        //atomic_set
#include         //input
#include   //platform
#include         //mdelay
#include 
#include "ap3216creg.h"

/* 设备结构体 */
struct ap3216c_dev {
    dev_t devid;            /* 设备号 */
    int major;              /* 主设备号 */
    int minor;              /* 主设备号 */
    int count;              /* 设备个数 */
    char* name;             /* 设备名字 */
    struct cdev cdev;       /* 注册设备结构体 */
    struct class *class;    /* 类 */
    struct device *device;  /* 设备 */
    void *private_data;     /* 私有数据,一般会设置为 i2c_client */
    unsigned short ir, als, ps; /* ap3216c传感器的三种数值 */
};
static struct ap3216c_dev ap3216c;  /* 实例ap3216c_dev结构体 */

/* 4.1 读取AP3216C的N个寄存器值 */
static int ap3216c_read_regs(struct ap3216c_dev *dev, u8 reg, void *val, int len) {
    struct i2c_client *client = (struct i2c_client *)dev->private_data;
    /* msg[0]发送从机地址来连接对应的从机   msg[1]发送连接从机设备对应的寄存器 */
    struct i2c_msg msg[2] = {
        [0] = {
            .addr  = client->addr,  //从机地址
            .flags = 0,             //表示发送数据,也就是控制位为写
            .buf   = &reg,          //发送需要读取的寄存器地址
            .len   = 1,             //发送读取的寄存器地址长度为1个字节
        },

        [1] = {
            .addr  = client->addr,  //从机地址
            .flags = I2C_M_RD,      //表示读取数据,控制位为读
            .buf   = val,           //将接收到的数据保存到缓存val中
            .len   = len,           //读取的寄存器数据长度
            
        },
    };  
    if (2 != i2c_transfer(client->adapter, msg, 2)) //判断是否为执行的消息个数
        return -1;
    return 0;
}

/* 4.2 向AP3216C的N个寄存器写入数值 */
static int ap3216c_write_regs(struct ap3216c_dev *dev, u8 reg, u8 *buf, int len) {
    u8 send_buf[256];
    struct i2c_client *client = (struct i2c_client *)dev->private_data;
    /* 构建要发送的数据,也就是寄存器首地址+实际发送的数据 */
    send_buf[0] = reg;  //寄存器地址
    memcpy(&send_buf[1], buf, len); //发送的数据
    struct i2c_msg msg = {
        .addr  = client->addr,  //从机地址
        .flags = 0,             //表示发送数据,也就是控制位为写
        .buf   = send_buf,      //发送的数据,寄存器首地址+实际发送的数据
        .len   = len + 1,       //要发送的数据长度,寄存器长度+实际发送的数据的长度
    }; 
    if (1 != i2c_transfer(client->adapter, &msg, 1)) //判断是否为执行的消息个数
        return -1;
    return 0;   
}

/* 4.3 读AP3216C一个寄存器值 */
static unsigned char ap3216c_read_reg(struct ap3216c_dev *dev, u8 reg) {
    u8 data = 0;
    int ret = 0;
    ret = ap3216c_read_regs(dev, reg, &data, 1);
    if(ret < 0) {
        return -1;
    }
    return data;
}

/* 4.4 向AP3216C一个寄存器写数据 */
static void ap3216c_write_reg(struct ap3216c_dev *dev, u8 reg, u8 data) {

    ap3216c_write_regs(dev, reg, &data, 1);
}

/* 4.5 读取AP3216C数据,读取AP3216C的数据,读取原始数据,包括ALS,PS和IR, 注意!如果同时打开ALS,IR+PS的话两次数据读取的时间间隔要大于112.5ms */
void ap3216c_readdata(struct ap3216c_dev *dev)
{
    unsigned char buf[6];
    unsigned char i;

	/* 循环读取所有传感器数据 */
    for(i = 0; i < 6; i++)	
    {
        buf[i] = ap3216c_read_reg(dev, AP3216C_IRDATALOW + i);	
    }
	
    if(buf[0] & 0X80) 	/* IR_OF位为1,则数据无效 */
		dev->ir = 0;					
	else 				/* 读取IR传感器的数据   		*/
		dev->ir = ((unsigned short)buf[1] << 2) | (buf[0] & 0X03); 			
	
	dev->als = ((unsigned short)buf[3] << 8) | buf[2];	/* 读取ALS传感器的数据 */  
	
    if(buf[4] & 0x40)	/* IR_OF位为1,则数据无效 			*/
		dev->ps = 0;    													
	else 				/* 读取PS传感器的数据    */
		dev->ps = ((unsigned short)(buf[5] & 0X3F) << 4) | (buf[4] & 0X0F); 	
}

/* 3.1 打开字符设备文件 */
static int ap3216c_open(struct inode *inde,struct file *filp) {
    u8 value = 0;   //读取写入的寄存器数值
    /* 设置私有类数据 */
    filp->private_data = &ap3216c;
    printk("ap3216c_open\r\n");

    /* 5.1 初始化AP3216C */
    ap3216c_write_reg(&ap3216c, AP3216C_SYSTEMCONG, 0X04);   //复位
    mdelay(50);
    ap3216c_write_reg(&ap3216c, AP3216C_SYSTEMCONG, 0X03);   //开启IR, ALS and PS
    value = ap3216c_read_reg(&ap3216c, AP3216C_SYSTEMCONG); //将写入寄存器的值读取出来
    if(value < 0) {
        return -1;
    }
    printk("AP3216C_SYSTEMCONG = 0X%X\r\n",value);

    return 0;
}

/* 3.2 关闭字符设备文件 */
static int ap3216c_release(struct inode *inde,struct file *filp) {
    /* 提取私有类的属性 */
    struct ap3216c_dev *dev = (struct ap3216c_dev *)filp->private_data;
    printk("ap3216c_release\r\n");
    return 0;
}
/* 3.3  向字符设备文件读取数据 */
static ssize_t ap3216c_read(struct file *filp,char __user *buf,
			size_t count,loff_t *ppos) {
    unsigned short data[3];
    int ret = 0;
    /* 提取私有类的属性 */
    struct ap3216c_dev *dev = (struct ap3216c_dev *)filp->private_data;    
    printk("ap3216c_read\r\n");

    /* 5.2 读取ap3216c传感器的3个数值 */
    ap3216c_readdata(dev);
    data[0] = dev->ir;
    data[1] = dev->als;
    data[2] = dev->ps;
    ret = copy_to_user(buf, data, sizeof(data));
	if(ret > 0)
		return -EFAULT;

    return 0;
}
/* 3.4 向字符设备文件写入数据 */
static ssize_t ap3216c_write(struct file *filp,const char __user *buf,
            size_t count,loff_t *ppos) {
    /* 提取私有类的属性 */
    struct ap3216c_dev *dev = (struct ap3216c_dev *)filp->private_data;
    printk("ap3216c_write\r\n");
    return 0;
}


/* ap3216c操作集合 */
static const struct file_operations ap3216c_fops = {
    .owner      =   THIS_MODULE,
    .open       =   ap3216c_open,
    .release    =   ap3216c_release,
    .read       =   ap3216c_read,
    .write      =   ap3216c_write,
};


/* 1.6 probe函数 */
static int ap3216c_probe(struct i2c_client *client, const struct i2c_device_id *id) {
    int ret = 0;
    printk("ap3216c_probe successful!\r\n");
    /*===================== 2.1 搭建字符设备框架 =====================*/
    /* 2.1.1 配置设备结构体的参数 */
    ap3216c.name = "ap3216c";   //设备名称
    ap3216c.major = 0;   //主设备号
    ap3216c.count = 1;
    /* 2.1.2 分配或定义设备号并注册设备号 */
    /* 如果主设备号不为0,否则为自定义设备号,否则为由系统分配设备号 */
    if(ap3216c.major) {
        ap3216c.devid = MKDEV(ap3216c.major,0); //整合设备号
        ret = register_chrdev_region(ap3216c.devid,ap3216c.count,ap3216c.name);   //注册设备号
    } else {
        alloc_chrdev_region(&ap3216c.devid,0,ap3216c.count,ap3216c.name);   //自动分配设备号
        ap3216c.major = MAJOR(ap3216c.devid);   //主设备号
        ap3216c.minor = MINOR(ap3216c.devid);   //次设备号
    }    
    if (ret < 0) {
        printk("ap3216c chrdev region failed!\r\n");
        goto fail_devid;    //注册设备号失败
    }
    printk("ap3216c major = %d, minor = %d \r\n",ap3216c.major,ap3216c.minor);  //打印主次设备号
    /* 2.1.3 添加字符设备 */
    cdev_init(&ap3216c.cdev, &ap3216c_fops);
    ret = cdev_add(&ap3216c.cdev, ap3216c.devid, ap3216c.count);
    if(ret < 0) {
        goto fail_cdev;
    }
    /* 2.1.4 自动创建设备节点 */
    ap3216c.class = class_create(THIS_MODULE,ap3216c.name); //创建类
    if(IS_ERR(ap3216c.class)) {
        ret = PTR_ERR(ap3216c.class);
        goto fail_class;
    }
    ap3216c.device = device_create(ap3216c.class,NULL,ap3216c.devid,NULL,ap3216c.name); //创建设备
    if(IS_ERR(ap3216c.device)) {
        ret = PTR_ERR(ap3216c.device);
        goto fail_device;
    }
    ap3216c.private_data = client;  //获取i2c_client
    return 0;

fail_device:    //创建设备失败
    class_destroy(ap3216c.class); 
fail_class: //创建类失败
    cdev_del(&ap3216c.cdev);
fail_cdev:   //注册设备或者叫添加设备失败
    unregister_chrdev_region(ap3216c.devid,ap3216c.count);  
fail_devid:  //分配设备号失败
    return ret;
}

/* 1.7 remove函数 */
static int ap3216c_remove(struct i2c_client *client) {
    /* 6.4 摧毁设备 */
    device_destroy(ap3216c.class,ap3216c.devid);    
    /* 6.3 摧毁类 */
    class_destroy(ap3216c.class);  
    /* 6.2 注销字符设备 */
    cdev_del(&ap3216c.cdev);    
    /* 6.1 注销设备号*/
    unregister_chrdev_region(ap3216c.devid,ap3216c.count);  
    return 0;
}

/* 1.4 传统的匹配表 */
static const struct i2c_device_id ap3216c_id[] = {
    {"alientek,ap3216c",0},
    {}
};

/* 1.5 设备树匹配表 */
static const struct of_device_id ap3216c_of_match[] = {
    { .compatible = "alientek,ap3216c" },
    {}
};

/* 1.3 i2c_driver结构体 */
static struct i2c_driver ap3216c_driver = {
    .probe = ap3216c_probe,
    .remove = ap3216c_remove,
    .driver = {
        .name = "ap3216c",
        .owner = THIS_MODULE,
        .of_match_table = of_match_ptr(ap3216c_of_match),
    },
    .id_table = ap3216c_id,
};
	  
/* 1.1 驱动模块入口函数 */  
static int __init ap3216c_init(void) {  
    int ret = 0;
    ret = i2c_add_driver(&ap3216c_driver);
    return 0;
} 

/* 1.2 驱动模块出口函数 */  
static void __exit ap3216c_exit(void) {  
    i2c_del_driver(&ap3216c_driver);
}  

	  
/* 驱动许可和个人信息 */ 
module_init(ap3216c_init);
module_exit(ap3216c_exit); 
MODULE_LICENSE("GPL");  
MODULE_AUTHOR("djw");  

ap3216cAPP.c

#include 
#include 
#include 
#include 
#include 
#include 
#include 
#include 
#include 

/*
 * argc:应用程序参数个数 
 * argv[]:具体打参数内容,字符串形式 
 * ./ap3216cAPP 
 * ./ap3216cAPP /dev/ap3216c
 */

/*
* @description : main 主程序
* @param - argc : argv 数组元素个数
* @param - argv : 具体参数
* @return : 0 成功;其他 失败
*/
int main(int argc, char *argv[])
{
    int fd, ret;
    char *filename;
    unsigned short data[3];
    unsigned short ir,als,ps;

    /* 判断输入的元素个数 */
    if(argc != 2) {
        printf("ERROR USAGE!\r\n");
        return -1;
    }

    filename = argv[1];     //获取驱动文件的路径
    fd = open(filename,O_RDWR); //根据文件路径以读写方式打开文件
    if(fd < 0) {
        printf("file %s open failed!\r\n",filename);
        return -1;
    }
    while(1) {
        ret = read(fd,&data,sizeof(data));
        if(ret < 0) {
            return -1;
        }
        ir = data[0];
        als = data[1];
        ps = data[2];
        printf("AP3216C ir=%d, als=%d, ps=%d\r\n",ir,als,ps);
        usleep(200000);
    }
    
    close(fd);
    return 0;
}

验证操作:
~# depmod
~# modprobe ap3216c.ko
~# ./ap3216cAPP /dev/ap3216c
现象:
驱动程序开发:I2C设备驱动_第4张图片

你可能感兴趣的:(Linux驱动开发,linux,驱动开发,嵌入式)