图像分类网络6——VGG16识别5分类(ImageDataGenerator和迁移学习)
目录
- 1 VGG16
-
- 1.1 VGG16简介
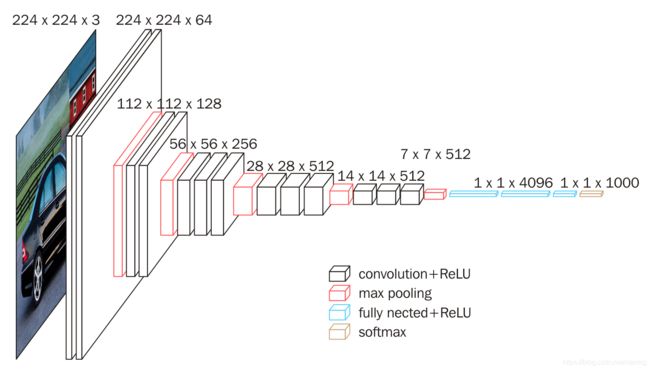
- 1.2 VGG16结构
- 1.3 VGG16特点
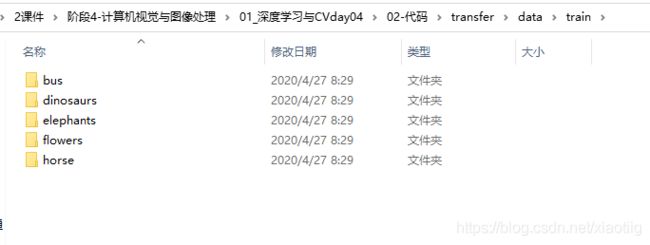
- 2 数据文件
- 3 代码
-
- 3.1 ImageDataGenerator和VGG16迁移学习
- 3.2 VGG16迁移学习+转移矩阵
-
- 3.2.1 训练
- 3.2.2 单张图像预测
- 3.2.3 测试获取准确率
- 3.2.4 批量图像预测实现转移矩阵
1 VGG16
1.1 VGG16简介
VGG是由Simonyan 和Zisserman在文献《Very Deep Convolutional Networks for Large Scale Image Recognition》中提出卷积神经网络模型,其名称来源于作者所在的牛津大学视觉几何组(Visual Geometry Group)的缩写。
该模型参加2014年的 ImageNet图像分类与定位挑战赛,取得了优异成绩:在分类任务上排名第二,在定位任务上排名第一。
论文地址:
https://arxiv.org/abs/1409.1556
1.2 VGG16结构
参考下面两篇文章:
https://www.cnblogs.com/lfri/p/10493408.html
https://baijiahao.baidu.com/s?id=1667221544796169037&wfr=spider&for=pc
1.3 VGG16特点
(1)结构简单,就是一层一层顺序堆叠
(2)卷积层均采用相同的卷积核参数

(3)池化层均采用相同的池化核参数,2*2 的最大池化
(4)网络很深,达到了16层,在当时已经是最深的网络了
(5)参数多,最后3个全连接层的参数太多
需要的存储容量大,不利于部署。例如存储VGG16权重值文件的大小为500多MB,不利于安装到嵌入式系统中。
(6)特征提取能力强,现在很多网络都以vgg16作为特征提取层
2 数据文件
3 代码
3.1 ImageDataGenerator和VGG16迁移学习
# 这个代码有点难懂


import tensorflow as tf
from tensorflow.keras.preprocessing.image import ImageDataGenerator
from tensorflow.keras.applications.vgg16 import VGG16, preprocess_input
import numpy as np
import os
os.environ["TF_CPP_MIN_LOG_LEVEL"] = "2"


class TransferModel(object):
    """VGG迁移学习做5个类别图片识别
    """
    def __init__(self):
        # 初始化训练集和测试集的迭代器
        self.train_generator = ImageDataGenerator(rescale=1.0 / 255.0,
                                                  shear_range=0.2,
                                                  zoom_range=0.2,
                                                  horizontal_flip=True)

        self.test_generator = ImageDataGenerator(rescale=1.0 / 255.0)

        # 数据目录
        self.train_dir = r"H:\05学习资料\14,软件开发\黑马人工智能\2课件\阶段4-计算机视觉与图像处理\01_深度学习与CVday04\02-代码\transfer\data\train"
        self.test_dir = r"H:\05学习资料\14,软件开发\黑马人工智能\2课件\阶段4-计算机视觉与图像处理\01_深度学习与CVday04\02-代码\transfer\data\test"

        # 定义输入数据的大小和批次大小
        self.image_size = (224, 224)
        self.batch_size = 32

        # 初始化VGG基础模型,
        self.base_model = VGG16(weights='imagenet', include_top=False)

        self.label_dict = {
            '0': 'bus',
            '1': 'dinosaurs',
            '2': 'elephants',
            '3': 'flowers',
            '4': 'horse'
        }

    def get_local_data(self):
        """读取本地的图片数据以及类别标签
        :return:
        """
        # 1、datagen.flow_from_directory
        # 这个函数需要好好看看

        # 这里没有用标签,是这个函数自动给赋予了0,1,2,3,4的标签了

        train_gen = self.train_generator.flow_from_directory(self.train_dir,
                                                             target_size=self.image_size,
                                                             batch_size=self.batch_size,
                                                             class_mode='binary',
                                                             shuffle=True)

        test_gen = self.train_generator.flow_from_directory(self.test_dir,
                                                             target_size=self.image_size,
                                                             batch_size=self.batch_size,
                                                             class_mode='binary',
                                                             shuffle=True)

        return train_gen, test_gen

    def refine_base_model(self):
        """
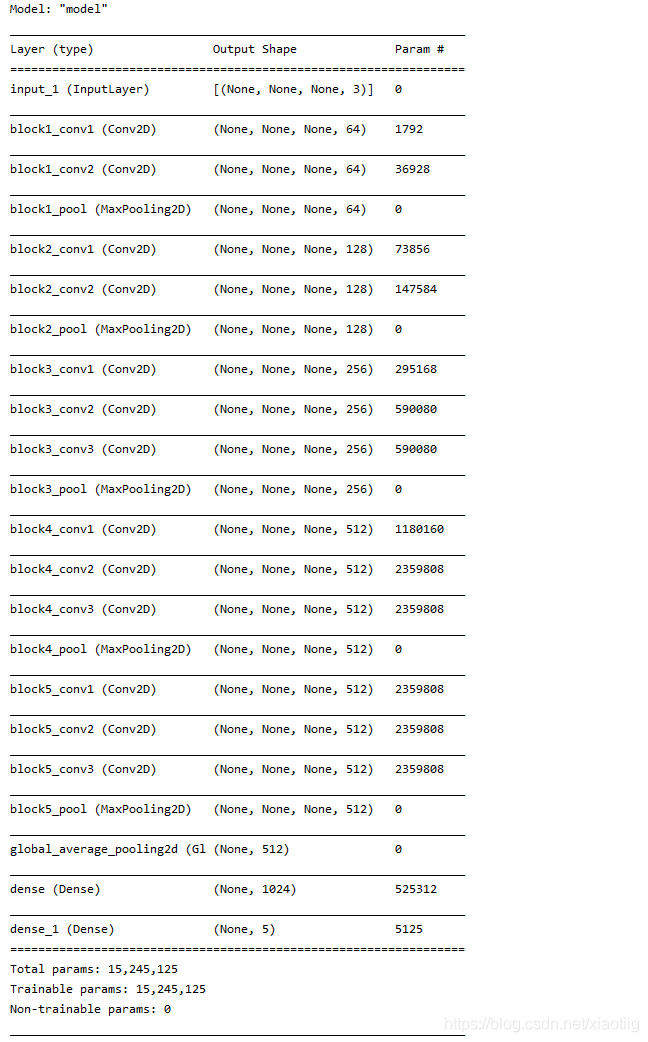
        修改VGG的模型,在VGG的5个block,[None, ?, ?, 512]--->全局平均池化-->两个全连接层1024, 5
        :return: 新的迁移学习模型
        """
        # 1、获取VGG模型的输出,不包含原有模型的top结构
        x = self.base_model.outputs[0]

        # 2、在VGG的输出之后定义自己的模型
        x = tf.keras.layers.GlobalAveragePooling2D()(x)

        # 两个全连接层
        x = tf.keras.layers.Dense(1024, activation=tf.nn.relu)(x)
        y_predict = tf.keras.layers.Dense(5, activation=tf.nn.softmax)(x)

        # 3、使用Model封装新的模型返回
        transfer_model = tf.keras.models.Model(inputs=self.base_model.inputs, outputs=y_predict)

        return transfer_model

    def freeze_vgg_model(self):
        """
        冻结VGG的前面卷积结构,不参与训练
        :return:
        """
        # 循环获取base_model当中的层
        for layer in self.base_model.layers:
            layer.trainable = False

        return None

    def compile(self, model):
        """
        编译模型,指定优化器损失计算方式,准确率衡量
        :return:
        """
        model.compile(optimizer=tf.keras.optimizers.Adam(),
                      loss=tf.keras.losses.sparse_categorical_crossentropy,
                      metrics=['accuracy'])
        return None

    def fit_generator(self, model, train_gen, test_gen):
        """进行模型训练,注意使用fit_generator,不是fit
        :param model:
        :param train_gen:
        :param test_gen:
        :return:
        """
        modelckpt = tf.keras.callbacks.ModelCheckpoint('./ckpt/transfer_{epoch:02d}-{val_accuracy:.2f}.h5',
                                                       monitor='val_accuracy',
                                                       save_best_only=True,
                                                       save_weights_only=False,
                                                       mode='auto',
                                                       period=1)

        model.fit_generator(train_gen, epochs=3, validation_data=test_gen, callbacks=[modelckpt])

        return None

    def predict(self, model):
        """预测输入图片的类别
        :return:
        """
        # 1、加载模型训练好的权重
        model.load_weights("./ckpt/transfer_01-0.93.h5")

        # 2、读取图片处理图片数据,形状,数据归一化
        image = tf.io.read_file(r"H:\05学习资料\14,软件开发\黑马人工智能\2课件\阶段4-计算机视觉与图像处理\01_深度学习与CVday04\02-代码\transfer\data\test\dinosaurs\402.jpg")
        image_decoded = tf.image.decode_jpeg(image)
        image_resized = tf.image.resize(image_decoded, [224, 224]) / 255.0
        # 3维-->4维的形状改变
        img = tf.reshape(image_resized, (1, image_resized.shape[0], image_resized.shape[1], image_resized.shape[2]))
        print("修改之后的形状:", img.shape)

        # 3、输入数据做预测
        y_predict = model.predict(img)

        index = np.argmax(y_predict, axis=1)
        print('=====', index)
        print('-=-=-=', index[0])
        print('-=-=-=', type(index[0]))
        print('-=-=-=', type(str(index[0])))

        print(self.label_dict[str(index[0])])

        return None


if __name__ == '__main__':

    tm = TransferModel()
    # 训练模型步骤
    # 1、读取数据
    train_gen, test_gen = tm.get_local_data()
    # print(train_gen, test_gen)
    # 2、定义模型去微调模型和冻结模型
    # 3、模型的compile和训练
    model = tm.refine_base_model()
    print(model.summary())
    tm.freeze_vgg_model()
    tm.compile(model)
    tm.fit_generator(model, train_gen, test_gen)

    # # 测试数据
    transfer_model = tm.refine_base_model()
    tm.predict(transfer_model)
3.2 VGG16迁移学习+转移矩阵
3个文件
一个训练文件
一个单张图像预测文件
一个批量文件预测实现转移矩阵
3.2.1 训练
import tensorflow as tf
import os


#定义一个数据读取的函数,读取指定文件夹下的数据,制作样本数据集
def read_image_filename(data_dir):
    building_dir=data_dir+'building/' #得到建筑的文件夹
    cloud_dir=data_dir+'cloud/'
    farmland_dir = data_dir + 'farmland/'
    health_dir = data_dir + 'health/'
    infected_dir = data_dir + 'infected/'
    water_dir = data_dir + 'water/'

    #构建特征数据集,值为对应的图片文件名
    building_filenames=tf.constant([building_dir+fn for fn in os.listdir(building_dir)]) #猫的文件名
    cloud_filenames=tf.constant([cloud_dir+fn for fn in os.listdir(cloud_dir)])
    farmland_filenames = tf.constant([farmland_dir + fn for fn in os.listdir(farmland_dir)])
    health_filenames = tf.constant([health_dir + fn for fn in os.listdir(health_dir)])
    infected_filenames = tf.constant([infected_dir + fn for fn in os.listdir(infected_dir)])
    water_filenames = tf.constant([water_dir + fn for fn in os.listdir(water_dir)])
    filenames=tf.concat([building_filenames,cloud_filenames,farmland_filenames,health_filenames,infected_filenames,water_filenames],axis=-1) #对矩阵按行结合


    #构建标签数据集,build为0,cloud为1
    labels=tf.concat([
        tf.zeros(building_filenames.shape,dtype=tf.int32),  #猫的数量,并赋值相应数量的0
        tf.ones(cloud_filenames.shape,dtype=tf.int32),
        tf.fill(farmland_filenames.shape,2),
        tf.fill(health_filenames.shape,3),
        tf.fill(infected_filenames.shape,4),
        tf.fill(water_filenames.shape,5)],
        axis=-1)    #安行结合

    return filenames,labels

#解码图片并调整图片大小
def decode_image_and_resize(filename,label):
    image_string=tf.io.read_file(filename)  #读取原始文件
    #问题1
    image_decoded=tf.image.decode_jpeg(image_string) #解码JPEG图片

    #调整图像大小,要和后面模型输入要求一致,并进行标准化
    image_resized=tf.image.resize(image_decoded,[224,224])/255.0
    return image_resized,label
"""
train_data_dir='./smalldata/train/'    #文件夹
filenames,labels=read_image_filename(train_data_dir)
dataset=tf.data.Dataset.from_tensor_slices((filenames,labels))  #构建数据集

####print(filenames,labels)
#######print(dataset)

sub_dataset=dataset.take(3) #取出前三项

for x,y in sub_dataset:
    print('filename:',x.numpy(),'label:',y.numpy())

"""
#对数据进行预处理
def prepare_dataset(data_dir,buffer_size=2000,batch_size=16):
    filenames,labels=read_image_filename(data_dir)
    print(filenames.shape)
    print(labels.shape)

    dataset=tf.data.Dataset.from_tensor_slices((filenames,labels))
    dataset=dataset.map(
        map_func=decode_image_and_resize,                  #对dataset中的数据统一进行相同处理
        num_parallel_calls=tf.data.experimental.AUTOTUNE
    )
    dataset=dataset.shuffle(buffer_size)#打乱
    dataset=dataset.batch(batch_size)  #划好批次
    dataset=dataset.prefetch(tf.data.experimental.AUTOTUNE)

    return dataset


#vgg16模型
def vgg16_model(input_shape=(224,224,3)):
    vgg16=tf.keras.applications.vgg16.VGG16(include_top=False,
                                            weights='imagenet',
                                            input_shape=input_shape)


    for layer in vgg16.layers:
        layer.trainable=False     #设置vgg-16预训练模型不可训练

    last=vgg16.output

    #加入剩下未经训练的全连接层
    x=tf.keras.layers.Flatten()(last)
    x=tf.keras.layers.Dense(128,activation='relu')(x)
    x=tf.keras.layers.Dropout(0.3)(x)
    x=tf.keras.layers.Dense(32,activation='relu')(x)
    x=tf.keras.layers.Dropout(0.3)(x)
    x=tf.keras.layers.Dense(6,activation='softmax')(x)

    #建立新的模型
    model=tf.keras.models.Model(inputs=vgg16.input,outputs=x)

    model.summary()

    return model
#建立模型,模型设置
model=vgg16_model()
model.compile(optimizer='adam',
              loss='sparse_categorical_crossentropy',
              metrics=['accuracy'])

#训练模型
#下面四步读取训练数据
#定义目录
train_data_dir='./dataset/train/'
#定义缓存大小,用于打乱
buffer_size=10000
#批次大小,每个批次多少样本数
batch_size=16

#训练用的数据集
dataset_train=prepare_dataset(train_data_dir,buffer_size,batch_size)


#定义超参数
training_epochs=4

#进行训练,训练数据,数据训练多少轮
train_history=model.fit(dataset_train,epochs=training_epochs,verbose=1)


"""

  #  从训练集选0.2个用于测试,
  #  model.fit() fit函数参数说明_可乐联盟-CSDN博客 https://blog.csdn.net/LuYi_WeiLin/article/details/88555813
train_history = model.fit(train_dataset,batch_size=batch_size,epochs=training_epochs,
                          validation_data=validation_dataset,
                          validation_freq=1,
                          callbacks=cp_collback,
                          verbose=1)


# 4模型训练损失和准确率可视化
    # 得到参数
acc = train_history.history['sparse_categorical_accuracy']
val_acc = train_history.history['val_sparse_categorical_accuracy']
loss = train_history.history['loss']
val_loss = train_history.history['val_loss']
    # 画图,一行两列
plt.subplot(1,1,1)      #  一行两列第一列
plt.plot(acc,label="Training Accuracy")
plt.plot(val_acc,label="Validation Accuracy")
plt.plot(loss,label="Training Loss")
plt.plot(val_loss,label="Validation Loss")
plt.title("Accuracy and Loss")
plt.legend()

    # 保存和显示
plt.savefig('./result.jpg')
plt.show()


"""


######模型存储
#将模型结构和模型权重参数分开存储
#模型结构存储再.yaml文件中
yaml_string=model.to_yaml()
with open('./models/cat_dog.yaml','w') as model_file:
    model_file.write(yaml_string)

#模型权重参数存储在.h5文件中
model.save_weights('./models/cat_dog.h5')

print("模型保存完毕!")
3.2.2 单张图像预测
import tensorflow as tf
from tensorflow.keras.preprocessing import image
import matplotlib.pyplot as plt
import os
import numpy as np


#载入模型
#恢复模型结构
with open('./models/cat_dog.yaml') as yamlfile:
    loaded_model_yaml=yamlfile.read()
model=tf.keras.models.model_from_yaml(loaded_model_yaml)

#导入模型的权重参数
model.load_weights('./models/cat_dog.h5')
model.summary()

'''
进行数据测试,显示出准确率的想法
1、读取文件路径 1
2、得到相应的labels 1
3、得到预测结果 1
4、预测结果与labels对比,相同的话t+1,
5、t/totle

'''

###1、2读取文件和labels

while True:
    files=input("filepath")

    print(files)


    ###3得到预测结果
    #结合原来的两个函数重新定义一个函数,实现数据的预处理和预测

    image_size=(224,224)

    test_images=[]
    img=image.load_img(files,target_size=image_size)
    img_array=image.img_to_array(img)
    test_images.append(img_array)
    test_data=np.array(test_images)
    test_data/=255.0

    print("The test_data's shape is",end='') #end为空,实现不换行
    print(test_data.shape)

    preds = model.predict(test_data)
    print(preds.shape)
    print(preds)

    max = np.argmax(preds)

    dict = {0:"building",1:"cloud",2:"farmland",3:"health",4:"infected",5:"water"}

    print(dict[max])

print("Finish!")
3.2.3 测试获取准确率
import tensorflow as tf
from tensorflow.keras.preprocessing import image
import matplotlib.pyplot as plt
import os
import numpy as np


#载入模型
#恢复模型结构
with open('./models/cat_dog.yaml') as yamlfile:
    loaded_model_yaml=yamlfile.read()
model=tf.keras.models.model_from_yaml(loaded_model_yaml)

#导入模型的权重参数
model.load_weights('./models/cat_dog.h5')

'''
进行数据测试,显示出准确率的想法
1、读取文件路径 1
2、得到相应的labels 1
3、得到预测结果 1
4、预测结果与labels对比,相同的话t+1,
5、t/totle

'''

###1、2读取文件和labels
test_data_dir='./dataset/test/'

def read_image_filename(data_dir):
    building_dir=data_dir+'building/' #得到建筑的文件夹
    cloud_dir=data_dir+'cloud/'
    farmland_dir = data_dir + 'farmland/'
    health_dir = data_dir + 'health/'
    infected_dir = data_dir + 'infected/'
    water_dir = data_dir + 'water/'

    #构建特征数据集,值为对应的图片文件名
    building_filenames=tf.constant([building_dir+fn for fn in os.listdir(building_dir)]) #猫的文件名
    cloud_filenames=tf.constant([cloud_dir+fn for fn in os.listdir(cloud_dir)])
    farmland_filenames = tf.constant([farmland_dir + fn for fn in os.listdir(farmland_dir)])
    health_filenames = tf.constant([health_dir + fn for fn in os.listdir(health_dir)])
    infected_filenames = tf.constant([infected_dir + fn for fn in os.listdir(infected_dir)])
    water_filenames = tf.constant([water_dir + fn for fn in os.listdir(water_dir)])
    filenames=tf.concat([building_filenames,cloud_filenames,farmland_filenames,health_filenames,infected_filenames,water_filenames],axis=-1) #对矩阵按行结合


    #构建标签数据集,build为0,cloud为1
    labels=tf.concat([
        tf.zeros(building_filenames.shape,dtype=tf.int32),  #猫的数量,并赋值相应数量的0
        tf.ones(cloud_filenames.shape,dtype=tf.int32),
        tf.fill(farmland_filenames.shape,2),
        tf.fill(health_filenames.shape,3),
        tf.fill(infected_filenames.shape,4),
        tf.fill(water_filenames.shape,5)],
        axis=-1)    #安行结合

    return filenames,labels

filenames,labels=read_image_filename(test_data_dir)
sess=tf.Session()
#files:./smalldata/test1/dog.11200.jpg
files=sess.run(filenames)
print(len(files))
print(files)
label=sess.run(labels)
print(len(label))
print(label)

###3得到预测结果
#结合原来的两个函数重新定义一个函数,实现数据的预处理和预测

def test_predict(files,image_size=(224,224)):
    test_images=[]
    # 读取测试图片并进行预处理
    for img_filename in files:
        img=image.load_img(img_filename,target_size=image_size)
        img_array=image.img_to_array(img)
        test_images.append(img_array)
    test_data=np.array(test_images)
    test_data/=255.0

    print("The test_data's shape is",end='') #end为空,实现不换行
    print(test_data.shape)

    preds = model.predict(test_data)
    print(preds.shape)
    print(preds)
    #4,t+1
    k=0
    t=0 #用于记录准确值
    for i in range(0, len(files)):
        if np.argmax(preds[i]) == label[i]:
            t=t+1
            print(t)

        else:
            print("错误:",files[i])

    #5,准确率
    accuracy=t/(1.0*len(files))
    print("准确率为:",accuracy)
    return accuracy


accuracy=test_predict(files)
print("Finish!")
3.2.4 批量图像预测实现转移矩阵
import tensorflow as tf
from tensorflow.keras.preprocessing import image
import matplotlib.pyplot as plt
import os
import numpy as np


#载入模型
#恢复模型结构
with open('./models/cat_dog.yaml') as yamlfile:
    loaded_model_yaml=yamlfile.read()
model=tf.keras.models.model_from_yaml(loaded_model_yaml)

#导入模型的权重参数
model.load_weights('./models/cat_dog.h5')

'''
进行数据测试,显示出准确率的想法
1、读取文件路径 1
2、得到相应的labels 1
3、得到预测结果 1
4、预测结果与labels对比,相同的话t+1,
5、t/totle

'''

###图片路径
test_data_dir='E:/6qiege/zx3'
dirs = os.listdir(test_data_dir)
print("一共%d张图像"%(len(dirs)))

# 用于统计个数
building_num = 0
cloud_num = 0
farmland_num = 0
health_num = 0
infected_num = 0
water_num = 0

number = 0

for jpg in dirs:
    number +=1
    if number%1000 == 0:
        print("处理到第%d张."%number)
    image_size = (224, 224)

    test_images = []
    jpgpath='E:/6qiege/zx3/'+jpg
    img = image.load_img(jpgpath, target_size=image_size)
    img_array = image.img_to_array(img)
    test_images.append(img_array)
    test_data = np.array(test_images)
    test_data /= 255.0

    preds = model.predict(test_data)

    max = np.argmax(preds)
    if max==0:
        building_num +=1
    if max==1:
        cloud_num +=1
    if max==2:
        farmland_num +=1
    if max==3:
        health_num +=1
    if max==4:
        infected_num +=1
    if max==5:
        water_num +=1

print("建筑%d张" % building_num)
print("云体%d张" % cloud_num)
print("农田%d张" % farmland_num)
print("健康林%d张" % health_num)
print("受害木%d张" % infected_num)
print("水体%d张" % water_num)


