速成Spring Boot:#3 创建Layers(2) : Data Access Layer
源码链接,建议使用VSCode的Gitlens或其它可视化软件(如SourceTree)查看Git Log,有助于理解
说明 三秋的数据库、LeetCode数据库专题都是用MySQL,干脆直接一周速成MySQL拿来用吧 ( •̀ ω •́ )y
文档 https://spring.io/guides/gs/accessing-data-mysql/
关联到本地数据库
首先配置src/main/resources/下的application.properties文件,在这里配置数据库的连接(简易起见用默认登陆MySQL的连接)
# URL:jdbc:mysql:// 表示使用MySQL,localhost:3306 为登陆地址,database为指定的数据库(Schema)名字
spring.datasource.url=jdbc:mysql://localhost:3306/database
# 用户名
spring.datasource.username=root
# 密码
spring.datasource.password=*******
# 驱动,直接用MySQL
spring.datasource.driver-class-name=com.mysql.cj.jdbc.Driver
# (旧版本)数据库操作语句规范(已不需要!)
spring.jpa.hibernate.dialect=org.hibernate.dialect.MySQLDialect
# 表的更新机制:关闭后端时自动删除,启动后创建(Debug用)
spring.jpa.hibernate.ddl-auto=create-drop
# 运行时显示SQL语句(Debug用)
spring.jpa.show-sql=true
# 格式化显示SQL语句(Debug用)
spring.jpa.properties.hibernate.format_sql=true

# 显示错误讯息
server.error.include-message=always
在实际发布时,注释为(Debug用)的可以去掉,然后记得补上spring.jpa.hibernate.ddl-auto=update
ddl-auto的选项
ddl-auto:create:每次运行该程序,没有表格会新建表格,表内有数据会清空ddl-auto:create-drop:每次程序结束的时候会清空表ddl-auto:update:每次运行程序,没有表格会新建表格,表内有数据不会清空,只会更新ddl-auto:validate:运行程序会校验数据与数据库的字段类型是否相同,不同会报错
不带注释的(可直接复制);复制后根据情况请自行修改.url,.username和.password
Debug
spring.datasource.url=jdbc:mysql://localhost:3306/database
spring.datasource.username=root
spring.datasource.password=********
spring.datasource.driver-class-name=com.mysql.cj.jdbc.Driver
spring.jpa.hibernate.ddl-auto=create-drop
spring.jpa.show-sql=true
spring.jpa.properties.hibernate.format_sql=true

server.error.include-message=always
Release
spring.datasource.url=jdbc:mysql://localhost:3306/database
spring.datasource.username=root
spring.datasource.password=********
spring.datasource.driver-class-name=com.mysql.cj.jdbc.Driver
spring.jpa.hibernate.ddl-auto=update

server.error.include-message=always
我们还没创建数据库,参考教程使用命令行创建MySQL数据库
修改pom.xml,将初始化时注释的依赖项去掉,运行,成功!
这时才知道Django有多香:
创建Models后可以通过python manage.py makemigrations在项目路径下的数据库.sqlite3中直接创建数据表
转换为实例(Entity)
在Django中要想为一个模型创建数据表,需要继承自models.Model,这样这个类才能作为模型存在
在Spring Boot中可以通过@Entity修饰符将类修饰成实例
关于模型与实例的不同,请参考what is difference between a Model and an Entity
从数据库操作上,两者大同小异,不宜过分纠结( ̄▽ ̄)"
注 为了统一上下文,仍沿用Django的方式称呼为"模型"
对于模型类,应默认使用数据表序号作为主键,在Django中这是默认的,而在Spring Boot中需要先创建id成员变量,再指定策略机制生成
利用@GeneratedValue()修饰符来指定产生主键的方式,然后通过@Id将变量修饰为主键
官方文档给出的一个标准的实例(Entity)如下:
@Entity // This tells Hibernate to make a table out of this class
public class User {
    @Id
    @GeneratedValue(strategy=GenerationType.AUTO)
    private Integer id; // this will be the pk
    ......
}
这里GenerationType.AUTO将会产生一个新的数据表hibernate_sequence,用来保存其它表的主键增长
然而这并不是一个好习惯,在复杂工程中很有可能会产生以下错误:
- 如果删掉的话将会产生错误
could not read a hi value - you need to populate the table: hibernate_sequence - 在搭建服务器时,服务器重启后主键将会从1重新开始记录,而此时数据库里已经有主键为1的数据,如果采用
GenerationType.AUTO会报主键重复的错误
解决方法为改用其它策略,其中MySQL建议使用GenerationType.IDENTITY(自增策略)
@GeneratedValue(strategy = GenerationType.AUTO):主键增长方式由数据库自动选择,不推荐@GeneratedValue(strategy = GenerationType.IDENTITY): 要求数据库选择自增方式,oracle不支持此种方式。@GeneratedValue(strategy = GenerationType.SEQUENCE):采用数据库提供的sequence机制生成主键。mysql不支持此种方式@GeneratedValue(strategy = GenerationType.TABLE):使用一个特定的数据库表格来保存主键
最终改为
@Entity
public class Student {
    @Id
    @GeneratedValue(strategy = GenerationType.IDENTITY)
    private Long id;
    ......
}
一般来说MySQL使用GenerationType.IDENTITY),而其它常见的比如PostgreSQL则使用GenerationType.SEQUENCE,作为介绍技术放在下面
@Entity
public class Student {
    @Id
    @SequenceGenerator(
        name = "student_sequence",
        sequenceName = "student_sequence",
        allocationSize = 1
    )
    @GeneratedValue(
        strategy=GenerationType.SEQUENCE,
        generator = "student_sequence"
    )
    private Long id;
    ......
}
顿时觉得还是MySQL最方便╰( ̄ω ̄o)(果然暑假一周速成MySQL是正确的)
Data Access Layer
Spring Boot将常用的数据库操作封装成一个工具类,省去了我们直接写SQL语句操作的负担
创建一个interface,它继承自这个已封装好了的工具类JpaRepository,传入 所对应的模型类名 和 该模型主键的元素类型
最后通过@Repository修饰为Data Access Layer
@Repository
public interface ModelRepository extends JpaRepository<Model, Typeof(Model.Id)> {
    ......
}
比如我们上面定义的模型class Student,而它的主键(用@Id修饰)的是private Long id,所以模板参数填入
@Repository
public interface StudentRepository extends JpaRepository<Student, Long> {
    ......
}
利用DI(依赖注入),修改Service Layer,使之关联至Data Access Layer
// Service Layer
@Service
public class StudentService {
    private final StudentRepository studentRepository;

    @Autowired
    public StudentService(StudentRepository studentRepository) {
        this.studentRepository = studentRepository;
    }

    public List<Student> getStudents() {
        return studentRepository.findAll(); // 等价于 SELECT * FROM TABLE
    }
}
现在数据表是空的,自然没有任何东西(验证?)
对数据库进行预设置(configure)
参考 @Bean
如果我们想在后端启动时立即对数据表进行设置(比如增加几条数据),我们可以创建一个专门进行预设置(Configuration)的类
创建一个class ModelConfig,通过@Configuration进行修饰使之称为"设置类"
将操作以λ-函数的方式封装在CommandLineRunner对象中,使得这个对象 在被修饰为Bean 的前提下,后端启动时能够自动运行这些操作
Interface used to indicate that a bean should run when it is contained within a SpringApplication.
如果没有通过
@Bean修饰为bean,那么CommandLineRunner将会无视它,使得被封装的操作无法被自动执行
以下是一个实例
@Configuration
public class StudentConfig {
    @Bean
    CommandLineRunner commandLineRunner(StudentRepository repository) {
        return args -> {
            List<Student> students = new LinkedList<>();
            students.add(new Student(1L, "Seele", "[email protected]", LocalDate.of(2000, 10, 18), 21));
            students.add(new Student("Kamisato", "[email protected]", LocalDate.of(2002, 9, 28), 19));
            repository.saveAll(students);
        };
    };
}
Multiple CommandLineRunner beans can be defined within the same application context and can be ordered using the Ordered interface or @Order annotation.
也就是说一个操作对应一个
CommandLineRunner,可以分开而不用(也不应该)全部封装在一起
至此,所有Layers已被成功构建并关联了起来,接下来实现接口即可
设置相对(Not persistent) 属性
参考 @Transient 理解
在实现class Student时,注意到Int age是随着当前时间相对变化的,我们希望能做到这种变化(i.e.非持久化,即不是一开始就在数据表中写死的)
可以使用@Transient修饰符,使得该变量属于该模型但不存在于数据表中
@Entity
public class Student {
    ......
    @Transient
    private Integer age;
    ......
    public Integer getAge() {
        return Period.between(this.dob, LocalDate.now()).getYears();
    }
}
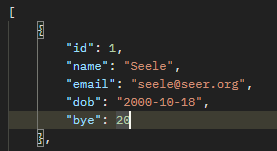
这时就产生了一个疑问:JPARepository是怎么知道这个函数就是对应着age?于是进行了各种尝试:
关联至数据表后,将不会调用
toString()生成JSON串
而是通过模型的所有Getters优先从数据表中按Getters的函数名(正则表达式提取)获取模型的信息
最后以函数名为key生成JSON串传递至前端
JSON的排列顺序
{
   主键,
   从数据表中直接提取的信息(按模型中定义变量的顺序),
   无法从数据表中直接提取的信息(按字符串排序)
}

