(5)RabbitMQ之Work Queues(工作队列)
上节中我们介绍了RabbitMQ的入门helloworld程序,本节会在上节的基础之上介绍Work Queues(工作队列):包括工作队列的使用方式、默认的分发方式及如何做到公平转发等。
概述
根据官网介绍,工作队列(又称:任务队列)背后的主要思想是避免立即执行资源密集型任务,并且必须等待它完成。相反,我们安排任务稍后完成。我们将任务封装 为消息并将其发送到队列。在后台运行的工作进程将弹出任务并最终执行作业。当您运行许多工作程序时,它们之间将共享任务。
这个概念在Web应用程序中特别有用,在这些应用程序中,在短HTTP请求窗口期间无法处理复杂任务。
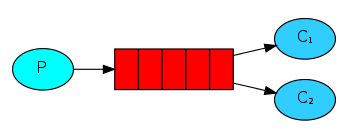
我们看到消息消费者会有多个,如果任务较多,当前的消费者处理不完的话,可以动态增加消费者以提高任务处理能力。
程序示例
项目GitHub地址 https://github.com/RookieMember/RabbitMQ-Learning.git。我们可以通过 Thread.sleep() 的方式来模拟消费者处理业务逻辑的耗时。消息发送者代码如下:
package cn.wkp.rabbitmq.newest.work;

import com.rabbitmq.client.Channel;
import com.rabbitmq.client.Connection;

import cn.wkp.rabbitmq.util.ConnectionUtil;

public class Send {

    private final static String QUEUE_NAME = "work_queue";

    public static void main(String[] argv) throws Exception {
        // 获取到连接以及mq通道
        Connection connection = ConnectionUtil.getConnection();
        // 从连接中创建通道
        Channel channel = connection.createChannel();

        // 声明(创建)队列
        channel.queueDeclare(QUEUE_NAME, false, false, false, null);

        // 消息内容
        for(int i=0;i<10;i++) {
        	String message = "工作"+i;
        	channel.basicPublish("", QUEUE_NAME, null, message.getBytes());
        	System.out.println(" [x] Sent '" + message + "'");
        }
        //关闭通道和连接
        channel.close();
        connection.close();
    }
}
注意:消费者代码 channel.basicConsume(QUEUE_NAME, false, consumer) 第二个参数为false表示需要手动发送Ack应答,channel.basicAck(envelope.getDeliveryTag(), false)表示消费者手动发送应答。
消费者1代码如下:通过线程休眠模拟处理业务耗时100ms,表示该消费者性能较好处理较快
package cn.wkp.rabbitmq.newest.simple;

import java.io.IOException;
import com.rabbitmq.client.AMQP.BasicProperties;
import com.rabbitmq.client.Channel;
import com.rabbitmq.client.Connection;
import com.rabbitmq.client.Consumer;
import com.rabbitmq.client.DefaultConsumer;
import com.rabbitmq.client.Envelope;

import cn.wkp.rabbitmq.util.ConnectionUtil;

public class Recv1 {

	private final static String QUEUE_NAME = "work_queue";

	public static void main(String[] argv) throws Exception {

		// 获取到连接以及mq通道
		Connection connection = ConnectionUtil.getConnection();
		Channel channel = connection.createChannel();

		// 声明队列
		channel.queueDeclare(QUEUE_NAME, false, false, false, null);

		// 定义队列的消费者
		Consumer consumer = new DefaultConsumer(channel) {
			@Override
			public void handleDelivery(String consumerTag, Envelope envelope, BasicProperties properties, byte[] body)
					throws IOException {
				System.out.println("消费者1收到消息:" + new String(body));
				try {
					Thread.sleep(100);
				} catch (InterruptedException e) {
					e.printStackTrace();
				}
                                //消费者手动发送ack应答
			        channel.basicAck(envelope.getDeliveryTag(), false);
			}
		};
		// 监听队列
		channel.basicConsume(QUEUE_NAME, false, consumer);
	}
}
消费者2代码如下:通过线程休眠模拟处理业务耗时30ms,表示该消费者性能差点儿处理较慢
package cn.wkp.rabbitmq.newest.simple;

import java.io.IOException;

import com.rabbitmq.client.AMQP.BasicProperties;
import com.rabbitmq.client.Channel;
import com.rabbitmq.client.Connection;
import com.rabbitmq.client.Consumer;
import com.rabbitmq.client.DefaultConsumer;
import com.rabbitmq.client.Envelope;

import cn.wkp.rabbitmq.util.ConnectionUtil;

public class Recv2 {

	private final static String QUEUE_NAME = "work_queue";

	public static void main(String[] argv) throws Exception {

		// 获取到连接以及mq通道
		Connection connection = ConnectionUtil.getConnection();
		Channel channel = connection.createChannel();

		// 声明队列
		channel.queueDeclare(QUEUE_NAME, false, false, false, null);

		// 定义队列的消费者
		Consumer consumer = new DefaultConsumer(channel) {
			@Override
			public void handleDelivery(String consumerTag, Envelope envelope, BasicProperties properties, byte[] body)
					throws IOException {
				System.out.println("消费者2收到消息:" + new String(body));
				try {
					Thread.sleep(30);
				} catch (InterruptedException e) {
					e.printStackTrace();
				}
                                //消费者手动发送ack应答
			        channel.basicAck(envelope.getDeliveryTag(), false);
			}
		};
		// 监听队列
		channel.basicConsume(QUEUE_NAME, false, consumer);
	}
}
运行消费者生产者代码之后,观察控制台输出如下:
 [x] Sent '工作0'
 [x] Sent '工作1'
 [x] Sent '工作2'
 [x] Sent '工作3'
 [x] Sent '工作4'
 [x] Sent '工作5'
 [x] Sent '工作6'
 [x] Sent '工作7'
 [x] Sent '工作8'
 [x] Sent '工作9'
消费者1收到消息:工作1
消费者1收到消息:工作3
消费者1收到消息:工作5
消费者1收到消息:工作7
消费者1收到消息:工作9
消费者2收到消息:工作0
消费者2收到消息:工作2
消费者2收到消息:工作4
消费者2收到消息:工作6
消费者2收到消息:工作8
我们可以看到,虽然消费者2比消费者1处理的快得多,但是还是收到的消息数量跟消费者1一样。仔细观察消息后面的数字,发现奇数消息发给了消费者1,偶数消息发给了消费者,是循环交替分发的。通过查看官网资料,我们知道RabbitMQ默认是通过 Round-robin dispatching 方式进行消息分发的,RabbitMQ将按顺序将每条消息发送给下一个消费者,它不会查看消费者未确认消息的数量。平均而言,每个消费者将获得相同数量的消息,这种分发消息的方式称为round-robin(循环法)。
公平分发
上面我们知道了RabbitMQ默认是 round-robin 分发的,但这种方式是不合理的,正常情况应该是消费者处理的快了应该多分发一些消息,处理慢了应该少分发一些。我们可以使用 basicQos 方法和 prefetchCount = 1 设置。这告诉RabbitMQ一次向一个worker发送一条消息。或者,换句话说,在处理并确认前一个消息之前,不要向worker发送新消息。注意这里消息的ack确认模式必须要为手动,channel.basicQos()方法才会起作用。

下面我们通过代码示例看下basicQos()方法是怎么使用的。生产者代码不变,消费者1、2代码如下:只是添加了一行代码channel.basicQos(1);
package cn.wkp.rabbitmq.newest.simple;

import java.io.IOException;
import com.rabbitmq.client.AMQP.BasicProperties;
import com.rabbitmq.client.Channel;
import com.rabbitmq.client.Connection;
import com.rabbitmq.client.Consumer;
import com.rabbitmq.client.DefaultConsumer;
import com.rabbitmq.client.Envelope;

import cn.wkp.rabbitmq.util.ConnectionUtil;

public class Recv1 {

	private final static String QUEUE_NAME = "work_queue";

	public static void main(String[] argv) throws Exception {

		// 获取到连接以及mq通道
		Connection connection = ConnectionUtil.getConnection();
		Channel channel = connection.createChannel();

		// 声明队列
		channel.queueDeclare(QUEUE_NAME, false, false, false, null);

		//指该消费者在接收到队列里的消息但没有返回确认结果之前,它不会将新的消息分发给它。
		channel.basicQos(1);

		// 定义队列的消费者
		Consumer consumer = new DefaultConsumer(channel) {
			@Override
			public void handleDelivery(String consumerTag, Envelope envelope, BasicProperties properties, byte[] body)
					throws IOException {
				System.out.println("消费者1收到消息:" + new String(body));
				try {
					Thread.sleep(100);
				} catch (InterruptedException e) {
					e.printStackTrace();
				}
				//消费者手动发送ack应答
				channel.basicAck(envelope.getDeliveryTag(), false);
			}
		};
		// 监听队列
		channel.basicConsume(QUEUE_NAME, false, consumer);
	}
}
package cn.wkp.rabbitmq.newest.simple;
import java.io.IOException;
import com.rabbitmq.client.AMQP.BasicProperties;
import com.rabbitmq.client.Channel;
import com.rabbitmq.client.Connection;
import com.rabbitmq.client.Consumer;
import com.rabbitmq.client.DefaultConsumer;
import com.rabbitmq.client.Envelope;
import cn.wkp.rabbitmq.util.ConnectionUtil;
public class Recv2 {
private final static String QUEUE_NAME = "work_queue";
public static void main(String[] argv) throws Exception {
// 获取到连接以及mq通道
Connection connection = ConnectionUtil.getConnection();
Channel channel = connection.createChannel();
// 声明队列
channel.queueDeclare(QUEUE_NAME, false, false, false, null);
//指该消费者在接收到队列里的消息但没有返回确认结果之前,它不会将新的消息分发给它。
channel.basicQos(1);
// 定义队列的消费者
Consumer consumer = new DefaultConsumer(channel) {
@Override
public void handleDelivery(String consumerTag, Envelope envelope, BasicProperties properties, byte[] body)
throws IOException {
System.out.println("消费者2收到消息:" + new String(body));
try {
Thread.sleep(30);
} catch (InterruptedException e) {
e.printStackTrace();
}
//消费者手动发送ack应答
channel.basicAck(envelope.getDeliveryTag(), false);
}
};
// 监听队列
channel.basicConsume(QUEUE_NAME, false, consumer);
}
}运行消费者、生产者之后控制台输出如下结果:
 [x] Sent '工作0'
 [x] Sent '工作1'
 [x] Sent '工作2'
 [x] Sent '工作3'
 [x] Sent '工作4'
 [x] Sent '工作5'
 [x] Sent '工作6'
 [x] Sent '工作7'
 [x] Sent '工作8'
 [x] Sent '工作9'
消费者1收到消息:工作1
消费者1收到消息:工作4
消费者1收到消息:工作8
消费者2收到消息:工作0
消费者2收到消息:工作2
消费者2收到消息:工作3
消费者2收到消息:工作5
消费者2收到消息:工作6
消费者2收到消息:工作7
消费者2收到消息:工作9
可以看到已经达到了我们想要的效果:消费者1处理的慢,只收到了3条消息;消费者2处理的更快,收到了7条消息。