mmLab系列使用方法
mmLab系列使用方法
-
- 环境搭建
- mmdetection
-
- 检查
- 数据集
- 运行
- 部署
- mmdeploy
-
- 环境搭建
- 使用
- mmOCR
- mmsegmentation
环境搭建
Windows最推荐安装方法:
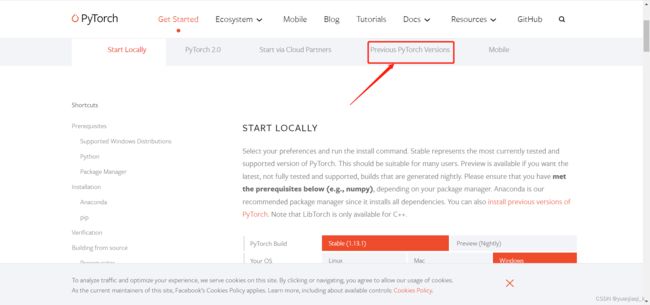
- 首先需要查好自己gpu的CUDA版本,根据版本到pytorch官方网站查找对应的pytorch版本(!!!只查找不下载!)https://pytorch.org/get-started/locally/
示例:gpu为3060
cmd中使用下列命令查看cuda版本:这查看的是CUDA最高支持的版本,并不一定是你环境里的版本!
nvidia-smi

cmd中查看CUDA版本nvcc -V,这里查看的是你安装的CUDA Toolkit版本,如果没有的话,再根据上面CUDA Version信息下载
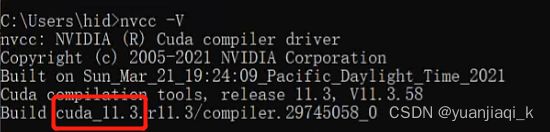
到官网进行查看
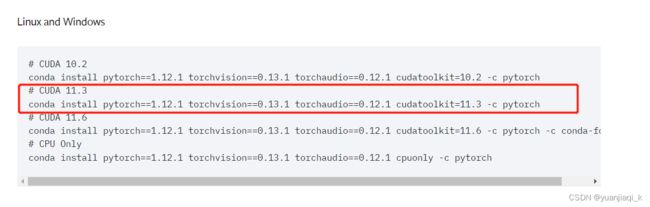
这里获得需要下载的命令,注意!!不要再cmd中使用该命令下载,也不要使用清华源下载,这样非常容易默认安装成cpuonly的版本,导致无法使用GPU!坑很多
-
根据上述命令,到轮子网站https://download.pytorch.org/whl/torch_stable.html添加链接描述中CTRL +F 查找对应版本进行下载
一定要对应好你的python版本,cuda版本以及windows版本
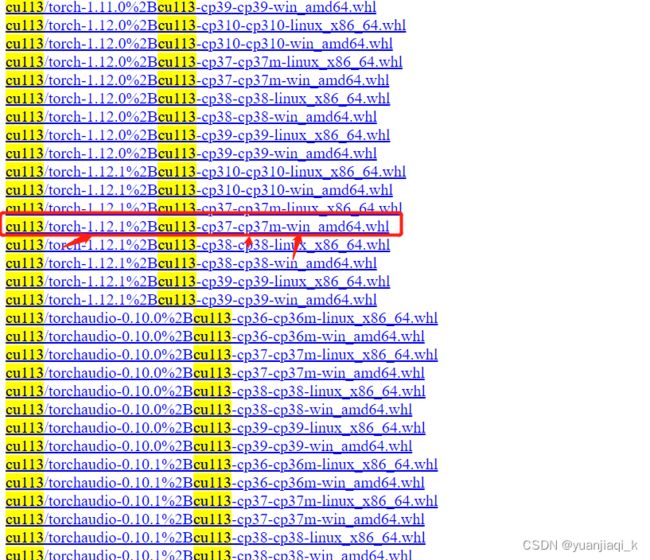

-
创建新的虚拟环境
conda create -n mmlab python=3.7
conda avtivate mmlab
cd 进入下载好的whl文件位置,pip进行安装
pip install E:/torch-1.8.0+cu101-cp37-cp37m-win_amd64.whl
- 测试gpu是否可用
import torch
flag = torch.cuda.is_available()
print(flag)

ngpu= 1
# Decide which device we want to run on
device = torch.device("cuda:0" if (torch.cuda.is_available() and ngpu > 0) else "cpu")
print(device)
print(torch.cuda.get_device_name(0))
print(torch.rand(3,3).cuda())
- 下载mmlab需要的环境mmcv
pip install mmcv-full -f https://download.openmmlab.com/mmcv/dist/{cu_version}/{torch_version}/index.html
其中{cu_version}/{torch_version}填写自己的版本,我的是
pip install mmcv-full -f https://download.openmmlab.com/mmcv/dist/cu113/torch1.12.1/index.html
6.官网下载对应的代码安装包zip,并进行环境配置
- 检测mmdetection
https://github.com/open-mmlab/mmdetection.git - 分割 mmsegmentation
https://github.com/open-mmlab/mmsegmentation - 字符识别 mmocr
https://github.com/open-mmlab/mmocr - 部署 mmdeploy
https://github.com/open-mmlab/mmdeploy
在对应的文件夹中安装对应配置
cd 你下载解压好的文件夹
python setup.py develop
mmdetection
检查
- 检测是否安装成功
安装pip install -U openmim
下载mim download mmdet --config yolov3_mobilenetv2_320_300e_coco --dest .
python demo/image_demo.py demo/demo.jpg yolov3_mobilenetv2_320_300e_coco.py yolov3_mobilenetv2_320_300e_coco_20210719_215349-d18dff72.pth --device cpu --out-file result.jpg
运行成功且result.jpg有对应框
数据集
- 准备数据集
将数据组织成COCO格式的数据
注意:MMDetection 现只支持对 COCO 格式的数据集进行 mask AP 的评测。
以能够同时分割检测的mask-rcnn 为例
{
    "images": [image],
    "annotations": [annotation],
    "categories": [category]
}


image = {
    "id": int,
    "width": int,
    "height": int,
    "file_name": str,
}

annotation = {
    "id": int,
    "image_id": int,
    "category_id": int,
    "segmentation": RLE or [polygon],
    "area": float,
    "bbox": [x,y,width,height],
    "iscrowd": 0 or 1,
}

categories = [{
    "id": int,
    "name": str,
    "supercategory": str,
}]
这里有之前写好的labelme2coco.py进行转化
import json
import os
#读入没有标注的测试集,转换成coco的json模式
pic_dir = 'D:\MyDatasets\qisheng_tianjiao\qs-front-coco/images/test'  # 图片存放文件夹名
# root为文件夹的名字,dirs  , files为由文件夹内的每个文件的名称组成数组
jpg_num=0


#print("发现label:{}张",jpg_num)
list=[]
for jpg_file_ in os.listdir(pic_dir):
    list.append(jpg_file_)
    print(jpg_file_)

print(list)
print(len(list))
def get_json_data():  # 获取json里面数据
    dicts = {}  # 用来存储数据
    with open('D:\MyDatasets\qisheng_tianjiao\qs-front-coco/annotations/instances_test2017.json', 'r', encoding='utf8') as f:
        json_data = json.load(f)
        features = json_data["images"]
        #print(features)
        i=0

        for feature in features:
            if i < len(list):
            #filename=feature['file_name']
                feature['file_name']=list[i]
                dicts = json_data
                print(feature['file_name'])
                print(i)
            i = i + 1
        dicts = json_data  # 将修改后的内容保存在dict中
    return dicts


def write_json_data(dict):  # 写入json文件
    with open('D:\MyDatasets\qisheng_tianjiao\qs-front-coco/annotations/instances_test2017.json', 'w') as r:
        json.dump(dict, r)

file = get_json_data()
write_json_data(file)
- 准备配置文件
# 这个新的配置文件继承自一个原始配置文件,只需要突出必要的修改部分即可
_base_ = 'mask_rcnn/mask_rcnn_r50_caffe_fpn_mstrain-poly_1x_coco.py'

# 我们需要对头中的类别数量进行修改来匹配数据集的标注
model = dict(
    roi_head=dict(
        bbox_head=dict(num_classes=1),
        mask_head=dict(num_classes=1)))

# 修改数据集相关设置
dataset_type = 'CocoDataset'
classes = ('balloon',)
data = dict(
    train=dict(
        img_prefix='balloon/train/',
        classes=classes,
        ann_file='balloon/train/annotation_coco.json'),
    val=dict(
        img_prefix='balloon/val/',
        classes=classes,
        ann_file='balloon/val/annotation_coco.json'),
    test=dict(
        img_prefix='balloon/val/',
        classes=classes,
        ann_file='balloon/val/annotation_coco.json'))

# 我们可以使用预训练的 Mask R-CNN 来获取更好的性能
load_from = 'checkpoints/mask_rcnn_r50_caffe_fpn_mstrain-poly_3x_coco_bbox_mAP-0.408__segm_mAP-0.37_20200504_163245-42aa3d00.pth'
运行
- 训练模型
python ./tools/train.py ./configs/mask_rcnn/mask_rcnn_r50_fpn_1x_coco_YUAN.py
- 测试模型
python tools/test.py configs/mask_rcnn/mask_rcnn_r50_fpn_1x_coco.py work_dirs/mask_rcnn_r50_fpn_1x_coco/latest.pth --eval bbox --show --show-dir work_dirs/mask_rcnn_r50_fpn_1x_coco/result
部署
具体环境配置等部署相关内容见下面mmdeploy,这里先展示相应命令
- 导出的模型储存在mmdeploy文件夹下
- 导出模型
将训练好的pytorfch权重文件.pth 转化为onnx并且转为tensorrt需要的.engine文件
python tools/deploy.py
configs/mmdet/detection/detection_tensorrt_dynamic-320x320-1344x1344.py
../mmdetection-master/configs/faster_rcnn/faster_rcnn_r50_fpn_1x_coco.py
../mmdetection-master/checkpoints/best_101.pth
../mmdetection-master/demo/1.jpg
--work-dir ../mmdeploy_out/mmdet/faster_rcnn_r50_trt/ --device cuda:0 --dump-info
- 使用c++生成的exe运行测试
object_detection.exe cuda
权重————E:\\PycharmProjects\\mmdeploy_out\\mmdet\\faster_rcnn_r50_trt
图片————E:\PycharmProjects\mmdetection-master\data\coco\val2017\
mmdeploy
这里只有我们所用的c++接口,匹配tensorRT的部署方法
最好在训练模型之前查看支持部署的模型
https://github.com/open-mmlab/mmdeploy/blob/master/README_zh-CN.md
推荐参考https://blog.csdn.net/qq_39435411/article/details/126010874
环境搭建
在已经搭建好mmdetection的情况下
-
安装 MMDeploy SDK 依赖
安装OpenCV并且添加至系统变量 -
安装vs2019(不支持vs2017)
-
安装pplcv
pplcv 是 openPPL 开发的高性能图像处理库
在以下链接下载https://github.com/openppl-public/ppl.cv.git
cd ppl.cv
git checkout tags/v0.7.0 -b v0.7.0
将ppl.cv的文件夹放入环境变量
mkdir pplcv-build
cd pplcv-build
cmake .. -G "Visual Studio 16 2019" -T v142 -A x64 -DCMAKE_BUILD_TYPE=Release -DCMAKE_INSTALL_PREFIX=install -DPPLCV_USE_CUDA=ON -DPPLCV_USE_MSVC_STATIC_RUNTIME=OFF
cmake --build . --config Release -- /m
cmake --install . --config Release
cd ../..
使用
-
在官网下载mmdeploy安装包
https://github.com/open-mmlab/mmdeploy 并解压 -
新建build文件夹,cd进去
-
编译(复制后要删除空行)
填好对应文件夹位置
#vs2019
cmake .. -G "Visual Studio 16 2019" -A x64 -T v142
-DMMDEPLOY_BUILD_SDK=ON -DMMDEPLOY_TARGET_DEVICES="cuda"
-DMMDEPLOY_TARGET_BACKENDS="trt"
-DMMDEPLOY_CODEBASES="all"
-Dpplcv_DIR="E:\PycharmProjects\mmdetection-master\ppl.cv\pplcv-build\install\lib\cmake\ppl"
-DTENSORRT_DIR="E:\PycharmProjects\mmdetection-master\ppl.cv\pplcv-build\install\lib\cmake\ppl"
-DCUDNN_DIR="C:\Program Files\NVIDIA GPU Computing Toolkit\CUDA\v11.3"
cmake --build . --config Release -- /m
cmake --install . --config Release
- 编译mmdeploy example
cd $env:MMDEPLOY_DIR\build\install\example
mkdir build -ErrorAction SilentlyContinue
cd build
cmake .. -G "Visual Studio 16 2019" -A x64 -T v142 ` -DMMDeploy_DIR="E:\\PycharmProjects\\mmdeploy-master\\build\\install\\lib\\cmake\\MMDeploy"

cmake --build . --config Release -- /m
- 推理测试
cd Release
object_detection.exe cuda F:\mmdeploy_c_sdk_demo\models\yolox_s F:\\gy77\\mmdetection\\demo\\demo.jpg
在Release文件夹下生成了mmdeploy支持部署的各种exe文件,可以导入对应转换好的engine文件进行测试
mmOCR 和mmSegmentation具体使用方法以及部署方法同类似,以下只放出对应命令,具体使用可以参考官方文档
mmOCR
Libra-Rcnn
1. python ./tools/train.py ./configs/libra_rcnn/libra_faster_rcnn_r50_fpn_1x_coco.py
2.python tools/test.py configs/libra_rcnn/libra_faster_rcnn_r50_fpn_1x_coco.py work_dirs/libra_faster_rcnn_r50_fpn_1x_coco/best_bbox_mAP_epoch_136.pth --eval bbox  --show --show-dir work_dirs/libra_faster_rcnn_r50_fpn_1x_coco/result
3.python tools/deploy.py configs/mmdet/detection/detection_tensorrt_dynamic-320x320-1344x1344.py ../mmdetection-master/configs/libra_rcnn/libra_faster_rcnn_r50_fpn_1x_coco.py  ../mmdetection-master/work_dirs/libra_faster_rcnn_r50_fpn_1x_coco/best_bbox_mAP_epoch_136.pth ../mmdetection-master/demo/1.jpg --work-dir ../mmdeploy_out/mmdet/libra_faster_rcnn_r50_fpn_1x_coco/ --device cuda:0 --dump-info
mmsegmentation
训练
python tools/train.py E:\PycharmProjects\mmsegmentation-master\configs\bisenetv2\bisenetv2_fcn_4x4_1024x1024_160k_cityscapes.py
--work-dir workplace
测试
python tools/test.py configs/bisenetv2/bisenetv2_fcn_4x4_1024x1024_160k_cityscapes.py
workplace/latest.pth --show-dir workplace/output_dir
部署
python tools/deploy.py configs/mmdet/detection/detection_tensorrt_dynamic-320x320-1344x1344.py
../mmdetection-master/configs/faster_rcnn/faster_rcnn_r50_fpn_1x_coco.py
../mmdetection-master/checkpoints/latest.pth ../mmdetection-master/demo/1.jpg --work-dir ../mmdeploy_out/mmdet/faster_rcnn_r50_trt/
--device cuda:0 --dump-info