谷粒学院——Day06【整合阿里云OSS、EasyExcel技术实现Excel导入分类】
阿里云存储OSS
一、对象存储OSS
1. 开通“对象存储OSS”服务
- 阿里云:https://www.aliyun.com/
- 申请阿里云账号
- 实名认证
- 开通“对象存储OSS”服务
- 进入管理控制台
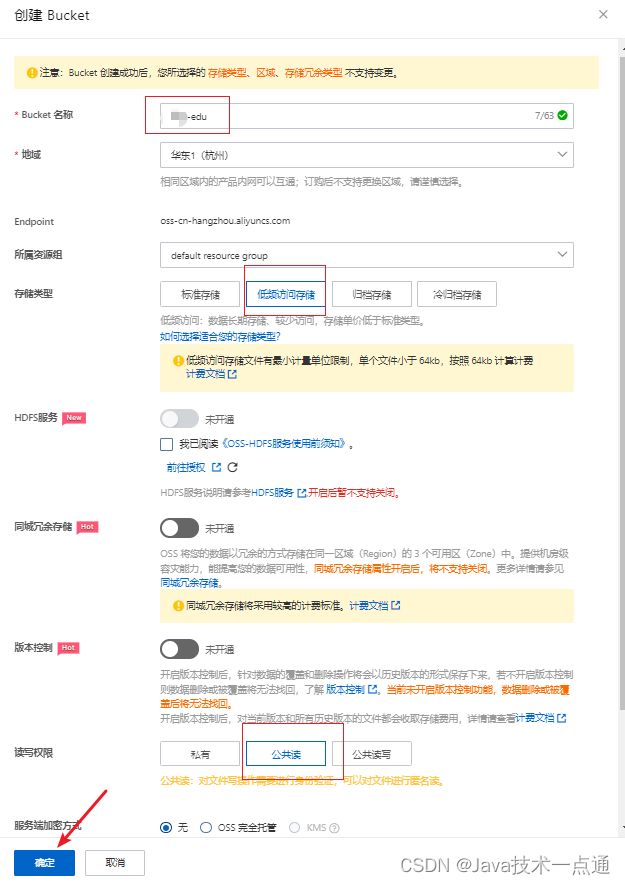
2. 创建Bucket
选择:标准存储、公共读、不开通。
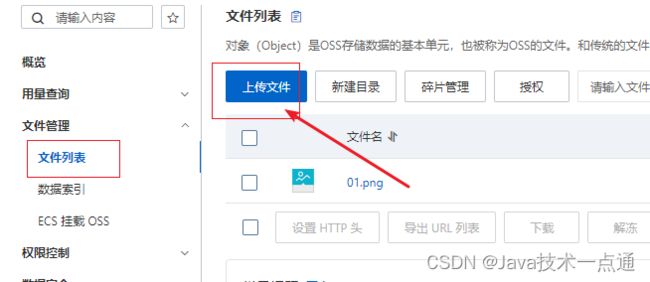
3.上传默认头像
4. 创建RAM子用户
二、使用SDK
1. 创建Mavaen项目
aliyun-oss
2. pom
    com.aliyun.oss
    aliyun-sdk-oss
    3.1.0
3. 找到编码时需要用到的常量值
(1)endpoint
(2)bucketName
(3)accessKeyId
(4)accessKeySecret
4. 测试创建Bucket的连接
// Endpoint以杭州为例,其它Region请按实际情况填写。
String endpoint = "https://oss-cn-hangzhou.aliyuncs.com";
// 阿里云主账号AccessKey拥有所有API的访问权限,风险很高。强烈建议您创建并使用RAM账号进行API访问或日常运维,请登录RAM控制台创建RAM账号。
String accessKeyId = "";
String accessKeySecret = "";
String bucketName = "";

// 创建OSSClient实例。
OSS ossClient = new OSSClientBuilder().build(endpoint, accessKeyId, accessKeySecret);

// 创建存储空间。
ossClient.createBucket(bucketName);

// 关闭OSSClient。
5. 判断存储空间是否存在
@Test
public void testExist() {
// 创建OSSClient实例。
OSSClient ossClient = new OSSClient(endpoint, accessKeyId, accessKeySecret);
boolean exists = ossClient.doesBucketExist(bucketName);
System.out.println(exists);
// 关闭OSSClient。
ossClient.shutdown();
}
6. 设置存储空间的访问权限
@Test
public void testAccessControl() {
// 创建OSSClient实例。
OSSClient ossClient = new OSSClient(endpoint, accessKeyId, accessKeySecret);
// 设置存储空间的访问权限为:公共读。
ossClient.setBucketAcl(bucketName, CannedAccessControlList.PublicRead);
// 关闭OSSClient。
ossClient.shutdown();
}
讲师管理后端【上传讲师头像】
一、新建云存储微服务
1. 在service模块下创建子模块service-oss
2. 配置pom.xml
service-oss 上级模块 service 已经引入 service 的公共依赖,所以 service-oss 模块只需引入阿里云 oss相关依赖即可。
service 父模块已经引入了 service-base 模块,所以 Swagger 相关默认已经引入。
            com.aliyun.oss
            aliyun-sdk-oss


            joda-time
            joda-time
3. 配置application.properties
注意: 阿里云OSS那里的配置需要修改成自己的信息。
#服务端口
server.port=8002

#服务名
spring.application.name=service-oss

#环境设置:dev、test、prod
spring.profiles.active=dev

#阿里云 OSS
#不同的服务器,地址不同
aliyun.oss.file.endpoint=your endpoint
aliyun.oss.file.keyid=your accessKeyId
aliyun.oss.file.keysecret=your accessKeySecret

#bucket可以在控制台创建,也可以使用java代码创建
aliyun.oss.file.bucketname=zwy-edu
4. 创建启动类
创建 OssApplication 启动类:
@SpringBootApplication
@ComponentScan(basePackages = {"com.atguigu"})
public class OssApplication {
    public static void main(String[] args) {

        SpringApplication.run(OssApplication.class, args);

    }
}
5. 启动项目
spring boot 会默认加载org.springframework.boot.autoconfigure.jdbc.DataSourceAutoConfiguration这个类,
而DataSourceAutoConfiguration类使用了@Configuration注解向spring注入了dataSource bean,又因为项目(oss模块)中并没有关于dataSource相关的配置信息,所以当spring创建dataSource bean时因缺少相关的信息就会报错。
解决方案:
在 @SpringBootApplication 注解上加上 exclude,解除自动加载 DataSourceAutoConfiguration。
@SpringBootApplication(exclude = DataSourceAutoConfiguration.class)
二、实现文件上传
1. 从配置文件读取常量
创建常量读取工具类:ConstantPropertiesUtil.java
使用 @Value 读取 application.properties 里的配置内容。
用spring的 InitializingBean 的 afterPropertiesSet 来初始化配置信息,这个方法将在所有的属性被初始化后调用。
/**
 *  ConstantPropertiesUtil:常量类,读取配置文件application.properties中的配置
 */
// 当项目已启动,spring接口,spring加载之后,执行接口一个方法
@Component
public class ConstantPropertiesUtil implements InitializingBean {

    @Value("${aliyun.oss.file.endpoint}")
    private String endpoint;

    @Value("${aliyun.oss.file.keyid}")
    private String keyid;

    @Value("${aliyun.oss.file.keysecret}")
    private String keysecret;

    @Value("${aliyun.oss.file.bucketname}")
    private String bucketname;

    // 定义公开静态变量
    public static String END_POINT;
    public static String KEY_ID;
    public static String KEY_SECRET;
    public static String BUCKET_NAME;


    @Override
    public void afterPropertiesSet() throws Exception {
        END_POINT = endpoint;
        KEY_SECRET = keysecret;
        KEY_ID = keyid;
        BUCKET_NAME = bucketname;
    }

}
2. 文件上传
创建Service接口:OssService.java
public interface OssService  {
    //上传头像到OSS
    String uploadFileAvatar(MultipartFile file);
}
创建Service接口的实现类:OssServiceImpl.java
参考SDK中的:Java->上传文件->简单上传->流式上传->上传文件流
@Service
public class OssServiceImpl implements OssService {

    //上传头像到OSS
    @Override
    public String uploadFileAvatar(MultipartFile file) {

        //工具类获取值
        String endpoint = ConstantPropertiesUtil.END_POINT;
        String accessKeyId = ConstantPropertiesUtil.KEY_ID;
        String accessKeySecret = ConstantPropertiesUtil.KEY_SECRET;
        String bucketName = ConstantPropertiesUtil.BUCKET_NAME;


        InputStream inputStream = null;


        try {
            // 创建OSS实例。
            OSS ossClient = new OSSClientBuilder().build(endpoint, accessKeyId, accessKeySecret);

            // 获取上传文件的输入流
            inputStream = file.getInputStream();

            //获取文件名称
            String fileName = file.getOriginalFilename();

            //调用oss实例中的方法实现上传
            //参数1: Bucket名称
            //参数2: 上传到oss文件路径和文件名称 /aa/bb/1.jpg
            //参数3: 上传文件的输入流
            ossClient.putObject(bucketName, fileName, inputStream);

            // 关闭OSSClient。
            ossClient.shutdown();

            //把上传后文件路径返回
            //需要把上传到阿里云oss路径手动拼接出来
            //https://zwy-edu.oss-cn-hangzhou.aliyuncs.com/01.png
            String url = "http://"+bucketName+"."+endpoint+"/"+fileName ;

            return url;
        } catch (IOException e) {
            e.printStackTrace();
            return null;
        }
    }

}
3. 控制层
创建controller:OssController.java
@Api(description="阿里云文件管理")
@RestController
@RequestMapping("/eduoss/fileoss")
@CrossOrigin // 解决跨域问题
public class OssController {

    @Autowired
    private OssService ossService;

    // 上传头像
    @ApiOperation(value = "文件上传")
    @PostMapping
    public R uploadOssFile(MultipartFile file) {
        // 获取上传文件:MultipartFile

        // 获取上传到oss的路径
        String url = ossService.uploadFileAvatar(file);

        // 返回R对象
        return R.ok().data("url", url);
    }
}
4. 重启oss服务
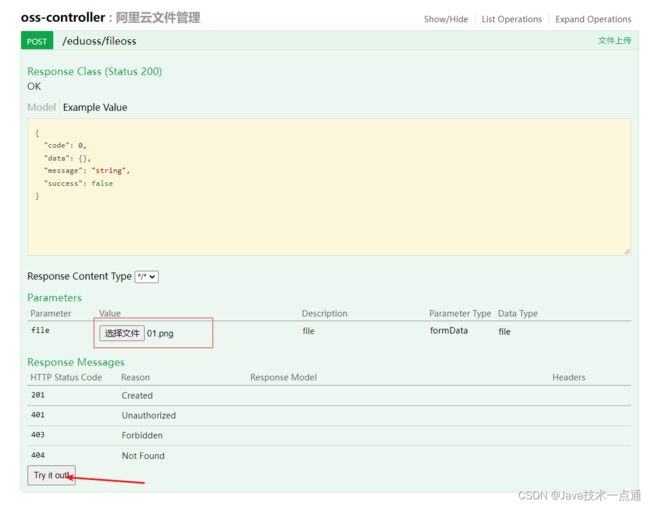
5. Swagger中测试文件上传
启动项目后,访问:http://localhost:8002/swagger-ui.html


6. 后端接口完善
问题1: 多次上传相同名称文件,会造成最后一次上传把之前上传的文件进行覆盖。
解决方案: 在文件名称随机添加唯一值,让每个文件名称都不同。
问题2: 把文件进行分类管理
解决方案: 根据日期进行分类,实现年月日分类。
在 OssServiceImpl 实现类中对文件名进行修改:
 //获取文件名称
            String fileName = file.getOriginalFilename();

            // 1.在文件名称里面添加随机唯一的值
            String uuid = UUID.randomUUID().toString().replaceAll("-", "");
            // qedfdfw01.jpg
            fileName = uuid + fileName;

            // 2.把文件按照日期分类
            // 2022/01/13/01.jpg
            // 获取当前日期
            String datePath = new DateTime().toString("yyyy/MM/dd");

            // 拼接日期
            //  2022/01/13/qedfdfw01.jpg
            fileName = datePath + "/" + fileName;
7. nginx回顾
nginx(反向代理服务器) 的优点:
- 请求转发
- 负载均衡
- 动静分离
下载官网:https://nginx.org/en/download.html
下载后解压到目录中。

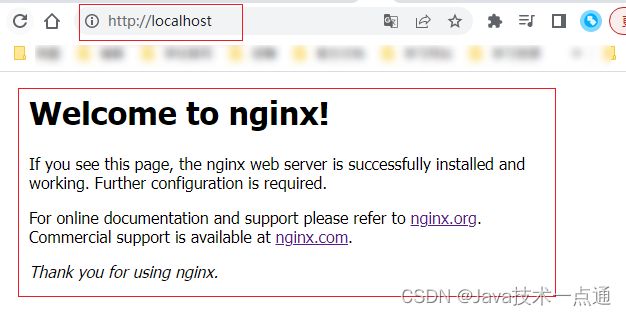
浏览器中输入:http://localhost/, nginx 启动成功后会出现页面:
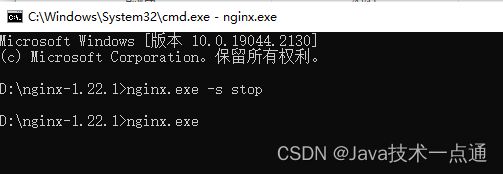
注意: 使用 cmd 启动 nginx, 如果关闭cmd窗口, nginx 不会停止的,需要手动停止再启动:
8. 配置nginx反向代理
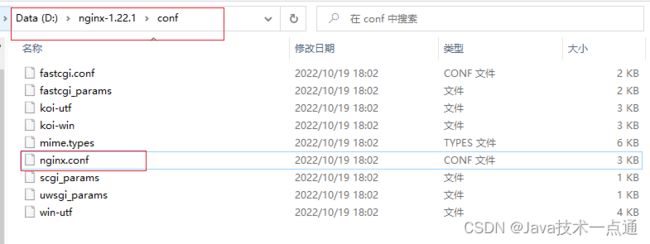
在 /conf/nginx.conf 打开配置文件:
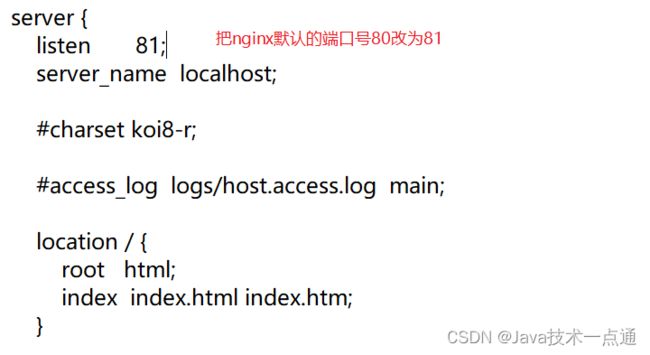
修改 nginx 默认端口:
配置 nginx转发规则:
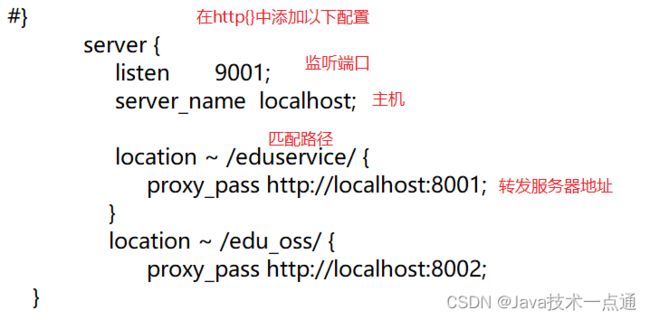
server {
        	     listen       9001;
                     server_name  localhost;

	     location ~ /eduservice/ {
	          proxy_pass http://localhost:8001;
                    }
                    location ~ /eduoss/ {
                          proxy_pass http://localhost:8002;
        }
- 启动前端端口9528
- 启动nginx端口81,用来监听端口9001
- 9001会监听请求转发
- 启动后端8001、8002
讲师管理前端【上传讲师头像】
一、前端整合图片上传组件
1. 复制头像上传组件
从vue-element-admin复制组件:
vue-element-admin/src/components/ImageCropper
vue-element-admin/src/components/PanThumb
2. 前端参考实现
src/views/components-demo/avatarUpload.vue
3. 前端添加文件上传组件
src\views\edu\teacher\save.vue:
更换头像
引入组件模板:
//引入头像组件
import ImageCropper from '@/components/ImageCropper'
import PanThumb from '@/components/PanThumb'
声明组件:
export default {
  //声明引入的组件
  components:{ImageCropper,PanThumb},
    ...

}
4. js脚本实现上传和图片回显
export default {
     //声明引入的组件
    components:{ImageCropper,PanThumb},
    data() {
        return {
            // 其他数据类型
            .......,

            imagecropperShow:false, // 上传弹框组件是否显示
            imagecropperKey:0, // 上传组件key值
            BASE_API: process.env.BASE_API, // 接口API地址
        }
    },

     .........

    methods: {
    	// 其他函数
    	.....,
        // 关闭上传弹框的方法
        close() {
            this.imagecropperShow = false
            // 上传组件初始化
            this.imagecropperKey = this.imagecropperKey+2
        },

        // 上传成功方法
        cropSuccess(data) {
            this.imagecropperShow = false
            // 上传之后接口返回图片地址
            this.teacher.avatar = data.url
            this.imagecropperKey = this.imagecropperKey+2
        },
         }
    }
}
二、测试文件上传
课程分类管理【EasyExcel导入课程分类】
一、课程分类存储结构
二、EasyExcel读写Excel的基本使用
1. Excel导入导出的应用场景
- 数据导入:减轻录入工作量
- 数据导出:统计信息归档
- 数据传输:异构系统之间数据传输
2. EasyExcel简介
- Java领域解析、生成Excel比较有名的框架有Apache poi、jxl等。但他们都存在一个严重的问题就是非常的耗内存。如果你的系统并发量不大的话可能还行,但是一旦并发上来后一定会OOM或者JVM频繁的full gc。
- EasyExcel是阿里巴巴开源的一个excel处理框架,以使用简单、节省内存著称。EasyExcel能大大减少占用内存的-主要原因是在解析Excel时没有将文件数据一次性全部加载到内存中,而是从磁盘上一行行读取数据,逐个解析。
- EasyExcel采用一行一行的解析模式,并将一行的解析结果以观察者的模式通知处理(AnalysisEventListener)。
三、EasyExcel实现对Excel写操作
1. 创建一个普通的maven项目
直接在 service_edu 这个模块中进行测试。
2. pom中引入xml相关依赖
    com.alibaba
    easyexcel
    2.1.1
由于 service 模块中已经引入依赖,所以不需要在 service_edu 中引入以下依赖:
            org.apache.poi
            poi


            org.apache.poi
            poi-ooxml
3. 创建实体类
创建 DemoData 实体类:
@Data
public class DemoData {

    // 设置excel表头名称
    @ExcelProperty("学生编号")
    private Integer sno;

    @ExcelProperty("学生姓名")
    private String sname;

}
4. 实现写操作
创建方法循环设置要添加到Excel的数据
public class TestEasyExcel {

    public static void main(String[] args) {
        // 实现excel写的操作
        // 1. 设置写入文件夹地址和excel文件名称
        String filename = "D:\\write.xlsx";

        // 2.调用easyExcel里面的方法实现写操作
        // write方法有两个参数: 第一个参数 文件路径名称, 第二个参数实体类class
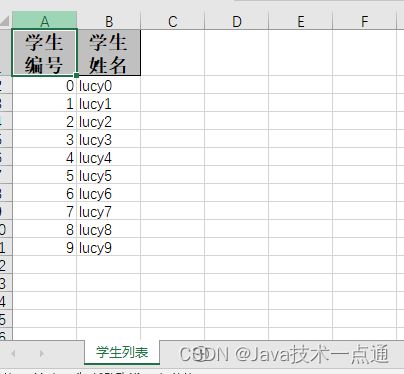
        EasyExcel.write(filename, DemoData.class).sheet("学生列表").doWrite(getLists());
    }

    // 创建方法返回List集合
    private static List getLists() {
        ArrayList list = new ArrayList<>();
        for (int i = 0; i < 10; i++) {
            DemoData demoData = new DemoData();
            demoData.setSno(i);
            demoData.setSname("lucy" + i);
            list.add(demoData);
        }
        return list;
    }
}
5. 测试
三、EasyExcel实现对Excel读操作
1. 创建实体类
@Data
public class DemoData {

    // 设置excel表头名称
    @ExcelProperty(value = "学生编号", index = 0)
    private Integer sno;

    @ExcelProperty(value = "学生姓名", index = 1)
    private String sname;

}
2. 创建读取操作的监听器
public class ExcelListener extends AnalysisEventListener {

    // 一行一行去读取excel内容
    @Override
    public void invoke(DemoData data, AnalysisContext analysisContext) {
        System.out.println("***" + data);
    }

    // 读取excel表头信息
    @Override
    public void invokeHeadMap(Map headMap, AnalysisContext context) {
        System.out.println("表头信息:"+headMap);
    }

    // 读取完成之后
    @Override
    public void doAfterAllAnalysed(AnalysisContext analysisContext) {

    }
}
3. 调用实现最终的读取
 public static void main(String[] args) {
        // 实现excel读的操作
        String filename = "D:\\read.xlsx";
        EasyExcel.read(filename, DemoData.class, new ExcelListener()).sheet().doRead();
    }
4. 测试
课程分类管理【添加课程分类】
1. 引入EasyExcel依赖
    com.alibaba
    easyexcel
    2.1.1
由于在上面的操作中 在 service 和 service_edu 模块中已经引入依赖了,此处不需要再引入。
2. 使用代码生成器生成课程分类代码
由于在 service_edu中使用过代码生成器,因此 只需要改数据库表为 edu_subject 即可。
public class CodeGenerator {

    @Test
    public void run() {

        // 1、创建代码生成器
        AutoGenerator mpg = new AutoGenerator();

        // 2、全局配置
        GlobalConfig gc = new GlobalConfig();
        String projectPath = System.getProperty("user.dir");
        gc.setOutputDir("D:\\IDEA\\guli_parent\\service\\service_edu" + "/src/main/java"); //输出目录

        gc.setAuthor("jyu_zwy"); //作者名
        gc.setOpen(false); //生成后是否打开资源管理器
        gc.setFileOverride(false); //重新生成时文件是否覆盖

        gc.setServiceName("%sService");	//去掉Service接口的首字母I
        gc.setIdType(IdType.ID_WORKER_STR); //主键策略
        gc.setDateType(DateType.ONLY_DATE);//定义生成的实体类中日期类型
        gc.setSwagger2(true);//开启Swagger2模式

        mpg.setGlobalConfig(gc);

        // 3、数据源配置
        DataSourceConfig dsc = new DataSourceConfig();
        dsc.setUrl("jdbc:mysql://localhost:3306/guli?useUnicode=true&characterEncoding=UTF-8&serverTimeZone=UTC");
        dsc.setDriverName("com.mysql.cj.jdbc.Driver");
        dsc.setUsername("root");
        dsc.setPassword("abc123");
        dsc.setDbType(DbType.MYSQL);
        mpg.setDataSource(dsc);

        // 4、包配置
        PackageConfig pc = new PackageConfig();

        //生成包:com.atguigu.eduservice
        pc.setModuleName("eduservice"); //模块名
        pc.setParent("com.atguigu");

        //生成包:com.atguigu.controller
        pc.setController("controller");
        pc.setEntity("entity");
        pc.setService("service");
        pc.setMapper("mapper");
        mpg.setPackageInfo(pc);

        // 5、策略配置
        StrategyConfig strategy = new StrategyConfig();
        strategy.setInclude("edu_subject");//根据数据库哪张表生成,有多张表就加逗号继续填写

        strategy.setNaming(NamingStrategy.underline_to_camel);//数据库表映射到实体的命名策略
        strategy.setTablePrefix(pc.getModuleName() + "_"); //生成实体时去掉表前缀

        strategy.setColumnNaming(NamingStrategy.underline_to_camel);//数据库表字段映射到实体的命名策略
        strategy.setEntityLombokModel(true); // lombok 模型 @Accessors(chain = true) setter链式操作

        strategy.setRestControllerStyle(true); //restful api风格控制器
        strategy.setControllerMappingHyphenStyle(true); //url中驼峰转连字符

        mpg.setStrategy(strategy);


        // 6、执行
        mpg.execute();

    }
}
3. EduSubjectController
@RestController
@CrossOrigin
@RequestMapping("/eduservice/subject")
public class EduSubjectController {

    @Autowired
    private EduSubjectService eduSubjectService;

    // 添加课程分类
    // 获取上传过来的文件,把文件内容读取出来
    @PostMapping("addSubject")
    public R addSubject(MultipartFile file) {
        // 获取上传过来的excel文件:MultipartFile
        eduSubjectService.addSubject(file, eduSubjectService);
        return R.ok();
    }
}
4. 创建和Excel对应的实体类
@Data
public class SubjectData {
    //一级分类
    @ExcelProperty(index = 0)
    private String oneSubjectName;

    //二级分类
    @ExcelProperty(index = 1)
    private String twoSubjectName;
}
5. SubjectExcelListener监听器
public class SubjectExcelListener extends AnalysisEventListener {

    //因为SubjectExcelListener態交给spring进行ioc管理,需要自己手动new,不能注入其他对象
    //不能实现数据库操作

    public EduSubjectService eduSubjectService;

    //有参,传递subjectService用于操作数据库
    public SubjectExcelListener(EduSubjectService eduSubjectService) {
        this.eduSubjectService = eduSubjectService;
    }

    //无参
    public SubjectExcelListener() {
    }


    //读取excel内容,一行一行读取
    @Override
    public void invoke(SubjectData subjectData, AnalysisContext analysisContext) {
        //表示excel中没有数据,就不需要读取了
        if (subjectData== null) {
            throw new GuliException(20001, "文件数据为空");
        }

        //一行一行读取,每次读取有两个值,第一个值一级分类,第二个值二级分类
        //判断是否有一级分类是否重复
        EduSubject existOneSubject = this.existOneSubject(eduSubjectService, subjectData.getOneSubjectName());
        if (existOneSubject == null){ //没有相同的一级分类,进行添加
            existOneSubject = new EduSubject();
            existOneSubject.setParentId("0"); //设置一级分类id值,0代表为一级分类
            existOneSubject.setTitle(subjectData.getOneSubjectName());//设置一级分类名
            eduSubjectService.save(existOneSubject);//给数据库添加一级分类
        }


        //获取一级分类的id值
        String pid = existOneSubject.getId();
        //判断是否有耳机分类是否重复
        EduSubject existTwoSubject = this.existTwoSubject(eduSubjectService, subjectData.getTwoSubjectName(), pid);
        if (existTwoSubject==null){//没有相同的二级分类,进行添加
            existTwoSubject = new EduSubject();
            existTwoSubject.setParentId(pid); //设置二级分类id值
            existTwoSubject.setTitle(subjectData.getTwoSubjectName());//设置二级分类名
            eduSubjectService.save(existTwoSubject);//给数据库添加二级分类
        }


    }

    //判断一级分类不能重复添加
    private EduSubject existOneSubject(EduSubjectService eduSubjectService, String name){
        QueryWrapper wrapper = new QueryWrapper<>();
        wrapper.eq("title", name)
                .eq("parent_id","0");
        EduSubject oneSubject = eduSubjectService.getOne(wrapper);
        return oneSubject;
    }

    //判断二级分类不能重复添加
    private EduSubject existTwoSubject(EduSubjectService eduSubjectService, String name, String pid){
        QueryWrapper wrapper = new QueryWrapper<>();
        wrapper.eq("title", name)
                .eq("parent_id", pid);
        EduSubject twoSubject = eduSubjectService.getOne(wrapper);
        return twoSubject;
    }


    @Override
    public void doAfterAllAnalysed(AnalysisContext analysisContext) {

    }
}
6. SubjctService
EduSubjectService:
public interface EduSubjectService extends IService {

    // 添加课程分类
    void addSubject(MultipartFile file, EduSubjectService eduSubjectService);
}
EduSubjectServiceImpl:
@Service
public class EduSubjectServiceImpl extends ServiceImpl implements EduSubjectService {

    // 添加课程分类
    @Override
    public void addSubject(MultipartFile file, EduSubjectService eduSubjectService) {

        try {
            // 文件输入流
            InputStream in = file.getInputStream();
            // 调用方法进行读取
            EasyExcel.read(in, SubjectData.class, new SubjectExcelListener(eduSubjectService)).sheet().doRead();
        } catch (IOException e) {
            e.printStackTrace();
        }
    }
}
7. 测试
首先把数据库表 edu_subject 中的数据清空。
启动项目后,在 localhost:8001/swagger-ui.html 中进行测试。
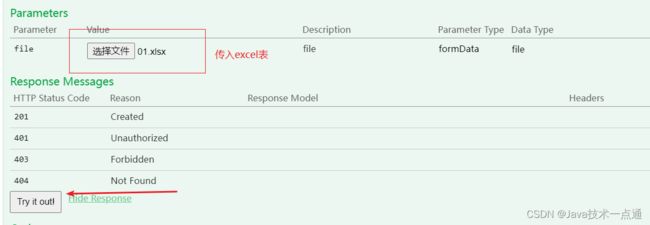
01.xlsx:


创作不易,如果有帮助到你,请给文章点个赞和收藏,让更多的人看到!!!
关注博主不迷路,内容持续更新中。
