基于C++编译的车牌识别系统
一个典型的车辆牌照识别系统一般包括以下4个部分:车辆图像获取、车牌定位、车牌字符分割和车牌字符识别 。为了方便起见,这里选用网上获取的图片。具体来说车牌识别主要分为以下几个步骤:
1、图像预处理,对于质量较差的图像需要进行图像增强。
(在这里将会以一副动态范围较窄的图像为例演示车牌号码的提取)
2、采用开运算断开较窄的狭颈和消除细的突出物,采用图像叠加(灰度图减去开操作图)突显字符等部分,随后进行二值化,再利用Canny算子进行边缘检测,利用闭运算及开运算使图像边缘成为一个整体。
3、形态学处理
4、车牌定位(矩形轮廓查找、筛选以及分割)
5、利用仿射变换同一化获取的车牌尺寸
6、切除车牌边框
7、车牌号码分割
8、车牌号码识别
源码下载地址(代码最终版参考本链接):https://download.csdn.net/download/jun_hun_/12543466
主函数部分:
		//加载图像
	Mat src, gray_src;
	src = imread("10.jpg");
	//图像预处理
	cvtColor(src, gray_src, COLOR_BGR2GRAY);
	Mat gray_blur_Image;
	GaussianBlur(gray_src, gray_blur_Image, Size(3, 3), 0, 0);
	Mat Canny_Image = Image_Preprocessing(gray_blur_Image);
	//形态学处理
	Mat median_Image = Morphological_Processing(Canny_Image);
	//车牌定位:矩形轮廓查找与筛选:
	Mat contour_Image;
	//查找轮廓会改变源图像信息,需要重新拷贝图像
	contour_Image = median_Image.clone();
	Mat Roi = Locate_License_Plate(contour_Image, src, gray_src);
	//创建仿射变换目标图像与原图像尺寸类型相同
	Mat warp_dstImage = Affine_Transform(Roi);
	Mat bin_warp_dstImage;
	threshold(warp_dstImage, bin_warp_dstImage, 0, 255, THRESH_BINARY_INV | THRESH_OTSU);
	imshow("同一尺寸的二值图像", bin_warp_dstImage);
	//车牌识别
	//切除车牌的水平与垂直边框
	bin_warp_dstImage = Remove_Vertial_Border(bin_warp_dstImage);
	bin_warp_dstImage = Remove_Horizon_Border(bin_warp_dstImage);
	//除去车牌号码以外的冗余部分
	Mat license = Horizon_Cut(bin_warp_dstImage);
	//车牌号码分割并显示分割结果
	int *x_begin = new int[8];
	int *x_end = new int[8];
	for (int i = 0; i < 8; i++)
	{
		x_begin[i] = 0;
		x_end[i] = 0;
	}
	Locate_String(x_begin, x_end, license);
	Draw_Result(x_begin, x_end, license);
	//车牌号码识别
	cout << "车牌号识别结果:" << endl;
	Recognize_Lisence(x_begin, x_end, license);
	delete[] x_begin;
	delete[] x_end;
一、图像预处理

本例是一副动态范围较窄的图像,图像整体偏暗,较难抓取车牌特征,因此需要先进行图像增强,这里采用了直方图均衡化的方式提高其对比度:

二、
采用开运算断开较窄的狭颈和消除细的突出物,采用图像叠加(灰度图-开操作图)突显字符等部分。随后进行二值化,再利用Canny算子进行边缘检测,利用闭运算及开运算使图像边缘成为一个整体。效果如下所示:
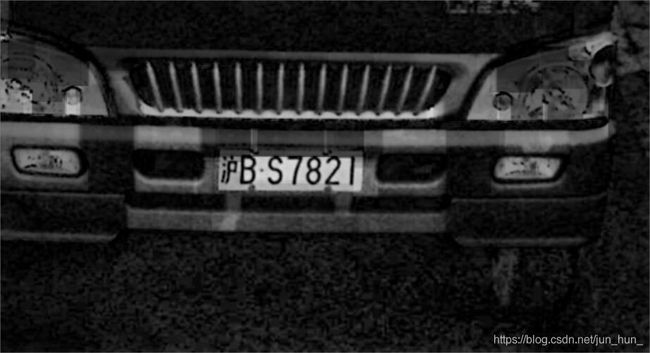
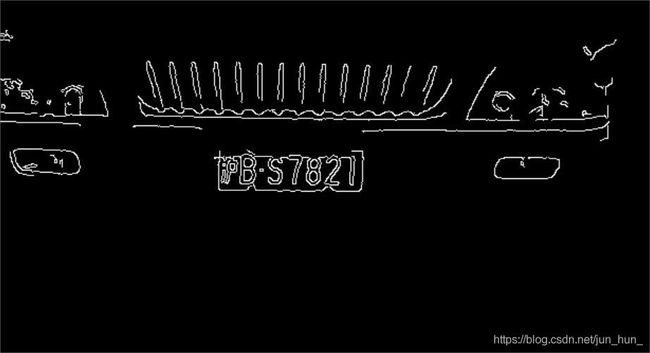
以上两图分别是灰度图与开操作图相减以及利用Canny算子提取边缘的结果。
该部分的代码如下:
Mat Image_Preprocessing(Mat temp)//图像预处理
{
	Mat kernel = getStructuringElement(MORPH_RECT, Size(25, 25), Point(-1, -1));
	Mat open_gray_blur_Image;
	morphologyEx(temp, open_gray_blur_Image, MORPH_OPEN, kernel);
	Mat rst;
	subtract(temp, open_gray_blur_Image, rst, Mat());
	imshow("rst", rst);
	Mat Canny_Image;
	Canny(rst, Canny_Image, 400, 200, 3);
	imshow("Canny_Image", Canny_Image);
	return Canny_Image;
}
三、形态学处理
通过膨胀连接相近的图像区域,利用腐蚀去除孤立细小的色块,从而将所有的车牌上所有的字符都连通起来。
该部分的代码如下:
Mat Morphological_Processing(Mat temp)//形态学处理
{
	//图片膨胀处理
	Mat dilate_image, erode_image;
	//自定义核:进行 x 方向的膨胀腐蚀
	Mat elementX = getStructuringElement(MORPH_RECT, Size(25, 1));
	Mat elementY = getStructuringElement(MORPH_RECT, Size(1, 19));
	Point point(-1, -1);
	dilate(temp, dilate_image, elementX, point, 2);
	erode(dilate_image, erode_image, elementX, point, 4);
	dilate(erode_image, dilate_image, elementX, point, 2);
	//自定义核:进行 Y 方向的膨胀腐蚀
	erode(dilate_image, erode_image, elementY, point, 1);
	dilate(erode_image, dilate_image, elementY, point, 2);
	//平滑处理
	Mat median_Image;
	medianBlur(dilate_image, median_Image, 15);
	medianBlur(median_Image, median_Image, 15);
	imshow("中值滤波", median_Image);
	return median_Image;
}
该步骤的处理结果如下图:

由此可见,经过膨胀与腐蚀处理,将车牌上的字符全部连通在一起,从而可以提取车牌的特征,从而定位车牌的位置。
四、车牌定位(矩形轮廓查找、筛选以及分割)
首先通过获得包围每个连通区的最小矩形,并计算其面积、长宽比以及矩形度从而定位车牌的位置。然后将车牌从输入图像中分割,最后进行仿射变换。进行仿射变换的原因是因为切割下来的图像有可能是倾斜的,为了方便车牌号码识别,需要将切割下来的车牌图像仿射变换至水平位置。
代码如下:
//车牌定位
Mat Locate_License_Plate(Mat temp, Mat src, Mat gray_src)
{
	vector<vector<Point>> contours;
	findContours(temp, contours, RETR_EXTERNAL, CHAIN_APPROX_SIMPLE);
	//画出轮廓
	drawContours(temp, contours, -1, Scalar(255), 1);
	//轮廓表示为一个矩形
	Mat Roi;
	for (int i = 0; i < contours.size(); i++)
	{
		RotatedRect rect = minAreaRect(Mat(contours[i]));
		Point2f p[4];
		rect.points(p);
		double axisLongTemp = 0.0, axisShortTemp = 0.0;//矩形的长边和短边
		axisLongTemp = sqrt(pow(p[1].x - p[0].x, 2) + pow(p[1].y - p[0].y, 2));  //计算长轴
		axisShortTemp = sqrt(pow(p[2].x - p[1].x, 2) + pow(p[2].y - p[1].y, 2)); //计算短轴
		double LengthTemp;//中间变量
		if (axisShortTemp > axisLongTemp)//若短轴大于长轴,交换数据
		{
			LengthTemp = axisLongTemp;
			axisLongTemp = axisShortTemp;
			axisShortTemp = LengthTemp;
		}
		double rectArea = axisLongTemp*axisShortTemp;//计算矩形面积
		double Area = contourArea(Mat(contours[i]));//轮廓面积
		double rectDegree = Area / rectArea;//计算矩形度
		if (axisLongTemp / axisShortTemp >= 2.2 && axisLongTemp / axisShortTemp <= 5.1 && rectDegree > 0.63 && rectDegree < 1.37 && rectArea>2000 && rectArea < 50000)//通过划定长宽比,矩形度以及矩形面积的变化范围划定车牌区域(该部分可视实际情况而调整)
		{
			for (int i = 0; i < 4; i++)       //划线框出车牌区域
				line(src, p[i], p[((i + 1) % 4) ? (i + 1) : 0], Scalar(0, 0, 255), 2, 8, 0);

			float width_height = (float)rect.size.width / (float)rect.size.height;
			float angle = rect.angle;
			if (width_height < 1)//处理图像中旋转角度大于90度的车牌
				angle = angle + 90;
			Mat rotMat = getRotationMatrix2D(rect.center, angle, 1);//获得矩形的旋转矩阵
			Mat warpImg;
			warpAffine(gray_src, warpImg, rotMat, src.size(), INTER_CUBIC);
			imshow("仿射变换", warpImg);
			//图像切割
			Size minRectSize = rect.size;
			if (width_height < 1)
				swap(minRectSize.width, minRectSize.height);
			getRectSubPix(warpImg, minRectSize, rect.center, Roi);
		}
	}
	//imshow("test", src);
	imshow("车牌提取结果", Roi);
	return Roi;
}
该步骤的处理结果如下:

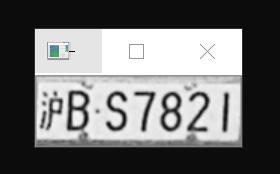
此时车牌在输入图像中被框出来并且被分割出来了。
五、同一化车牌尺寸
为了能够实现车牌的自动识别,需要通过仿射变换同一化车牌的尺寸。这里按照车牌的长宽比为1:5,将仿射变换后的尺寸设定为100*500。
代码如下:
Mat Affine_Transform(Mat temp)
{
	Mat warp_dstImage = Mat::zeros(100, 500, temp.type());
	Point2f srcTri[3];
	Point2f dstTri[3];
	//设置三个点来计算仿射变换
	srcTri[0] = Point2f(0, 0);
	srcTri[1] = Point2f(temp.cols, 0);
	srcTri[2] = Point2f(0, temp.rows);

	dstTri[0] = Point2f(0, 0);
	dstTri[1] = Point2f(500, 0);
	dstTri[2] = Point2f(0, 100);
	//计算仿射变换矩阵
	Mat warp_mat(2, 3, CV_32FC1);
	warp_mat = getAffineTransform(srcTri, dstTri);
	//对加载图形进行仿射变换操作
	warpAffine(temp, warp_dstImage, warp_mat, warp_dstImage.size());
	return warp_dstImage;
}
六、切除车牌边框
由于切割下来的车牌图像难免会包含车牌的边框,而如果车牌的边框处理不当将会导致车牌号码分割错误,从而严重影响车牌号码的识别。因此我们需要想办法拿到一张干净的车牌图像。
想要切除车牌边框,首先需要想办法将车牌的边框提取出来,然后将车牌图像与之相减即可得到一副较为干净的车牌图像。
所谓车牌边框检测就是检测车牌中的水平线及垂直线,设计一个合适的滤波器,通过邻域操作即可将其检测出来。
注:膨胀与腐蚀处理本质上就是最值滤波。
代码如下:
Mat Remove_Vertial_Border(Mat temp)
{
	Mat vline = getStructuringElement(MORPH_RECT, Size(1, temp.rows), Point(-1, -1));
	Mat dst1, temp1;
	erode(temp, temp1, vline);
	dilate(temp1, dst1, vline);
	namedWindow("提取垂直线", WINDOW_AUTOSIZE);
	imshow("提取垂直线", dst1);
	subtract(temp, dst1, temp, Mat());
	imshow("切割车牌垂直边框结果", temp);
	return temp;
}
Mat Remove_Horizon_Border(Mat temp)
{
	Mat hline = getStructuringElement(MORPH_RECT, Size(60, 1), Point(-1, -1));//矩形形状为:1*src.cols
	Mat dst1, temp1;
	erode(temp, temp1, hline);
	dilate(temp1, dst1, hline);
	namedWindow("提取水平线", WINDOW_AUTOSIZE);
	imshow("提取水平线", dst1);
	subtract(temp, dst1, temp, Mat());
	imshow("切割车牌水平边框结果", temp);
	return temp;
}
未处理前:

处理后:

显然车牌边框基本清除干净。
七、车牌号码分割
要进行车牌号码分割首先需要实现对车牌号码的精确定位,因为获得的图像是一个二维的车牌图像,那么可以将其映射至平面直角坐标系中来解决这个问题。将车牌中的每个字符向直角坐标系的X轴与Y轴投影,利用两个数组存储每个字符的位置信息即可实现对字符位置的精准定位。
字符分割结果如下:

由此可见每个字符都被精确分割。
代码如下:
Mat Horizon_Cut(Mat temp)
{
	int *counter_y = new int[temp.rows];
	for (int i = 0; i < temp.rows; i++)
		counter_y[i] = 0;
	for (int row = 0; row < temp.rows; row++)
	{
		int count = 0;
		for (int col = 0; col < temp.cols; col++)
		{
			if (temp.at<uchar>(row, col) == 255)
			{
				count++;
			}
		}
		if (count > 50)
		{
			counter_y[row] = 1;
		}
	}
	for (int i = 0; i < temp.rows; i++)
		cout << counter_y[i] << '\t';// = 0;
	cout << endl;
	int count_temp = 0;
	int *record = new int[temp.rows];
	for (int i = 0; i < temp.rows; i++)
		record[i] = 0;
	for (int i = 0; i < temp.rows; i++)
	{
		if (counter_y[i] == 1)
		{
			count_temp++;
			record[i] = count_temp;
		}
		else
			count_temp = 0;
	}
	int max = record[0];
	int index = 0;
	for (int i = 1; i < temp.rows; i++)
	{
		if (max < record[i])
		{
			max = record[i];
			index = i;
		}
	}
	int index_row_begin = index - max + 1;
	int index_row_end = index;
	cout << index_row_begin << endl << index_row_end << endl;
	int height = index_row_end - index_row_begin;
	Mat image_preprocess = Mat::zeros(height, temp.cols, CV_8UC1);
	for (int row = 0; row < image_preprocess.rows; row++)
	{
		for (int col = 0; col < image_preprocess.cols; col++)
		{
			image_preprocess.at<uchar>(row, col) = temp.at<uchar>(row + index_row_begin, col);
		}
	}
	imshow("image_preprocess", image_preprocess);
	return image_preprocess;
}
void Locate_String(int *x_begin, int *x_end, Mat temp)
{
	int *counter_x = new int[temp.cols];//记录每一列的白像素个数
	for (int i = 0; i < temp.cols; i++)
		counter_x[i] = 0;
	for (int col = 0; col < temp.cols; col++)
	{
		int count = 0;
		for (int row = 0; row < temp.rows; row++)
		{
			if (temp.at<uchar>(row, col) == 255)
			{
				count++;
			}
		}
		counter_x[col] = count;
	}
	int index_col = 0;
	int number_width = 0;
	for (int i = 0; i < temp.cols - 1; i++)
	{
		if (counter_x[i] >= 6)//此处阈值可视情况调整
		{
			number_width++;
			if (number_width > 10)//此处阈值可视情况调整
			{
				x_end[index_col] = i;
				x_begin[index_col] = i - number_width + 1;
				if (counter_x[i + 1] < 6)//此处阈值可视情况调整
				{
					number_width = 0;
					index_col++;
				}
			}
		}
		else
		{
			number_width = 0;
		}
		if (index_col >= 8)
			break;
	}
}
八、车牌号码识别
为简单起见,这里的识别是算法采用的是模板匹配的思想,亦即求分割下来的字符与库中的每个字符得匹配度。可以采用多种方式衡量匹配度,但方法都殊途同归,本质上就是两副图像的距离,取距离最小的那副图像的编号所对应的字符作为当前位置车牌号码的输出。
识别结果如下:

很显然,车牌号码被准确无误的识别了出来。
注:此处将库中的字符集仿射变换至与提取出的字符同样尺寸,可增加识别的准确率。
这部分的代码如下:
void Recognize_Lisence(int *x_begin, int *x_end, Mat temp)
{
	int cycle_index = 0;
	for (int i = 0; i < 8; i++)
	{
		if (x_end[i] > 0)
			cycle_index++;
	}
	for (int i = 0; i < cycle_index; i++)
	{
		float error[27] = { 0 };
		//	//picture1是二值图像
		Mat picture1 = Mat::zeros(temp.rows, x_end[i] - x_begin[i], temp.type());
		for (int row = 0; row < picture1.rows; row++)
		{
			for (int col = 0; col < picture1.cols; col++)
			{
				picture1.at<uchar>(row, col) = temp.at<uchar>(row, col + x_begin[i]);
			}
		}
		Mat NUM[27];//字符匹配模板
		for (int i = 0; i < 27; i++)
		{
			stringstream stream;
			stream << "pictures/num_";
			stream << i;
			stream << ".bmp";
			String name = stream.str();
			NUM[i] = imread(name);
			if (NUM[i].empty())
			{
				cout << "未能读取" << name << endl;
			}
			cvtColor(NUM[i], NUM[i], COLOR_BGR2GRAY);
			threshold(NUM[i], NUM[i], 0, 255, THRESH_BINARY);

			Point2f srcTri[3];
			Point2f dstTri[3];
			Mat warp_mat(2, 3, CV_32FC1);
			//创建仿射变换目标图像与原图像尺寸类型相同
			Mat result = Mat::zeros(picture1.rows, picture1.cols, picture1.type());
			//设置三个点来计算仿射变换
			srcTri[0] = Point2f(0, 0);
			srcTri[1] = Point2f(NUM[i].cols, 0);
			srcTri[2] = Point2f(0, NUM[i].rows);
			dstTri[0] = Point2f(0, 0);
			dstTri[1] = Point2f(picture1.cols, 0);
			dstTri[2] = Point2f(0, picture1.rows);
			//计算仿射变换矩阵
			warp_mat = getAffineTransform(srcTri, dstTri);
			//对加载图形进行仿射变换操作
			warpAffine(NUM[i], result, warp_mat, picture1.size());
			threshold(result, result, 0, 255, THRESH_BINARY_INV);
			float error_sum = 0;
			float error_temp = 0;
			for (int row = 0; row < result.rows; row++)
			{
				for (int col = 0; col < result.cols; col++)
				{
					error_temp = picture1.at<uchar>(row, col) - result.at<uchar>(row, col);
					error_sum = error_sum + pow(error_temp, 2);
				}
			}
			error[i] = error_sum / (picture1.rows*picture1.cols * 255);
		}
		float min_error = error[0];
		int Index = 0;
		for (int i = 1; i < 27; i++)
		{
			if (min_error > error[i])
			{
				min_error = error[i];
				Index = i;
			}
		}
		if (Index == 10)
			cout << "E" << '\t';
		else if (Index == 11)
			cout << "V" << '\t';
		else if (Index == 12)
			cout << "苏" << '\t';
		else if (Index == 13)
			cout << "沪" << '\t';
		else if (Index == 14)
			cout << "B" << '\t';
		else if (Index == 15)
			cout << "S" << '\t';
		else if (Index == 16)
			cout << "京" << '\t';
		else if (Index == 17)
			cout << "N" << '\t';
		else if (Index == 18)
			cout << "J" << '\t';
		else if (Index == 19)
			cout << "P" << '\t';
		else if (Index == 20)
			cout << "A" << '\t';
		else if (Index == 21)
			cout << "浙" << '\t';
		else if (Index == 22)
			cout << "G" << '\t';
		else if (Index == 23)
			cout << "U" << '\t';
		else if (Index == 24)
			cout << "豫" << '\t';
		else if (Index == 25)
			cout << "K" << '\t';
		else if (Index == 26)
			cout << "陕" << '\t';
		else if (Index >= 0 && Index <= 9)
			cout << Index << '\t';
	}
	cout << endl;
}
九、系统可靠性及其评价
为了验证此套系统的可靠性,又从网站上下载了一些图片去识别。结果如下:
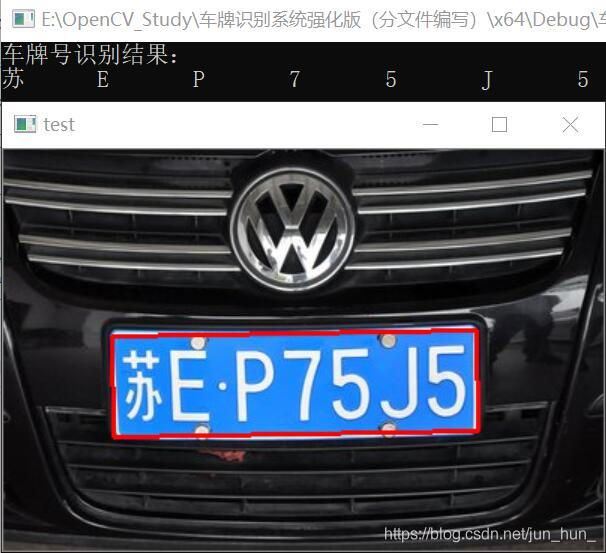


以上几幅图中的车牌号码均被精准定位并正确识别。
对于较为模糊的字符存在错误识别的情况,识别情况如下:
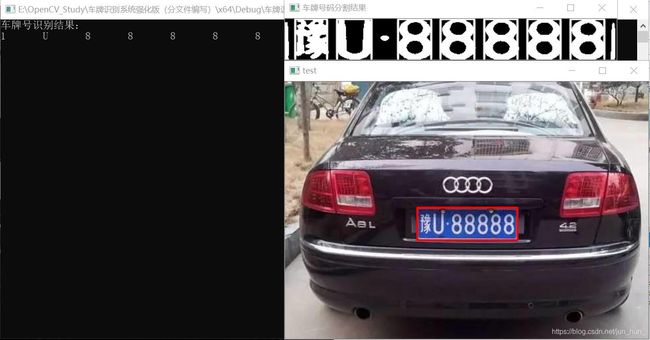
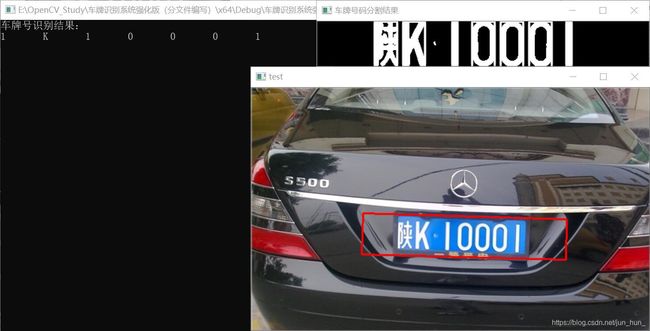
以上图像中的车牌号码虽然被精准定位,但由于提取出的各省简称字体较为模糊,因此出现了字符识别错误。可以考虑通过增加数据集容量改善这种情况,也可以考虑采用人工智能算法。