springboot-启动器作用及自定义启动器
一、为什么需要需要使用启动器
当我们在开发中,需要引用其他项目里面的Bean 或者说想要被Spring容器管理的bean不在SpringBoot包扫描路径下,怎么办?
可以@ComponentScan注解的作用是扫描@SpringBootApplication所在的Application类所在的包(basepackage)下所有的@component注解(或拓展了@component的注解)标记的bean,并注册到spring容器中
1、通过@ComponentScan扫描jar中的类
在SpringBootApplication启动类指定扫描jar下面的类所在路径,这样spring就会创建该路径下所有定义的Bean,比如下面这种写法
@ComponentScan(basePackages =  {"com.alibaba.user","com.alibaba.msg"})
//com.alibaba.user属于A项目下的路径,里面有个Test1 这个Bean,com.alibaba.msg属于B项目下的路径,里面有个Test2 Bean
这样我们就可以在自己的项目中就可以通过@Autowired 把Test1和Test2注入进来
2、使用spring.factories
这是一种非常解耦的扩展机制:SpringFactories
这种扩展机制实际上是仿照Java中的SPI扩展机制来实现的。在Spring中也有一种类似与JavaSPI的加载机制。它在resources/META-INF/spring.factories文件中配置接口的实现类名称,然后在程序中读取这些配置文件并实例化。这种自定义的SPI机制是SpringBootStarter实现的基础。
比如下面这段代码:
org.springframework.boot.autoconfigure.EnableAutoConfiguration=\
simbot.example.service.HelloServiceAutoConfiguration
当引了这个启动器,那么在项目启动的时候,就要会导入HelloServiceAutoConfiguration这个Configuration,
当然HelloServiceAutoConfiguration上面会配置很多其他注解,这个我们先不管,只要应用了这个jar,那么就会加载spring.factories配置的类,不过这些配置类上面会存其他要加载该类所需要的条件。
3、在 SpringBoot主类上使用@Import注解
像Spring源码里面经常就使用这种方式注册指定的BeanPostProcess,比如开启Aspect的注解


总结:
我们最终的目的就是使用jar里面的Bean,为我们提供服务。
二、Springboot启动器优点:
1、减少对项目代码的侵入性
当我们需要使用某些功能,但是又不想对代码有很强的侵入性就可以使用启动器。比如我们要对Controller方法请求打印入参和出参,可以使用实现拦截器,来拿到参数和返回值,那如果我们有很多项目都要统一Controller的入参和出参日志,那就要在所有项目里面写一遍,那这个时候我们就可以定义一个拦截器Bean。然后其他项目里面引用这个Bean就可以了。这样侵入性就很小了。
2、功能模块化
这样我们一个完整的大功能,可以通过很多小的功能组装起来,比如多个项目使用同一套redis,我们把redis封装成一个启动器,多个项目去引用这个启动器,这样就算redis配置需要更改,我们只需要在启动配置里面统一改就可以了。
三、自定义启动器
下面以自定义一个启动器为例,流程是在A项目中定义Bean-HelloService 在B项目中引用A的jar,拿到Bean-HelloService,然后使用它里面的方法
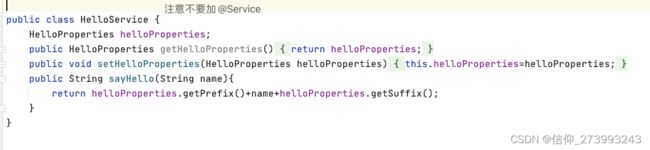
1、在A项目中定义HelloService
2、定义Properties可以用来控制是否加载A项目的Bean到B里面去,包括设置一些额外的业务数据配置

3、创建并定义spring.factories,配置里面的内容

4、下面是定义@Bean
启动器里面大部分都是以Configuration这种,然后里面通过方法定义@Bean,在附上一些必须满足一些条件才允许加载@Bean
关于HelloServiceAutoConfiguration上面的注解不清楚可以参考我的这篇文章springboot常用注解
@Configuration
@ConditionalOnWebApplication
@EnableConfigurationProperties(HelloProperties.class)
@ConditionalOnProperty(prefix = "com.hello",name= "enable",havingValue = "true")
public class HelloServiceAutoConfiguration {

    @Autowired
    HelloProperties helloProperties;

    @Bean  //将HelloService定义成Bean
    public HelloService helloService(){
        HelloService helloService=new HelloService();
        helloService.setHelloProperties(helloProperties);
        return helloService;
    }
}
5、下面是定义spring.factories,表示需要加载的配置类:HelloServiceAutoConfiguration
org.springframework.boot.autoconfigure.EnableAutoConfiguration=\
simbot.example.service.HelloServiceAutoConfiguration
6、pom.xml文件
<parent>
    <groupId>org.springframework.bootgroupId>
    <artifactId>spring-boot-starter-parentartifactId>
    <version>2.3.5.RELEASEversion>
    <relativePath/>
parent>

<groupId>simbot.examplegroupId>
<artifactId>simbot-mirai-springboot-starter-demoartifactId>
<version>1.0.0924-SNAPSHOTversion>

<dependencies>
    <dependency>
        <groupId>org.springframework.bootgroupId>
        <artifactId>spring-boot-autoconfigureartifactId>
    dependency>
    <dependency>
        <groupId>org.springframework.bootgroupId>
        <artifactId>spring-boot-starter-loggingartifactId>
    dependency>
    <dependency>
        <groupId>org.yamlgroupId>
        <artifactId>snakeyamlartifactId>
    dependency>
    <dependency>
        <groupId>org.springframework.bootgroupId>
        <artifactId>spring-boot-starter-webartifactId>
    dependency>
dependencies>
7、然后在B项目中引入A的jar:
<dependency>
	<groupId>simbot.examplegroupId>
	<artifactId>simbot-mirai-springboot-starter-demoartifactId>
	<version>1.0.0924-SNAPSHOTversion>
dependency>
9、在项目的application.yml中引入
com:
  hello:
    prefix: 123
    suffix: 456
    enable: true
10、在B项目中注入
