javaCV+idea+gradle配置全教程(一)
javaCV+idea+gradle配置教程
- 前言
-
- 所需文件 及 下载/参考位置
- jar包下载说明
- 安装配置所需软件
- jar包配置说明
- gradle引入说明
- 引入案例(官方案例位置)
- jar包排错方式
- 案例说明
- 实现效果
- 各种其他功能
- 网络案例排错说明
- 到此结束
前言
本文章完全免费!!!
本文章完全免费!!!
本文章完全免费!!!
重要的事情说三遍,自身研究时全是收费文章,就算免费也只说一般或一点点,真是令人生痛恶觉。
此文章主要为安装 和 部署环境,不涉及具体开发,案例也主要为官方的和网络上的。
另:此方法不需要安装openCV等软件,不要和网上的联合部署方式的弄混了。
目前本人也是刚开始研究,我会根据自身研究情况不定期修改。
所需文件 及 下载/参考位置
目前已知jar包所需:
- javaCV.jar ,及其相关jar包:
a.我的jar包下载:点击跳转:这是我自己用的jar,如想照着来一遍建议下我的
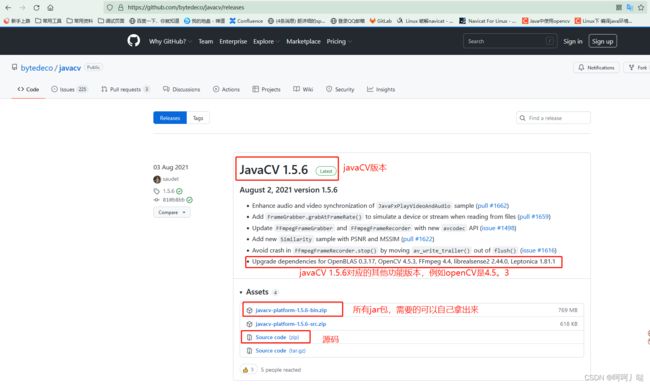
b.官方免费jar包下载:点击跳转:后续有交下载方式和对应版本jar包区分和案例下载
jar包下载说明
-
版本说明:
每个版本的jar看着都一样,但是,但是!!!它真的不一样,这也是我遇到的大坑,网上下的一模一样的jar,就是不行,替换成同一批的编译就成功了!

-
官网案例: 点击跳转
后面会介绍在哪里看详细的,一个个功能的案例,包括代码实现
 下面的随便截一点,里面有很多其它文档的跳转和说明,不算很详细,但也基本能搞清楚个大概,对着慢慢查也能研究个七七八八
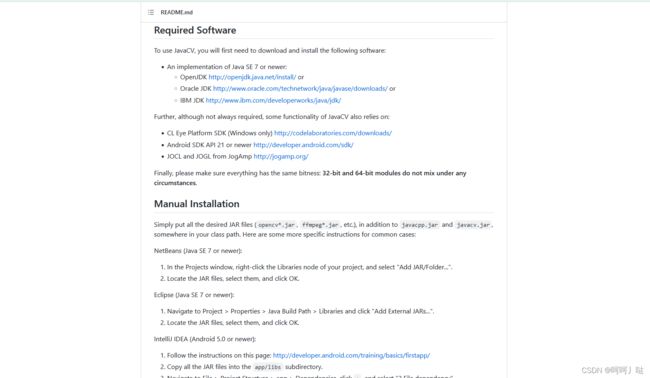
看不懂英文用下翻译插件,哈哈
此处多嘴提一下,我用的是火狐“翻译网页”,好用!!!

-
网络案例注意事项:
javaCV版本不同,里面的jar包引用路径也不同,甚至调用方法的方式,方法的名字都不一样,请小心注意
安装配置所需软件
我这里主要是图片处理,所以就是openCV,如果你是其它处理请根据实际情况配置
jar包配置说明
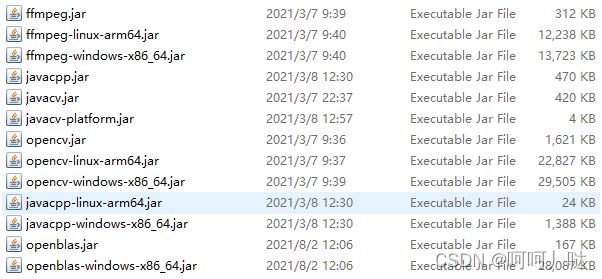
- 核心jar: javacv.jar、javacpp.jar,这两个jar必须要有
- 功能jar: opencv.jar、ffmpeg.jar等,如果要使用对应功能,这种无后缀名的也必须要有
- 环境jar:ffmpeg-linux-arm64.jar、ffmpeg-windows-x86_64.jar、opencv-linux-arm64.jar和opencv-windows-x86_64.jar等后面带有系统环境后缀的jar包,这些jar包里面都是对应的.dll和.so等第三方库文件,此包根据自身运行环境额外引入环境配置相关的jar包
- 其它jar包:openblas.jar、openblas-windows-x86_64.jar等,这些我也不是很清楚,但是根据DeBug就是需要,不然就报错,根据功能不同可能还需导其它jar,具体可以去 ·jar包排错·查看缺包排查流程
gradle引入说明
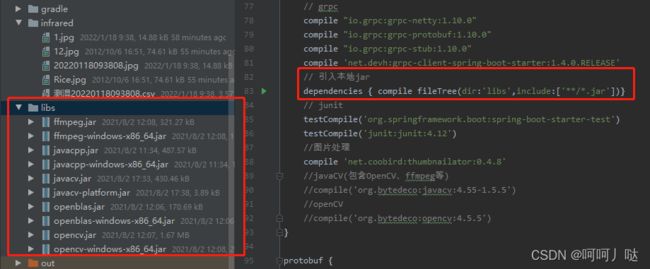
直接引入所有jar包,maven也一样,不会的好好去补补课去,网上教程很多就不详细介绍了
引入案例(官方案例位置)
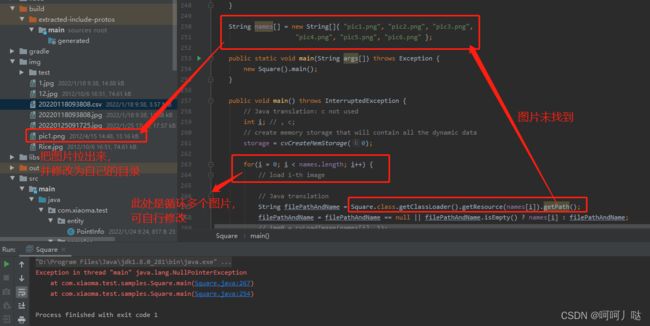
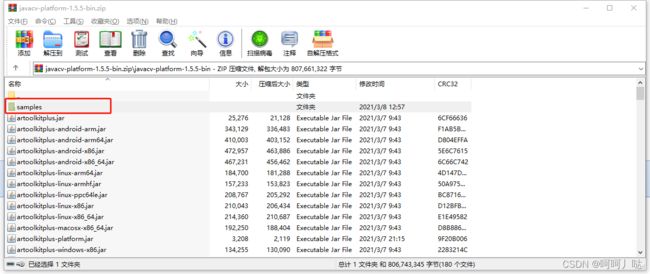
在下载的jar压缩包中,有samples文件夹,下面全是案例,可以直接拖出来运行测试,测试时需自行看清楚调用的图片和修改图片的位置,这是很多个案例直接扔一起了,自己手动区分一下
报错处理在下一项介绍
jar包排错方式
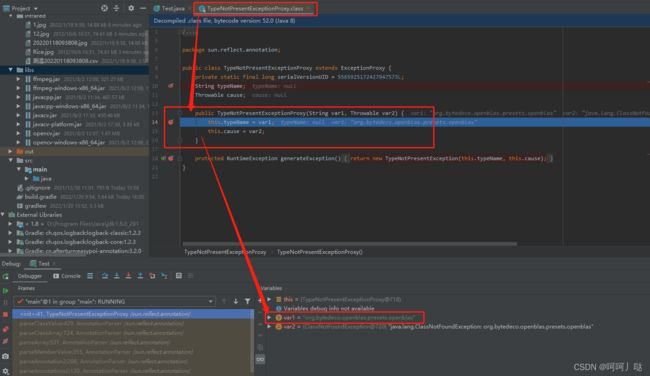
运行时有各种各样的报错,其中最主要的是jar包引入冲突或者缺失导致的,建议直接把jar包全清除掉,只引入 javacv.jar 和 javacpp.jar ,然后运行,一般会出现报错,进入报错的方法(大部分都是 “TypeNotPresentExceptionProxy”),idea进入方式:连续按两下 Shift 然后输入 “TypeNotPresentExceptionProxy” ,选择“Class”,点击进入,点击断点,然后运行,查看是那个包路径异常,然后导入或调整jar包
网络案例的异常我放在了最后
案例说明
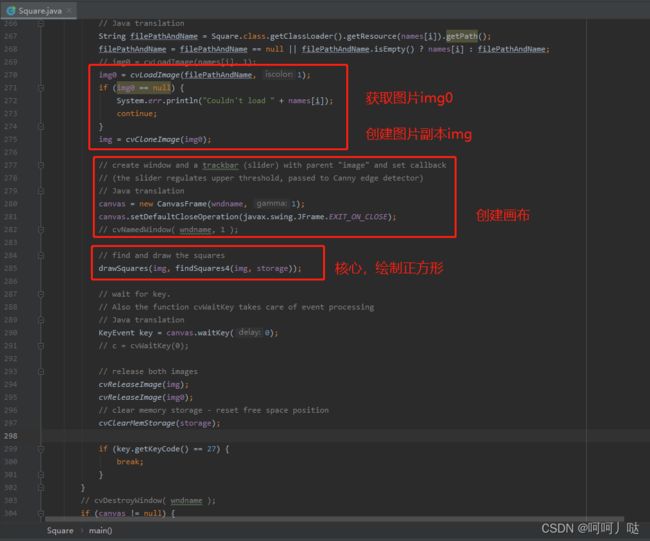
此处我是使用的 “Square.java”,以此为例 (导包问题就不继续说明了)
package com.xiaoma.test.samples;

import java.awt.event.KeyEvent;

import org.bytedeco.javacpp.*;
import org.bytedeco.javacv.*;

import org.bytedeco.opencv.opencv_core.*;
import org.bytedeco.opencv.opencv_imgproc.*;
import static org.bytedeco.opencv.global.opencv_core.*;
import static org.bytedeco.opencv.global.opencv_imgproc.*;
import static org.bytedeco.opencv.global.opencv_imgcodecs.*;

/**
 * I was unable to find the OpenCV squares.c translated into JavaCV, so this
 * is a line-by-line translation of the C source.
 * The squares.c source used, found here:
 *      https://code.ros.org/trac/opencv/browser/trunk/opencv/samples/c/squares.c?rev=1429
 *
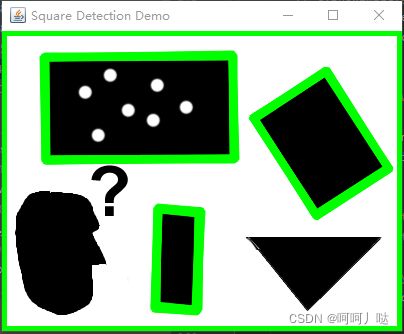
 * This is a demo class for finding squares/rectangles in an image, using JavaCV.
 *
 * All individual imports are kept as is; if you are like me,
 * you probably dislike the catch all .* import when trying to understand stuff.
 *
 * The major headache of the C code was figuring out the
 * "drawLines" method, and what parameters "cvPolyLine" is supposed to use.
 *
 * @author [email protected]
 */
public class Square {

    int thresh = 50;
    IplImage img = null;
    IplImage img0 = null;
    CvMemStorage storage = null;
    String wndname = "Square Detection Demo";

    // Java spesific
    CanvasFrame canvas = null;
    OpenCVFrameConverter.ToIplImage converter = new OpenCVFrameConverter.ToIplImage();

    // helper function:
    // finds a cosine of angle between vectors
    // from pt0->pt1 and from pt0->pt2
    double angle(CvPoint pt1, CvPoint pt2, CvPoint pt0) {
        double dx1 = pt1.x() - pt0.x();
        double dy1 = pt1.y() - pt0.y();
        double dx2 = pt2.x() - pt0.x();
        double dy2 = pt2.y() - pt0.y();

        return (dx1*dx2 + dy1*dy2) / Math.sqrt((dx1*dx1 + dy1*dy1) * (dx2*dx2 + dy2*dy2) + 1e-10);
    }

    // returns sequence of squares detected on the image.
    // the sequence is stored in the specified memory storage
    CvSeq findSquares4(IplImage img, CvMemStorage storage) {
        // Java translation: moved into loop
        // CvSeq contours = new CvSeq();
        int i, c, l, N = 11;
        CvSize sz = cvSize(img.width() & -2, img.height() & -2);
        IplImage timg = cvCloneImage(img); // make a copy of input image
        IplImage gray = cvCreateImage(sz, 8, 1);
        IplImage pyr = cvCreateImage(cvSize(sz.width()/2, sz.height()/2), 8, 3);
        IplImage tgray = null;
        // Java translation: moved into loop
        // CvSeq result = null;
        // double s = 0.0, t = 0.0;

        // create empty sequence that will contain points -
        // 4 points per square (the square's vertices)
        CvSeq squares = cvCreateSeq(0, Loader.sizeof(CvSeq.class), Loader.sizeof(CvPoint.class), storage);

        // select the maximum ROI in the image
        // with the width and height divisible by 2
        cvSetImageROI(timg, cvRect(0, 0, sz.width(), sz.height()));

        // down-scale and upscale the image to filter out the noise
        cvPyrDown(timg, pyr, 7);
        cvPyrUp(pyr, timg, 7);
        tgray = cvCreateImage(sz, 8, 1);

        // find squares in every color plane of the image
        for (c = 0; c < 3; c++) {
            // extract the c-th color plane
            cvSetImageCOI(timg, c+1);
            cvCopy(timg, tgray);

            // try several threshold levels
            for (l = 0; l < N; l++) {
                // hack: use Canny instead of zero threshold level.
                // Canny helps to catch squares with gradient shading
                if (l == 0) {
                    // apply Canny. Take the upper threshold from slider
                    // and set the lower to 0 (which forces edges merging)
                    cvCanny(tgray, gray, 0, thresh, 5);
                    // dilate canny output to remove potential
                    // holes between edge segments
                    cvDilate(gray, gray, null, 1);
                } else {
                    // apply threshold if l!=0:
                    //     tgray(x,y) = gray(x,y) < (l+1)*255/N ? 255 : 0
                    cvThreshold(tgray, gray, (l+1)*255/N, 255, CV_THRESH_BINARY);
                }

                // find contours and store them all as a list
                // Java translation: moved into the loop
                CvSeq contours = new CvSeq();
                cvFindContours(gray, storage, contours, Loader.sizeof(CvContour.class), CV_RETR_LIST, CV_CHAIN_APPROX_SIMPLE, cvPoint(0,0));

                // test each contour
                while (contours != null && !contours.isNull()) {
                    // approximate contour with accuracy proportional
                    // to the contour perimeter
                    // Java translation: moved into the loop
                    CvSeq result = cvApproxPoly(contours, Loader.sizeof(CvContour.class), storage, CV_POLY_APPROX_DP, cvContourPerimeter(contours)*0.02, 0);
                    // square contours should have 4 vertices after approximation
                    // relatively large area (to filter out noisy contours)
                    // and be convex.
                    // Note: absolute value of an area is used because
                    // area may be positive or negative - in accordance with the
                    // contour orientation
                    if(result.total() == 4 && Math.abs(cvContourArea(result, CV_WHOLE_SEQ, 0)) > 1000 && cvCheckContourConvexity(result) != 0) {

                        // Java translation: moved into loop
                        double s = 0.0, t = 0.0;

                        for( i = 0; i < 5; i++ ) {
                            // find minimum angle between joint
                            // edges (maximum of cosine)
                            if( i >= 2 ) {
                                //      Java translation:
                                //          Comment from the HoughLines.java sample code:
                                //          "    Based on JavaCPP, the equivalent of the C code:
                                //                  CvPoint* line = (CvPoint*)cvGetSeqElem(lines,i);
                                //                  CvPoint first=line[0];
                                //                  CvPoint second=line[1];
                                //          is:
                                //                  Pointer line = cvGetSeqElem(lines, i);
                                //                  CvPoint first = new CvPoint(line).position(0);
                                //                  CvPoint second = new CvPoint(line).position(1);
                                //          "
                                //          ... so after some trial and error this seem to work
//                                t = fabs(angle(
//                                        (CvPoint*)cvGetSeqElem( result, i ),
//                                        (CvPoint*)cvGetSeqElem( result, i-2 ),
//                                        (CvPoint*)cvGetSeqElem( result, i-1 )));
                                t = Math.abs(angle(new CvPoint(cvGetSeqElem(result, i)),
                                        new CvPoint(cvGetSeqElem(result, i-2)),
                                        new CvPoint(cvGetSeqElem(result, i-1))));
                                s = s > t ? s : t;
                            }
                        }

                        // if cosines of all angles are small
                        // (all angles are ~90 degree) then write quandrange
                        // vertices to resultant sequence
                        if (s < 0.3)
                            for( i = 0; i < 4; i++ ) {
                                cvSeqPush(squares, cvGetSeqElem(result, i));
                            }
                    }

                    // take the next contour
                    contours = contours.h_next();
                }
            }
        }

        // release all the temporary images
        cvReleaseImage(gray);
        cvReleaseImage(pyr);
        cvReleaseImage(tgray);
        cvReleaseImage(timg);

        return squares;
    }

    // the function draws all the squares in the image
    void drawSquares(IplImage img, CvSeq squares) {

        //      Java translation: Here the code is somewhat different from the C version.
        //      I was unable to get straight forward CvPoint[] arrays
        //      working with "reader" and the "CV_READ_SEQ_ELEM".

//        CvSeqReader reader = new CvSeqReader();

        IplImage cpy = cvCloneImage(img);
        int i = 0;

        // Used by attempt 3
        // Create a "super"-slice, consisting of the entire sequence of squares
        CvSlice slice = new CvSlice(squares);

        // initialize reader of the sequence
//        cvStartReadSeq(squares, reader, 0);

         // read 4 sequence elements at a time (all vertices of a square)
         for(i = 0; i < squares.total(); i += 4) {

//              // Attempt 1:
//              // This does not work, uses the "reader"
//              CvPoint pt[] = new CvPoint[]{new CvPoint(1), new CvPoint(1), new CvPoint(1), new CvPoint(1)};
//              PointerPointer rect = new PointerPointer(pt);
//              int count[] = new int[]{4};
//
//              CV_READ_SEQ_ELEM(pt[0], reader);
//              CV_READ_SEQ_ELEM(pt[1], reader);
//              CV_READ_SEQ_ELEM(pt[2], reader);
//              CV_READ_SEQ_ELEM(pt[3], reader);

//              // Attempt 2:
//              // This works, somewhat similar to the C code, somewhat messy, does not use the "reader"
//              CvPoint pt[] = new CvPoint[]{
//                      new CvPoint(cvGetSeqElem(squares, i)),
//                      new CvPoint(cvGetSeqElem(squares, i + 1)),
//                      new CvPoint(cvGetSeqElem(squares, i + 2)),
//                      new CvPoint(cvGetSeqElem(squares, i + 3))};
//              PointerPointer rect = new PointerPointer(pt);
//              int count[] = new int[]{4};

              // Attempt 3:
              // This works, may be the "cleanest" solution, does not use the "reader"
             CvPoint rect = new CvPoint(4);
             IntPointer count = new IntPointer(1).put(4);
             // get the 4 corner slice from the "super"-slice
             cvCvtSeqToArray(squares, rect, slice.start_index(i).end_index(i + 4));

//             // Attempt 4:
//             // This works, and look the most like the original C code, uses the "reader"
//             CvPoint rect = new CvPoint(4);
//             int count[] = new int[]{4};
//
//             // read 4 vertices
//             CV_READ_SEQ_ELEM(rect.position(0), reader);
//             CV_READ_SEQ_ELEM(rect.position(1), reader);
//             CV_READ_SEQ_ELEM(rect.position(2), reader);
//             CV_READ_SEQ_ELEM(rect.position(3), reader);

             // draw the square as a closed polyline
             // Java translation: gotcha (re-)setting the opening "position" of the CvPoint sequence thing
             cvPolyLine(cpy, rect.position(0), count, 1, 1, CV_RGB(0,255,0), 3, CV_AA, 0);
         }

        // show the resultant image
        // cvShowImage(wndname, cpy);
        canvas.showImage(converter.convert(cpy));
        cvReleaseImage(cpy);
    }

    String names[] = new String[]{ "pic1.png", "pic2.png", "pic3.png",
                      "pic4.png", "pic5.png", "pic6.png" };

    public static void main(String args[]) throws Exception {
        new Square().main();
    }

    public void main() throws InterruptedException {
        // Java translation: c not used
        int i; // , c;
        // create memory storage that will contain all the dynamic data
        storage = cvCreateMemStorage(0);

        for(i = 0; i < names.length; i++) {
            // load i-th image

            // Java translation
            String filePathAndName = Square.class.getClassLoader().getResource(names[i]).getPath();
            filePathAndName = filePathAndName == null || filePathAndName.isEmpty() ? names[i] : filePathAndName;
            // img0 = cvLoadImage(names[i], 1);
            img0 = cvLoadImage(filePathAndName, 1);
            if (img0 == null) {
                System.err.println("Couldn't load " + names[i]);
                continue;
            }
            img = cvCloneImage(img0);

            // create window and a trackbar (slider) with parent "image" and set callback
            // (the slider regulates upper threshold, passed to Canny edge detector)
            // Java translation
            canvas = new CanvasFrame(wndname, 1);
            canvas.setDefaultCloseOperation(javax.swing.JFrame.EXIT_ON_CLOSE);
            // cvNamedWindow( wndname, 1 );

            // find and draw the squares
            drawSquares(img, findSquares4(img, storage));

            // wait for key.
            // Also the function cvWaitKey takes care of event processing
            // Java translation
            KeyEvent key = canvas.waitKey(0);
            // c = cvWaitKey(0);

            // release both images
            cvReleaseImage(img);
            cvReleaseImage(img0);
            // clear memory storage - reset free space position
            cvClearMemStorage(storage);

            if (key.getKeyCode() == 27) {
                break;
            }
        }
        // cvDestroyWindow( wndname );
        if (canvas != null) {
            canvas.dispose();
        }
    }

}
实现效果
各种其他功能
此处参考其他文章的统计,网上有很多,参考具体方法就好
- 图像绘制:点击跳转
- 音视频开发:点击跳转
网络案例排错说明
其实大部分网上案例报错,都是jar包不一致或者调用方法异常导致的
-
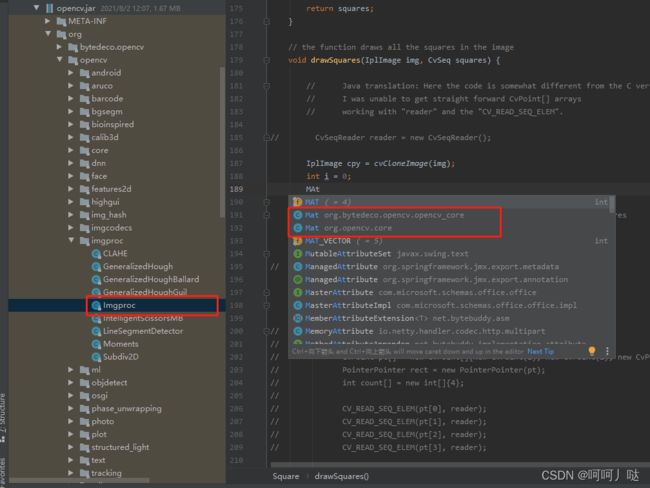
Mat 、Mat 和 IplImage 傻傻分不清
– 其中有两种Mat引用,这两种引用的不一致,后面所有的方法就都不一样的,简单理解,虽然写的一样,但它却是两套东西

-
IplImage 、 Mat 一样也不一样
– 在部分情况下,IplImage 和 Mat都可以直接使用图片地址获取文件,就如此文章使用的IplImage一样,同时他们有时还可当一个对象进行参数传值
– 但是他们不是一个对象,尽量不要同时使用,当然,测试或调代码的时候随便换换,说不定有奇迹呢 -
排错方式
– 此处直接翻原码就好,具体的大佬请绕行,下面教教不会的小伙伴就好
– 例如要导入Imgproc ,但根据网上导入的包去找,显示不存在怎么办?

一般是两种情况:
1、引用包的方式改了,或者说被省略了
类似这个案例中 opencv_imgproc 和 opencv_core 是找不到包的
 其实处理办法很简单,就是删除它就可以了,就跟下面一样

2、位置改变了:
输入一个常用的类型:例如Mat,然后按住 Ctrl+单击鼠标进入代码,点击左上角![]() 找到代码页面位置,左边的目录就是它所调用的包了,然后就是在里面根据之前的路径线索去寻找了
找到代码页面位置,左边的目录就是它所调用的包了,然后就是在里面根据之前的路径线索去寻找了
到此结束
到此就结束啦,希望大家看了我的文章可以顺利解决问题,然后提前祝大家新年快乐!!!
