SpringCloud Alibaba的使用
文章目录
- 一、springboot的回顾
-
- 1.1 快速创建springboot项目的注意事项
- 1.2 必会 Spring Boot Actuator
- 1.3 必会 Spring Boot 配置管理
-
- 1.3.1 支持的配置格式:
- 1.3.2 环境变量:
- 1.3.3 外部配置文件
- 1.3.4 命令行参数:
- 1.4 必会 Profile
-
- 1.4.1 如何实现不同环境不同配置?
- 二、微服务的拆分与编写
-
- 2.1 如何创建小程序
- 2.2 创建项目(springboot+mybatis+通用mapper)
-
- 2.2.1 pom依赖(mybatis+通用mapper)
- 2.2.2 配置文件
- 2.2.3 @MapperScan
- 2.2.4 MBG(代码生成器):
-
- 2.2.4.1 方式一(不推荐):使用Java编码方式运行MBG:
- 2.2.4.2 方式二(推荐):使用Plugin的方式去运行MBG:
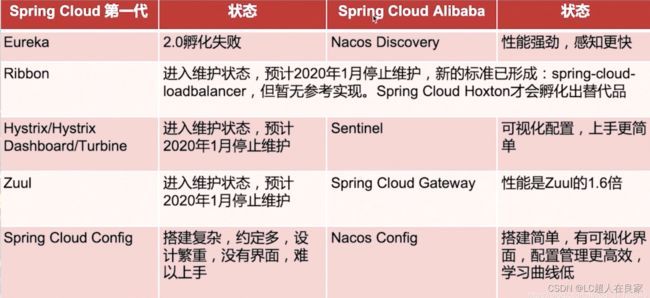
- 三、Spring Cloud Alibaba介绍
-
- 3.1 Spring Cloud Alibaba的介绍
-
- 3.1.1 快速构建分布式系统的工具集(主要功能如图所示:)
- 3.1.2 常用子项目如图
- 3.1.3 SpringCloud Alibaba的功能描述
- 3.1.4 我们整理后如图所示
- 3.1.5 SpringCloud发布生命周期
- 3.1.6 版本兼容性
- 3.2 为项目整合SpringCloudAlibaba
-
- 3.2.1 引入依赖
- 3.2.2 配置yml
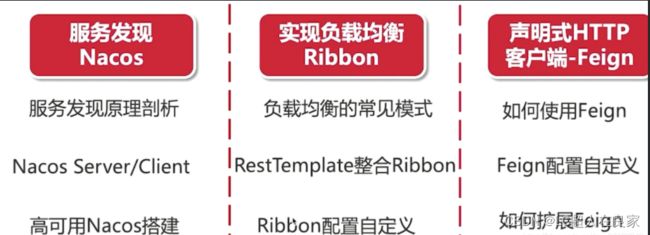
- 3.3 服务发现-Nacos
-
- 3.3.1 什么是Nacos
- 3.3.2 搭建Nacos Server
- 3.3.3 项目模块注册到nacos
- todo:3.3.4 项目中nacos的消费使用
- todo: 3.3.5 Nacos的NameSpace
- 3.4 负载均衡
-
- 3.4.1 使用Ribbon实现负载均衡
- 3.4.2 Ribbon组成
- 3.4.3 Ribbon内置的负载均衡规则
- 3.4.4 自定义Ribbon的策略配置
-
- 3.4.4.1 方式一:代码
- 3.4.4.2 方式二:配置yml
- 3.4.5 全局配置
- 3.4.6 支持的配置项
- 3.4.7 饥饿加载
- 3.4.8 扩展Ribbon-支持Nacos权重
-
- 3.4.8.1 第一步:定义一个类去继承另外一个类 AbstractLoadBalancerRule并实现方法
- 3.4.8.2 第二步:定义Bean替换默认的
- 3.5 声明式HTTP客户端: Feign
-
- 3.5.1 使用Feign实现远程Http调用
-
- 3.5.1.1 第一步:pom.xml中引入依赖
- 3.5.1.2 第二步:启动类上加上 @EnableFeignClients 注解
- 3.5.1.3 第三步:写配置,暂时没有
- 3.5.1.4 第四步:写一个Feign示例:
- 3.5.2 Feign的组成
- 3.5.3 Feign的日志级别的配置(打印日志):
-
- 3.5.3.1 方式一:代码
- 3.5.3.2 方式二:yml
- 3.5.4 全局配置自定义
- 3.5.5 支持的配置项
- 3.5.6 配置最佳实践总结
- 3.5.7 Feign的继承 - 一处编写多处使用
- 3.5.8 GetMapping如何发送Feign请求
-
- 3.5.8.1 方式一:使用@SpringQueryMap ,参数是实体类
- 3.5.8.2 方法二:使用@RequestParam注解指定请求的参数,多个参数
- 3.5.9 Feign脱离Ribbon使用
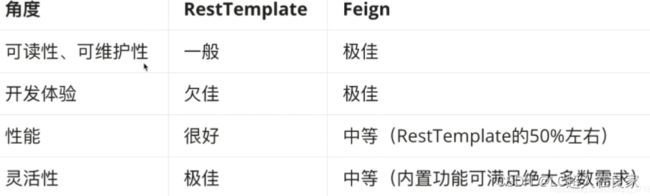
- 3.5.10 原则:尽量使用Feign,杜绝使用RestTemplate
- 3.5.11 Feign常见性能优化
-
- 3.5.11.1 配置连接池(提升15%左右)
- 3.5.11.2 降低日志级别
- 3.5.12 常见的问题总结
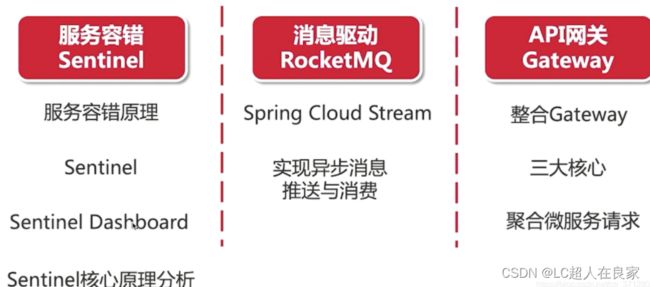
- 3.6 服务容错
-
- 3.6.1 雪崩效应
- 3.6.2 使用Sentinel实现容错
-
- 3.6.2.1 依赖
- 3.6.2.2 application.yml 加入配置,暴露端点
- 3.6.2.3 访问 localhost:服务端口号/actuator/sentinel,出现如下图所示画面,即为配置完成
- 3.6.3 Sentinel控制台
-
- 3.6.3.1 使用方式:
- 3.6.3.2 流控规则
- 3.6.3.3 降级规则
-
- 3.6.3.3.1 RT降级规则:
- 3.6.3.3.2 异常比例降级规则:
- 3.6.3.3.3 异常数降级规则
- 3.6.3.4 热点规则
-
- 3.6.3.4.1 使用
- 3.6.3.5 系统规则
- 3.6.3.6 授权规则
- 3.6.3.7 sentinel代码配置详解
- 3.6.3.8 Sentinel与控制台通信原理剖析
-
- 3.6.3.8.1 控制台相关配置项
- 3.6.3.8.2 Sentinel API详解
- 3.6.3.9 SentinelResource注解详解
- 3.6.3.10 RestTemplate整合Sentinel
- 3.6.3.11 Feign整合Sentinel
-
- 使用Fallback:
- 使用FallbackFactory,它的功能更强大,且能够拿到异常
- 3.6.3.12 规则持久化
- 3.6.3.13 生产环境使用Sentinel
- 3.6.3.14 集群流控(推荐使用gateway网关的)
- 3.6.3.15 错误页优化
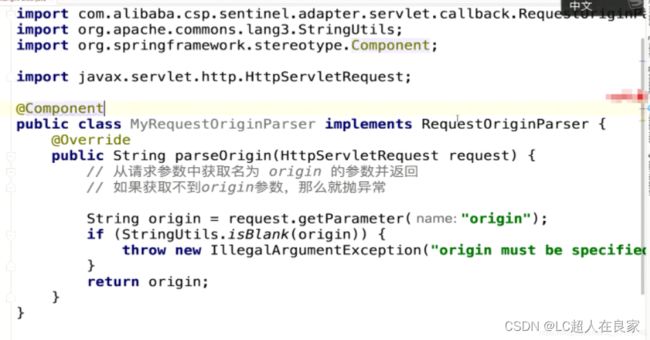
- 3.6.3.16 实现区分来源
- 3.6.3.17 RESTFUL URL
- 3.6.3.18 sentinel总结
- 3.7 消息驱动的微服务
-
- 3.7.1 Spring实现异步的方法
- 3.7.2 MQ
-
- 3.7.2.1 搭建RocketMQ
- 3.7.2.2 搭建RocketMQ控制台
- 3.7.2.3 项目中使用RocketMQ
-
- 3.7.2.3.1 消息发送者
- 3.7.2.3.2 消息消费者
- 3.7.3 分布式事务
-
- 3.7.3.1 RocketMQ实现事务的流程
- 3.7.3.2 RocketMQ实现编码
- 3.7.4 Spring Cloud Stream用于构建消息驱动的微服务的框架
-
- 3.7.4.1 Spring Cloud Stream 代码-消息生产者
- 3.7.4.2 Spring Cloud Stream 消息消费者
- 3.7.4.3 Spring Cloud Stream 接口自定义:消息生产者
- 3.7.4.4 Spring Cloud Stream 接口自定义:消息消费者
- 3.7.4.5 消息过滤
-
- 3.7.4.6 Spring Cloud Stream 的监控
- 3.7.4.7 Spring Cloud Stream 异常处理
- 3.7.4.8 Spring Cloud Stream + RocketMQ实现分布式事务
- 3.8 Spring Cloud Gateway
-
什么是SpringCloudAlibaba? ------------ 阿里巴巴结合自身微服务实践,开源的微服务全家桶
-
Spring Cloud Alibaba真实应用场景 ------------大型复杂的系统(大型电商系统); 高并发系统(大型门户,秒杀系统); 需求不明确(初创公司业务系统)
-
Spring Cloud Alibaba与Spring Cloud的区别
SpringCloud Alibaba是SpringCloud的子项目,它是SpringCloud第二代的实现
-
Spring Cloud Alibaba的重要组件
一、springboot的回顾
1.1 快速创建springboot项目的注意事项
快速创建springboot项目的时候,选择需要的依赖,同时选择SpringBoot版本,其中如图所示的,除了2.1.5外,上方的都不是正式版,所以我们选择版本为2.1.5,如图所示

我们可以自己部署一个Costom,结合官方文档和网上文章,当为内王环境时,自己就可以部署一个,如图所示:

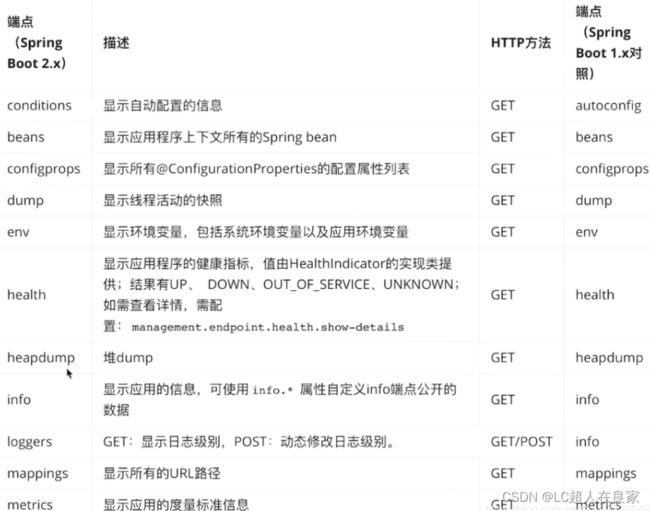
1.2 必会 Spring Boot Actuator
第一步:加依赖
		org.springframework.boot
		spring-boot-starter-actuator
第二步:application.yml中配置
# 让健康检查更加详细
management.endpoint.health.show-details=always
# 激活所有的actuator断点
# management.endpoints.web.exposure.include=*
# 激活指定的actuator断点
management.endpoints.web.exposure.include=metrics,health

# 描述应用
info.app-name=spring-boot-demo
info.author=damu
info.email=xxx@email

第三步:直接启动,访问:ip:端口/actuator

提供的监控端点如图(此处列的是常用的,可以去官方文档查看全部的):
1.3 必会 Spring Boot 配置管理
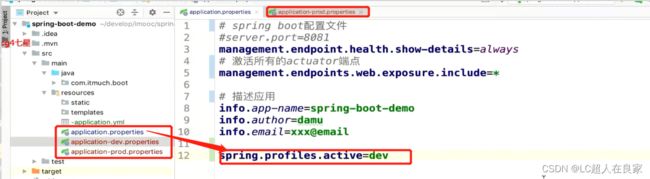
1.3.1 支持的配置格式:
application.yml
application.yaml
application.properties
properties中的值若为 * ,在yml中则需要改为 “*”
yml>yaml>properties 执行顺序,如果有重复内容,则properties为最终的结果
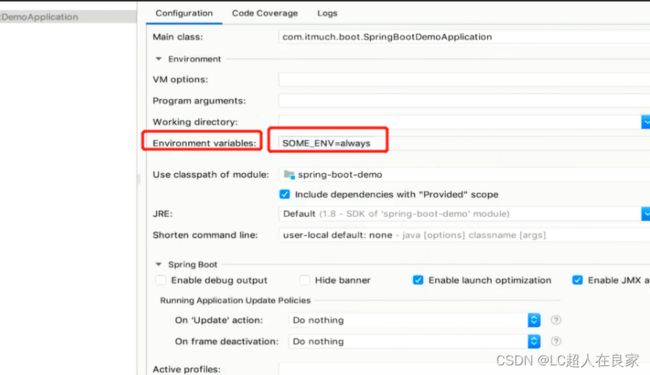
1.3.2 环境变量:
以 ${xxx} 形式标记变量名,在IDEA中可在 Environment variables 中添加环境变量,如图所示:

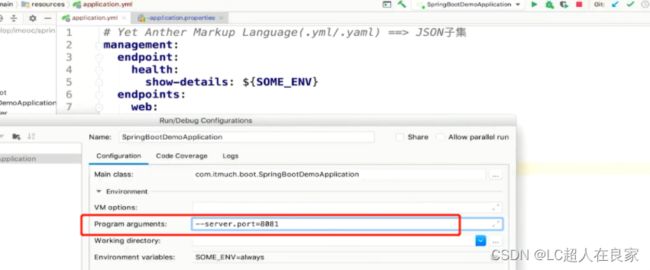
1.3.3 外部配置文件
spring-boot能够读取外部的配置文件,将其配置文件放同一路经下即可,且外部的配置文件优先级更高,如图所示:

1.3.4 命令行参数:
java -jar xxx.jar --server.port=8081
1.4 必会 Profile
1.4.1 如何实现不同环境不同配置?
- 方式一:指定yml中的环境配置
yml中配置
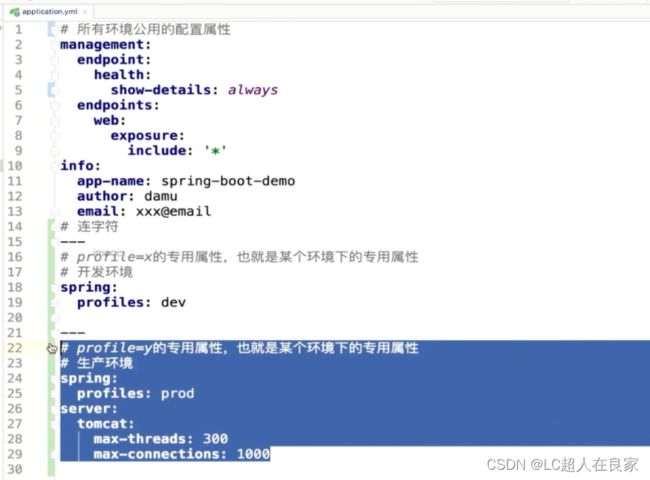
在IDEA中指定要启动的环境:
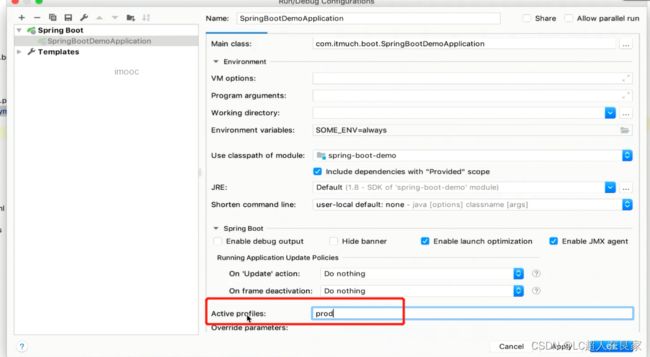
不指定环境配置的时候,就只执行公共部分的配置,我们可以配置默认的环境配置方案,如图所示

- 方式二:我们也可以创建出多个profile配置文件,然后在配置的时候选择指定的配置文件,如图所示
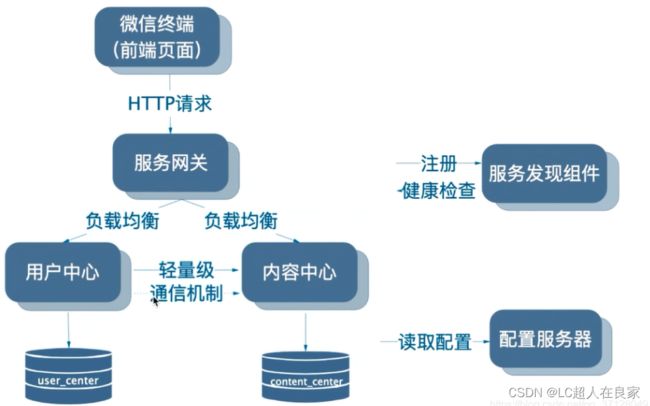
二、微服务的拆分与编写
微服务架构图:

项目架构图:
数据库设计:

2.1 如何创建小程序
注册账号: https//mp.weixin.qq.com
填写信息,申请创建小程序

在激活邮箱中点击跳转链接,完善补全如图信息:

进入小程序首页,我们可以配置小程序信息等,这里我们点击 **开发设置 **,查看AppId与AppSecret
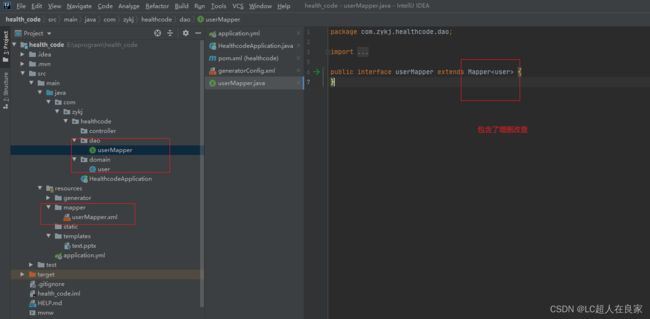
2.2 创建项目(springboot+mybatis+通用mapper)
2.2.1 pom依赖(mybatis+通用mapper)
            org.springframework.boot
            spring-boot-starter-web


            org.projectlombok
            lombok
            true


            org.springframework.boot
            spring-boot-starter-test


            junit
            junit
            test


            junit
            junit
            4.13.2


            com.alibaba
            fastjson
            1.2.78


            org.mybatis.spring.boot
            mybatis-spring-boot-starter
            2.2.0


            mysql
            mysql-connector-java


            tk.mybatis
            mapper-spring-boot-starter
            2.1.5


            org.springframework.boot
            spring-boot-starter-actuator
通用Mapper专用代码生成器生成的Model会在原有基础上增加@Table,@Id,@Column等注解,方便自动回数据库字段进行映射。运行MBG有多种方法,这里只是介绍两种比较常见的方法。并且有关的内容会针对这样的运行方式进行配置;
2.2.2 配置文件
server:
  port: 9551
#spring:
#  data:
#    elasticsearch:
#      cluster-name: elastics01
#      cluster-nodes: 127.0.0.1:9200

# 让健康检查更加详细
management:
  endpoint:
    health:
      show-details: always
    web: # 激活指定的actuator断点
      exposure:
        include: "*"
info:
  app-name: spring-boot-demo
  author: damu
  email: [email protected]


spring:
  datasource:
    username: root321
    password: root123
    url: jdbc:mysql://localhost:3306/mysql?allowMultiQueries=true&useUnicode=true&characterEncoding=UTF-8&useSSL=true&serverTimezone=Asia/Shanghai
    driver-class-name:

mybatis:
  mapper-locations: classpath:mapper/*.xml
  configuration:
    log-impl: org.apache.ibatis.logging.stdout.StdOutImpl
2.2.3 @MapperScan

2.2.4 MBG(代码生成器):
通用Mapper专用代码生成器生成的Model会在原有基础上增加@Table,@Id,@Column等注解,方便自动回数据库字段进行映射。运行MBG有多种方法,这里只是介绍两种比较常见的方法。并且有关的内容会针对这样的运行方式进行配置;
2.2.4.1 方式一(不推荐):使用Java编码方式运行MBG:
- pom.xml
            org.springframework.boot
            spring-boot-starter-web


            org.projectlombok
            lombok
            true


            org.springframework.boot
            spring-boot-starter-test


            com.alibaba
            fastjson
            1.2.78


            org.mybatis.spring.boot
            mybatis-spring-boot-starter
            2.2.0


            mysql
            mysql-connector-java
            5.1.47


            tk.mybatis
            mapper-spring-boot-starter
            2.1.5


            org.springframework.boot
            spring-boot-starter-actuator


            org.hsqldb
            sqltool
            2.3.3


            org.mybatis.generator
            mybatis-generator-core
            1.3.7
- 创建Generator
package com.zykj.healthcode.config;

import org.hsqldb.cmdline.SqlFile;
import org.mybatis.generator.api.MyBatisGenerator;
import org.mybatis.generator.config.Configuration;
import org.mybatis.generator.config.xml.ConfigurationParser;
import org.mybatis.generator.internal.DefaultShellCallback;

import java.io.File;
import java.io.InputStream;
import java.io.InputStreamReader;
import java.sql.*;
import java.util.ArrayList;
import java.util.List;

/**
 * @author lc
 * @version 1.0
 * @date 2022/3/30 14:47
 */
public class Generator {
    public static void startDB(){
        try {
            Class.forName("org.hsqldb.jdbcDriver");
        } catch (ClassNotFoundException e) {
            e.printStackTrace();
        }
        String url = "jdbc:mysql://localhost:3306/mysql";
        String user = "root2131";
        String password = "root432423";
        try {
            Connection connection = DriverManager.getConnection(url, user, password);
            InputStream inputStream = getResourceAsStream("CreateDB.sql");

            SqlFile sqlFile = new SqlFile(new InputStreamReader(inputStream), "init", System.out, "UTF-8", false, new File("."));
            sqlFile.setConnection(connection);
            sqlFile.execute();

            connection.close();
        } catch (Exception e) {
            e.printStackTrace();
        }
    }

    public static InputStream getResourceAsStream(String path){
        return Thread.currentThread().getContextClassLoader().getResourceAsStream(path);
    }

    public static void main(String[] args) throws Exception {
        startDB();
        List warnings = new ArrayList<>();
        boolean overwrite = true;
        ConfigurationParser cp = new ConfigurationParser(warnings);
        Configuration config = cp.parseConfiguration(getResourceAsStream("generatorConfig.xml"));
        DefaultShellCallback callback = new DefaultShellCallback(overwrite);
        MyBatisGenerator myBatisGenerator = new MyBatisGenerator(config, callback, warnings);
        myBatisGenerator.generate(null);
        for (String warning : warnings) {
            System.out.println(warning);
        }
    }
}
2.2.4.2 方式二(推荐):使用Plugin的方式去运行MBG:
- 修改pom.xml
            org.springframework.boot
            spring-boot-starter-web


            org.projectlombok
            lombok
            true


            org.springframework.boot
            spring-boot-starter-test


            com.alibaba
            fastjson
            1.2.78


            org.mybatis.spring.boot
            mybatis-spring-boot-starter
            2.2.0


            mysql
            mysql-connector-java
            5.1.47


            tk.mybatis
            mapper-spring-boot-starter
            2.1.5


            org.springframework.boot
            spring-boot-starter-actuator


                org.springframework.boot
                spring-boot-maven-plugin


                            org.projectlombok
                            lombok


                org.mybatis.generator
                mybatis-generator-maven-plugin
                1.3.7


                        Generate MyBatis Artifacts

                            generate


                    ${basedir}/src/main/resources/generator/generatorConfig.xml
                    true
                    true


                        org.mybatis.generator
                        mybatis-generator-core
                        1.3.7


                        tk.mybatis
                        mapper
                        4.1.1


                        mysql
                        mysql-connector-java
                        5.1.47
- 创建generatorConfig.xml

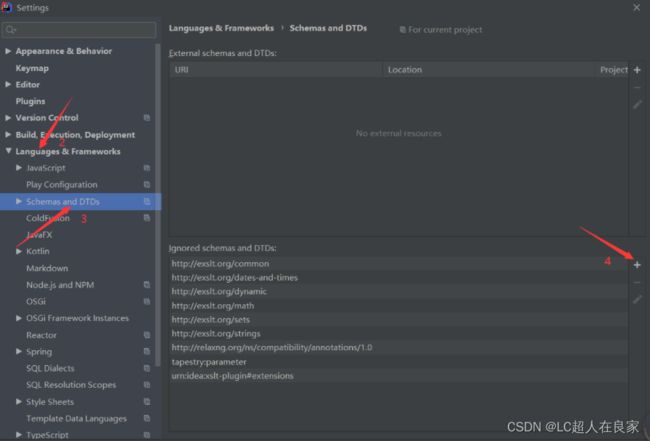
此时,可能会爆红

URI is not registered (Settings | Languages & Frameworks | Schemas and DTDs)
中文意思就是统一资源标识符没有注册,解决方法就是将这个标识符手动添加到IDEA中,首先复制报红色的那串代码(只要红色的部分),然后按照步骤添加就行
file --> settings- -> languages & frameworks -->Schemas and DTDs
- 执行
点击

三、Spring Cloud Alibaba介绍
3.1 Spring Cloud Alibaba的介绍
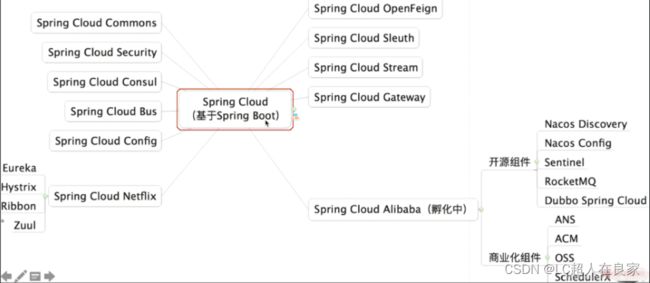
3.1.1 快速构建分布式系统的工具集(主要功能如图所示:)

3.1.2 常用子项目如图
3.1.3 SpringCloud Alibaba的功能描述
3.1.4 我们整理后如图所示

3.1.5 SpringCloud发布生命周期
版本发布计划:(https://github.com/spring-cloud/spring-cloud-release/milestones)[https://github.com/spring-cloud/spring-cloud-release/milestones]
版本发布记录:(https://github.com/spring-cloud/spring-cloud-release/releases)[https://github.com/spring-cloud/spring-cloud-release/releases]
版本终止声明:(https://spring.io/projects/spring-cloud#overview)[https://spring.io/projects/spring-cloud#overview]
3.1.6 版本兼容性
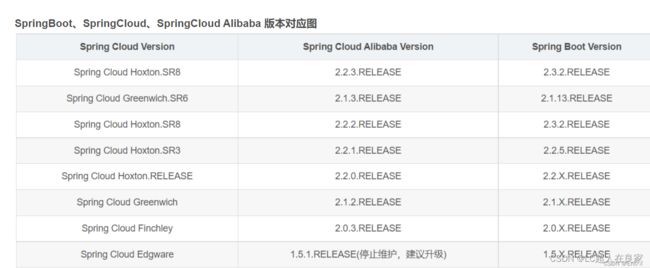

[外链图片转存失败,源站可能有防盗链机制,建议将图片保存下来直接上传(img-4JhWCLSk-1667050463986)(img.png)]
3.2 为项目整合SpringCloudAlibaba
其实,就是新建一个maven项目充当父工程,然后再在父工程(pom里面引入springcloud和springcloud阿里巴巴的依赖)里面创建一个个springboot项目充当子工程;
3.2.1 引入依赖
2.1.6.RELEASE 版本的springboot
                org.springframework.cloud
                spring-cloud-dependencies
                Greenwich.SR2
                pom
                import


                org.springframework.cloud
                spring-cloud-alibaba-dependencies

                0.9.0.RELEASE


                pom
                import


                org.apache.httpcomponents
                httpclient
                4.5


                com.fasterxml.jackson.core
                jackson-core
                2.11.3
3.2.2 配置yml
server:
  port: 9551
#spring:
#  data:
#    elasticsearch:
#      cluster-name: elastics01
#      cluster-nodes: 127.0.0.1:9200

# actuator 让健康检查更加详细
management:
  endpoint:
    health:
      show-details: always
    web: # 激活指定的actuator断点
      exposure:
        include: "*"
info:
  app-name: spring-boot-demo
  author: damu
  email: [email protected]


spring:
  datasource:
    username: root232
    password: root23
    url: jdbc:mysql://localhost:3306/mysql?allowMultiQueries=true&useUnicode=true&characterEncoding=UTF-8&useSSL=true&serverTimezone=Asia/Shanghai
    driver-class-name: com.mysql.jdbc.Driver

mybatis:
  mapper-locations: classpath:mapper/*.xml
  configuration:
    log-impl: org.apache.ibatis.logging.stdout.StdOutImpl
此时,可以启动启动类!
3.3 服务发现-Nacos
- 服务提供者:服务的被调用方(即:为其他微服务提供接口的微服务)
- 服务消费者:服务的调用方(即:调用其他微服务接口的微服务)
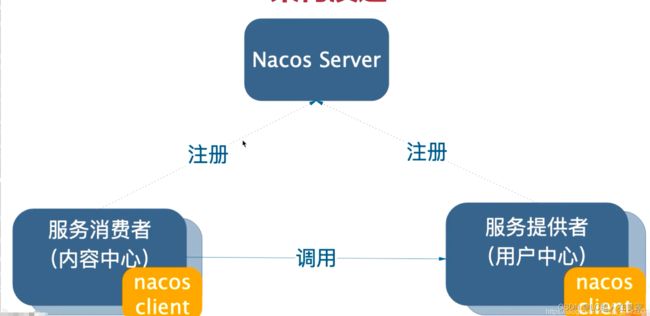
大白话剖析服务发现原理
如果用户地址发生变化,怎么办?
服务发现机制就是通过一个中间件去记录服务提供者的ip地址,服务名以及心跳等数据(比如用mysql去存储这些信息),然后服务消费者会去这个中间平台去查询相关信息,然后再去访问对应的地址,这就是服务注册和服务发现。
当用户地址发生了变化也没有影响,因为服务提供方修改了用户地址,在中间件中会被更新,当服务消费方去访问中间件时就能及时获取最新的用户地址,就不会出现用户地址发生变化导致服务找不到
3.3.1 什么是Nacos
官方文档:hptps://nacos.io/zh-cn/docs/what-is-nacos.html
微服务全景架构图:

引入Nacos后的架构演进图:
3.3.2 搭建Nacos Server
下载Nacos Server: https://github.com/alibaba/nacos/releases
搭建Nacos Server: https://nacos.io/zh-cn/docs/quick-start.html | https://blog.csdn.net/LC_Liangchao/article/details/123714314
启动服务器:
此处启动命令为单机模式,非集群模式
- Linux/Unix/Mac:
sh startup.sh -m standalone
- ubuntu
bash startup.sh -m standalone
- Windows:
startup.cmd -m standalone
依赖引入后可能会有很多依赖冲突,可以在我的小问题的文章中查看如解决冲突的方法;
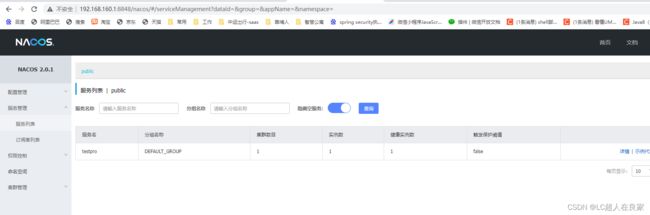
3.3.3 项目模块注册到nacos
- 添加依赖
		org.springframework.cloud
		spring-cloud-starter-alibaba-nacos-discovery
早期在启动类上需要加上 @EnableDiscoveryClient注解,现在已经可以不需要加了
- 配置yml
spring
  cloud:
    nacos:
      discovery:
        server-addr: localhost:8848   #指定nacos server的地址
  application:
    name: testpro   # 服务器名称;尽量用- ,不要用_
启动项目,控制台会打印

http://localhost:8848/nacos
默认的账号密码都是 nacos
todo:3.3.4 项目中nacos的消费使用
todo: 3.3.5 Nacos的NameSpace
NameSpace是命名空间。处于不同命名空间的服务,它们之间是隔离的,通过这个特点,我们可以多个环境同时注册Nacos,通过处于不同的命名空间,去区分dev/test/prod等不同环境

3.4 负载均衡
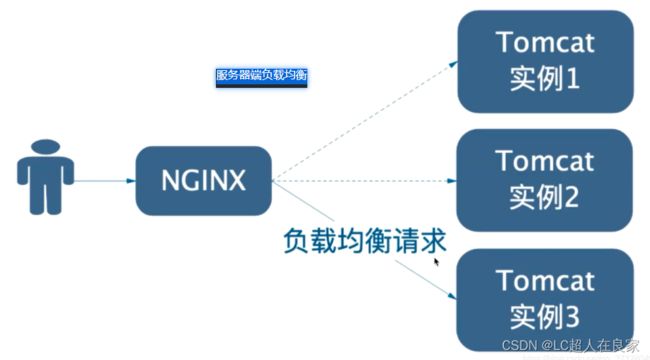
负载均衡的两种方式 - 服务器端负载均衡 + 客户端负载均衡

3.4.1 使用Ribbon实现负载均衡
Ribbon为我们提供了丰富的负载均衡算法;
使用方法如下:
- 加依赖: 此步骤省略,因为Nacos已经结合了Ribbon
- 写注解 (在RestTemplate的Bean上加@LoadBalanced + 使用RestTemplate)
@LoadBalanced 加上此注解后,访问服务带服务名就可以了,并且会自动负载均衡
@Bean
   @LoadBalanced
   public RestTemplate restTemplate() {
       RestTemplate restTemplate = new RestTemplate();
       restTemplate.getMessageConverters().set(1,new StringHttpMessageConverter(StandardCharsets.UTF_8));
       return  restTemplate;
   }
- 使用RestTemplate
3.4.2 Ribbon组成

3.4.3 Ribbon内置的负载均衡规则

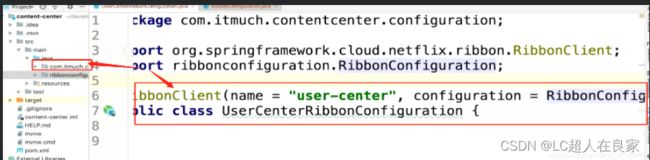
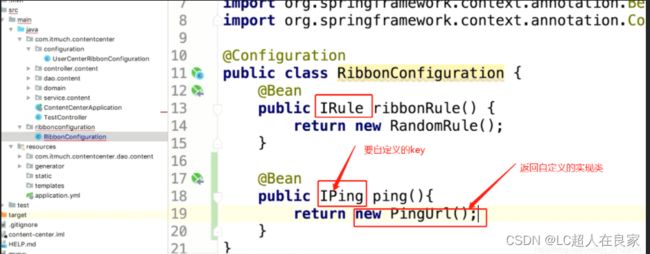
3.4.4 自定义Ribbon的策略配置

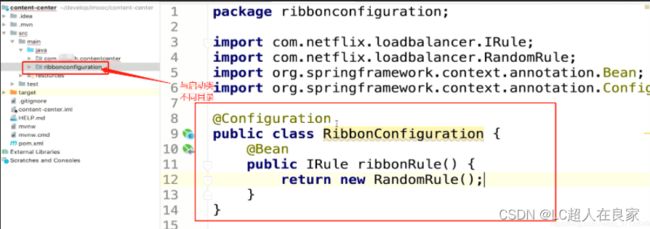
3.4.4.1 方式一:代码
在与启动类包不同路径下创建:
	@Configuration
	public class RibbonConfiguration{
		@Bean
		public IRule ribbonRule(){
			// 随机
			return new RandomRule();
		}
	}
在与启动类包下创建:
	@Configuration
	@RibonClient(name = "服务名称", configuration=RibbonConfiguration.class)
	public class XXXRibbonConfiguration{

	}
3.4.4.2 方式二:配置yml
在resource目录下的application.yml中添加配置
	xxx服务名称:
		ribbon:
			NFLoadBalancerRuleClassName: com.netflix.loadbalancer.RandomRule   # 想要的规则的类的所在全路径
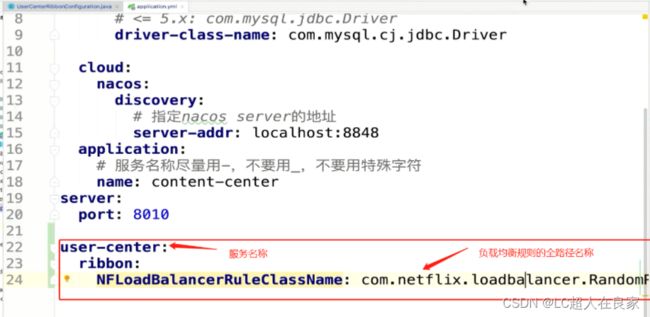
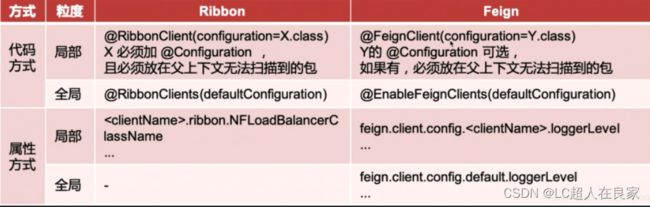
两个方式之间的对比:(属性配置方式优先级更高)

3.4.5 全局配置
在我们定义的XXXRibbonConfiguration中,把configuration改为defaultConfiguration即可,代码如图所示:

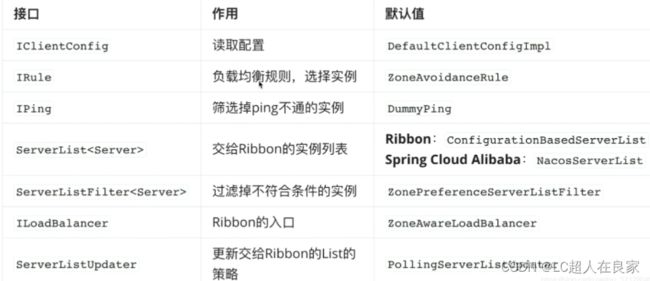
3.4.6 支持的配置项
如图的每一项都支持,方式就是定义一个Bean,去返回它的实现类。如果配置实现类,则给指定的key值,value值为实现类的全路径地址;

3.4.7 饥饿加载
在使用RestTemplate的时候,用Rabbon时会进行懒加载,头一次的访问会比较慢。我们可以通过改变加载模式,将懒加载改为饥饿加载,这样第一次请求就不会慢了,在application.yml中进行配置:此处为开启饥饿加载
ribbon:
  eager-load:
    clients: xxx服务名   # 多个服务,以 `,`号分割
    enabled: true

3.4.8 扩展Ribbon-支持Nacos权重
扩展Ribbon支持权重的三种方式: hppts://www.imooc.com/article/288660
3.4.8.1 第一步:定义一个类去继承另外一个类 AbstractLoadBalancerRule并实现方法
package com.zykj.healthcode.config;

import com.alibaba.nacos.api.exception.NacosException;
import com.alibaba.nacos.api.naming.NamingService;
import com.alibaba.nacos.api.naming.pojo.Instance;
import com.netflix.client.config.IClientConfig;
import com.netflix.loadbalancer.AbstractLoadBalancerRule;
import com.netflix.loadbalancer.BaseLoadBalancer;
import com.netflix.loadbalancer.Server;
import org.springframework.beans.factory.annotation.Autowired;
import org.springframework.cloud.alibaba.nacos.NacosDiscoveryProperties;
import org.springframework.cloud.alibaba.nacos.ribbon.NacosServer;

/**
 * 自定义一个rule
 *
 * @author lc
 * @version 1.0
 * @date 2022/3/31 10:31
 */
public class NacosWeightedRule extends AbstractLoadBalancerRule {

    @Autowired
    private NacosDiscoveryProperties nacosDiscoveryProperties;

    @Override
    public void initWithNiwsConfig(IClientConfig iClientConfig) {
        // 读取配置文件,并初始化NacosWeightedRule
    }

    @Override
    public Server choose(Object o) {
        try {
            // getLoadBalancer是AbstractLoadBalancerRule的,我们继承来的
            BaseLoadBalancer loadBalancer = (BaseLoadBalancer) this.getLoadBalancer();
            // 想要请求的微服务的名称
            String name = loadBalancer.getName();

            // 拿到服务发现的相关api
            NamingService namingService = nacosDiscoveryProperties.namingServiceInstance();

            // nacos client自动通过基于权重的负载均衡算法,给我们选择一个实例
            Instance instance = namingService.selectOneHealthyInstance(name);
            return new NacosServer(instance);
        } catch (NacosException e) {
            e.printStackTrace();
        }

        return null;
    }
}
3.4.8.2 第二步:定义Bean替换默认的
如图的每一项都支持,方式就是定义一个Bean,去返回它的实现类。如果配置实现类,则给指定的key值,value值为实现类的全路径地址;
可以查看3.4.6
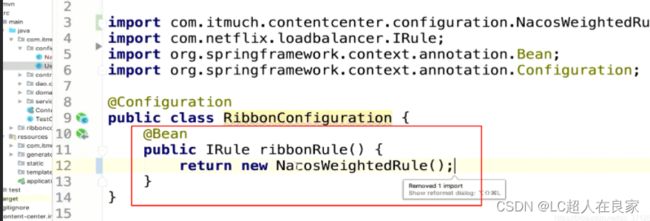
在Nacos中编辑权重

3.5 声明式HTTP客户端: Feign
3.5.1 使用Feign实现远程Http调用
作用:服务端之间的接口调用,通过注册中心来查找服务信息;
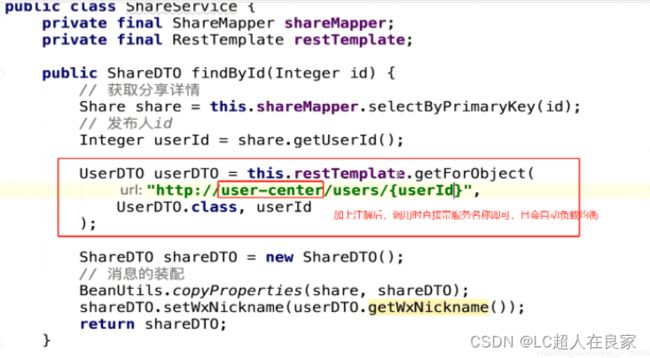
例子:假如我有两个模块A,B;然后,我要A中调用B的方法,那就是在A中写一个B的client;
3.5.1.1 第一步:pom.xml中引入依赖
	org.springframework.cloud
	spring-cloud-starter-openfeign
3.5.1.2 第二步:启动类上加上 @EnableFeignClients 注解
3.5.1.3 第三步:写配置,暂时没有
3.5.1.4 第四步:写一个Feign示例:
@FeignClient(name="xxx服务名称")
public interface xxxFeignCLient{
	/**
	 * 这是一个Feign的示例
	 *
	 * /
	@GetMapping("xxx/xxx") // 路径
	XXX findById(xxx xxx)
}
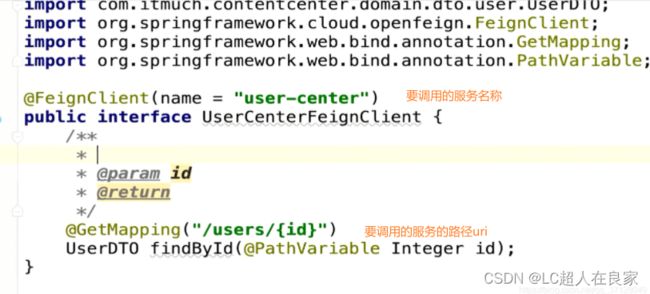
Feign与Ribbon也可以一起整合,可以参考Feign的整合方式
3.5.2 Feign的组成
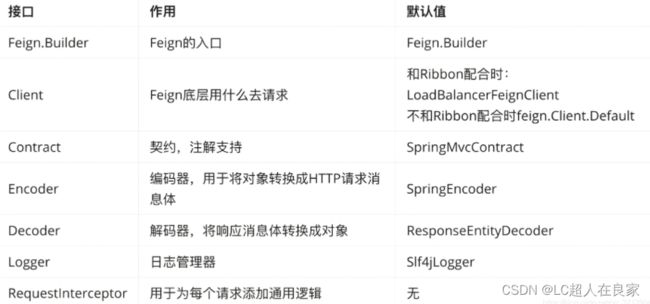
使用RequestInterceptor可以进行拦截,我们可以加上通用逻辑,比如为每个Feign的方法在调用的时候,都加上Header,Header里可以统一带上AuthToken
3.5.3 Feign的日志级别的配置(打印日志):
Feign的日志级别与通用的日志级别不同,它自己定义了四种日志级别

3.5.3.1 方式一:代码
第一步:设置配置类,更改feign的日志级别
import feign.Logger;
import org.springframework.context.annotation.Bean;
import org.springframework.context.annotation.Configuration;

/**
 * 设置用户的feign的日志级别
 *
 * @author lc
 * @version 1.0
 * @date 2022/3/31 11:09
 */
@Configuration
public class UserClientFeignConfiguration {

    @Bean
    public Logger.Level level() {
        // 让feign打印所有请求的细节
        return Logger.Level.FULL;
    }
}

第二步:在feign接口处使用上

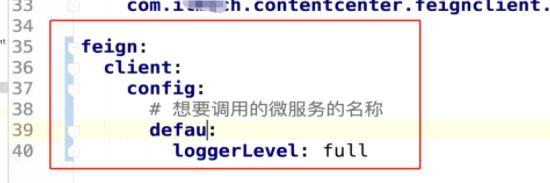
3.5.3.2 方式二:yml
feign:
	client:
		config:
			# 想要调用的微服务名称
			user-center:
				loggerLevel: full
3.5.4 全局配置自定义
方式一:启动类中的 @EnableFeignClients(defaultConfiguration=xxx.class)
方式二:在resource/application.yml中进行设置
3.5.5 支持的配置项

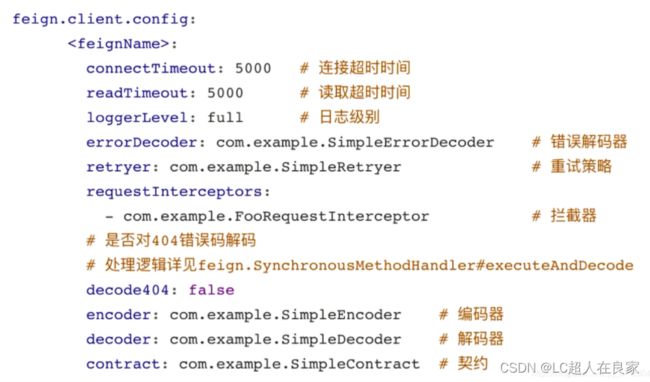
3.5.6 配置最佳实践总结
3.5.7 Feign的继承 - 一处编写多处使用
当我们有一些服务存在一些相同的Feign远程调用时,我们可以将这些通用的Feign独立出来,然后写在外部的一些地方然后引用进来,直接继承。这样就可以一次修改,处处生效,同时遵循契约写法。
3.5.8 GetMapping如何发送Feign请求
使用@GetMapping请求方式的Feign调用,它仍然会发送Post请求,所以会导致请求异常;
解决办法如下:
3.5.8.1 方式一:使用@SpringQueryMap ,参数是实体类
@FeignClient("xxxx-xx")
public interface UserFeignClient{
	@GetMapping("/get")
	public User get0(@SpringQueryMap User user);
}
3.5.8.2 方法二:使用@RequestParam注解指定请求的参数,多个参数
@FeignClient("xxxx-xx")
public interface UserFeignClient{
	@GetMapping("/get")
	public User get0(@RequestParam("id")Long id,@RequestParam("username")String str);
}
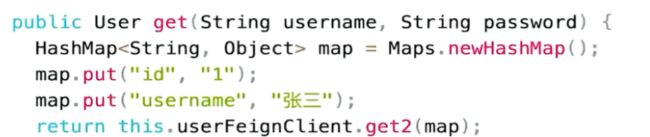
多参数的Url也可以使用Map来进行构建。当目标Url参数非常多的时候,可使用这种方式简化Feign接口的编写
@FeignClient("xxxx-xx")
public interface UserFeignClient{
	@GetMapping("/get")
	public User get0(@RequestParam Mapmap);
}
最终使用:
注入UserFeignClient userFeignClient
3.5.9 Feign脱离Ribbon使用
脱离Ribbon使用就是不直接指定服务名去调用,而是直接填入url地址:
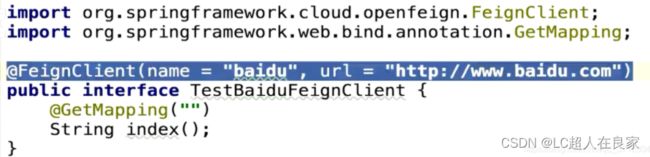
Feign支持占位符,如图所示:
![]()
3.5.10 原则:尽量使用Feign,杜绝使用RestTemplate
3.5.11 Feign常见性能优化
3.5.11.1 配置连接池(提升15%左右)
okHtpp 或者 HttpClient都支持连接池
- 方式一:配置HttpClient:
- 引入依赖:
	<dependency>
		<group>io.github.openfeigngroupId>
		<artifactId>feign-httpclientartifactId>
	dependency>
- application.yml中进行配置:
feign:
	client:
		config:
			#全局配置
			default:
				loggerLevel: full
	httpclient:
		# 让Feign使用 apache httpclient做请求,而不是默认的urlHttp
		enabled: true
		# feign的最大连接数
		max-connections:200
		# feign单个路径的最大连接数
		max-connections-per-route: 50
- 方式二: 也可以使用OkHttp:
	<dependency>
		<groupId>io.github.openfeigngroupId>
		<artifactId>feign-okhttpartifactId>
		<version>10.1.0verrsion>
	dependency>

3.5.11.2 降低日志级别
还有一个优化是降低日志级别,越低的日志级别,打印的日志越少,同时性能就越高
3.5.12 常见的问题总结
https://www.imooc.com/article/289005
3.6 服务容错
3.6.1 雪崩效应
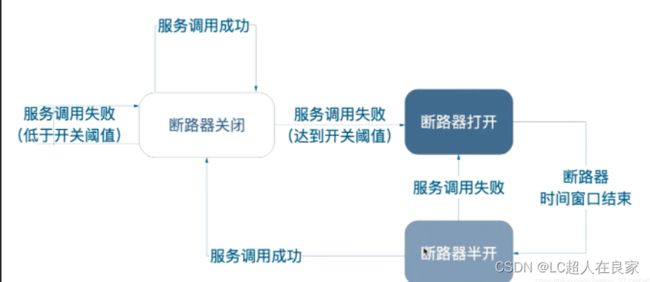
问题:在我们的系统中,当一个服务宕机后,其他服务如果需要来访问这个服务时,就会得不到结果,然后会一直等待此服务返回结果,直至调用超时。每个一个访问请求都是一个线程资源,当服务的调用次数过多,就会导致大量的资源得不到释放,可能就会导致消费服务方也宕机,这样类推会导致雪崩效应,就是由一个服务宕机导致其他服务系统资源被持续占用消耗得不到释放,从而引发一连串的级联失败。
解决:
- 设置超时时间
- 设置限流
- 仓壁模式:(Sentinel基本可以实现这个模式,哪些线程用于哪些地方)
比如这个船,里面每个船舱都是独立的,当一个船舱进水了,也不会导致所有的船舱进水,从而使船沉没。每个Controller作为一个“船舱”

- 断路器
参考我们日常中的电闸,当用电量超过阀值时,就会跳闸;
短路器的三态转换:
3.6.2 使用Sentinel实现容错
Sentinel它是一个轻量级容错的库
3.6.2.1 依赖
		org.springframework.cloud
		spring-cloud-starter-alibaba-sentinel


		org.springframework.boot
		spring-boot-starter-actuator
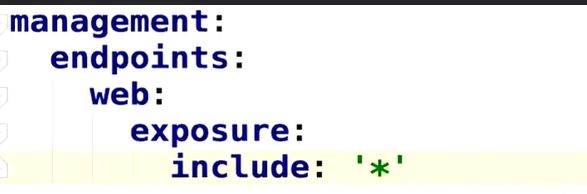
3.6.2.2 application.yml 加入配置,暴露端点
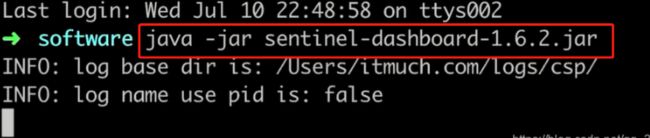
3.6.2.3 访问 localhost:服务端口号/actuator/sentinel,出现如下图所示画面,即为配置完成

3.6.3 Sentinel控制台
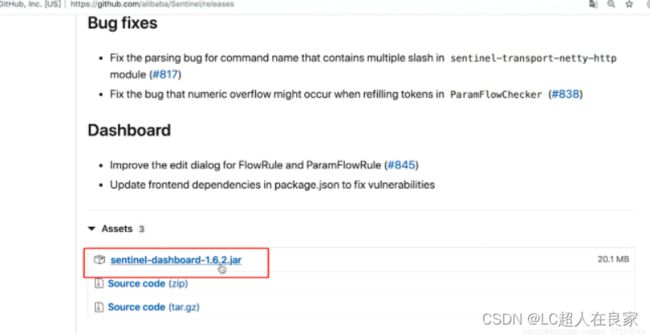
下载地址:https://github.com/alibaba/Sentinel/releases
版本选择: 根据我们的依赖版本或者使用最新的也可以,如果用在生产环境,最好是依赖与控制台版本相同;
3.6.3.1 使用方式:
1. 下载
2. 传入服务器,运行以下命令启动
- 访问web页面:ip/8080/#/login,输入账号密码均为: sentinel

- 添加配置
sentinel是懒加载
	spring:
		cloud:
			sentinel:
				transport:
					# 指定sentinel 控制台地址
					dashboard: localhost:8080
3.6.3.2 流控规则

- QPS 和线程数,是过滤条件,以哪种方式来进行过滤。单机阀值是达到多少量后进行流控;
- 流控模式有三种,分别是直接、关联和链路。直接就是最常见的一种模式,限流达到了,直接对这个接口生效。而流控效果就是生效的三种形式;快速失败也是最常用的一种,就是当达到阀值后,这个直接接口直接返回失败。而流控模式-关联 表示,当访问填入入口资源的路径的单机阀值触发了,此接口就会触发所选择的流控效果;而链路就表示只对此入口过来的数据对此接口触发限流规则;Warm up是热等待,它会在指定的时间后完成触发效果;排队等待是不返回失败,而是进行排队,一个处理完了,再去处理另外一个。
- Warm Up

Warm Up它可以让流量缓慢增加。

- 排队等待:

3.6.3.3 降级规则
Sentinel的降级规则有三种:RT,异常比例,异常数

3.6.3.3.1 RT降级规则:
RT 默认最大4900ms,通过 -Dcsp.sentinel.statistic.max.rt=xxx 修改


3.6.3.3.2 异常比例降级规则:
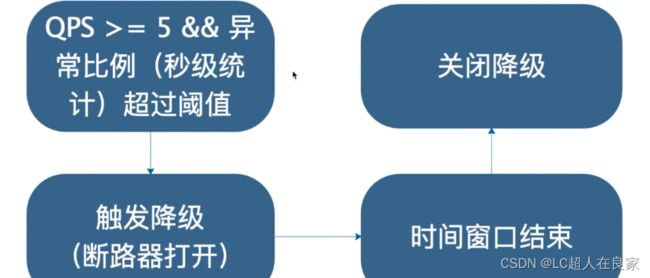
3.6.3.3.3 异常数降级规则
注意点: 时间窗口 < 60秒可能会出问题 比如我们设置时间窗口为10秒,当触发降级内如果异常数依然触发降级,那么可能会再次降级

源码:com.alibaba.csp.sentinel.slots.block.degrade.DegradeRule#passCheck
注意: 目前Sentinel没有半开状态,后期可能会推出半开;
3.6.3.4 热点规则
热点规则的功能是,能够对指定的接口进行限流。可以对这个接口的某个参数,某个类型,以及这个参数取某个值时单位时间内限流等;它能够对一些热点接口起到保护的作用,所以叫做热点规则;
3.6.3.4.1 使用
- 定义接口:

- 配置热点规则

适用于场景:
- QPS非常高的接口或者参数
- 参数必须为基本类型或者String
源码地址:
com.alibaba.csp.sentinel.slots.block.flow.param.ParamFlowChecker#passCheck
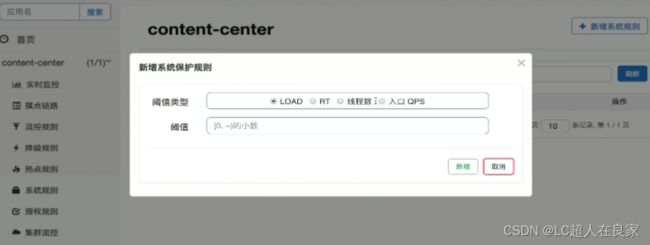
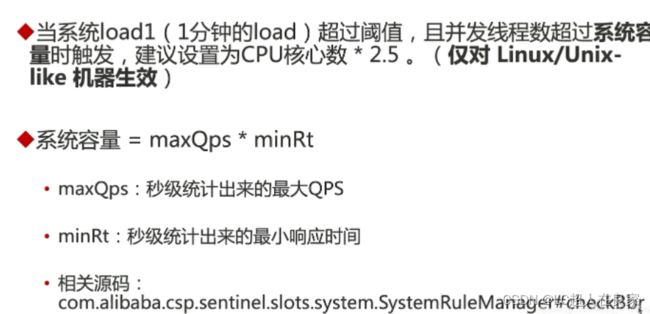
3.6.3.5 系统规则
有四种类型:LOAD,RT,线程数,入口QPS
-
系统-Load
-
系统-RT、线程数、入口QPS

源码地址:
com.alibaba.csp.sentinel.slots.block.flow.param.ParamFlowChecker#passCheck
3.6.3.6 授权规则
授权规则可以对服务消费者的授权,限制访问等

3.6.3.7 sentinel代码配置详解
配置方法手记:https://www.imooc.com/article/289345
扩展Sentinel以及学习其架构有一定意义,我们也可以直接通过这个界面去配置就可以。
3.6.3.8 Sentinel与控制台通信原理剖析
- 控制台是如何获取到微服务的监控信息的?
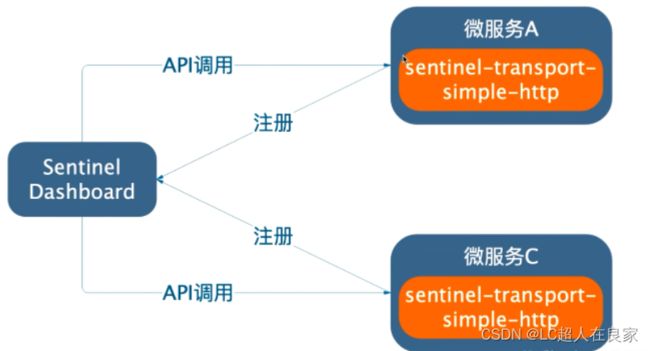
- 用控制台配置规则时,控制台是如何将规则发送到各个微服务的呢? 定时推送到控制台
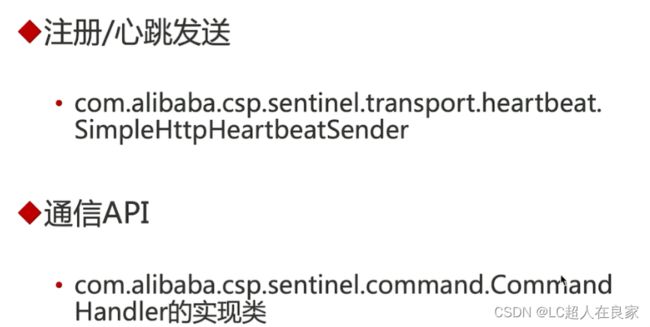
3.6.3.8.1 控制台相关配置项

操作: 启动Sentinel jar的时候,传入参数即可,如图:

3.6.3.8.2 Sentinel API详解
主要API:
- SphU:定义资源,让资源被监控,并且可以保护资源
- Tracer: 对我们想要的其他异常进行统计
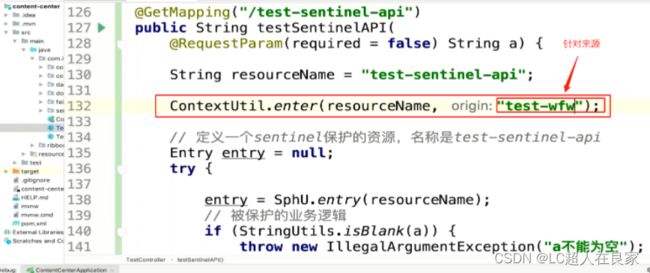
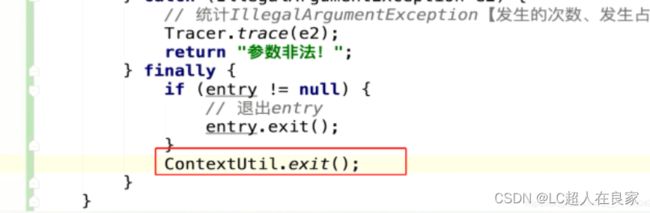
- ContextUtil:针对来源
后期我们可以用更简单的办法来实现,但都是基于此下图中的代码实现的;
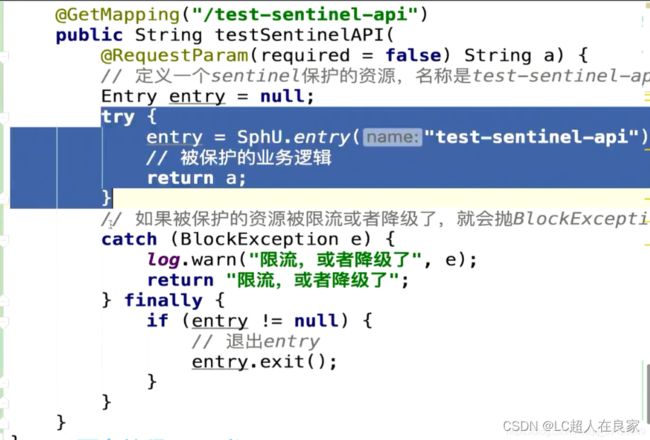
这样就会统计这个流控,同时如果超过限流阀值,就会执行catch内的代码;
- 监控其他异常情况
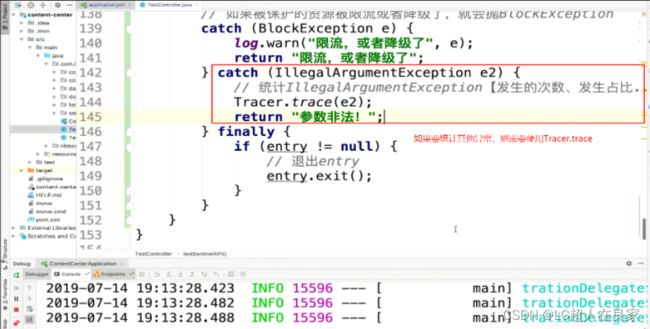
- 来源
结尾需要关闭流
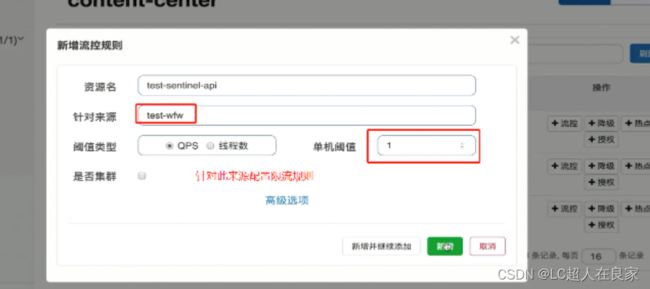
- 针对此来源的服务可以进行单独限流规则:
3.6.3.9 SentinelResource注解详解
https://www.imooc.com/article/289384
使用此注解可以完成 8.13 的功能
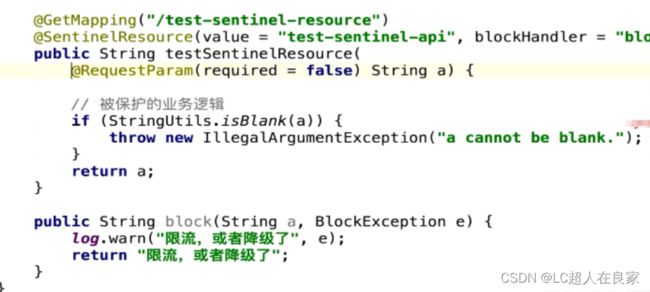
这里面的block可以处理限流或者降级。处理降级可以单独使用fallback关键字,然后也类似于block一样写一个方法即可;升级到sentinel 1.6 可以处理Throwable
相关源码:
com.alibaba.csp.sentinel.annotation.aspectj.SentinelResourceAspect
com.alibaba.csp.sentinel.annotation.aspectj.AbstractSentinelAspectSupport
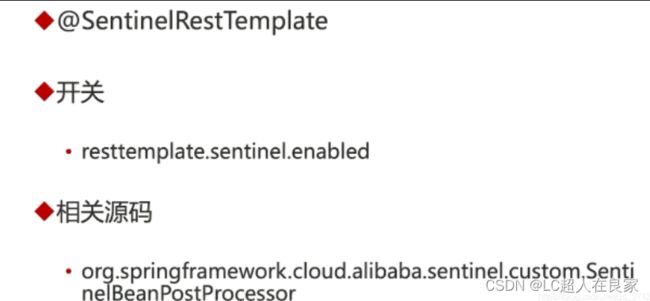
3.6.3.10 RestTemplate整合Sentinel
只需要使用@SentinelRestTemplate注解即可,开关在 application.yml(resttemplate.sentinel.enabled)中进行配置
-
为RestTemplate加上注解:

-
代码中使用RestTemplate即可,这样会在Sentinel获取到监控信息,如果将开关改为false,则就不能获取到信息了。
3.6.3.11 Feign整合Sentinel
源码:org.springframework.cloud.alibaba.sentinel.feign.Sentinel
使用Fallback:


指向的类:

使用FallbackFactory,它的功能更强大,且能够拿到异常


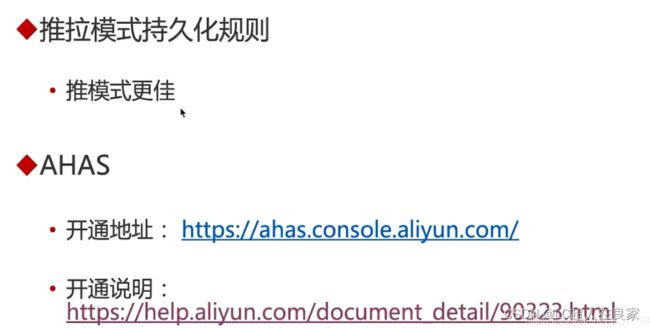
3.6.3.12 规则持久化
- 方式一:拉模式
https://www.imooc.com/article/289402
配置好了重新刷新可能会没有数据展示,可以先去访问接口再回来刷新,因为它是懒加载模式;

- 方式二:推模式
https://www.imooc.com/article/289464
3.6.3.13 生产环境使用Sentinel
3.6.3.14 集群流控(推荐使用gateway网关的)
网关gateway也可以实现类似集群流控的效果,且更加简单,性能更好;
集群流控官方文档: hppts://github.com/alibaba/Sentinel/wiki/集群流控
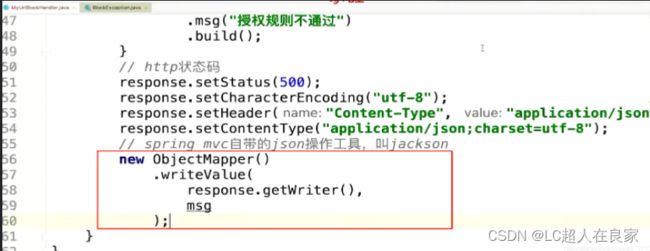
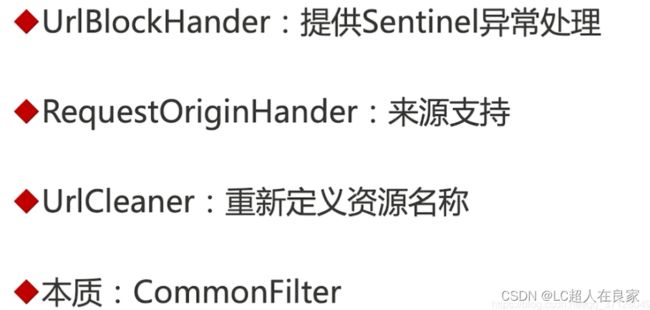
3.6.3.15 错误页优化
使用UrlBlockHandler可以优化错误提示,这样我们能区分出这个接口是因为 限流或降级还是异常的原因导致的;
- 继承接口:

- 编写代码:
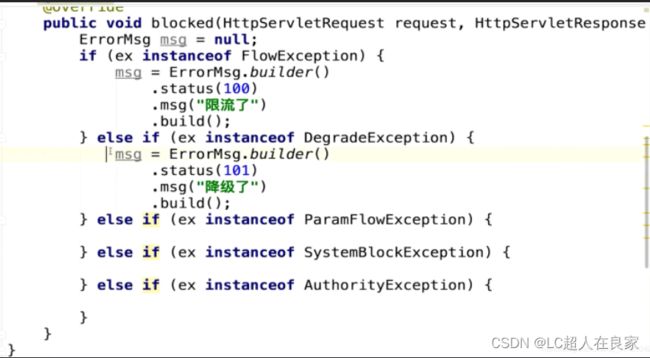
3. 返回结果
3.6.3.16 实现区分来源

3.6.3.17 RESTFUL URL
可以让所有相同资源名称的路径使用相同的限流规则:


3.6.3.18 sentinel总结

https://www.imooc.com/article/289562
3.7 消息驱动的微服务
3.7.1 Spring实现异步的方法
- AsyncRestTemplate: 参考文档:https://blog.csdn.net/jiangchao858/article/details/86709750
- @Async注解: 参考文档:https://blog.csdn.net/qq_37128049/article/details/108145501
- WebClient(Spring 5.0引入)
- MQ 消息中间件
3.7.2 MQ
MQ适用场景:
- 异步处理
- 流量削峰填谷
- 解耦微服务
MQ的种类:
- Kafka
- RabbitMQ
- RocketMQ
- ActiveMQ
工具类的使用:
- RocketMQ: RocketMQTemplate
- ActiveMQ/Artemis:JmsTemplate
- RabbitMQ:AmqpTemplate
- Kafka: KafkaTemplate
消费者各个MQ的注解简单总结:
- RocketMQ: RocketMQMessageListener
- ActiveMQ/Artemis:JmsListener
- RabbitMQ: RabbitListener
- Kafka: KafkaListener
3.7.2.1 搭建RocketMQ
https://www.imooc.com/article/290089
3.7.2.2 搭建RocketMQ控制台
https://www.imooc.com/article/290092


3.7.2.3 项目中使用RocketMQ
3.7.2.3.1 消息发送者
引入依赖:
		org.apache.rocketmq
		rocketmq-spring-boot-starter
		2.0.3
写配置:

引入RocketTemplate:

发送消息

不指定group会报异常,后期不知是否会处理这种;
3.7.2.3.2 消息消费者
- 依赖
		org.apache.rocketmq
		rocketmq-spring-boot-starter
		2.0.3
- 写配置,在application.yml中编写\
name-server的值根据每个人自身实际的ip及端口来填写,以我们安装的rocketmq地址来决定
	rocketmq:
		name-server:127.0.0.1:9876
- 创建接收消息的对象
	@Data
	@NoArgsConstructor
	@AllArgsConstructor
	@Builder
	public class UserAddBOnusMsgDTO{

		/**
		 * 为谁加积分
		 */
		private Integer userId;
		/**
		 * 加多少积分
		 */
		private Integer bonus;

	}
- 创建消息监听类
@Service
@RocketMQMessageListener(consumerGroup= "consumer-group",topic= "add-bonus")
public class AddBonusListener implements RocketMQListener{
	@Override
	public void onMessage(UserAddBonusMsgDTO message){
		System.out.println(message.getUserId())
		System.out.println(message.getBonus())
	}
}
注意:consumerGroup在生产者中是写到配置文件中的,在消费者中是在此处进行指定的。topic在生产者中是发送消息的时候添加,在此处是接收监听类的时候指定,这两个都必须带上;
3.7.3 分布式事务
以前解决事务的办法: @Transactional(rollbackFor= Exception.class) 当发现了Exception异常,就进行回滚;
但是这种方式是存在问题的,如下

问题概述:当我们的逻辑代码中,不仅仅对数据库做了处理,一些场景下我们需要同时进行消息发送和与MySQL进行交互的功能;此图中,我们首先进行了消息发送,然后再把消息写入缓存,那么就会导致: 如果写入缓存的时候,代码执行失败,回滚操作只能回滚数据库,消息已经被消费者监听到了并做了处理了。
现在使用mq来实现事务。
3.7.3.1 RocketMQ实现事务的流程

简单来说RocketMQ实现分布式事务的原理是: 执行到应该发送消息的时候,它并未发送,而是处于“准备发送”阶段,当所有的代码都已执行完毕且无异常时,则进行完全发送,此刻消息消费者才能监听到消息;
- 半消息(Half(Prepare) Message)
暂时无法消费的消息。生产者将消息发送到了MQ server,但这个消息会被标记为“暂不能投递”状态,先存储起来;消费者不会去消费这条消息 - 消息回查(Message Status Check)
网络断开或生产者重启可能会导致丢失事务消息的第二次确认。当MQ Server发现消息长时间处于半消息状态时,将向消息生产者发送请求,询问该消息的最终状态(提交或回滚) - 消息三态:
Commit:提交事务消息,消费者可以消费此消息
Rollback: 回滚事务消息,broker会删除该消息,消费者不能消费
UNKNOWN: broker需要回查确认该消息的状态
3.7.3.2 RocketMQ实现编码
- 到数据库中新增一张表,用来记录 RocketMQ的事务日志:
	create table rocketmq_transaction_log(
		id int auto_increment comment 'id' primary key,
		transaction_Id varchar(45) not null comment '事务id',
		log varchar(45) not null comment '日志')

- 消息生产者编写:发送半消息:
// 首先可以判断,当前面代码执行成功后再执行此代码,此处略
// 发送半消息
String transactionId=UUID.randomUUID().toString()
this.rocketMQTemplate.sendMessageInTransaction(
	"tx-add-bonus-group","add-bonus",MessageBuilder.withPayload(
		UserAddBonusMsgDTO.builder().userId(share.getUserId)
		.bonus(50)
		.build()
	).setHeader(RocketMQHeaders.TRANSACTION_ID,transactionId)
	  .setHeader("share_id",id)
	.build(),
	auditDTO
)
此处 “tx-add-bonus-group”,“add-bonus” 组名及topic是由自己指定的,可根据实际改变。auditDTO、share_id是根据业务需要所传入的数据,auditDTO在消息监听类中可以直接强转使用,share_id的数据可以直接从请求头中获取;
- 消息消费者编写
	@RocketMQTransactionListener(txProducerGroup = "tx-add-bonus-group")
	@RequiredArgsConstructor(onConstructor = @_(@Autowired))
	public class AddBonusTransactionListener implements RocketMQLocalTransactionListener{

		@Override
		public RocketMQLocalTransactionState executeLocalTransaction(Message msg, Object arg)
		String transactionId(String)headers.get(RocketMQHeaders.TRANSACTION_ID);
		Integer shareId= Integer.valueOf((String)headers.get("share_id"))
		try{
			this.shareService.auditByIdInDB(shareId,(ShareAuditDTO) arg)
			return RocketMQLocalTransactionState.COMMIT;
		}catch(Exception e){
			return RocketMQLocalTransactionState.ROLLBACK;
		}
	}
	// 编写回查代码,当我们
	@Override
	public RocketMQLocalTransactionState checkLocalTransaction(Message msg){
		return null;
		}
	}
当我们执行成功,则执行RocketMQLocalTransactionState.COMMIT,失败则ROLLBACK。但是有这样一种情况,比如我们已经执行完逻辑代码,正准备COMMIT提交,此时突然停电了,导致数据已经存入,但是却没有提交成功。所以我们需要一个回查方法,checkLocalTransaction()是一个回查方法,它会去里面进行判断是否执行成功。结合我们已经建立的RocketMQ事务表,我们可以进行回查操作,代码看下方:
// auditByInDB具体方法内容如图所示:

4. 新建一个存入方法,我们之前的存入方法,没有将事务数据加入日志表,我们可以这样改造: 当数据存入的时候,将数据存入日志表;回查方法就进行回查,如果没有存入则表示执行失败:
@Autowired
private RocketmqTransactionLogMapepr rocketmqTransactionLogMapepr;

@Transactional(rollbackFor= Exception.class)
public void auditByIdWithRocketMqLog(Integer id, ShareAuditDTO auditDTO, String transactionId){
	this.auditByIdInDB(id,auditDTO);
	this.rocketmqTransactionLogMapper.insertSelective(
		RocketmqTransactionLog.builder().transactionId(transactionId)
		.log("审核分享")
		.build()
	);
}
- 消息消费者重写:
	@Autowired
	private ShareService shareService;
	@Autowired
	priavte RocketmqTransactionLogMapper rocketmqTransactionLogMapper;
	@RocketMQTransactionListener(txProducerGroup = "tx-add-bonus-group")
	@RequiredArgsConstructor(onConstructor = @_(@Autowired))
	public class AddBonusTransactionListener implements RocketMQLocalTransactionListener{

		@Override
		public RocketMQLocalTransactionState executeLocalTransaction(Message msg, Object arg)
		String transactionId(String)headers.get(RocketMQHeaders.TRANSACTION_ID);
		Integer shareId= Integer.valueOf((String)headers.get("share_id"))
		try{
			this.shareService.auditByIdWIthRocketMqLog(shareId,(ShareAuditDTO) arg,transactionId)

			return RocketMQLocalTransactionState.COMMIT;
		}catch(Exception e){
			return RocketMQLocalTransactionState.ROLLBACK;
		}
	}
	// 编写回查代码,当我们
	@Override
	public RocketMQLocalTransactionState checkLocalTransaction(Message msg){
		MessageHeaders headers= msg.getHeaders();
		String transactionId= (String) headers.get(RocketMQHeaders.TRANSACTION_ID);
		// 查询是否存了事务数据
		this.rocketmqTransactionLogMapper.selectOne(RocketmqTransactionLog.builder().transactionId(transactionId).build());
		// 判断是否提交
		if(transactionLog != null){
			return RocketMQLocalTransactionState.COMMIT;
		}
		return RocketMQLocalTransactionState.ROLLBACK;
		}
	}
使用header和arg可以传参
3.7.4 Spring Cloud Stream用于构建消息驱动的微服务的框架
是一个用于构建消息驱动的微服务的框架
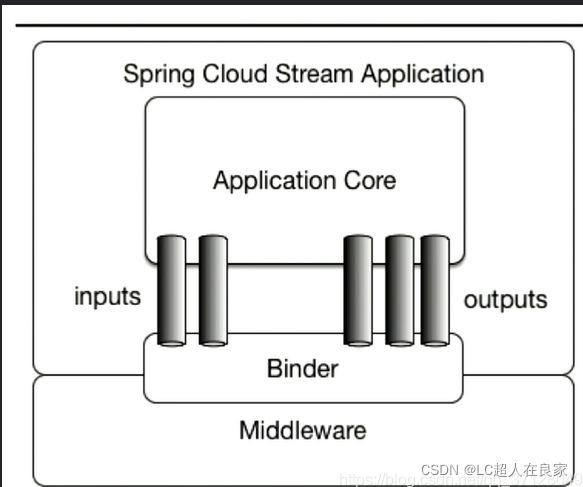
概念:
- Destination Binder(目标绑定器)
与消息中间件通信的组件 - Destination Bindings(目标绑定)
Binding是连接应用程序跟消息中间件的桥梁,用于消息的消费和生产,由binder创建 - Message(消息)

当消息生产者使用Kafka发送消息,那只能用Kafka来接收消息。当使用SpringCloudStream来处理消息的话,我们接收Kafka的消息,可以使用其他的消息中间件来进行接收。SpringCloudStream对消息进行了一层封装,所以我们不需要去关心生产者用的是什么消息中间件。
3.7.4.1 Spring Cloud Stream 代码-消息生产者
- 添加依赖
	<dependency>
		<groupId>org.springframework.cloudgroupId>
		<artifactId>spring-cloud-starter-stream-rocketmqartifactId>
	dependency>
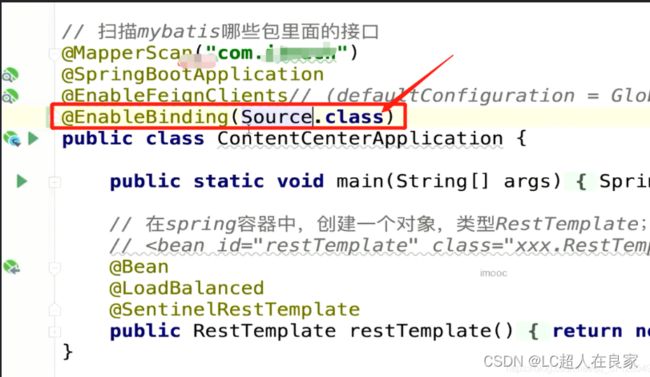
- 在启动类上添加注解, 添加@ EnableBing(Source.class) 注解
3. 写配置(application.yml):
	spring:
		cloud:
			stream:
				rocketmq:
					binder:
						name-server: 127.0.0.1:9876
				bindings:
					output:
						# 用来指定topic
						destination: stream-test-topic
- 生产者发送消息
	@GetMapping("test-stream")
	public String testStream(){
		this.source.output()
			.send(
				MessageBuilder
					.withPayload("消息体")
					.build()
			);
		return "success";
	}
- 检查是否成功发送
在控制台中我们可以查看此组下是否有已发送过的消息:

如果控制台在一直打印日志的话,我们可以降低日志级别:

3.7.4.2 Spring Cloud Stream 消息消费者
- 添加依赖
	<dependency>
		<groupId>org.springframework.cloudgroupId>
		<artifactId>spring-cloud-starter-stream-rocketmqartifactId>
	dependency>
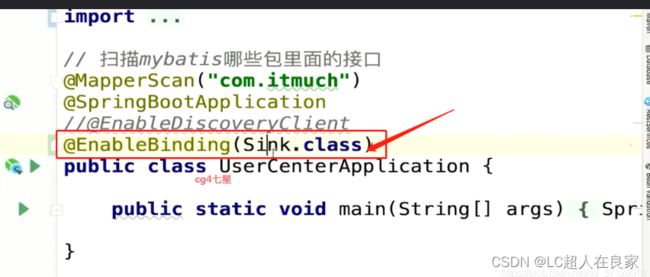
- 添加注解(在启动类上添加注解):@EnableBinding(Sink.class)
- 写配置(application.yml)
	spring:
		cloud:
			stream:
				rocketmq:
					binder:
						name-server: 127.0.0.1:9876
				bindings:
					input:
						destination: stream-test-topic
						group: binder-group  # 这里的group 一定要设置; 如果使用的不是rocketmq的话,这里可以不用设置,可以留空
- 监听消费类
	@Service
	@Slf4j
	public class TestStreamConsumer{
		@StreamListener(Sink.INPUT)
		public void receive(String messageBody){
			log.info("通过stream收到了消息: messageBody = {}");

		}
	}
3.7.4.3 Spring Cloud Stream 接口自定义:消息生产者
	public interface MySource{
		String MY_OUTPUT= "my-output";

		@Output(MY_OUTPUT)
		MessageChannel output();
	}
启动类上,**@EnableBinding注解上引入 MySource.class,如图所示:

加配置

定义接口,发送消息:

使用自定义的接口我们可以进行消息的收发;
3.7.4.4 Spring Cloud Stream 接口自定义:消息消费者

启动类:

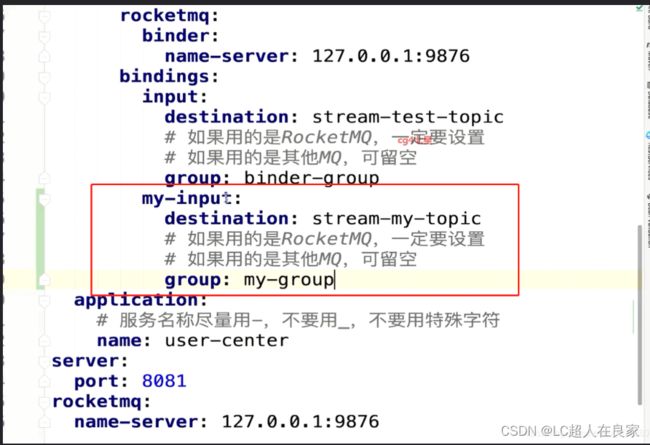
使用自定义接口:消息消费监听,如图所示

3.7.4.5 消息过滤
https://www.imooc.com/article/290424
3.7.4.6 Spring Cloud Stream 的监控
Spring Cloud Actuator为我们提供了三个端点来监控Stream:
- /actuator/bindings
- /actuator/channels
- /actuator/health
3.7.4.7 Spring Cloud Stream 异常处理
https://www.imooc.com/article/290435
定义全局异常处理的办法如下:
	@StreamListener("errorChannel")
	public void error(Message<?> message){
		ErrorMessage errorMessage= (ErrorMessage) message;
		log.warn("发生异常,errorMessage = {}",errorMessage);
	}
3.7.4.8 Spring Cloud Stream + RocketMQ实现分布式事务
SpringCloud Stream 本身没有实现分布式事务,它与RocketMQ结合则是使用RocketMQ的分布式事务。它若与其他结合,则使用其他消息中间件的分布式事务。
- 发送者从rocketRestTemplate改为source:

-
在配置文件中定义组合事务:
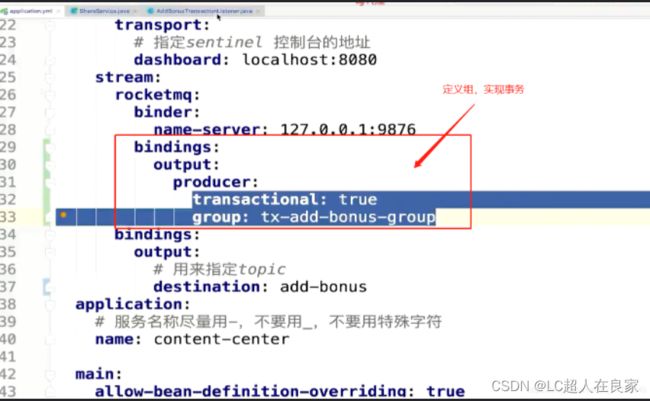
-
消息的监听定义组名称时,一定要与配置文件中的保持一致,如图所示:
