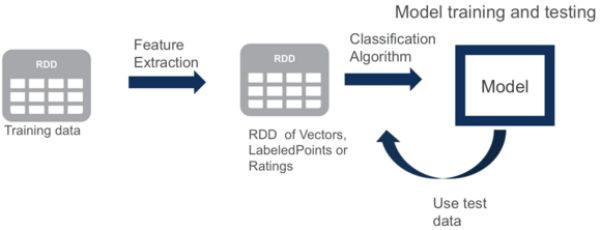
编者注:不要错过有关如何使用Apache Spark创建数据管道应用程序的新的免费按需培训课程-在此处了解更多信息。
决策树广泛用于分类和回归的机器学习任务。 在此博客文章中,我将帮助您开始使用Apache Spark的MLlib机器学习决策树进行分类。
机器学习算法概述
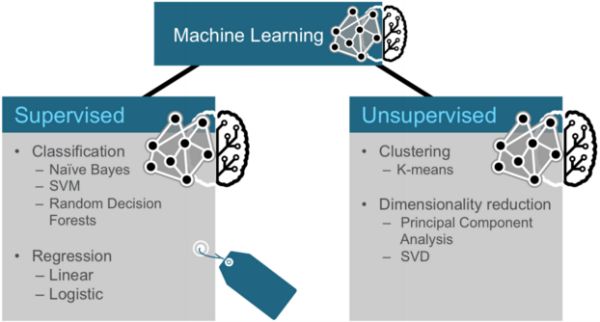
通常,机器学习可以分为两类算法:有监督算法和无监督算法。
监督算法使用标记的数据,其中输入和输出都提供给算法。 无监督算法没有预先的输出。 这些算法留给没有标签的数据有意义。
机器学习的三类技术
机器学习技术的三个常见类别是分类,聚类和协作过滤。
- 分类: Gmail使用一种称为分类的机器学习技术,根据电子邮件的数据(发件人,收件人,主题和邮件正文)指定电子邮件是否为垃圾邮件。 分类采用一组带有已知标签的数据,并学习如何根据该信息为新记录添加标签。
- 群集: Google新闻使用一种称为群集的技术,根据标题和内容将新闻文章分为不同的类别。 聚类算法发现数据集合中出现的分组。
- 协作过滤: Amazon使用一种称为协作过滤(通常称为推荐)的机器学习技术,根据用户的历史记录和与其他用户的相似性来确定用户喜欢哪些产品。
分类
分类是有监督的机器学习算法家族,其将输入指定为属于几个预定义类之一。 分类的一些常见用例包括:
- 信用卡欺诈检测
- 电子邮件垃圾邮件检测
分类数据被标记为例如垃圾邮件/非垃圾邮件或欺诈/非欺诈。 机器学习为新数据分配标签或类。
您可以基于预定功能对事物进行分类。 功能就是您提出的“如果有问题”。 标签是这些问题的答案。 在此示例中,如果它走路,游泳和像鸭子一样嘎嘎叫,则标签为“鸭子”。
聚类
在聚类中,一种算法通过分析输入示例之间的相似性将对象分为类别。 集群用途包括:
- 搜索结果分组
- 客户分组
- 异常检测
- 文字分类
聚类使用无监督算法,该算法没有预先的输出。
使用K-means算法的聚类首先将所有坐标初始化为质心。 每次使用算法时,都会根据某种距离度量(通常是欧几里得距离)将每个点分配给它最近的质心。 然后将质心更新为该遍中分配给它的所有点的“中心”。 重复此过程,直到中心的变化最小。
协同过滤
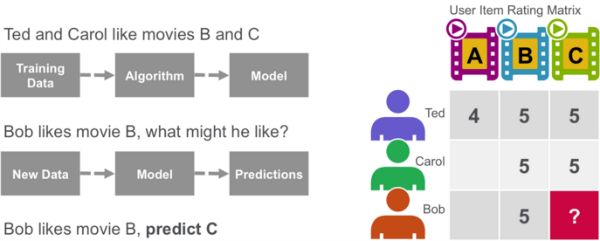
协作过滤算法根据来自许多用户的偏好信息(这是协作部分)推荐项目(这是过滤部分)。 协作过滤方法基于相似性; 过去喜欢类似物品的人将来会喜欢类似物品。 协作过滤算法的目标是从用户那里获取偏好数据,并创建可用于推荐或预测的模型。 泰德(Ted)喜欢电影A,B和C。卡罗尔(Carol)喜欢电影B和C。我们获取这些数据,并通过算法对其进行运行以建立模型。 然后,当我们拥有鲍勃喜欢电影B的新数据时,我们使用该模型预测C是鲍勃的可能推荐。
决策树
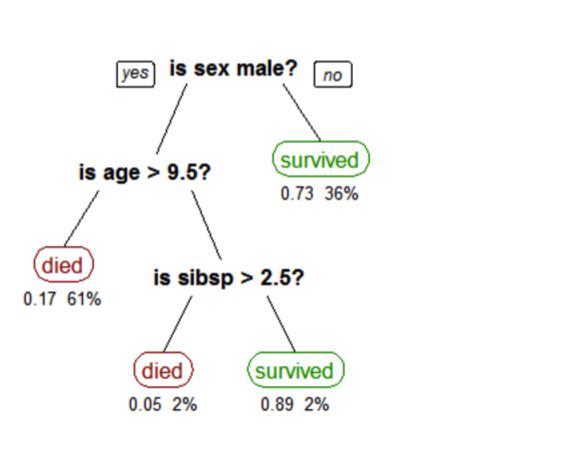
决策树创建一个模型,该模型根据多个输入要素预测类别或标签。 决策树通过评估在每个节点上包含功能的表达式并根据答案选择到下一个节点的分支来工作。 下面显示了预测泰坦尼克号生存的决策树。 特征问题是节点,答案“是”或“否”是树中子节点的分支。
- Q1:是男性吗?
- 是
一棵树,显示了泰坦尼克号上乘客的生存情况(“同胞”是船上的配偶或兄弟姐妹的数量)。 叶子下面的数字显示了生存的可能性和叶子中观察的百分比。
- 参考:斯蒂芬·米尔伯罗(Stephen Milborrow)的树木泰坦尼克号幸存者
使用Spark机器学习场景分析航班延误
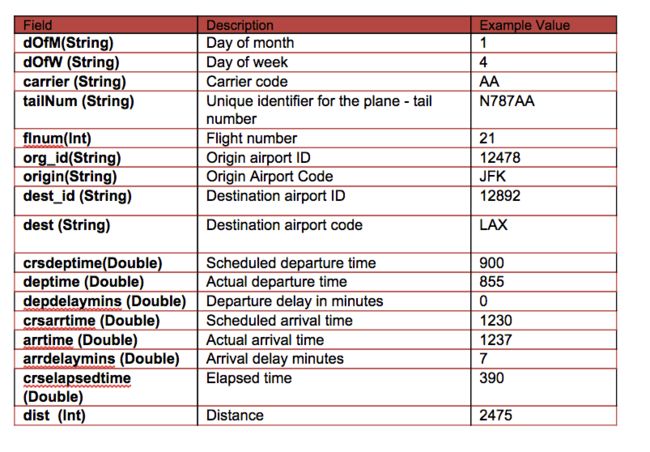
我们的数据来自http://www.transtats.bts.gov/DL_SelectFields.asp?Table_ID=236&DB_Short_Name=On-Time 。 我们正在使用2014年1月的航班信息。对于每个航班,我们都有以下信息:
在这种情况下,我们将基于以下功能构建一棵树来预测延迟或不延迟的标签/分类:
- 标签→延迟而不延迟-如果延迟> 40分钟,则延迟
- 功能→{day_of_month,工作日,crsdeptime,crsarrtime,运营商,crselapsedtime,来源,dest,延迟}
软件
本教程将在包含Spark的MapR沙盒上运行。
- 您可以从此处下载代码和数据以运行这些示例: https : //github.com/caroljmcdonald/sparkmldecisiontree
- 使用spark-shell命令启动后,本文中的示例可以在Spark shell中运行。
- 您还可以按照独立的应用程序运行代码,如MapR Sandbox上的Spark入门教程中所述。
如使用Mapr Sandbox上的Spark入门所述 ,使用密码为userid user01的用户登录到MapR Sandbox。 使用scp将样本数据文件复制到沙箱主目录/ user / user01。 使用以下命令启动Spark Shell:
$ spark-shell从csv文件加载和解析数据
首先,我们将导入机器学习包。 (在代码框中,注释为绿色,输出为蓝色)
import org.apache.spark._
import org.apache.spark.rdd.RDD
// Import classes for MLLib
import org.apache.spark.mllib.regression.LabeledPoint
import org.apache.spark.mllib.linalg.Vectors
import org.apache.spark.mllib.tree.DecisionTree
import org.apache.spark.mllib.tree.model.DecisionTreeModel
import org.apache.spark.mllib.util.MLUtils
在我们的示例中,每个排期都是一个项目,我们使用Scala案例类来定义与csv数据文件中的一行相对应的排期架构。
// define the Flight Schema
case class Flight(dofM: String, dofW: String, carrier: String, tailnum: String, flnum: Int, org_id: String, origin: String, dest_id: String, dest: String, crsdeptime: Double, deptime: Double, depdelaymins: Double, crsarrtime: Double, arrtime: Double, arrdelay: Double, crselapsedtime: Double, dist: Int)
下面的函数将数据文件中的一行解析为Flight类。
// function to parse input into Flight class
def parseFlight(str: String): Flight = {
  val line = str.split(",")
  Flight(line(0), line(1), line(2), line(3), line(4).toInt, line(5), line(6), line(7), line(8), line(9).toDouble, line(10).toDouble, line(11).toDouble, line(12).toDouble, line(13).toDouble, line(14).toDouble, line(15).toDouble, line(16).toInt)
}
我们将2014年1月的航班数据用作数据集。 下面,我们将csv文件中的数据加载到弹性分布式数据集(RDD)中 。 RDD可以具有转换和动作 ,first()动作返回RDD中的第一个元素。
// load the data into a  RDD
val textRDD = sc.textFile("/user/user01/data/rita2014jan.csv")
// MapPartitionsRDD[1] at textFile

// parse the RDD of csv lines into an RDD of flight classes
val flightsRDD = textRDD.map(parseFlight).cache()
flightsRDD.first()

//Array(Flight(1,3,AA,N338AA,1,12478,JFK,12892,LAX,900.0,914.0,14.0,1225.0,1238.0,13.0,385.0,2475),
提取功能
要建立分类器模型,首先提取对分类最有帮助的特征。 我们定义了两个类或标签-是(延迟)和否(不延迟)。 如果航班晚点40分钟以上,则视为航班延误。
每个项目的功能包括以下所示的字段:
- 标签→延迟而不延迟-如果延迟> 40分钟,则延迟
- 功能→{day_of_month,工作日,crsdeptime,crsarrtime,运营商,crselapsedtime,来源,dest,延迟}
下面,我们将非数字特征转换为数字值。 例如,承运人AA是数字6。始发机场ATL是273。
// create  airports RDD with ID and Name
var carrierMap: Map[String, Int] = Map()
var index: Int = 0
flightsRDD.map(flight => flight.carrier).distinct.collect.foreach(x => { carrierMap += (x -> index); index += 1 })
carrierMap.toString
//res2: String = Map(DL -> 5, F9 -> 10, US -> 9, OO -> 2, B6 -> 0, AA -> 6, EV -> 12, FL -> 1, UA -> 4, MQ -> 8, WN -> 13, AS -> 3, VX -> 7, HA -> 11)

// Defining a default vertex called nowhere
var originMap: Map[String, Int] = Map()
var index1: Int = 0
flightsRDD.map(flight => flight.origin).distinct.collect.foreach(x => { originMap += (x -> index1); index1 += 1 })
originMap.toString
//res4: String = Map(JFK -> 214,  LAX -> 294,  ATL -> 273,MIA -> 175 ...

  // Map airport ID to the 3-letter code to use for printlns
var destMap: Map[String, Int] = Map()
var index2: Int = 0
flightsRDD.map(flight => flight.dest).distinct.collect.foreach(x => { destMap += (x -> index2); index2 += 1 })
定义要素数组
将要素转换并放入“要素向量”中,“要素向量”是代表每个要素的值的数字向量。
接下来,我们创建一个包含要素数组的RDD,该要素数组由标签和数字格式的要素组成。 下表显示了一个示例:
//- Defining the features array
val mlprep = flightsRDD.map(flight => {
  val monthday = flight.dofM.toInt - 1 // category
  val weekday = flight.dofW.toInt - 1 // category
  val crsdeptime1 = flight.crsdeptime.toInt
  val crsarrtime1 = flight.crsarrtime.toInt
  val carrier1 = carrierMap(flight.carrier) // category
  val crselapsedtime1 = flight.crselapsedtime.toDouble
  val origin1 = originMap(flight.origin) // category
  val dest1 = destMap(flight.dest) // category
  val delayed = if (flight.depdelaymins.toDouble > 40) 1.0 else 0.0
  Array(delayed.toDouble, monthday.toDouble, weekday.toDouble, crsdeptime1.toDouble, crsarrtime1.toDouble, carrier1.toDouble, crselapsedtime1.toDouble, origin1.toDouble, dest1.toDouble)
})
mlprep.take(1)
//res6: Array[Array[Double]] = Array(Array(0.0, 0.0, 2.0, 900.0, 1225.0, 6.0, 385.0, 214.0, 294.0))
创建标记点
从包含要素数组的RDD中,我们创建一个包含LabeledPoints数组的RDD 。 带标签的点是代表数据点的特征向量和标签的类。
//Making LabeledPoint of features - this is the training data for the model
val mldata = mlprep.map(x => LabeledPoint(x(0), Vectors.dense(x(1), x(2), x(3), x(4), x(5), x(6), x(7), x(8))))
mldata.take(1)
//res7: Array[org.apache.spark.mllib.regression.LabeledPoint] = Array((0.0,[0.0,2.0,900.0,1225.0,6.0,385.0,214.0,294.0]))
接下来,对数据进行拆分,以得到较高百分比的延迟航班和不延迟航班。 然后将其分为训练数据集和测试数据集
// mldata0 is %85 not delayed flights
val mldata0 = mldata.filter(x => x.label == 0).randomSplit(Array(0.85, 0.15))(1)
// mldata1 is %100 delayed flights
val mldata1 = mldata.filter(x => x.label != 0)
// mldata2 is delayed and not delayed
val mldata2 = mldata0 ++ mldata1

//  split mldata2 into training and test data
val splits = mldata2.randomSplit(Array(0.7, 0.3))
val (trainingData, testData) = (splits(0), splits(1))

testData.take(1)
//res21: Array[org.apache.spark.mllib.regression.LabeledPoint] = Array((0.0,[18.0,6.0,900.0,1225.0,6.0,385.0,214.0,294.0]))
训练模型
接下来,我们为决策树所需的参数准备值:
-
categoricalFeaturesInfo,它指定哪些要素是分类要素,以及每个要素可以采用多少分类值。 此处的第一项表示月份中的某天,可以采用从0到31之间的值。第二项表示一周中的某日,可以采用从1到7的值。载体值可以从4变为整数。不同的载体等等。 -
maxDepth:一棵树的最大深度。 -
maxBins:离散化连续特征时使用的仓数。 -
impurity:节点上标签同质性的杂质度量。
通过在输入要素和与那些要素相关的标记输出之间建立关联来训练模型。 我们使用DecisionTree.trainClassifier方法训练模型,该方法返回DecisionTreeModel。
// set ranges for 0=dofM 1=dofW 4=carrier 6=origin 7=dest
var categoricalFeaturesInfo = Map[Int, Int]()
categoricalFeaturesInfo += (0 -> 31)
categoricalFeaturesInfo += (1 -> 7)
categoricalFeaturesInfo += (4 -> carrierMap.size)
categoricalFeaturesInfo += (6 -> originMap.size)
categoricalFeaturesInfo += (7 -> destMap.size)

val numClasses = 2
// Defning values for the other parameters
val impurity = "gini"
val maxDepth = 9
val maxBins = 7000

// call DecisionTree trainClassifier with the trainingData , which returns the model
val model = DecisionTree.trainClassifier(trainingData, numClasses, categoricalFeaturesInfo,
impurity, maxDepth, maxBins)


// print out the decision tree
model.toDebugString
// 0=dofM 4=carrier 3=crsarrtime1  6=origin
res20: String =
DecisionTreeModel classifier of depth 9 with 919 nodes
  If (feature 0 in {11.0,12.0,13.0,14.0,15.0,16.0,17.0,18.0,19.0,20.0,21.0,22.0,23.0,24.0,25.0,26.0,27.0,30.0})
   If (feature 4 in {0.0,1.0,2.0,3.0,4.0,5.0,6.0,7.0,8.0,9.0,10.0,11.0,13.0})
    If (feature 3 <= 1603.0)
     If (feature 0 in {11.0,12.0,13.0,14.0,15.0,16.0,17.0,18.0,19.0})
      If (feature 6 in {0.0,1.0,2.0,3.0,4.0,5.0,6.0,7.0,8.0,10.0,11.0,12.0,13.0...
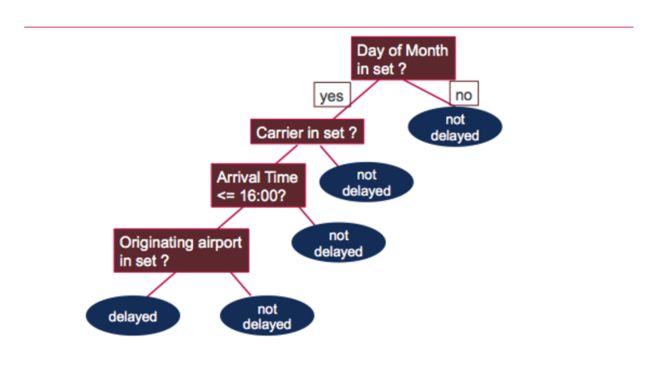
Model.toDebugString打印出决策树,该决策树会询问以下问题以确定航班是否延迟:
测试模型
接下来,我们使用测试数据来获取预测,然后将飞行延迟的预测与实际飞行延迟值(标签)进行比较。 错误的预测比率是错误的预测数/测试数据值的计数,为31%。
// Evaluate model on test instances and compute test error
val labelAndPreds = testData.map { point =>
  val prediction = model.predict(point.features)
  (point.label, prediction)
}
labelAndPreds.take(3)

res33: Array[(Double, Double)] = Array((0.0,0.0), (0.0,0.0), (0.0,0.0))


val wrongPrediction =(labelAndPreds.filter{
  case (label, prediction) => ( label !=prediction)
  })

wrongPrediction.count()
res35: Long = 11040

val ratioWrong=wrongPrediction.count().toDouble/testData.count()
ratioWrong: Double = 0.3157443157443157
想了解更多?
- 免费点播Spark培训
- http://spark.apache.org/docs/latest/mllib-decision-tree.html
在此博客文章中,我们向您展示了如何开始使用Apache Spark的MLlib机器学习决策树进行分类。 如果您对本教程还有其他疑问,请在下面的评论部分中提问。
翻译自: https://www.javacodegeeks.com/2016/02/apache-spark-machine-learning-tutorial.html
