使用Selenium自动爬取腾讯街景
注:因为使用这种方式不太方便,因此又写了另一种爬取街景的方式,使用fillder进行腾讯街景爬虫,完成API key申请后去看新的博客即可
文章目录
-
- 1. 腾讯静态街景API申请
- 2. Selenium编程过程
-
- 2.1 启动selenium,打开腾讯街景页面(这段也可以手动操作,由于不是必须,没配图)
- 2.2 手动点击界面,并手动启动Flash
- 2.3 定义自动点击flash的函数
- 2.4 定义获取页面信息的函数
- 2.5 定义得到白色箭头的函数
-
- 注意:直接的坐标是错误的
- 2.6 正确的模拟点击
- 3 自动爬取的完整代码
-
- 3.1 第一步:输入当前要爬取街道的名字(同时也是照片保存到的文件名)
- 3.2 第二步:手动选择起点
- 3.3 第三步:运行爬取函数
1. 腾讯静态街景API申请
参照静态街景图官方文档https://lbs.qq.com/panostatic_v1/index.html,可以知道为了使用腾讯街景API,首先需要申请开发者key,申请地址在这里https://lbs.qq.com/dev/console/key/add,按照要求填写,即可等待审核使用。

需要注意的是,在获得key后,还需要再写邮件开通一下获取静态图的功能。写完邮件后,这个key就可以获取街景了。

2. Selenium编程过程
没有安装的话,可以看我之前的博客安装Selenium《python配置selenium 火狐+谷歌Chrome》。
2.1 启动selenium,打开腾讯街景页面(这段也可以手动操作,由于不是必须,没配图)
首先导入库,并打开腾讯位置服务的页面
from selenium import webdriver
from selenium.webdriver.common.action_chains import ActionChains
import cv2
import numpy as np
import time

opts = webdriver.FirefoxOptions()
option_profile = webdriver.FirefoxProfile()
option_profile.set_preference("plugin.state.flash",2)
browser = webdriver.Firefox(firefox_profile=option_profile,options=opts)
# 使用浏览器访问网址
browser.get('https://lbs.qq.com/tool/streetview/index.html')
由于嵌套了另一个页面,因此先要转换到那个页面上
browser.switch_to.frame('iframe')
寻找到更换当前城市的按钮
# 阅读HTML源代码可看到,这是在一层层的往里扒
city = browser.find_elements_by_id('cur_city')
change_city = city[0].find_elements_by_class_name('change_city')
span = change_city[0].find_elements_by_tag_name('span')
点击这个按钮,就会弹出来选择城市的框
span[0].click()
# 这里可以得到所有城市的标签
city = browser.find_elements_by_id('city')
city_spans = city[0].find_elements_by_tag_name('span')
找到xx市,并执行点击切换
for each in city_spans:
    if '北京' in each.text:
        each.click()
找到搜索框所在的位置
input_box = browser.find_elements_by_id('input_box')
每次先执行清空操作,再输入要查询的位置
input_box[0].clear()
input_box[0].send_keys('北京大学')
找到搜索按钮,并直接点击
search_button =  browser.find_elements_by_id('btn_search')
search_button[0].click()
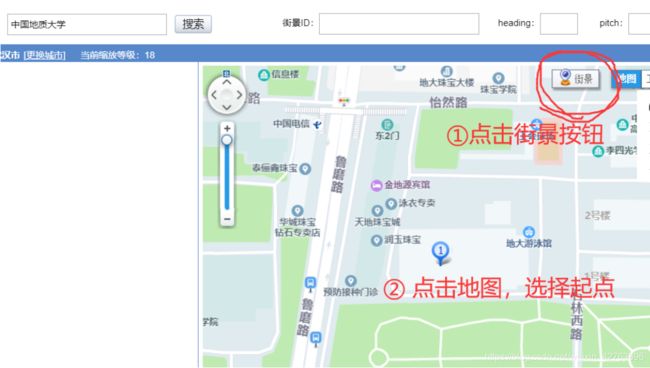
找到街景按钮,并点击
street_button = browser.find_elements_by_id('panel')
street_button[0].click()
2.2 手动点击界面,并手动启动Flash
这步只能手动操作~后面的就是自动的了

2.3 定义自动点击flash的函数
首先找到flash元素,然后定义在flash上通过坐标进行点击的函数
'''
Summary:
    定义点击flash函数
    xy是坐标
    left_click用来区分左右键
'''

def click_flash(x,y,left_click=True):
    # 找到flash元素
    flash = browser.find_element_by_id('_panoSwf_0')
    if left_click:
        ActionChains(browser).move_to_element_with_offset(flash,x,y).click().perform()
    else:
        ActionChains(browser).move_to_element_with_offset(flash,x,y).context_click().perform()
通过右键执行这个函数,来查看当前点击的位置
2.4 定义获取页面信息的函数
定义寻找当前页面API的函数
'''
Summaty:
    用来寻找当前页面的API
Return:
    API字符串
'''
def Find_API():
    a = browser.find_elements_by_tag_name('a')
    for each in a:
        if '开发' in each.text:
            return each.text
    return None
'''
Summaty:
    得到API的pano值
Return:
    pano字符串
'''
def Get_pano(API):
    if API == None:
        return None
    API = API.split('pano=')[1]
    pano = API.split('&')[0]
    return pano

# 第二种更简单的方法
def Get_pano2():#(API):
    pano = browser.find_elements_by_id('pano_id')
    return pano[0].get_attribute('value')

# 调用获取pano函数,验证结果
print(Get_pano(Find_API()))
print(Get_pano2())
可视化的时候需要获取到该照片的地理坐标,因此需要通过pano反向获得坐标,用到上一次调用的API
import json         # 解析json文件
import requests     # 下载东西用的request
# 根据pano得到地理坐标
"""
参数:
     id        - pano
     raduis    - 街景的范围
     key       - 开发者秘钥
返回值:
     pano      - 街景的pano
"""
def GetLatLng(id,raduis=100,key='你的密钥'):
    # 和上面一样的拼接url
    panourl = 'https://apis.map.qq.com/ws/streetview/v1/getpano?'
    panourl = panourl + 'id=' + str(id) + '&'
    panourl = panourl + 'raduis=' + str(raduis) + '&'
    panourl = panourl + 'key=' + str(key)
    #print('url地址:',panourl)

    # 得到返回的json
    r = requests.get(panourl)
    panojson = r.text

    # 解析json格式为字典类型
    json_dic = json.loads(panojson)
    #print(json_dic)
    # 返回纬度,经度
    lat = json_dic['detail']['location']['lat']
    lng = json_dic['detail']['location']['lng']

    return lat,lng

# 测试获取经纬度的函数
GetLatLng(Get_pano(Find_API()))
2.5 定义得到白色箭头的函数
得到白色箭头需要两个步骤
- 截图当前flash
- 使用opencv来分离图象 首先完成第一步,截图flash,用的是下面这一行,会在当前目录下保存一个flash.png的图片
flash = browser.find_element_by_id('_panoSwf_0')
flash.screenshot('flash.png')
调用cv2的库读取该图象,并使用findContours轮廓检测函数来获取边框,这里我们找白色物体的边框,运行下面代码就可以得到结果
# 模拟点击一下屏幕出现白色箭头
click_flash(200,200)
# 等待两秒钟加载完箭头
time.sleep(2)
# 保存截图
flash.screenshot('flash.png')
# 使用cv2加载截图
img = cv2.imread('flash.png')
gray = cv2.cvtColor(img,cv2.COLOR_BGR2GRAY)
ret, binary = cv2.threshold(gray,250,255,cv2.THRESH_BINARY)
# 调用轮廓检测函数
contours, hierarchy = cv2.findContours(binary,cv2.RETR_TREE,cv2.CHAIN_APPROX_SIMPLE)
# 将得到的轮廓画出来
cv2.drawContours(img,contours,-1,(0,0,255),3)
cv2.imshow("img", img)
cv2.waitKey(0)
可以看到所有白色的轮廓都被检测出来了,如下图
可以看到contours中是由很多点的列表组成的,就是这些点绘制出了上面的图象
contours
[array([[[ 33, 648]]], dtype=int32),
 array([[[  4, 646]]], dtype=int32),
 .
 .
 .
 array([[[ 74, 645]]], dtype=int32)]
接下来设置阈值,过滤掉没用的点,先从数量开始过滤,看一看结果
# 过滤后的contours
contours_filter = []
for each in contours:
    if each.size >100:
        # 只保留大于100的
        contours_filter.append(each)
mg = cv2.imread('flash.png')
cv2.drawContours(img,contours_filter,-1,(0,0,255),3)

cv2.imshow("img", img)
cv2.waitKey(0)
接下来统计筛选出来的轮廓坐标的平均值,这样就可以获得坐标来进行点击了

contours_mean = []
contours_mean_center = []
for contour in contours_filter:
    # 变成好处理的形状
    contour = contour.reshape(-1,2)
    # 计算平均值
    xmean,ymean = contour.mean(axis=0)
    if ymean >300:
        contours_mean.append(contour)
        contours_mean_center.append((xmean,ymean))
contours_mean_center

输出:[(396.56, 468.25333333333333), (383.97014925373134, 394.5074626865672)]
注意:直接的坐标是错误的
根据返回值,用click_flash的右键看看都是在哪个位置
click_flash(311.0782608695652, 423.62608695652176,False)
这是因为我们截图保存的图片尺寸和网页中原始flash的尺寸不一样,通过以下方式查看flash的长宽
flash.size
输出:{'height': 520.0, 'width': 621.0}
而我们保存的图片大小为
img.shape
输出:(650, 776, 3)
因此需要在保存图片的时候,修改成网页中的大小,才能保证点击位置是正确的,在保存的时候填上这么一句话img = cv2.resize(img,(int(flash.size['width']),int(flash.size['height'])))
# 这些都是复制之前的
click_flash(200,200)
time.sleep(2)
flash.screenshot('flash.png')
img = cv2.imread('flash.png')

# 这里是添加的
img = cv2.resize(img,(int(flash.size['width']),int(flash.size['height'])))

# 这些都是复制之前的
gray = cv2.cvtColor(img,cv2.COLOR_BGR2GRAY)
contours, hierarchy = cv2.findContours(binary,cv2.RETR_TREE,cv2.CHAIN_APPROX_SIMPLE)
# 过滤后的contours
contours_filter = []
for each in contours:
    if each.size >100:
        # 只保留大于100的
        contours_filter.append(each)
#cv2.drawContours(img,contours_filter,-1,(0,0,255),3)
#cv2.imshow("img", img)
#cv2.waitKey(0)

contours_mean = []
contours_mean_center = []
for contour in contours_filter:
    # 变成好处理的形状
    contour = contour.reshape(-1,2)
    # 计算平均值
    xmean,ymean = contour.mean(axis=0)
    if ymean >300:
        contours_mean.append(contour)
        contours_mean_center.append((xmean,ymean))
contours_mean_center
输出:[(396.56, 468.25333333333333), (383.97014925373134, 394.5074626865672)]
2.6 正确的模拟点击
现在再来点击一下,就可以点到对应的箭头了
点击一下试试,可以看到街景移动了
click_flash(380.0625, 340.828125)
3 自动爬取的完整代码
from selenium import webdriver
from selenium.webdriver.common.action_chains import ActionChains
from  selenium.webdriver.chrome.options  import  Options
import os
import json         # 解析json文件
import requests     # 下载东西用的request

import cv2
import numpy as np
import time


from functools import cmp_to_key


opts = webdriver.FirefoxOptions()
option_profile = webdriver.FirefoxProfile()
option_profile.set_preference("plugin.state.flash",2)
browser = webdriver.Firefox(firefox_profile=option_profile,options=opts)


# 使用浏览器访问网址
browser.get('https://lbs.qq.com/tool/streetview/index.html')

browser.switch_to.frame('iframe')


# 阅读HTML源代码可看到,这是在一层层的往里扒
city = browser.find_elements_by_id('cur_city')
change_city = city[0].find_elements_by_class_name('change_city')
span = change_city[0].find_elements_by_tag_name('span')

span[0].click()

city = browser.find_elements_by_id('city')
city_spans = city[0].find_elements_by_tag_name('span')

for each in city_spans:
    if '武汉' in each.text:
        each.click()


'''
Summaty:
    用来寻找当前页面的API
Return:
    API字符串
'''
def Find_API():

    a = browser.find_elements_by_tag_name('a')
    for each in a:
        if '开发' in each.text:
            return each.text
    return None
'''
Summaty:
    得到API的pano值
Return:
    pano字符串
'''
def Get_pano():#(API):
    pano = browser.find_elements_by_id('pano_id')
    return pano[0].get_attribute('value')


# 根据pano得到地理坐标
"""
参数:
     id        - pano
     raduis    - 街景的范围
     key       - 开发者秘钥
返回值:
     pano      - 街景的pano
"""
def GetLatLng(id,raduis=100,key='你的密钥'):
    # 和上面一样的拼接url
    panourl = 'https://apis.map.qq.com/ws/streetview/v1/getpano?'
    panourl = panourl + 'id=' + str(id) + '&'
    panourl = panourl + 'raduis=' + str(raduis) + '&'
    panourl = panourl + 'key=' + str(key)
    #print('url地址:',panourl)


    #print(json_dic)
    lat = ''
    lng = ''
    while lat == '' and lng == '':
        try:
            # 得到返回的json
            r = requests.get(panourl)
            panojson = r.text

            # 解析json格式为字典类型
            json_dic = json.loads(panojson)
            lat = json_dic['detail']['location']['lat']
            lng = json_dic['detail']['location']['lng']
        except:
           ''''''


    return lat,lng


"""
参数:
     size  - 街景图片尺寸
     pano  - 街景ID
     heading - 与正北方向角度,范围: [0,360],默认0
     pitch   - 与平视的夹角,范围[-90,20],默认0
     key     - 开发者秘钥
返回值:
     mapurl  - 地图的url
'''
def GetTencentMapUrl(pano,size='640x480',heading=0,pitch=0,key='你的密钥'):
    mapurl = 'https://apis.map.qq.com/ws/streetview/v1/image?'
    mapurl = mapurl + 'size=' + str(size) + '&'
    mapurl = mapurl + 'pano=' + str(pano) + '&'
    mapurl = mapurl + 'heading=' + str(heading) + '&'
    mapurl = mapurl + 'pitch=' + str(pitch) + '&'
    mapurl = mapurl + 'key=' + str(key)
    #print('url地址',mapurl)
    return mapurl

"""
参数:
     filname  - 要保存的文件名
     url      - 下载文件的链接
"""

def DownloadFile(filname,url):
    # 得到该url的数据
    r = requests.get(url)

    # 将数据写入文件
    with open(filname, "wb") as picfile:
        picfile.write(r.content)

'''
Summary:
    点击函数
'''
def click_flash(x,y,left_click=True):
    flash = browser.find_element_by_id('_panoSwf_0')
    if left_click:
        ActionChains(browser).move_to_element_with_offset(flash,x,y).click().perform()
    else:
        ActionChains(browser).move_to_element_with_offset(flash,x,y).context_click().perform()
    ActionChains(browser).release().perform()


'''
Summary:
    左右移动一点点角度
'''
def MoveFlashCamera_LR():
    flash = browser.find_element_by_id('_panoSwf_0')
    ActionChains(browser).move_to_element_with_offset(flash,20,100).click_and_hold().perform()
    ActionChains(browser).move_by_offset(xoffset=100,yoffset=0).perform()
    ActionChains(browser).release().perform()


'''
Summary:
    从counters中选择可能是箭头的counter
'''
def ChooseCounter(contours):
    centers_return = []
    contours_return = []
    for each in contours:
        # 首先要够大
        if each.size >50:
            y = each.reshape(-1,2)
            xmean,ymean = y.mean(axis=0)
            # 竖着的位置在350以下 横着的在
            if ymean >300 and xmean > 200 and xmean < 400:
                contours_return.append(each)
                centers_return.append((xmean,ymean))
    return centers_return,contours_return

'''
Summary:
    获取flash.png的counters
'''
def AnalysisFlash(index = 0):
    flash = browser.find_element_by_id('_panoSwf_0')
    click_flash(200,200)
    time.sleep(2)
    flash.screenshot('flash.png')
    img = cv2.imread('flash.png')
    img = cv2.resize(img,(int(flash.size['width']),int(flash.size['height'])))
    gray = cv2.cvtColor(img,cv2.COLOR_BGR2GRAY)
    ret, binary = cv2.threshold(gray,250,255,cv2.THRESH_BINARY)
    contours, hierarchy = cv2.findContours(binary,cv2.RETR_TREE,cv2.CHAIN_APPROX_SIMPLE)
    centers_return,contours_return = ChooseCounter(contours)
    # 保存图片
    cv2.drawContours(img,contours_return,-1,(0,0,255),3)
    cv2.imwrite('auto/save_{0}.jpg'.format(index), img)
    return centers_return

# 自定义排序
def fun_1(x,y):
    if x[1]>y[1]:
        return 1
    if x[1]<y[1]:
        return -1
    return 0

SavePath = "./"
NowPath = "./"
zero_pano = Get_pano()
MySteps = [False,False,False]

# 自动爬取num个图片
def AutoMoveAndSave(num):
    global SavePath
    global NowPath
    NowPath = SavePath
    # 已保存的pano名
    save_pano = []
    # 初始化pano
    pano = Get_pano()
    # 角度
    heading_list = [315,45,135,225]


    for i in range(num):
        if pano not in save_pano:
            for heading in heading_list:
                # 获取当前的pano,并保存文件
                # 得到经纬度作为文件名
                lat,lng = GetLatLng(pano)
                url = GetTencentMapUrl(pano = pano,heading = heading)
                filename = 'StreetViews/%s/%s_%s_%s.jpg'%(SavePath,str(lat),str(lng),str(heading))
                DownloadFile(filename,url)
            save_pano.append(pano)
        # 稍微旋转一个角度
        else:
            print('旋转一个角度')
            time.sleep(0.5)
            MoveFlashCamera_LR()
        # 拉回原来的角度
        #click_flash(550,90)
        # 更新下标
        index = i

        centers_return = AnalysisFlash(pano)
        centers_return = sorted(centers_return, key = cmp_to_key(fun_1))
        print('第{0}步'.format(i),pano)
        # 遍历所有的,都尝试一边点击
        for x,y in centers_return:
            print('尝试',(x,y))
            click_flash(x, y)
            now_pano =  Get_pano()
            # 当不等于的时候说明移动了
            if pano != now_pano:
                pano = now_pano
                break

# 得到保存路径
def GetSavePath(path):
    global SavePath
    SavePath = path
    makepath = "StreetViews/"+path
    if os.path.exists(makepath) == False:
        os.mkdir(makepath)
    else:
        print('已经存在%s文件夹,如果里面有原来爬的图片的话,接下来保存的图片会和它们混杂,请慎重考虑'%(makepath))
    print('\n当前文件保存路径:'+makepath)

def ChangeCity(path):
    input_box = browser.find_elements_by_id('input_box')
    input_box[0].clear()
    input_box[0].send_keys(path)
    search_button =  browser.find_elements_by_id('btn_search')
    search_button[0].click()
3.1 第一步:输入当前要爬取街道的名字(同时也是照片保存到的文件名)
inputpath = '财大'
ChangeCity(inputpath)
GetSavePath(inputpath)
3.2 第二步:手动选择起点
这一步需要去页面操作,修改当前的街景,一定要做!
3.3 第三步:运行爬取函数
如果出现报错信息,自己手动调整一下flash镜头的位置就好。比如让白色箭头冲前,或者调整俯仰角度(让镜头向下看,使白色箭头的面积最大)
AutoMoveAndSave(600)