MyBatis框架+Spring框架
MyBatis框架
目录
- MyBatis框架
-
- 为什么要使用框架
- 主流框架介绍MyBatis
- 持久化与ORM
- MyBatis 介绍
- 搭建MyBatis 开发环境
- my baits核心文件
- encironments 配置文件
- 设置别名
-
- 操作Mybaits
- properties元素
- settings 元素
- mappers 元素
-
- 配置文件
-
- Mapper 文件配置
- SqlSessionFactory
- 实现类编写
- 以实体类封装查询结果
- 核心接口和类的关系
- SqlSession
- 小结
- SQL 映射文件
-
- 回顾
- SQL 映射的 XML 文件
- mapper
- select 单一条件查询
-
- 示例
- select 多条件查询
- 根据 entity 来查
- 更具map来查
- 多参数情况下
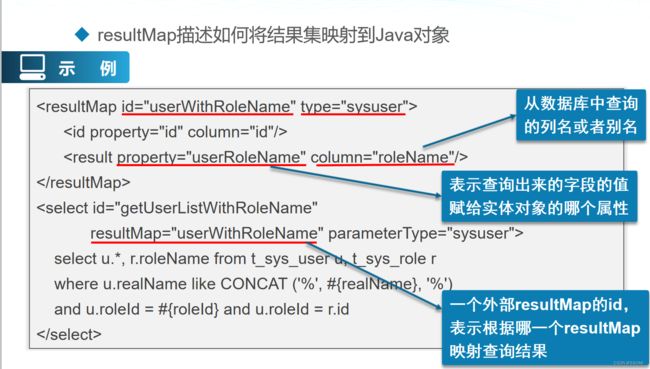
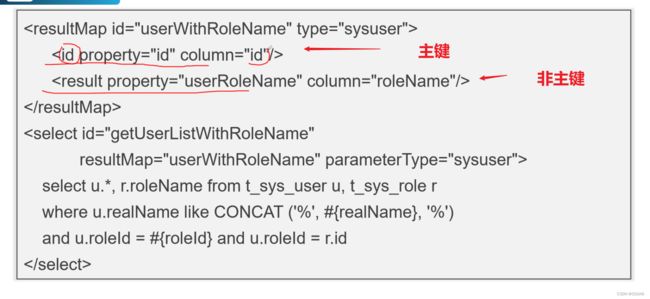
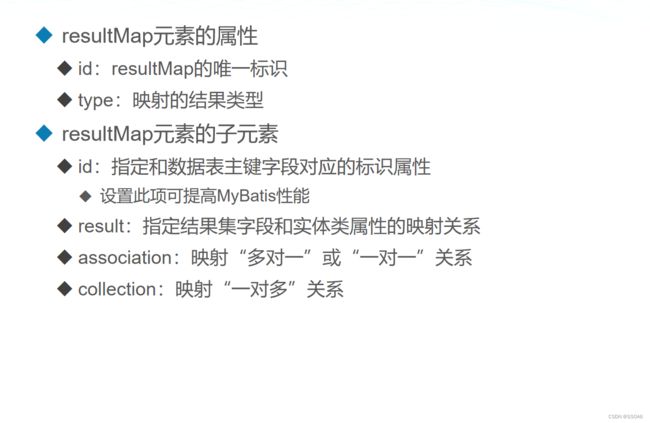
- resultMap
- 示例
-
- 一对一映射association
-
- 示例
- 一对多映射关系 collection
-
- 示例
- 添加数据
- 修改数据
- 删除数据
- 动态 SQL
-
- 什么是动态 SQL
- if 标签
-
- 示例
- where 标签
- choose(when、otherwise)标签
- foreach标签
-
- List
- map 集合
- set标签
- trim标签
- 初识 Spring
-
- Spring 框架
-
- Spring 设计核心
- 控制反转/依赖注入
-
- 第一个Spring程序
- 示例
-
- 配置模板
- 面向切面编程(AOP)
-
- 名词
- Spring AOP在项目中的运用
-
- 示例
- 总结
- Spring 深入学习
-
- 异常抛出增强
- 最终增强
- 环绕增强
- 构造注入
- p命名空间注入
- 不同数据类型注入
- 使用注解实现Spring IoC
- 使用Java标准注解完成装配
- 使用注解实现Spring AOP
-
- 示例
- Spring 整合 MyBatis
-
- 基本整合方式
-
- 示例
- 映射器整合方式
-
- 示例
- 配置声明式事务
- 使用注解实现声明式事务
- 掌握更多配置数据源的方法
-
- 使用properties 文件配置数据源
- 使用 JNDI 配置数据源
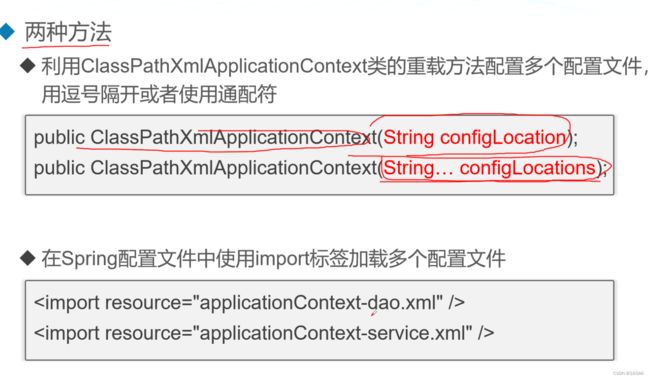
- 拆分Spring 配置文件
-
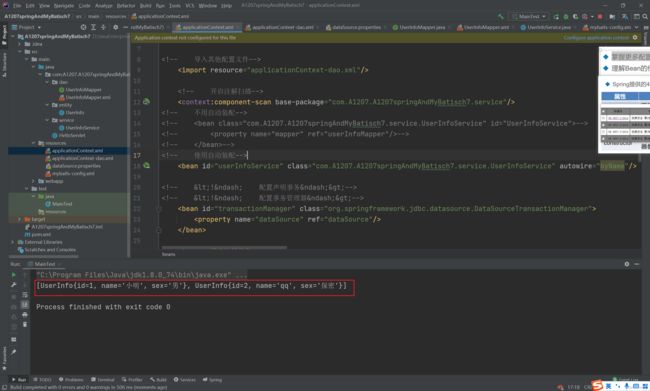
- 引入拆分后的配置文件
- 示例
- Spring 中Bean 的自动装配
-
- 示例
-
- 更改自动装配的方式
- 设置全局自动装配的方式
- Spring 中的Bean 的作用域
- Spring MVC
-
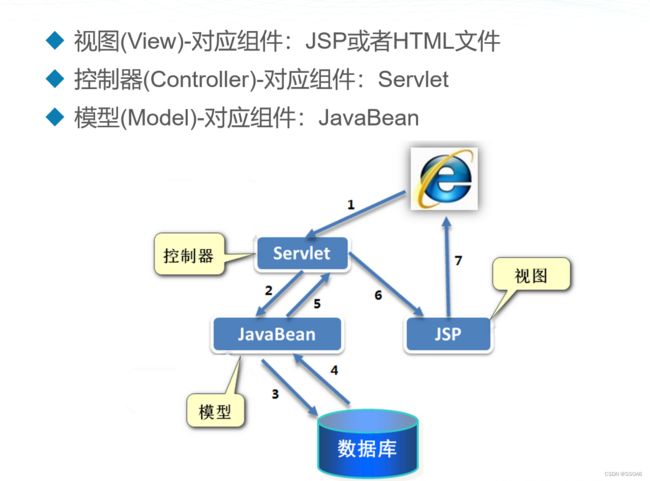
- 理解MVC设计模式
-
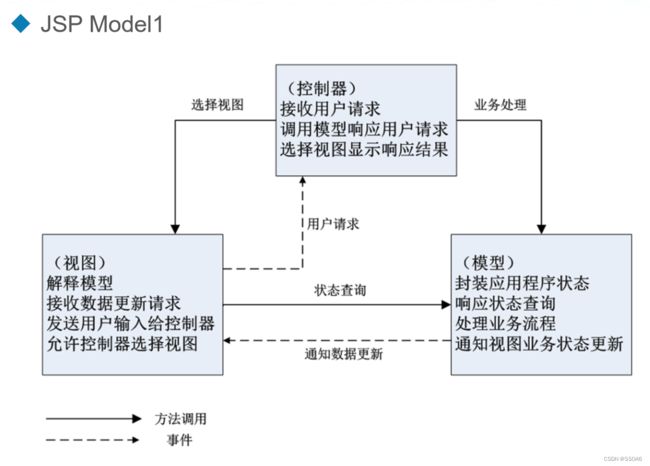
- jsp model 1
- jsp model 2
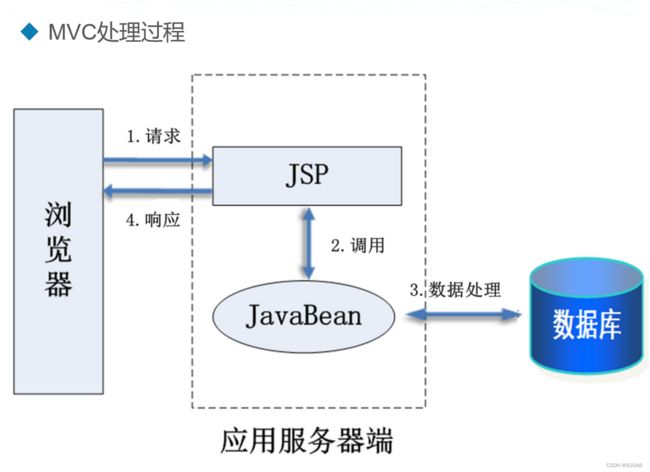
- MVC 处理过程
- MVC 的优点
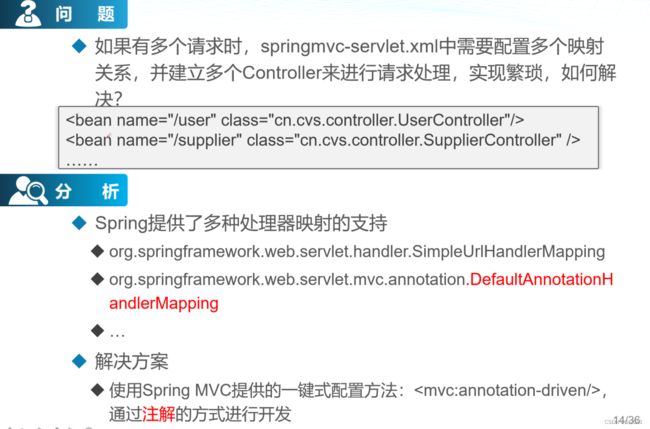
- 使用注解开发Spring MVC
- 配置视图解析器
- Spring MVC请求处理流程
- @RequestMapping 注解
-
- 入参处理
-
- 示例
- 出参
- 使用注解
- 使用 spring MVC
-
- 示例 MVC 的基本使用
-
- 方法一
- 方式二 注解的方式
- 单例模式及统一异常处理
-
- 单列模式
-
- 示例
- 懒汉模式
- 饿汉模式
-
- 饿汉模式实现延迟加载(使用内部内)
- Spring MVC中的单例模式
- Spring MVC 的整合
-
- 实例
- 异常处理
-
- 局部异常处理
- 全局异常处理
- 数据校验及文件上传
-
- 改造添加功能
-
- 体验
- REST 风格
-
- 改造查询功能
-
- 演示
- Spring 表单标签
-
- 体验
- 数据校验
-
- 实例
- Spring MVC的文件上传
-
- 体验
- Spring MVC扩展和SSM框架整合
-
- JSON数据的传递处理
-
- 演示
- JSON数据传递过程中的中文乱码和日期问题
-
- 解决中文乱码
-
- 第一种写法
- 第二种方法
- 解决日期乱码问题
-
- 第一种
- 第二种方法(这里版本问题就不演示了)
- 多视图解释器
- Spring MVC框架中的数据格式转换
-
- 编写自定义转换器
- SSM整合
- 分页框架
-
- 分页插件 pageHelper
- 拦截器
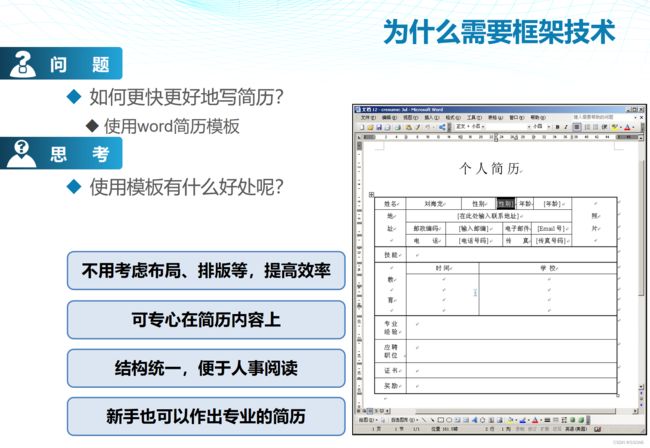
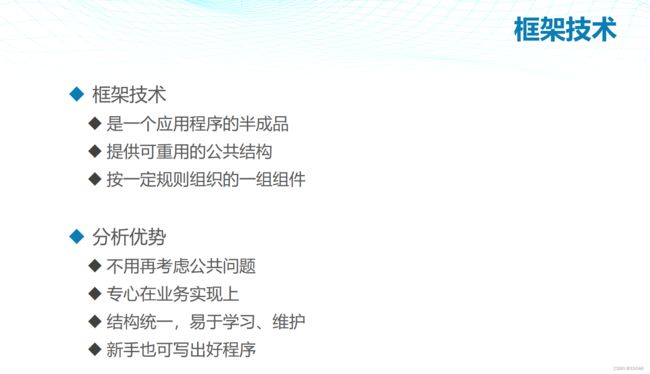
为什么要使用框架
主流框架介绍MyBatis


持久化与ORM


MyBatis 介绍

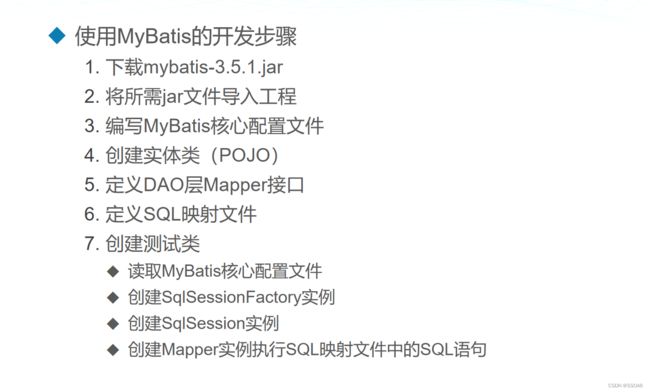
搭建MyBatis 开发环境
使用Maven
编辑路径
直接写路径访问官网下载
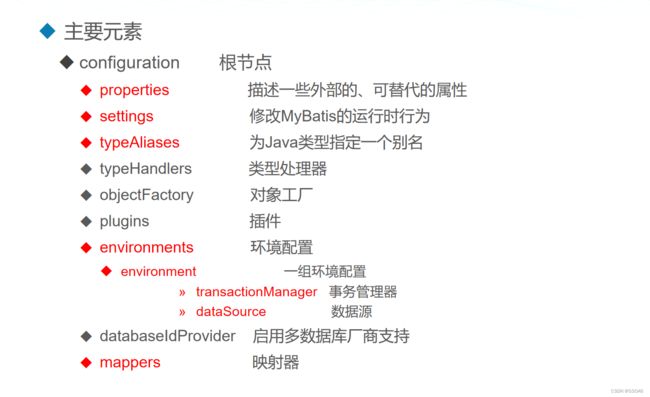
my baits核心文件
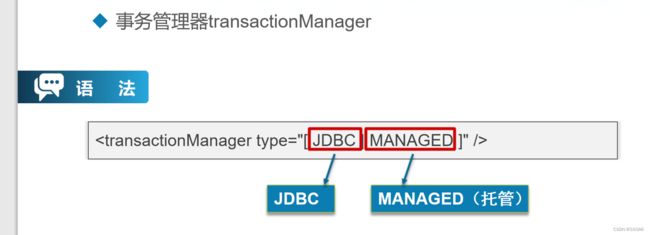
encironments 配置文件


设置别名
如果类太多,就用第二个
这里强烈建议用第二个

操作Mybaits
输入这串代码,下载mybatis
 <dependency>
            <groupId>org.mybatis</groupId>
            <artifactId>mybatis</artifactId>
            <version>3.5.7</version>
        </dependency>
        <dependency>
            <groupId>mysql</groupId>
            <artifactId>mysql-connector-java</artifactId>
            <version>5.1.32</version>
        </dependency>

properties元素

settings 元素

mappers 元素


配置文件
新建配置文件里面存放 连接字符串 数据库用户名 数据库密码 注册驱动
新建文件名 dataSource.properties
driver=com.mysql.jdbc.Driver
url=jdbc:mysql://localhost:3306/test220707
user=root
password=root123

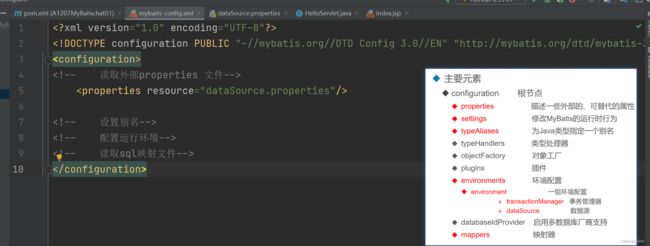
配置文件,头文件:
<?xml version="1.0" encoding="UTF-8"?>
<!DOCTYPE configuration PUBLIC "-//mybatis.org//DTD Config 3.0//EN" "http://mybatis.org/dtd/mybatis-3-config.dtd" >
新建文件名 mybatis-config.xml 记得改后缀
注意编写配置文件一定要一步步来
<?xml version="1.0" encoding="UTF-8"?>
<!DOCTYPE configuration PUBLIC "-//mybatis.org//DTD Config 3.0//EN" "http://mybatis.org/dtd/mybatis-3-config.dtd" >
<configuration>
<!-- 读取外部properties 文件-->
<properties resource="dataSource.properties"/>
<!-- 设置别名-->
<typeAliases>
<!-- 第一种一个一个设置别名-->
<!-- <typeAlias type="com.A1207.A1207MyBalischat01.userInfo" alias="userInfo"/>-->
<!-- 第二种设置某个包的所有类作为别名-->
<package name="com.A1207.A1207MyBalischat01.entity"/>
</typeAliases>
<!-- 配置运行环境-->
<environments default="userDB">
<environment id="userDB">
<!-- 设置事务管理 这里就用JDBC-->
<transactionManager type="JDBC"></transactionManager>
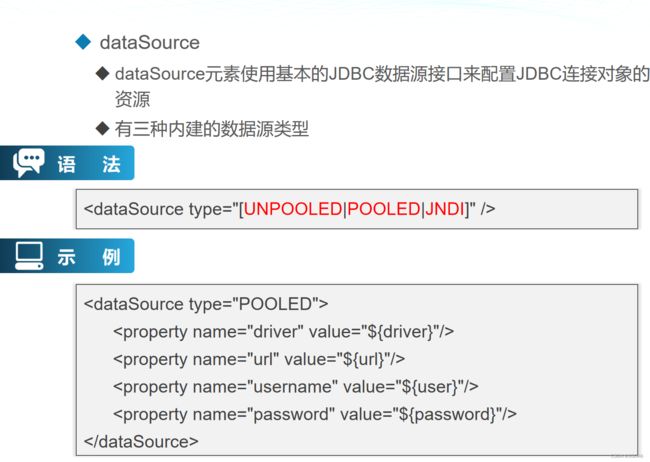
<!-- 设置数据源-->
<dataSource type="POOLED">
<property name="driver" value="${driver}"/>
<property name="url" value="${url}"/>
<property name="username" value="${user}"/>
<property name="password" value="${password}"/>
</dataSource>
</environment>
</environments>
<!-- 读取sql映射文件-->
</configuration>
设置 sql 映射文件前要把之前的build 里面的代码替换掉
<build>
<resources>
<resource>
<directory>src/main/java</directory>
<includes>
<include>**/*.properties
**/ *.xml</include>
</includes>
</resource>
</resources>
</build>

配置 sql 映射文件
<?xml version="1.0" encoding="UTF-8"?>
<!DOCTYPE configuration PUBLIC "-//mybatis.org//DTD Config 3.0//EN" "http://mybatis.org/dtd/mybatis-3-config.dtd" >
<configuration>
    <!--    读取外部properties 文件-->
    <properties resource="dataSource.properties"/>

    <!--    设置别名-->
    <typeAliases>
        <!--        第一种一个一个设置别名-->
        <!--        <typeAlias type="com.A1207.A1207MyBalischat01.userInfo" alias="userInfo"/>-->
        <!--        第二种设置某个包的所有类作为别名-->
        <package name="com.A1207.A1207MyBalischat01.entity"/>
    </typeAliases>

    <!--    配置运行环境-->
    <environments default="userDB">
        <environment id="userDB">
            <!--            设置事务管理 这里就用JDBC-->
            <transactionManager type="JDBC"/>
            <!--            设置数据源-->
            <dataSource type="POOLED">
                <property name="driver" value="${driver}"/>
                <property name="url" value="${url}"/>
                <property name="username" value="${user}"/>
                <property name="password" value="${password}"/>
            </dataSource>
        </environment>
    </environments>
    <!--    读取sql映射文件-->
    <mappers>
        <!--挨个读取sql映射文件-->
<!--        <mapper resource="com/A1207/A1207MyBalischat01/dao/userInfoMapper.xml"/>-->
        <!--    读取某个包下面的所有的sqL映射文件:接口和sqL映射文件必须在同一个包下面,并且名称要相同-->
        <package name="com.A1207.A1207MyBalischat01.dao"/>
    </mappers>

</configuration>
编写dao 文件
接口名: UserInfoMapper
package com.A1207.A1207MyBalischat01.dao;

import com.A1207.A1207MyBalischat01.entity.UserInfo;

import java.util.List;

public interface UserInfoMapper {
    public List<UserInfo> queryAll();
}

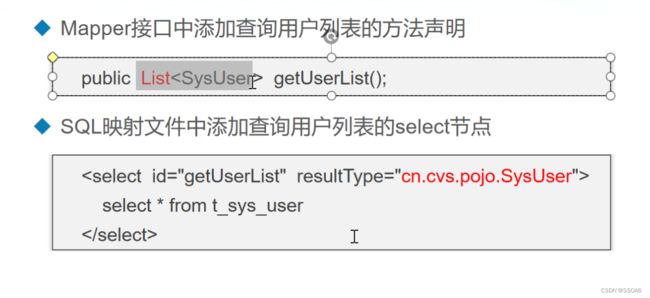
Mapper 文件配置
这个配置文件和上面的不一样
<?xml version="1.0" encoding="UTF-8"?>
<!DOCTYPE mapper
        PUBLIC "-//mybatis.org//DTD Mapper 3.0//EN"
        "http://mybatis.org/dtd/mybatis-3-mapper.dtd" >
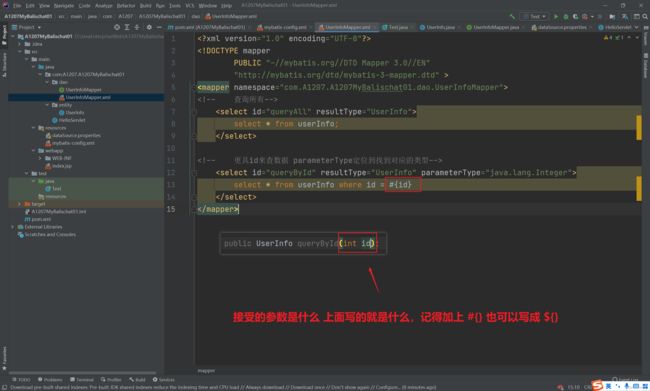
具体配置
id 写方法名,resultType写bean名
<?xml version="1.0" encoding="UTF-8"?>
<!DOCTYPE mapper
        PUBLIC "-//mybatis.org//DTD Mapper 3.0//EN"
        "http://mybatis.org/dtd/mybatis-3-mapper.dtd" >
<mapper namespace="com.A1207.A1207MyBalischat01.dao.UserInfoMapper">
    <select id="queryAll" resultType="UserInfo">
        select * from userInfo;
    </select>
</mapper>
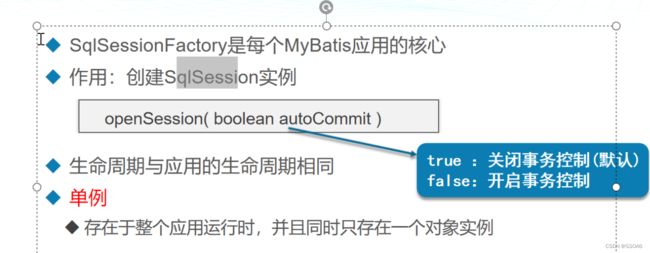
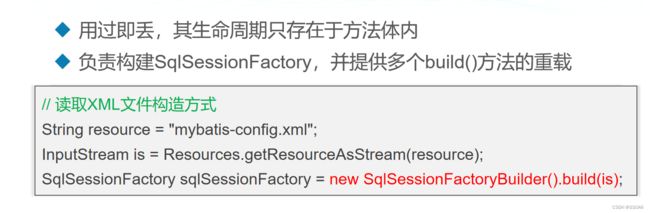
SqlSessionFactory

实现类编写
在java里新建 Test 类
import com.A1207.A1207MyBalischat01.dao.UserInfoMapper;
import com.A1207.A1207MyBalischat01.entity.UserInfo;
import org.apache.ibatis.io.Resources;
import org.apache.ibatis.session.SqlSession;
import org.apache.ibatis.session.SqlSessionFactory;
import org.apache.ibatis.session.SqlSessionFactoryBuilder;

import java.io.IOException;
import java.io.InputStream;
import java.util.List;

public class Test {
    public static void main(String[] args) throws IOException {
        InputStream ins = Resources.getResourceAsStream("mybatis-config.xml");
        SqlSessionFactory ssf = new SqlSessionFactoryBuilder().build(ins);
        SqlSession ss = ssf.openSession();

        List<UserInfo> lu = ss.getMapper(UserInfoMapper.class).queryAll();
        System.out.println(lu);
    }
}
以实体类封装查询结果
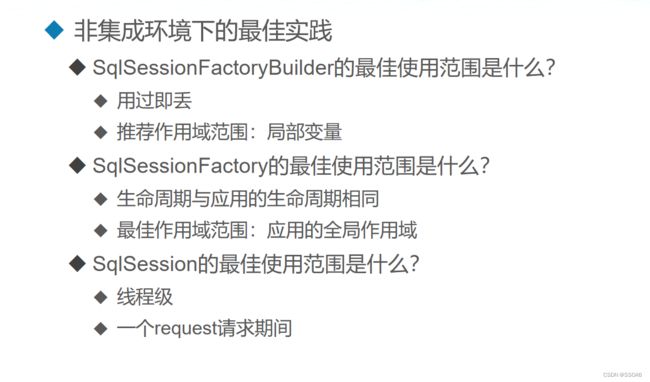
核心接口和类的关系


SqlSession
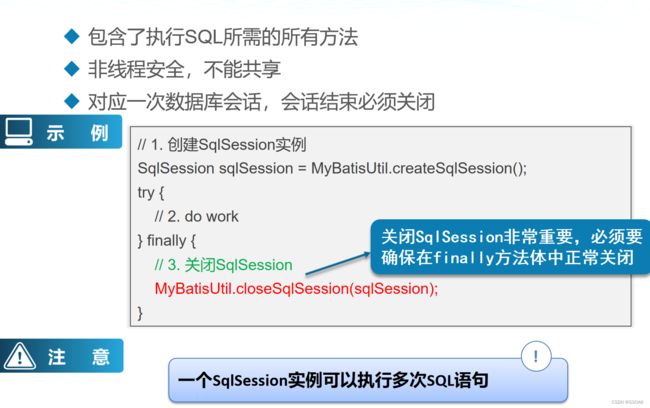
小结
SQL 映射文件
回顾


SQL 映射的 XML 文件

mapper


select 单一条件查询
resultType 返回对应的类型

示例
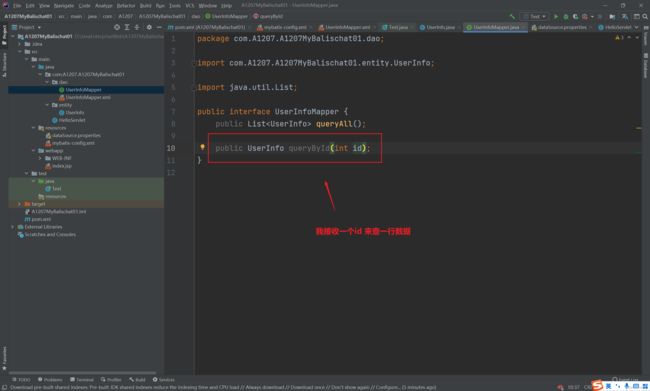
#{} 和 ${} 区别 #{}: 会根据传过来的参数类型做预编译 , ${} :字节值替换表达式
这里最好用 #{}


但是注意 如果我们传的是多个参数 这里的指定Interger 就不行

![]()
select 多条件查询
这就是 select 多条件查询
根据 entity 来查


更具map来查


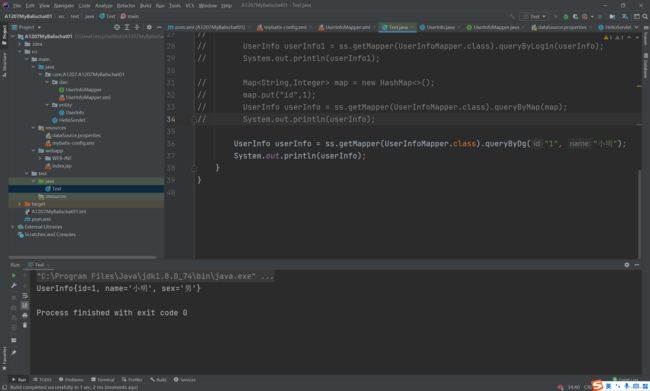
多参数情况下

resultMap
我们把 id 改成 uid
这里和我们的表不对应了,所以我们得自己写映射关系


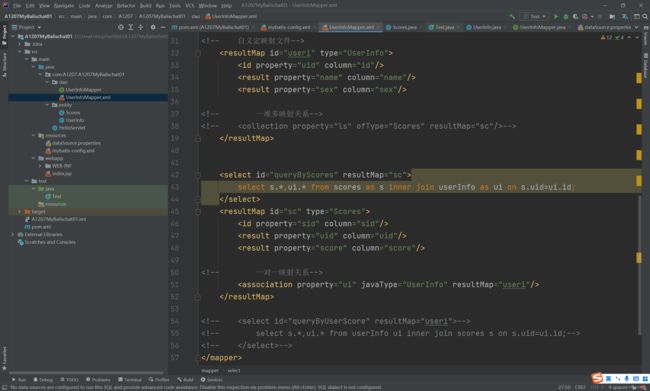
示例


一对一映射association

示例

首先新建一个 entity 类
注意这里一定要创建 UserInfo 这个属性

然后在添加映射文件
<?xml version="1.0" encoding="UTF-8"?>
<!DOCTYPE mapper
PUBLIC "-//mybatis.org//DTD Mapper 3.0//EN"
"http://mybatis.org/dtd/mybatis-3-mapper.dtd" >
<mapper namespace="com.A1207.A1207MyBalischat01.dao.UserInfoMapper">
<!-- 查询所有-->
<select id="queryAll" resultType="UserInfo">
select * from userInfo;
</select>
<!-- 更具id来查数据 parameterType定位到找到对应的类型-->
<select id="queryById" resultType="UserInfo" parameterType="java.lang.Integer">
select * from userInfo where id = #{id};
</select>
<!-- 更具 UserInfo 来查-->
<select id="queryByLogin" resultType="UserInfo" parameterType="UserInfo">
select * from userInfo where name=#{name} and sex=#{sex};
</select>
<!-- 传一个map集合-->
<select id="queryByMap" resultType="UserInfo" parameterType="java.util.Map">
select * from userInfo where id = #{id}
</select>
<!-- 多个参数情况下-->
<select id="queryByDg" resultType="UserInfo">
select * from userInfo where id=#{id} and name=#{name};
</select>
<!-- 自义定映射文件-->
<resultMap id="useri" type="UserInfo">
<id property="uid" column="id"/>
<result property="name" column="name"/>
<result property="sex" column="sex"/>
<!-- 一堆多映射关系-->
<!-- <collection property="ls" ofType="Scores" resultMap="sc"/>-->
</resultMap>
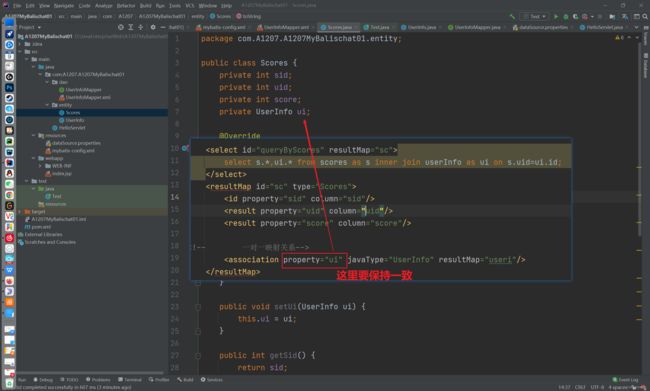
<select id="queryByScores" resultMap="sc">
select s.*,ui.* from scores as s inner join userInfo as ui on s.uid=ui.id;
</select>
<resultMap id="sc" type="Scores">
<id property="sid" column="sid"/>
<result property="uid" column="uid"/>
<result property="score" column="score"/>
<!-- 一对一映射关系-->
<association property="ui" javaType="UserInfo" resultMap="useri"/>
</resultMap>
<!-- <select id="queryByUserScore" resultMap="useri">-->
<!-- select s.*,ui.* from userInfo ui inner join scores s on s.uid=ui.id;-->
<!-- </select>-->
</mapper>
编写测试类

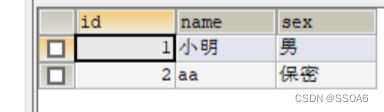
数据结果
可以看到一个 成绩对应一个人 这个就是 一对一
比如 scores 这个表中
sid=1 uid=1 score=50 ui就对应的小明这个数据
[Scores{sid=1, uid=1, score=50, ui=UserInfo{uid=1, name='小明', sex='男'}}, Scores{sid=2, uid=1, score=23, ui=UserInfo{uid=1, name='小明', sex='男'}}, Scores{sid=3, uid=1, score=23, ui=UserInfo{uid=1, name='小明', sex='男'}}, Scores{sid=4, uid=2, score=50, ui=UserInfo{uid=2, name='小红', sex='女'}}, Scores{sid=5, uid=2, score=80, ui=UserInfo{uid=2, name='小红', sex='女'}}, Scores{sid=6, uid=2, score=90, ui=UserInfo{uid=2, name='小红', sex='女'}}]
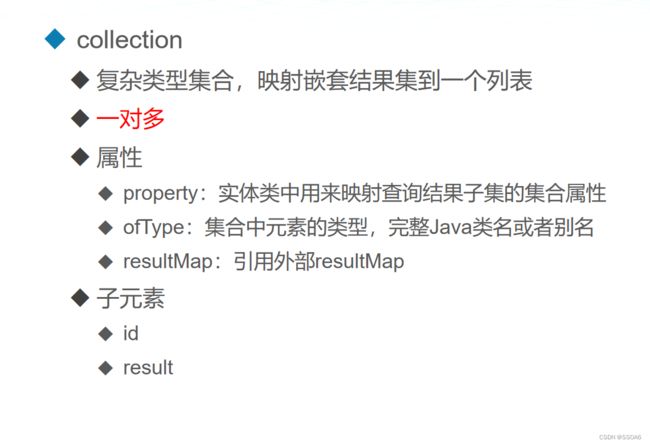
一对多映射关系 collection
示例
一对多 首先要把一对一的数据注释掉
添加SQL语句
    <select id="queryByUserScore" resultMap="useri">
        select s.*,ui.* from scores as s inner join userInfo as ui on s.uid=ui.id;
    </select>
<?xml version="1.0" encoding="UTF-8"?>
<!DOCTYPE mapper
        PUBLIC "-//mybatis.org//DTD Mapper 3.0//EN"
        "http://mybatis.org/dtd/mybatis-3-mapper.dtd" >
<mapper namespace="com.A1207.A1207MyBalischat01.dao.UserInfoMapper">
<!--    查询所有-->
    <select id="queryAll" resultType="UserInfo">
        select * from userInfo;
    </select>

<!--    更具id来查数据 parameterType定位到找到对应的类型-->
    <select id="queryById" resultType="UserInfo" parameterType="java.lang.Integer">
        select * from userInfo where id = #{id};
    </select>

<!--     更具 UserInfo 来查-->
    <select id="queryByLogin" resultType="UserInfo" parameterType="UserInfo">
        select * from userInfo where name=#{name} and sex=#{sex};
    </select>

<!--     传一个map集合-->
    <select id="queryByMap" resultType="UserInfo" parameterType="java.util.Map">
        select  * from userInfo where id = #{id}
    </select>

<!--    多个参数情况下-->
    <select id="queryByDg" resultType="UserInfo">
        select * from userInfo where id=#{id} and name=#{name};
    </select>

<!--    自义定映射文件-->
    <resultMap id="useri" type="UserInfo">
        <id property="uid" column="id"/>
        <result property="name" column="name"/>
        <result property="sex" column="sex"/>

<!--        一堆多映射关系-->
    <collection property="score" ofType="Scores" resultMap="sc"/>
    </resultMap>


    <select id="queryByScores" resultMap="sc">
        select s.*,ui.* from scores as s inner join userInfo as ui on s.uid=ui.id;
    </select>
    <resultMap id="sc" type="Scores">
        <id property="sid" column="sid"/>
        <result property="uid" column="uid"/>
        <result property="score" column="score"/>

<!--        一对一映射关系-->
<!--        <association property="ui" javaType="UserInfo" resultMap="useri"/>-->
    </resultMap>

    <select id="queryByUserScore" resultMap="useri">
        select s.*,ui.* from scores as s inner join userInfo as ui on s.uid=ui.id;
    </select>
</mapper>
userInfo 类添加 Score 对象


编写测试类

结果
可以看到这里的一个用户对应的多个成绩,我的表有 2个用户,每个用户对应三个成绩
[UserInfo{uid=1, name='小明', sex='男', score=null}, UserInfo{uid=1, name='小明', sex='男', score=null}, UserInfo{uid=1, name='小明', sex='男', score=null}, UserInfo{uid=2, name='小红', sex='女', score=null}, UserInfo{uid=2, name='小红', sex='女', score=null}, UserInfo{uid=2, name='小红', sex='女', score=null}]
添加数据


修改数据


删除数据


动态 SQL
导图

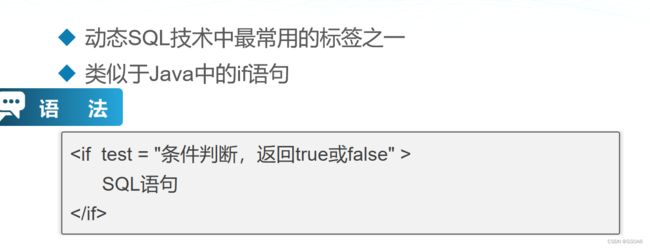
什么是动态 SQL

if 标签

这里我们就可以用if 标签解决
示例
编写配置文件
<?xml version="1.0" encoding="UTF-8"?>
<!DOCTYPE configuration PUBLIC "-//mybatis.org//DTD Config 3.0//EN" "http://mybatis.org/dtd/mybatis-3-config.dtd" >

<configuration>
<!--    导入配置文件-->
    <properties resource="dataSource.properties"/>
<!--    设置别名-->
    <typeAliases>
        <package name="com.A1207.A1207mybaitch03.entity"/>
    </typeAliases>
<!--    配置运行环境 数据源等-->
   <environments default="ScoresDB">
       <environment id="ScoresDB">
<!--           设置事务管理器-->
           <transactionManager type="JDBC"/>
<!--           设置数据源-->
           <dataSource type="POOLED">
               <property name="driver" value="${driver}"/>
               <property name="url" value="${url}"/>
               <property name="username" value="${user}"/>
               <property name="password" value="${password}"/>
           </dataSource>
       </environment>
   </environments>

<!--    设置Sql映射文件-->

    <mappers>
<!--        先新建 dao-->
        <package name="com.A1207.A1207mybaitch03.dao"/>
    </mappers>
</configuration>
配置文件
driver=com.mysql.jdbc.Driver
url=jdbc:mysql://localhost:3306/test220707
user=root
password=root123
新建实体类
package com.A1207.A1207mybaitch03.entity;

public class Scores {
    private int sid;
    private int uid;
    private String score;

    @Override
    public String toString() {
        return "Scores{" +
                "sid=" + sid +
                ", uid=" + uid +
                ", score=" + score +
                '}';
    }

    public int getSid() {
        return sid;
    }

    public void setSid(int sid) {
        this.sid = sid;
    }

    public int getUid() {
        return uid;
    }

    public void setUid(int uid) {
        this.uid = uid;
    }

    public String getScore() {
        return score;
    }

    public void setScore(String score) {
        this.score = score;
    }
}
新建接口
package com.A1207.A1207mybaitch03.dao;

import com.A1207.A1207mybaitch03.entity.Scores;
import org.apache.ibatis.annotations.Param;

import java.util.List;

public interface ScoresMapper {
    public List<Scores> queryById(@Param("sid") int id);
}
新建 Sql 映射文件
<?xml version="1.0" encoding="UTF-8"?>
<!DOCTYPE mapper
        PUBLIC "-//mybatis.org//DTD Mapper 3.0//EN"
        "http://mybatis.org/dtd/mybatis-3-mapper.dtd" >
<mapper namespace="com.A1207.A1207mybaitch03.dao.ScoresMapper">
    <select id="queryById" resultType="Scores">
        SELECT * FROM scores
        <if test="sid>0">
            where sid=#{sid}
        </if>
    </select>
</mapper>
测试类编写
import com.A1207.A1207mybaitch03.dao.ScoresMapper;
import com.A1207.A1207mybaitch03.entity.Scores;
import org.apache.ibatis.io.Resources;
import org.apache.ibatis.session.SqlSession;
import org.apache.ibatis.session.SqlSessionFactory;
import org.apache.ibatis.session.SqlSessionFactoryBuilder;

import java.io.IOException;
import java.io.InputStream;
import java.util.List;

public class Test {
    public static void main(String[] args) throws IOException {
        InputStream ins = Resources.getResourceAsStream("mybatis-config.xml");
        SqlSessionFactory ssf = new SqlSessionFactoryBuilder().build(ins);
        SqlSession ss = ssf.openSession();

        ScoresMapper sm = ss.getMapper(ScoresMapper.class);
        List<Scores> scores = sm.queryById(0);

        ss.close();

        System.out.println(scores);

    }
}
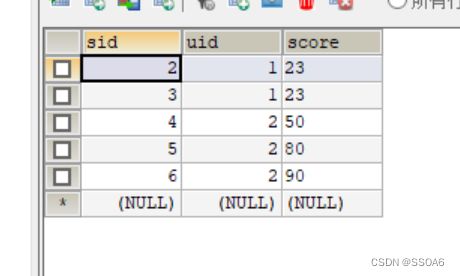
这是 id 给 0 的结果
[Scores{sid=2, uid=1, score=23}, Scores{sid=3, uid=1, score=23}, Scores{sid=4, uid=2, score=50}, Scores{sid=5, uid=2, score=80}, Scores{sid=6, uid=2, score=90}]
这是 id 给 2 的结果
[Scores{sid=2, uid=1, score=23}]
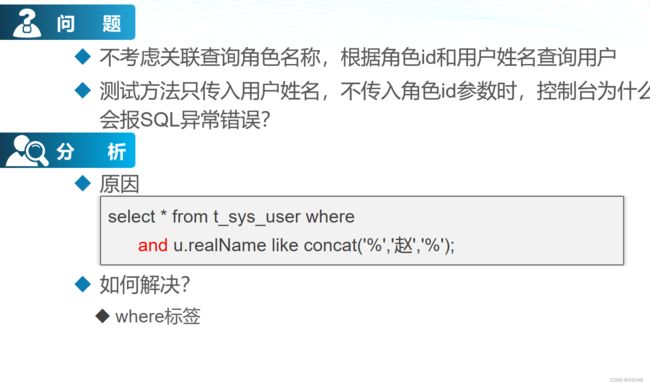
where 标签

接口编写
package com.A1207.A1207mybaitch03.dao;

import com.A1207.A1207mybaitch03.entity.Scores;
import org.apache.ibatis.annotations.Param;

import java.util.List;

public interface ScoresMapper {
    public List<Scores> queryById(@Param("sid") int sid,@Param("score") int score);
}
测试类
import com.A1207.A1207mybaitch03.dao.ScoresMapper;
import com.A1207.A1207mybaitch03.entity.Scores;
import org.apache.ibatis.io.Resources;
import org.apache.ibatis.session.SqlSession;
import org.apache.ibatis.session.SqlSessionFactory;
import org.apache.ibatis.session.SqlSessionFactoryBuilder;

import java.io.IOException;
import java.io.InputStream;
import java.util.List;

public class Test {
    public static void main(String[] args) throws IOException {
        InputStream ins = Resources.getResourceAsStream("mybatis-config.xml");
        SqlSessionFactory ssf = new SqlSessionFactoryBuilder().build(ins);
        SqlSession ss = ssf.openSession();

        ScoresMapper sm = ss.getMapper(ScoresMapper.class);
        List<Scores> scores = sm.queryById(2,23);

        ss.close();

        System.out.println(scores);

    }
}
结果
[Scores{sid=2, uid=1, score=23}]
注意:在动态Sql中使用参数作为变量一定要加上 @Param() 哪怕只有一个参数,他也会报错
这个问题我找了半天,不仔细看很容易忽略
choose(when、otherwise)标签
如果其中的一个 when 为 true 就会执行里面的语句 ,如果不符合就会寻找符合的条件,如果都不符合就会执行 otherwise 里面的语句

package com.A1207.A1207mybaitch03.dao;

import com.A1207.A1207mybaitch03.entity.Scores;
import org.apache.ibatis.annotations.Param;

import java.util.List;

public interface ScoresMapper {
    public List<Scores> queryById(@Param("sid") int sid,@Param("score") int score);

    public  List<Scores> queryByScore(@Param("score") int score);
}
这里注意的是 动态 Sql 不可以使用 < 必须使用转义符号 才可以
> >
< <
<?xml version="1.0" encoding="UTF-8"?>
<!DOCTYPE mapper
PUBLIC "-//mybatis.org//DTD Mapper 3.0//EN"
"http://mybatis.org/dtd/mybatis-3-mapper.dtd" >
<mapper namespace="com.A1207.A1207mybaitch03.dao.ScoresMapper">
<select id="queryById" resultType="Scores">
SELECT * FROM scores
<where>
<if test="sid>0">
sid=#{sid}
</if>
<if test="score>90">
and score=#{score}
</if>
</where>
</select>
<select id="queryByScore" resultType="Scores">
SELECT * FROM scores
<where>
<choose>
<when test="score>90">
score = 99
</when>
<when test="score>80 and score < 90">
score = 88
</when>
<when test="score>70 and score < 80">
score = 77
</when>
<otherwise>
score < #{score}
</otherwise>
</choose>
</where>
</select>
</mapper>
foreach标签


如果我么要查 张三就好查
![]()
但是我们要查 张三 李四 王五 就不好查了
![]()
我们可以设置一个集合 然后在进行遍历
![]()
List
package com.A1207.A1207mybaitch03.dao;

import com.A1207.A1207mybaitch03.entity.Scores;
import org.apache.ibatis.annotations.Param;

import java.util.List;

public interface ScoresMapper {
    public List<Scores> queryById(@Param("sid") int sid,@Param("score") int score);

    public  List<Scores> queryByScore(@Param("score") int score);

    public  List<Scores> queryByIn(@Param("li") List<Integer> li);
}
<?xml version="1.0" encoding="UTF-8"?>
<!DOCTYPE mapper
PUBLIC "-//mybatis.org//DTD Mapper 3.0//EN"
"http://mybatis.org/dtd/mybatis-3-mapper.dtd" >
<mapper namespace="com.A1207.A1207mybaitch03.dao.ScoresMapper">
<select id="queryById" resultType="Scores">
SELECT * FROM scores
<where>
<if test="sid>0">
sid=#{sid}
</if>
<if test="score>90">
and score=#{score}
</if>
</where>
</select>
<select id="queryByScore" resultType="Scores">
SELECT * FROM scores
<where>
<choose>
<when test="score>=90">
score = 99
</when>
<when test="score>=80 and score < 90">
score = 88
</when>
<when test="score>=70 and score < 80">
score = 77
</when>
<otherwise>
score < #{score}
</otherwise>
</choose>
</where>
</select>
<select id="queryByIn" resultType="Scores" parameterType="java.util.List">
select * from scores
<where>
uid in
<foreach collection="li" item="uid" open="(" separator="," close=")">
#{uid}
</foreach>
</where>
</select>
</mapper>
import com.A1207.A1207mybaitch03.dao.ScoresMapper;
import com.A1207.A1207mybaitch03.entity.Scores;
import org.apache.ibatis.io.Resources;
import org.apache.ibatis.session.SqlSession;
import org.apache.ibatis.session.SqlSessionFactory;
import org.apache.ibatis.session.SqlSessionFactoryBuilder;

import java.io.IOException;
import java.io.InputStream;
import java.util.ArrayList;
import java.util.List;

public class Test {
    public static void main(String[] args) throws IOException {
        InputStream ins = Resources.getResourceAsStream("mybatis-config.xml");
        SqlSessionFactory ssf = new SqlSessionFactoryBuilder().build(ins);
        SqlSession ss = ssf.openSession();

        ScoresMapper sm = ss.getMapper(ScoresMapper.class);
        // 名字集合
        List<Integer> list = new ArrayList<>();
        list.add(1);
        list.add(3);

        List<Scores> scores = sm.queryByIn(list);

        ss.close();

        System.out.println(scores);

    }
}
结果
[Scores{sid=2, uid=1, score=23}, Scores{sid=3, uid=1, score=23}, Scores{sid=7, uid=1, score=99}, Scores{sid=9, uid=1, score=88}]
map 集合
如果是 map 呢
package com.A1207.A1207mybaitch03.dao;

import com.A1207.A1207mybaitch03.entity.Scores;
import org.apache.ibatis.annotations.Param;

import java.util.List;
import java.util.Map;

public interface ScoresMapper {
    public List<Scores> queryById(@Param("sid") int sid,@Param("score") int score);

    public  List<Scores> queryByScore(@Param("score") int score);

    public  List<Scores> queryByIn(@Param("li") List<Integer> li);

    public List<Scores> queryByInMap(Map<String,Object> mso);
}
<?xml version="1.0" encoding="UTF-8"?>
<!DOCTYPE mapper
PUBLIC "-//mybatis.org//DTD Mapper 3.0//EN"
"http://mybatis.org/dtd/mybatis-3-mapper.dtd" >
<mapper namespace="com.A1207.A1207mybaitch03.dao.ScoresMapper">
<select id="queryById" resultType="Scores">
SELECT * FROM scores
<where>
<if test="sid>0">
sid=#{sid}
</if>
<if test="score>90">
and score=#{score}
</if>
</where>
</select>
<select id="queryByScore" resultType="Scores">
SELECT * FROM scores
<where>
<choose>
<when test="score>=90">
score = 99
</when>
<when test="score>=80 and score < 90">
score = 88
</when>
<when test="score>=70 and score < 80">
score = 77
</when>
<otherwise>
score < #{score}
</otherwise>
</choose>
</where>
</select>
<select id="queryByIn" resultType="Scores" parameterType="java.util.List">
select * from scores
<where>
uid in
<foreach collection="li" item="uid" open="(" separator="," close=")">
#{uid}
</foreach>
</where>
</select>
<select id="queryByInMap" parameterType="java.util.Map" resultType="Scores">
select * from scores
<where>
uid in
-- uids key 的名称
<foreach collection="uids" item="uid" open="(" separator="," close=")">
#{uid}
</foreach>
</where>
</select>
</mapper>

import com.A1207.A1207mybaitch03.dao.ScoresMapper;
import com.A1207.A1207mybaitch03.entity.Scores;
import org.apache.ibatis.io.Resources;
import org.apache.ibatis.session.SqlSession;
import org.apache.ibatis.session.SqlSessionFactory;
import org.apache.ibatis.session.SqlSessionFactoryBuilder;

import java.io.IOException;
import java.io.InputStream;
import java.util.ArrayList;
import java.util.HashMap;
import java.util.List;
import java.util.Map;

public class Test {
    public static void main(String[] args) throws IOException {
        InputStream ins = Resources.getResourceAsStream("mybatis-config.xml");
        SqlSessionFactory ssf = new SqlSessionFactoryBuilder().build(ins);
        SqlSession ss = ssf.openSession();

        ScoresMapper sm = ss.getMapper(ScoresMapper.class);
        // 名字集合
        Map<String,Object> mso = new HashMap<>();
        int[] uids = {1,2};
        mso.put("uids",uids);

        List<Scores> scores = sm.queryByInMap(mso);

        ss.close();

        System.out.println(scores);

    }
}
结果
[Scores{sid=2, uid=1, score=23}, Scores{sid=3, uid=1, score=23}, Scores{sid=4, uid=2, score=50}, Scores{sid=5, uid=2, score=80}, Scores{sid=6, uid=2, score=90}, Scores{sid=7, uid=1, score=99}, Scores{sid=8, uid=2, score=77}, Scores{sid=9, uid=1, score=88}]
set标签
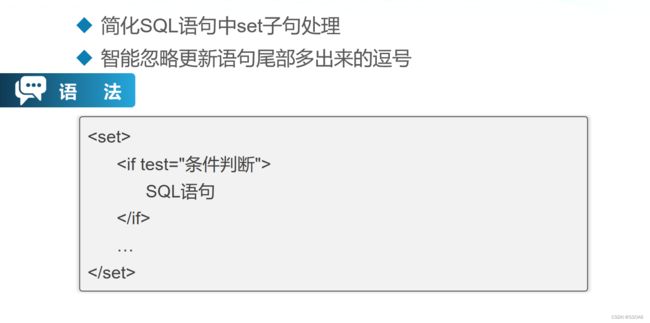
set 标签解决下面 的问题
![]()
package com.A1207.A1207mybaitch03.dao;

import com.A1207.A1207mybaitch03.entity.Scores;
import org.apache.ibatis.annotations.Param;

import java.util.List;
import java.util.Map;

public interface ScoresMapper {
    public List<Scores> queryById(@Param("sid") int sid,@Param("score") int score);

    public  List<Scores> queryByScore(@Param("score") int score);

    public  List<Scores> queryByIn(@Param("li") List<Integer> li);

    public List<Scores> queryByInMap(Map<String,Object> mso);

    public int updateUserInfo(@Param("name") String name,@Param("sex") String sex,@Param("id") int id);
}
<?xml version="1.0" encoding="UTF-8"?>
<!DOCTYPE mapper
PUBLIC "-//mybatis.org//DTD Mapper 3.0//EN"
"http://mybatis.org/dtd/mybatis-3-mapper.dtd" >
<mapper namespace="com.A1207.A1207mybaitch03.dao.ScoresMapper">
<select id="queryById" resultType="Scores">
SELECT * FROM scores
<where>
<if test="sid>0">
sid=#{sid}
</if>
<if test="score>90">
and score=#{score}
</if>
</where>
</select>
<select id="queryByScore" resultType="Scores">
SELECT * FROM scores
<where>
<choose>
<when test="score>=90">
score = 99
</when>
<when test="score>=80 and score < 90">
score = 88
</when>
<when test="score>=70 and score < 80">
score = 77
</when>
<otherwise>
score < #{score}
</otherwise>
</choose>
</where>
</select>
<select id="queryByIn" resultType="Scores" parameterType="java.util.List">
select * from scores
<where>
uid in
<foreach collection="li" item="uid" open="(" separator="," close=")">
#{uid}
</foreach>
</where>
</select>
<select id="queryByInMap" parameterType="java.util.Map" resultType="Scores">
select * from scores
<where>
uid in
-- uids key 的名称
<foreach collection="uids" item="uid" open="(" separator="," close=")">
#{uid}
</foreach>
</where>
</select>
<update id="updateUserInfo">
update userInfo
<set>
<if test="name!=null and name!=''">
name=#{name},
</if>
<if test="sex!=null and sex!=''">
sex=#{sex},
</if>
</set>
where id=#{id}
</update>
</mapper>
注意 添加和修改 一定要提交事务
这里姓名 和 性别 输入 null 或者 为空的话 原数据不会改变
import com.A1207.A1207mybaitch03.dao.ScoresMapper;
import com.A1207.A1207mybaitch03.entity.Scores;
import org.apache.ibatis.io.Resources;
import org.apache.ibatis.session.SqlSession;
import org.apache.ibatis.session.SqlSessionFactory;
import org.apache.ibatis.session.SqlSessionFactoryBuilder;

import java.io.IOException;
import java.io.InputStream;
import java.util.ArrayList;
import java.util.HashMap;
import java.util.List;
import java.util.Map;

public class Test {
    public static void main(String[] args) throws IOException {
        InputStream ins = Resources.getResourceAsStream("mybatis-config.xml");
        SqlSessionFactory ssf = new SqlSessionFactoryBuilder().build(ins);
        SqlSession ss = ssf.openSession();

        ScoresMapper sm = ss.getMapper(ScoresMapper.class);
//        // map
//        Map mso = new HashMap<>();
//        int[] uids = {1,2};
//        mso.put("uids",uids);

//        List scores = sm.queryByInMap(mso);

        int i = sm.updateUserInfo("aa", "保密", 2);

        ss.commit();

        ss.close();

        System.out.println(i);

    }
}
返回结果 1
修改成功
trim标签


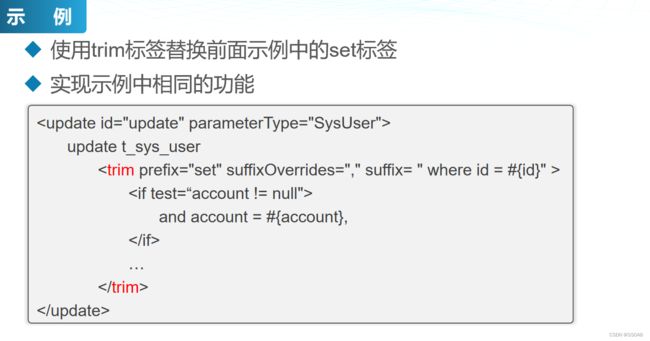
trim 这里改了 第一个查询的where 和最后一个修改的 set ,trim 可以看到这个语句非常好用
<?xml version="1.0" encoding="UTF-8"?>
<!DOCTYPE mapper
PUBLIC "-//mybatis.org//DTD Mapper 3.0//EN"
"http://mybatis.org/dtd/mybatis-3-mapper.dtd" >
<mapper namespace="com.A1207.A1207mybaitch03.dao.ScoresMapper">
<select id="queryById" resultType="Scores">
SELECT * FROM scores
<!-- <where>-->
<!-- <if test="sid>0">-->
<!-- sid=#{sid}-->
<!-- </if>-->
<!-- <if test="score>90">-->
<!-- and score=#{score}-->
<!-- </if>-->
<!-- </where>-->
<trim prefix="where" prefixOverrides="and|or">
<if test="sid>0">
sid=#{sid}
</if>
<if test="score>90">
and score=#{score}
</if>
</trim>
</select>
<select id="queryByScore" resultType="Scores">
SELECT * FROM scores
<where>
<choose>
<when test="score>=90">
score = 99
</when>
<when test="score>=80 and score < 90">
score = 88
</when>
<when test="score>=70 and score < 80">
score = 77
</when>
<otherwise>
score < #{score}
</otherwise>
</choose>
</where>
</select>
<select id="queryByIn" resultType="Scores" parameterType="java.util.List">
select * from scores
<where>
uid in
<foreach collection="li" item="uid" open="(" separator="," close=")">
#{uid}
</foreach>
</where>
</select>
<select id="queryByInMap" parameterType="java.util.Map" resultType="Scores">
select * from scores
<where>
uid in
-- uids key 的名称
<foreach collection="uids" item="uid" open="(" separator="," close=")">
#{uid}
</foreach>
</where>
</select>
<update id="updateUserInfo">
update userInfo
<!-- <set>-->
<!-- <if test="name!=null and name!=''">-->
<!-- name=#{name},-->
<!-- </if>-->
<!-- <if test="sex!=null and sex!=''">-->
<!-- sex=#{sex},-->
<!-- </if>-->
<!-- </set>-->
<!-- where id=#{id}-->
<trim prefix="set" suffix="where id=#{id}" suffixOverrides=",">
<if test="name!=null and name!=''">
name=#{name},
</if>
<if test="sex!=null and sex!=''">
sex=#{sex},
</if>
</trim>
</update>
</mapper>
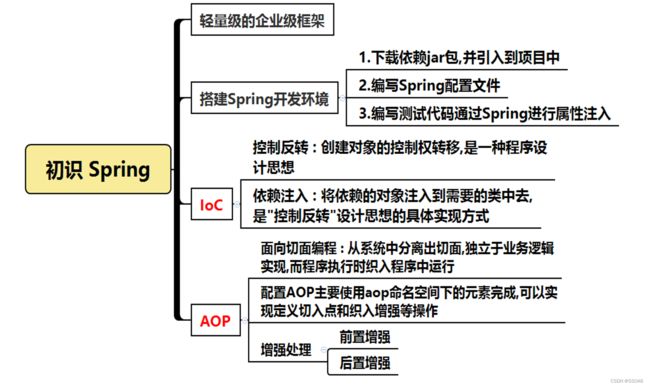
初识 Spring
理解Spring loC原理
掌握Spring loC配置
理解Spring AOP原理
掌握Spring AOP配置
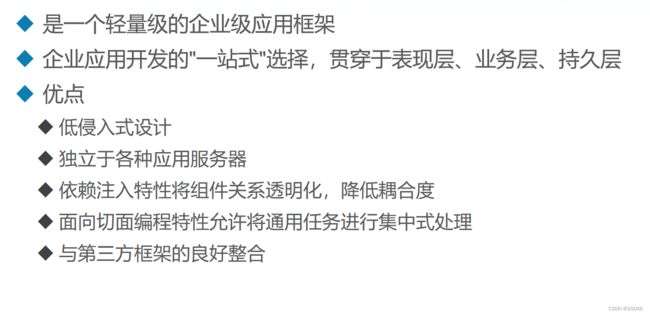
Spring 框架
我们MyBatis 和 JDBC 都是持久层也可以叫数据层
我们Spring 那个层都不是,而是贯穿式的

Spring 体系结构

Spring 设计核心

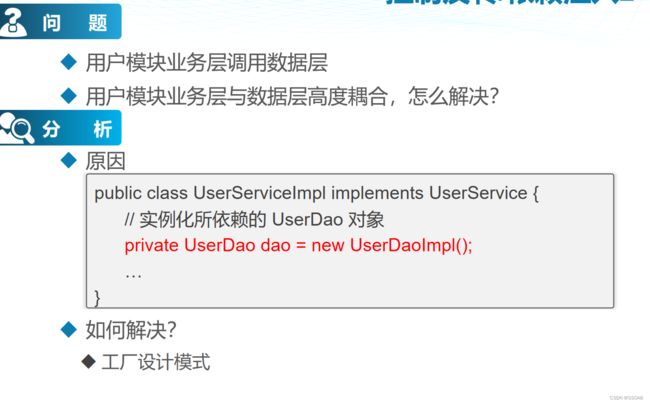
控制反转/依赖注入
以往的方法
这个方法耦合度太高了
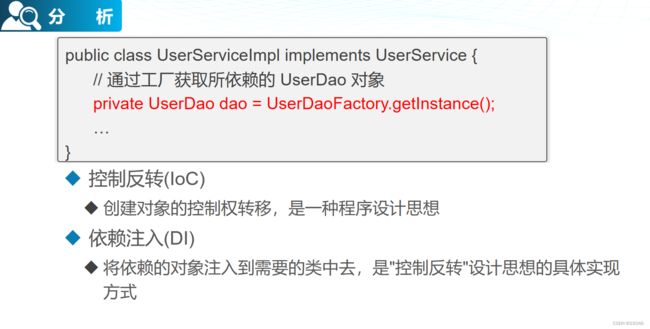
我们可以使用工厂设计模式来解决
下面就是工厂方法,但是代码太多了,有没有耦合度低代码少的方法
有就是下面的 Ioc 和 DI
第一个Spring程序
步骤
1.下载依赖jar包,并引入到项目中
2.编写Springi配置文件
3.编写测试代码通过Spring进行属性注入

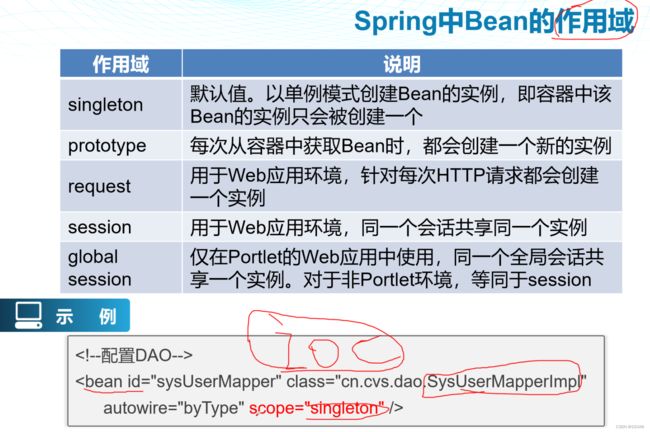
示例
创建 spring 模板
头文件
<?xml version="1.0" encoding="UTF-8"?>
<beans xmlns="http://www.springframework.org/schema/beans"
	   xmlns:xsi="http://www.w3.org/2001/XMLSchema-instance" xmlns:aop="http://www.springframework.org/schema/aop"
	   xmlns:p="http://www.springframework.org/schema/p"
	   xsi:schemaLocation="http://www.springframework.org/schema/beans
    http://www.springframework.org/schema/beans/spring-beans.xsd http://www.springframework.org/schema/aop https://www.springframework.org/schema/aop/spring-aop.xsd ">


</beans>
配置模板

这里要把头文件粘贴进去

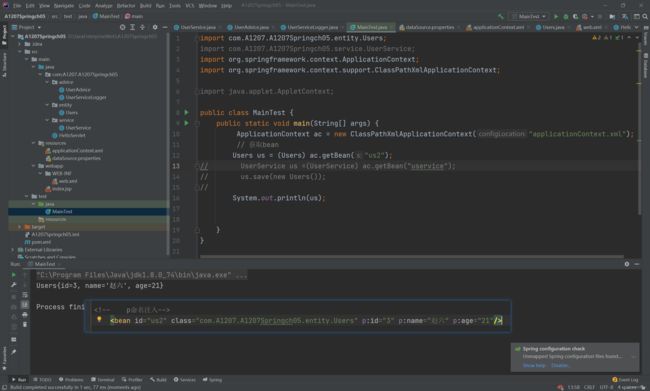
设置 bean
<?xml version="1.0" encoding="UTF-8"?>
<beans xmlns="http://www.springframework.org/schema/beans"
       xmlns:xsi="http://www.w3.org/2001/XMLSchema-instance" xmlns:aop="http://www.springframework.org/schema/aop"
       xmlns:p="http://www.springframework.org/schema/p"
       xsi:schemaLocation="http://www.springframework.org/schema/beans
    http://www.springframework.org/schema/beans/spring-beans.xsd http://www.springframework.org/schema/aop https://www.springframework.org/schema/aop/spring-aop.xsd ">
    <bean id="us" class="com.A1207.A1207Springch05.entity.Users">
        <property name="id" value="1"/>
        <property name="name" value="李四"/>
        <property name="age" value="20"/>
    </bean>
</beans>
然后就可以使用了
ClassPathXmlApplicationContext 括号里放 applicationContext.xml 的路径
import com.A1207.A1207Springch05.entity.Users;
import org.springframework.context.ApplicationContext;
import org.springframework.context.support.ClassPathXmlApplicationContext;

import java.applet.AppletContext;

public class MainTest {
    public static void main(String[] args) {
         ApplicationContext ac = new ClassPathXmlApplicationContext("applicationContext.xml");
         // 获取bean
        Users us = (Users) ac.getBean("us");
        System.out.println(us);
    }
}
结果
Users{id=1, name='李四', age=20}

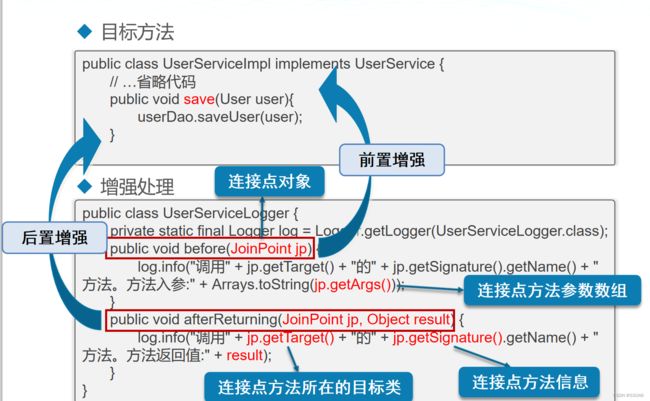
面向切面编程(AOP)


名词
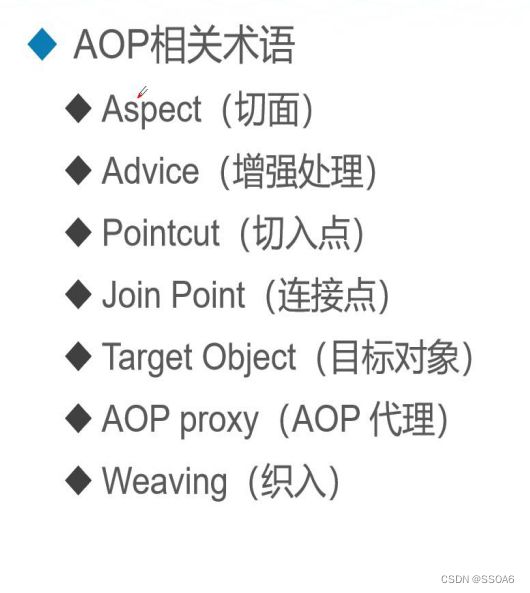
AOP相关术语
Aspect(切面)
Advice(增强处理)
Pointcut(切入点)
Join Point(连接点)
Target Object(目标对象)
AOP proxy(AOP 代理)
Weaving(织入)
Spring AOP在项目中的运用


public * addNewUser(entity.User):"*"表示匹配所有类型的返回值
public void *(entity.User):"*"表示匹配所有方法名
public void addNewUser(..):".."表示匹配任意参数个数和类型
* com.service.*.*(..):匹配com.service包下所有类的所有方法
* com.service..*.*(..):匹配com.service包及其子包下所有类的所有方法
添加增强类

示例
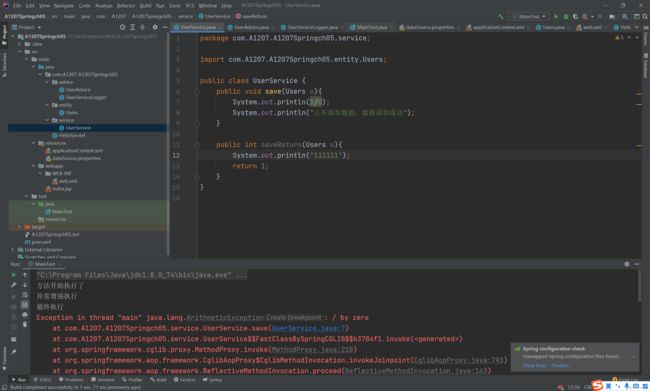
编写 service
package com.A1207.A1207Springch05.service;

import com.A1207.A1207Springch05.entity.Users;

public class UserService {
    public void save(Users u){
        System.out.println("正在添加数据,数据添加成功");
    }
}

编写 前置增强 和 后置增强
package com.A1207.A1207Springch05.advice;

import org.aspectj.lang.JoinPoint;

public class UserAdvice {
    // 前置增强
    public void before(JoinPoint jp){
        System.out.println("方法开始执行了");
    }

    // 后置增强
    public void afterReturning(JoinPoint jp){
        System.out.println("方法执行完毕");
    }
}

分辨添加 bean 和 配置aop信息
<?xml version="1.0" encoding="UTF-8"?>
<beans xmlns="http://www.springframework.org/schema/beans"
xmlns:xsi="http://www.w3.org/2001/XMLSchema-instance" xmlns:aop="http://www.springframework.org/schema/aop"
xmlns:p="http://www.springframework.org/schema/p"
xsi:schemaLocation="http://www.springframework.org/schema/beans
http://www.springframework.org/schema/beans/spring-beans.xsd http://www.springframework.org/schema/aop https://www.springframework.org/schema/aop/spring-aop.xsd ">
<bean id="us" class="com.A1207.A1207Springch05.entity.Users">
<property name="id" value="1"/>
<property name="name" value="李四"/>
<property name="age" value="20"/>
</bean>
<bean id="ua" class="com.A1207.A1207Springch05.advice.UserAdvice"/>
<bean id="uservice" class="com.A1207.A1207Springch05.service.UserService"/>
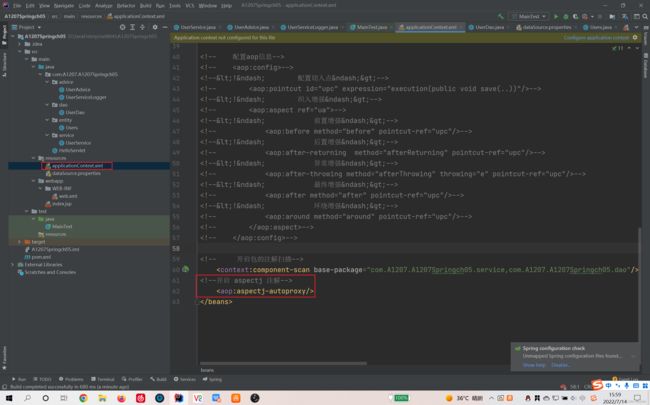
<!-- 配置aop信息-->
<aop:config>
<!-- 配置切入点-->
<aop:pointcut id="upc" expression="execution(public void save(..))"/>
<!-- 织入增强-->
<aop:aspect ref="ua">
<!-- 前置增强-->
<aop:before method="before" pointcut-ref="upc"/>
<!-- 后置增强-->
<aop:after-returning method="afterReturning" pointcut-ref="upc"/>
</aop:aspect>
</aop:config>
</beans>

编写测试类
import com.A1207.A1207Springch05.entity.Users;
import com.A1207.A1207Springch05.service.UserService;
import org.springframework.context.ApplicationContext;
import org.springframework.context.support.ClassPathXmlApplicationContext;

import java.applet.AppletContext;

public class MainTest {
    public static void main(String[] args) {
         ApplicationContext ac = new ClassPathXmlApplicationContext("applicationContext.xml");
         // 获取bean
//        Users us = (Users) ac.getBean("us");
        UserService us =(UserService) ac.getBean("uservice");
        us.save(new Users());

//        System.out.println(us);
    }
}

总结
Spring 深入学习
异常抛出增强


最终增强


环绕增强

这里用环绕增强是没有执行方法的,我们的在环绕增强里调用方法

//    环绕增强
    public void around(ProceedingJoinPoint pjp){
        try {
            System.out.println("环绕增强开始执行");
            pjp.proceed();
            System.out.println("环绕增强执行完毕");
        } catch (Throwable throwable) {
            throwable.printStackTrace();
        }
    }
}
可以看到用环绕增强后可以使用方法了

构造注入
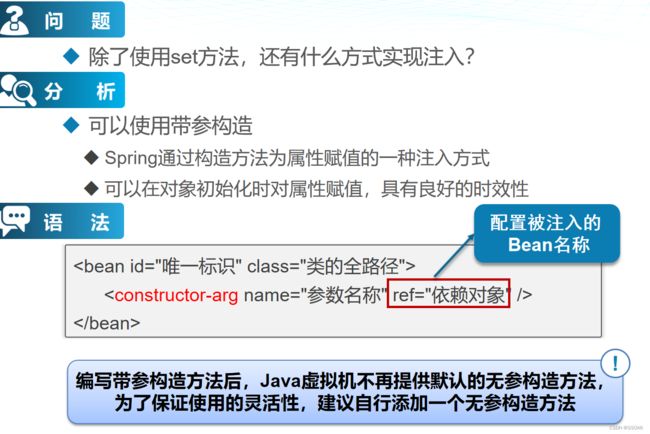

p命名空间注入

不同数据类型注入


结果
Users{id=1, name='李四', age=20, uu=Users{id=2, name='王五', age=20, uu=null, ls=null}, ls=[aa, bb, cc]}
使用注解实现Spring IoC
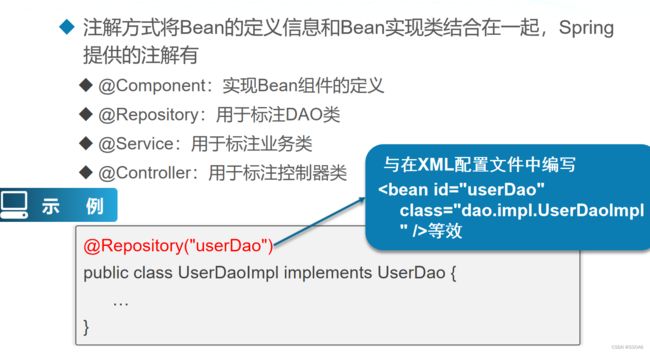
@Component:实现Bean组件的定义
@Repository:用于标注DAO类
@Service:用于标注业务类
@Controller:用于标注控制器类


先新建 bean
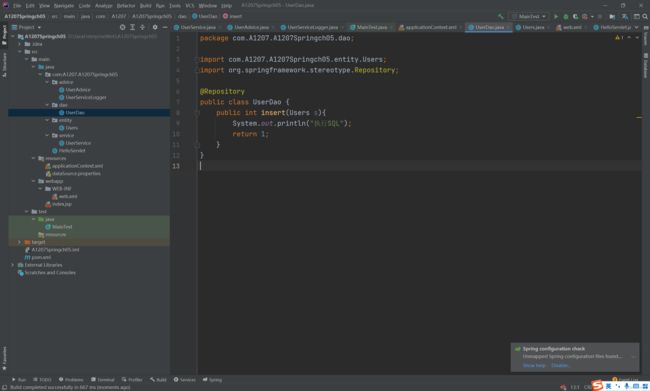
进行注解


这就非常简洁了,减少了许多代码
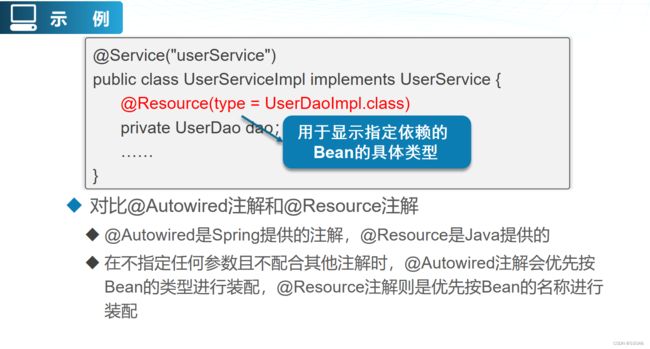
使用Java标准注解完成装配

使用注解实现Spring AOP
注意我们AOP 一般都是用配置的方式,不用注解的方式


@AfterThrowing注解定义异常抛出增强
@After注解定义最终增强
@Around注解定义环绕增强
示例
编写注解
package com.A1207.A1207Springch05.advice;

import org.aspectj.lang.JoinPoint;
import org.aspectj.lang.ProceedingJoinPoint;
import org.aspectj.lang.annotation.*;

@Aspect
public class UserAdvice {
    // 配置切入点
    @Pointcut(value = "execution(public void save(..))")
    public void pointcut(){

    }

    // 前置增强
    @Before(value = "pointcut()")
    public void before(JoinPoint jp){
        System.out.println("方法开始执行了");
    }

    // 后置增强
    @AfterReturning("pointcut()")
    public void afterReturning(JoinPoint jp){
        System.out.println("方法执行完毕");
    }

    // 异常增强
    @AfterThrowing(value = "pointcut()",throwing = "e")
    public void afterThrowing(Exception e){
        System.out.println("异常增强执行");
    }

    // 最终增强
    @After("pointcut()")
    public void after(){
        System.out.println("最终执行");
    }

//    环绕增强
    @Around("pointcut()")
    public void around(ProceedingJoinPoint pjp){
        try {
            System.out.println("环绕增强开始执行");
            pjp.proceed();
            System.out.println("环绕增强执行完毕");
        } catch (Throwable throwable) {
            throwable.printStackTrace();
        }
    }
}
开启注解
Spring 整合 MyBatis
基本整合方式
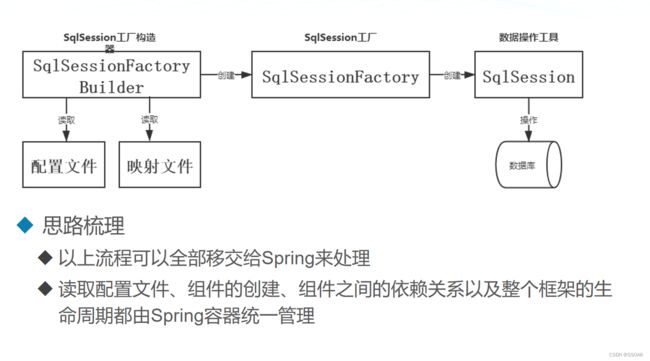

Spring 整合 MyBaits
坐标
   <dependency>
            <groupId>org.springframework</groupId>
            <artifactId>spring-context</artifactId>
            <version>5.3.19</version>
        </dependency>
        <dependency>
            <groupId>mysql</groupId>
            <artifactId>mysql-connector-java</artifactId>
            <version>5.1.32</version>
        </dependency>
        <dependency>
            <groupId>org.mybatis</groupId>
            <artifactId>mybatis</artifactId>
            <version>3.5.7</version>
        </dependency>
        <!--    Spring操作数据库的花,还需要spring-jdbc-->
        <dependency>
            <groupId>org.springframework</groupId>
            <artifactId>spring-jdbc</artifactId>
            <version>5.3.14</version>
        </dependency>
        <dependency>
            <groupId>org.aspectj</groupId>
            <artifactId>aspectjweaver</artifactId>
            <version>1.9.7</version>
        </dependency>


        <dependency>
            <groupId>org.mybatis</groupId>
            <artifactId>mybatis-spring</artifactId>
            <version>1.3.2</version>
        </dependency>


        <dependency>
            <groupId>org.apache.commons</groupId>
            <artifactId>commons-dbcp2</artifactId>
            <version>2.8.0</version>
        </dependency>
Spring 配置文件
applicationcontext.xml 文件
ApplicationContext.xml 文件
示例
首先导入连接
   <dependency>
            <groupId>org.springframework</groupId>
            <artifactId>spring-context</artifactId>
            <version>5.3.19</version>
        </dependency>
        <dependency>
            <groupId>mysql</groupId>
            <artifactId>mysql-connector-java</artifactId>
            <version>5.1.32</version>
        </dependency>
        <dependency>
            <groupId>org.mybatis</groupId>
            <artifactId>mybatis</artifactId>
            <version>3.5.7</version>
        </dependency>
        <!--    Spring操作数据库的花,还需要spring-jdbc-->
        <dependency>
            <groupId>org.springframework</groupId>
            <artifactId>spring-jdbc</artifactId>
            <version>5.3.14</version>
        </dependency>
        <dependency>
            <groupId>org.aspectj</groupId>
            <artifactId>aspectjweaver</artifactId>
            <version>1.9.7</version>
        </dependency>


        <dependency>
            <groupId>org.mybatis</groupId>
            <artifactId>mybatis-spring</artifactId>
            <version>1.3.2</version>
        </dependency>


        <dependency>
            <groupId>org.apache.commons</groupId>
            <artifactId>commons-dbcp2</artifactId>
            <version>2.8.0</version>
        </dependency>
<build>
<resources>
<resource>
<directory>src/main/java</directory>
<includes>
<include>**/*.properties
**/ *.xml</include>
</includes>
</resource>
</resources>
</build>

mybaits-config.xml 文件只用设置别名就可以
<?xml version="1.0" encoding="UTF-8"?>
<!DOCTYPE configuration PUBLIC "-//mybatis.org//DTD Config 3.0//EN" "http://mybatis.org/dtd/mybatis-3-config.dtd" >
<configuration>
<!-- <!– 导入配置文件–>-->
<!-- <properties resource="dataSource.properties"/>-->
<!-- 设置别名-->
<typeAliases>
<package name="com.A1207.A1207springAndMyBatisch7.entity"/>
</typeAliases>
<!-- <!– 配置运行环境 数据源等–>-->
<!-- <environments default="随便起但要和id保持一致">-->
<!-- <environment id="随便起但要和id保持一致">-->
<!-- <!– 设置事务管理器–>-->
<!-- <transactionManager type="JDBC"/>-->
<!-- <!– 设置数据源–>-->
<!-- <dataSource type="POOLED">-->
<!-- <property name="driver" value="${driver}"/>-->
<!-- <property name="url" value="${url}"/>-->
<!-- <property name="username" value="${user}"/>-->
<!-- <property name="password" value="${password}"/>-->
<!-- </dataSource>-->
<!-- </environment>-->
<!-- </environments>-->
<!-- <!– 设置Sql映射文件–>-->
<!-- <mappers>-->
<!-- <!– 先新建 dao–>-->
<!-- <package name="dao 文件夹位置"/>-->
<!-- </mappers>-->
</configuration>
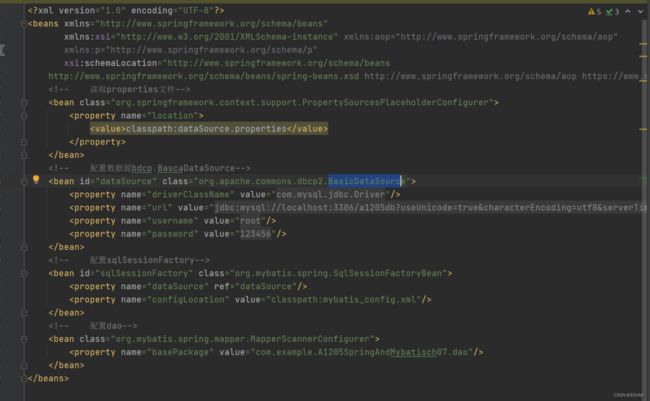
<?xml version="1.0" encoding="UTF-8"?>
<beans xmlns="http://www.springframework.org/schema/beans"
xmlns:xsi="http://www.w3.org/2001/XMLSchema-instance"
xsi:schemaLocation="http://www.springframework.org/schema/beans http://www.springframework.org/schema/beans/spring-beans.xsd">
<!-- 读取 properties 文件-->
<bean class="org.springframework.context.support.PropertySourcesPlaceholderConfigurer">
<property name="location" value="classpath:dataSource.properties"/>
</bean>
<!-- 配置数据源-->
<bean id="dataSource" class="org.apache.commons.dbcp2.BasicDataSource">
<property name="driverClassName" value="${driver}"/>
<property name="url" value="${url}"/>
<property name="username" value="${user}"/>
<property name="password" value="${password}"/>
</bean>
<!-- 配置 sqlSessionFactory-->
<bean id="sqlSessionFactory" class="org.mybatis.spring.SqlSessionFactoryBean">
<property name="dataSource" ref="dataSource"/>
<property name="configLocation" value="classpath:mybaits-config.xml"/>
</bean>
<!-- 配置 dao-->
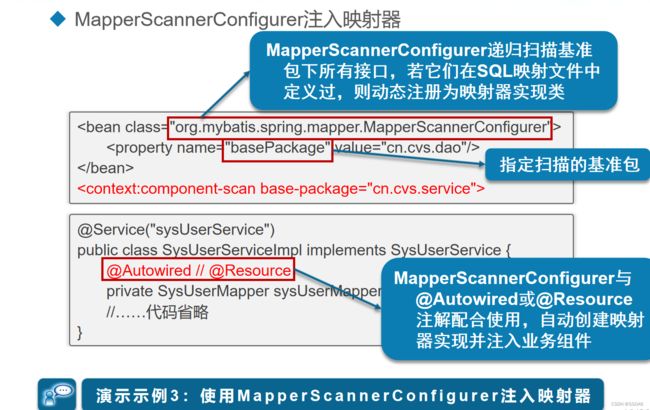
<bean class="org.mybatis.spring.mapper.MapperScannerConfigurer">
<property name="basePackage" value="com.A1207.A1207springAndMyBatisch7.dao"/>
</bean>
</beans>
映射器整合方式


我们上面用的就是这个
示例
dao 文件
接口
UserInfoMapper
package com.A1207.A1207springAndMyBatisch7.dao;

import com.A1207.A1207springAndMyBatisch7.entity.UserInfo;

import java.util.List;

public interface UserInfoMapper {
    public List<UserInfo> selectAll();
}
UserInfoMapper.xml
<?xml version="1.0" encoding="UTF-8"?>
<!DOCTYPE mapper
        PUBLIC "-//mybatis.org//DTD Mapper 3.0//EN"
        "http://mybatis.org/dtd/mybatis-3-mapper.dtd" >
<mapper namespace="com.A1207.A1207springAndMyBatisch7.dao.UserInfoMapper">
    <select id="selectAll" resultType="UserInfo">
        SELECT * FROM userinfo;
    </select>
</mapper>
entity
package com.A1207.A1207springAndMyBatisch7.entity;

public class UserInfo {
    private int id;
    private String name;
    private String sex;

    @Override
    public String toString() {
        return "UserInfo{" +
                "id=" + id +
                ", name='" + name + '\'' +
                ", sex='" + sex + '\'' +
                '}';
    }

    public int getId() {
        return id;
    }

    public void setId(int id) {
        this.id = id;
    }

    public String getName() {
        return name;
    }

    public void setName(String name) {
        this.name = name;
    }

    public String getSex() {
        return sex;
    }

    public void setSex(String sex) {
        this.sex = sex;
    }
}
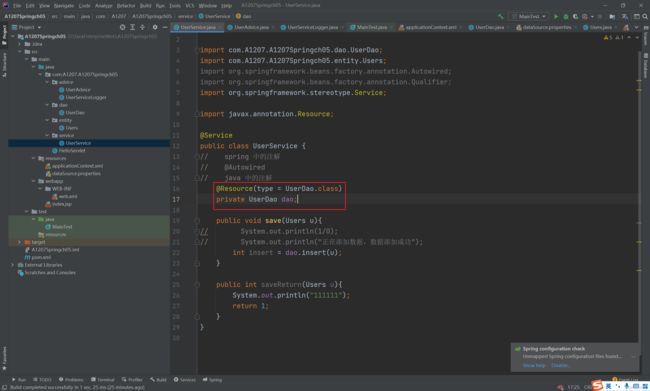
service
package com.A1207.A1207springAndMyBatisch7.service;

import com.A1207.A1207springAndMyBatisch7.dao.UserInfoMapper;
import com.A1207.A1207springAndMyBatisch7.entity.UserInfo;
import org.aspectj.lang.annotation.Around;
import org.springframework.beans.factory.annotation.Autowired;
import org.springframework.stereotype.Service;

import javax.annotation.Resource;
import java.util.List;

@Service
public class UserInfoService {
    @Autowired
    private UserInfoMapper userInfoMapper;

    public List<UserInfo> selectAll(){
        return userInfoMapper.selectAll();
    }
}
配置文件
driver=com.mysql.jdbc.Driver
url=jdbc:mysql://localhost:3306/test220707
user=root
password=root123
applicationContext.xml
<?xml version="1.0" encoding="UTF-8"?>
<beans xmlns="http://www.springframework.org/schema/beans"
       xmlns:xsi="http://www.w3.org/2001/XMLSchema-instance"
       xmlns:context="http://www.springframework.org/schema/context"
       xsi:schemaLocation="http://www.springframework.org/schema/beans http://www.springframework.org/schema/beans/spring-beans.xsd http://www.springframework.org/schema/context https://www.springframework.org/schema/context/spring-context.xsd">

<!--    读取 properties 文件-->
    <bean class="org.springframework.context.support.PropertySourcesPlaceholderConfigurer">
        <property name="location" value="classpath:dataSource.properties"/>
    </bean>

<!--    配置数据源-->
    <bean id="dataSource" class="org.apache.commons.dbcp2.BasicDataSource">
        <property name="driverClassName" value="${driver}"/>
        <property name="url" value="${url}"/>
        <property name="username" value="${user}"/>
        <property name="password" value="${password}"/>
    </bean>

<!--    配置 sqlSessionFactory-->
    <bean id="sqlSessionFactory" class="org.mybatis.spring.SqlSessionFactoryBean">
        <property name="dataSource" ref="dataSource"/>
        <property name="configLocation" value="classpath:mybaits-config.xml"/>
    </bean>

<!--    配置 dao-->
    <bean class="org.mybatis.spring.mapper.MapperScannerConfigurer">
        <property name="basePackage" value="com.A1207.A1207springAndMyBatisch7.dao"/>
    </bean>

<!--    开启注解扫描-->
    <context:component-scan base-package="com.A1207.A1207springAndMyBatisch7.service"/>
</beans>
mybaits-config.xml
<?xml version="1.0" encoding="UTF-8"?>
<!DOCTYPE configuration PUBLIC "-//mybatis.org//DTD Config 3.0//EN" "http://mybatis.org/dtd/mybatis-3-config.dtd" >
<configuration>
<!-- <!– 导入配置文件–>-->
<!-- <properties resource="dataSource.properties"/>-->
<!-- 设置别名-->
<typeAliases>
<package name="com.A1207.A1207springAndMyBatisch7.entity"/>
</typeAliases>
<!-- <!– 配置运行环境 数据源等–>-->
<!-- <environments default="随便起但要和id保持一致">-->
<!-- <environment id="随便起但要和id保持一致">-->
<!-- <!– 设置事务管理器–>-->
<!-- <transactionManager type="JDBC"/>-->
<!-- <!– 设置数据源–>-->
<!-- <dataSource type="POOLED">-->
<!-- <property name="driver" value="${driver}"/>-->
<!-- <property name="url" value="${url}"/>-->
<!-- <property name="username" value="${user}"/>-->
<!-- <property name="password" value="${password}"/>-->
<!-- </dataSource>-->
<!-- </environment>-->
<!-- </environments>-->
<!-- <!– 设置Sql映射文件–>-->
<!-- <mappers>-->
<!-- <!– 先新建 dao–>-->
<!-- <package name="dao 文件夹位置"/>-->
<!-- </mappers>-->
</configuration>
测试文件
MainTest
注意后面那个 userInfoService 要小写 因为我们没有指定 所以要小写
import com.A1207.A1207springAndMyBatisch7.service.UserInfoService;
import org.springframework.context.ApplicationContext;
import org.springframework.context.support.ClassPathXmlApplicationContext;

public class MainTest {
    public static void main(String[] args) {
        ApplicationContext ac = new ClassPathXmlApplicationContext("applicationContext.xml");
        UserInfoService ui = (UserInfoService)ac.getBean("userInfoService");

        System.out.println(ui.selectAll());

    }
}
配置声明式事务


导入命名空间
定义事务管理器
设置事务属性
定义事务切面


timeout:事务超时时间
允许事务运行的最长时间,以秒为单位
超过给定的时间自动回滚,防止事务执行时间过长而影响系统性能
read-only:事务是否为只读
默认值为false,对于仅执行查询功能的事务设置为true,提高事务处理性能
rollback-for:设定能够触发回滚的异常类型
Spring默认只在抛出RuntimeException时才标识事务回滚
可以通过全限定类名自行指定需要回滚事务的异常
no-rollback-for:设定不触发回滚的异常类型
Spring默认CheckedException不会触发事务回滚
可以通过全限定类名自行指定不需回滚事务的异常

<?xml version="1.0" encoding="UTF-8"?>
<beans xmlns="http://www.springframework.org/schema/beans"
xmlns:xsi="http://www.w3.org/2001/XMLSchema-instance"
xmlns:context="http://www.springframework.org/schema/context" xmlns:tx="http://www.springframework.org/schema/tx"
xmlns:aop="http://www.springframework.org/schema/aop"
xsi:schemaLocation="http://www.springframework.org/schema/beans http://www.springframework.org/schema/beans/spring-beans.xsd http://www.springframework.org/schema/context https://www.springframework.org/schema/context/spring-context.xsd http://www.springframework.org/schema/tx http://www.springframework.org/schema/tx/spring-tx.xsd http://www.springframework.org/schema/aop https://www.springframework.org/schema/aop/spring-aop.xsd">
<!-- 读取 properties 文件-->
<bean class="org.springframework.context.support.PropertySourcesPlaceholderConfigurer">
<property name="location" value="classpath:dataSource.properties"/>
</bean>
<!-- 配置数据源-->
<bean id="dataSource" class="org.apache.commons.dbcp2.BasicDataSource">
<property name="driverClassName" value="${driver}"/>
<property name="url" value="${url}"/>
<property name="username" value="${user}"/>
<property name="password" value="${password}"/>
</bean>
<!-- 配置 sqlSessionFactory-->
<bean id="sqlSessionFactory" class="org.mybatis.spring.SqlSessionFactoryBean">
<property name="dataSource" ref="dataSource"/>
<property name="configLocation" value="classpath:mybaits-config.xml"/>
</bean>
<!-- 配置 dao-->
<bean class="org.mybatis.spring.mapper.MapperScannerConfigurer">
<property name="basePackage" value="com.A1207.A1207springAndMyBatisch7.dao"/>
</bean>
<!-- 开启注解扫描-->
<context:component-scan base-package="com.A1207.A1207springAndMyBatisch7.service"/>
<!-- <!– 配置声明事务–>-->
<!-- <!– 配置事务管理器–>-->
<bean id="transactionManager" class="org.springframework.jdbc.datasource.DataSourceTransactionManager">
<property name="dataSource" ref="dataSource"/>
</bean>
<!-- <!– 开启注解事务–>-->
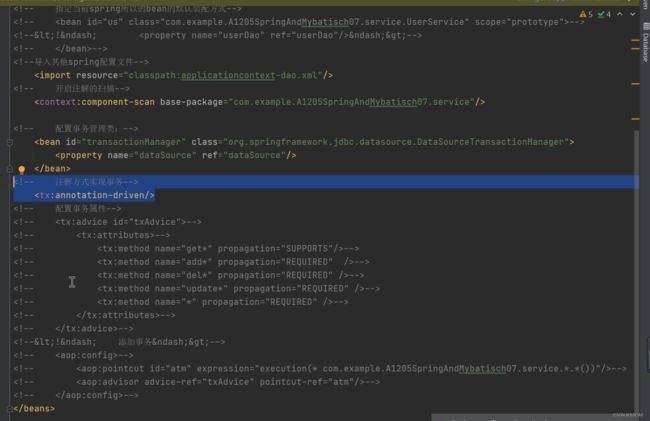
<!-- <tx:annotation-driven/>-->
<!-- 配置事务属性-->
<tx:advice id="txAdvice">
<tx:attributes>
<tx:method name="*" propagation="REQUIRED" isolation="DEFAULT"/>
<tx:method name="update*" propagation="REQUIRED"/>
</tx:attributes>
</tx:advice>
<aop:config>
<aop:pointcut id="userPointCut" expression="execution(* com.A1207.A1207springAndMyBatisch7.service.*.*(..))"/>
<aop:advisor advice-ref="txAdvice" pointcut-ref="userPointCut"/>
</aop:config>
</beans>
使用注解实现声明式事务


使用上面的方法有代码有点多
我们可以使用注解的方式
<?xml version="1.0" encoding="UTF-8"?>
<beans xmlns="http://www.springframework.org/schema/beans"
xmlns:xsi="http://www.w3.org/2001/XMLSchema-instance"
xmlns:context="http://www.springframework.org/schema/context" xmlns:tx="http://www.springframework.org/schema/tx"
xmlns:aop="http://www.springframework.org/schema/aop"
xsi:schemaLocation="http://www.springframework.org/schema/beans http://www.springframework.org/schema/beans/spring-beans.xsd http://www.springframework.org/schema/context https://www.springframework.org/schema/context/spring-context.xsd http://www.springframework.org/schema/tx http://www.springframework.org/schema/tx/spring-tx.xsd http://www.springframework.org/schema/aop https://www.springframework.org/schema/aop/spring-aop.xsd">
<!-- 读取 properties 文件-->
<bean class="org.springframework.context.support.PropertySourcesPlaceholderConfigurer">
<property name="location" value="classpath:dataSource.properties"/>
</bean>
<!-- 配置数据源-->
<bean id="dataSource" class="org.apache.commons.dbcp2.BasicDataSource">
<property name="driverClassName" value="${driver}"/>
<property name="url" value="${url}"/>
<property name="username" value="${user}"/>
<property name="password" value="${password}"/>
</bean>
<!-- 配置 sqlSessionFactory-->
<bean id="sqlSessionFactory" class="org.mybatis.spring.SqlSessionFactoryBean">
<property name="dataSource" ref="dataSource"/>
<property name="configLocation" value="classpath:mybaits-config.xml"/>
</bean>
<!-- 配置 dao-->
<bean class="org.mybatis.spring.mapper.MapperScannerConfigurer">
<property name="basePackage" value="com.A1207.A1207springAndMyBatisch7.dao"/>
</bean>
<!-- 开启注解扫描-->
<context:component-scan base-package="com.A1207.A1207springAndMyBatisch7.service"/>
<!-- <!– 配置声明事务–>-->
<!-- <!– 配置事务管理器–>-->
<bean id="transactionManager" class="org.springframework.jdbc.datasource.DataSourceTransactionManager">
<property name="dataSource" ref="dataSource"/>
</bean>
<!-- 开启注解事务-->
<tx:annotation-driven/>
<!-- <!– 配置事务属性–>-->
<!-- <tx:advice id="txAdvice">-->
<!-- <tx:attributes>-->
<!-- <tx:method name="*" propagation="REQUIRED" isolation="DEFAULT"/>-->
<!-- <tx:method name="update*" propagation="REQUIRED"/>-->
<!-- </tx:attributes>-->
<!-- </tx:advice>-->
<!-- <aop:config>-->
<!-- <aop:pointcut id="userPointCut" expression="execution(* com.A1207.A1207springAndMyBatisch7.service.*.*(..))"/>-->
<!-- <aop:advisor advice-ref="txAdvice" pointcut-ref="userPointCut"/>-->
<!-- </aop:config>-->
</beans>
package com.A1207.A1207springAndMyBatisch7.service;
import com.A1207.A1207springAndMyBatisch7.dao.UserInfoMapper;
import com.A1207.A1207springAndMyBatisch7.entity.UserInfo;
import org.aspectj.lang.annotation.Around;
import org.springframework.beans.factory.annotation.Autowired;
import org.springframework.stereotype.Service;
import org.springframework.transaction.annotation.Isolation;
import org.springframework.transaction.annotation.Propagation;
import org.springframework.transaction.annotation.Transactional;
import javax.annotation.Resource;
import java.util.List;
@Service
public class UserInfoService {
@Autowired
private UserInfoMapper userInfoMapper;
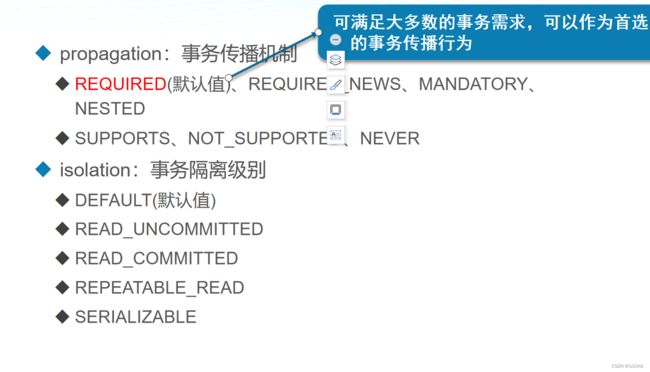
@Transactional(propagation = Propagation.REQUIRED,isolation = Isolation.DEFAULT)
public List<UserInfo> selectAll(){
return userInfoMapper.selectAll();
}
}
掌握更多配置数据源的方法
使用properties 文件配置数据源


使用 JNDI 配置数据源

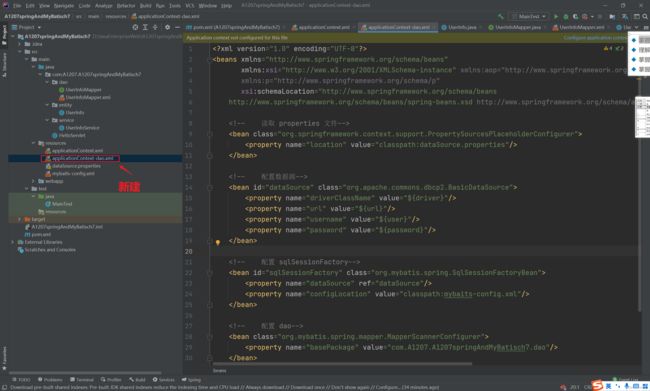
拆分Spring 配置文件
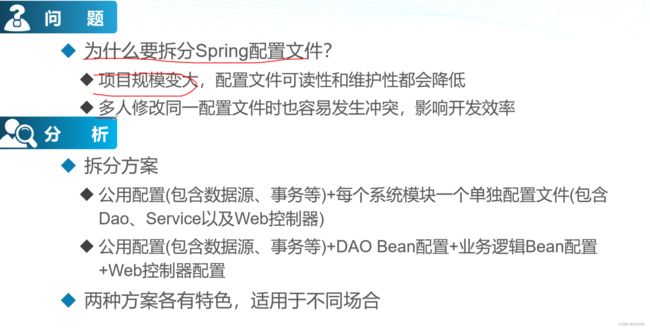
引入拆分后的配置文件
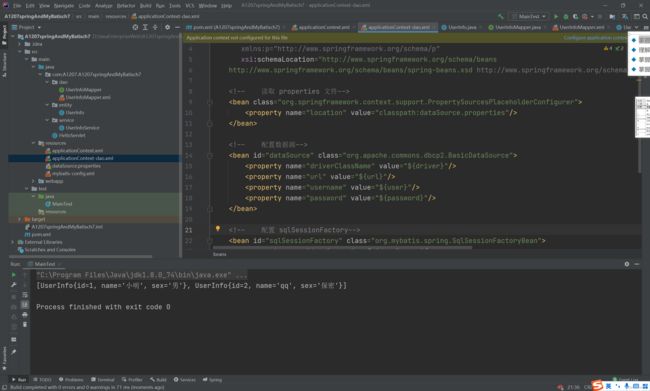
示例

依然可以运行

Spring 中Bean 的自动装配


示例


更改自动装配的方式
![]()


设置全局自动装配的方式


Spring 中的Bean 的作用域


Spring MVC
理解MVC设计模式
jsp model 1
jsp model 2

MVC 处理过程
MVC 的优点


使用注解开发Spring MVC
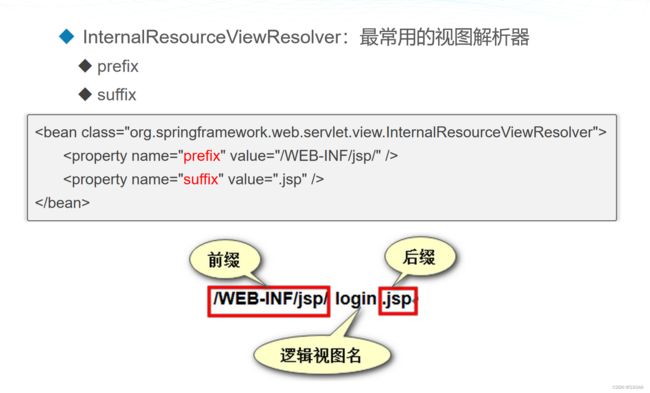
配置视图解析器

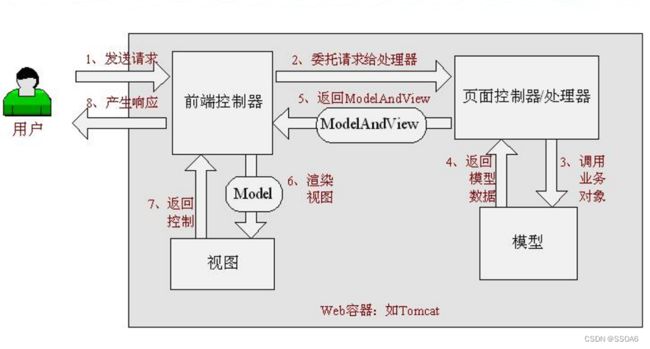
Spring MVC请求处理流程
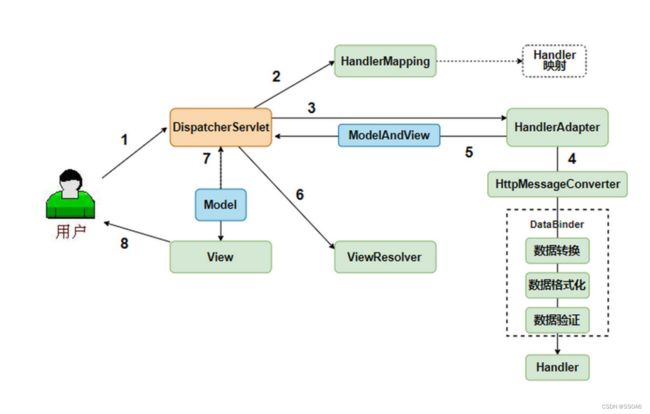
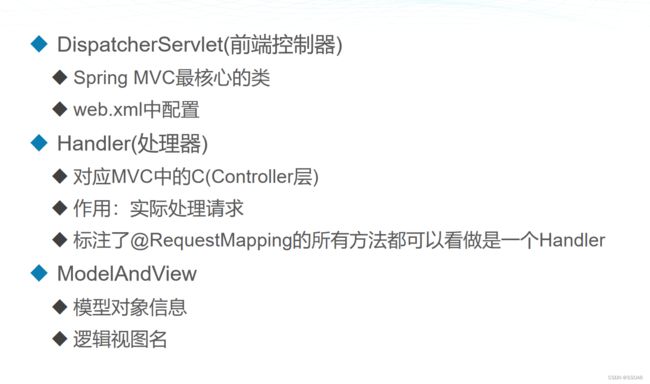
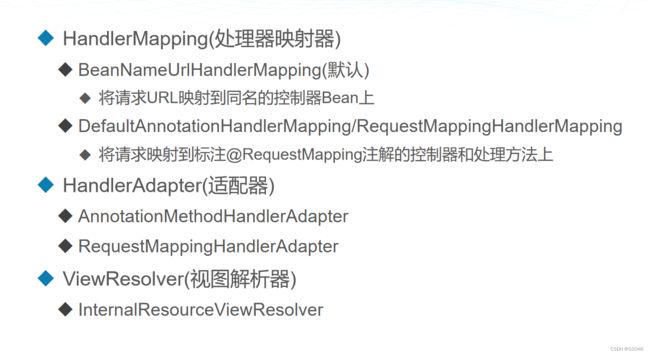

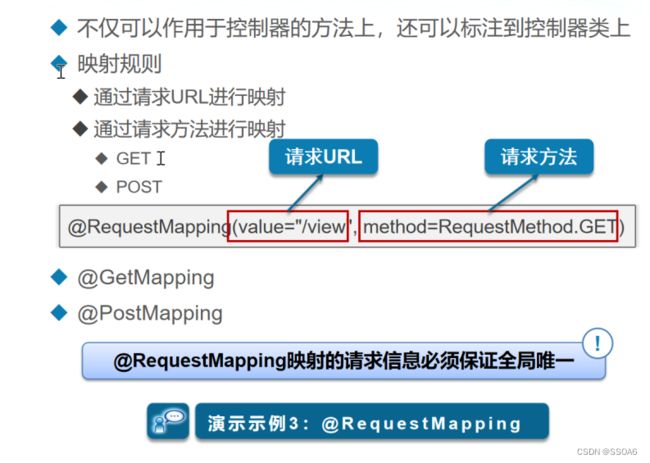
@RequestMapping 注解

入参处理
就是把 userName 你传过来的参数 给到 realName
如果 括号里的代码 什么都不写那传过来的参数要和参数一直,不然接受不到

示例
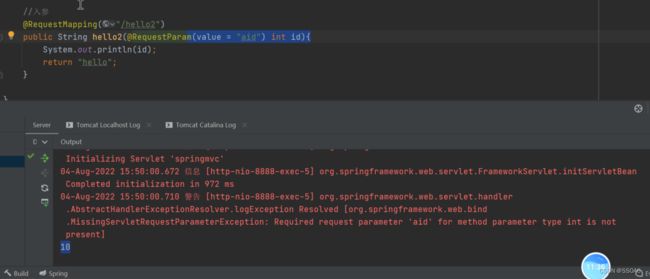
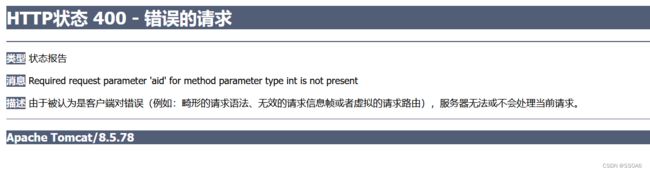

可以看到不给参数就报错
出参

要传键和值


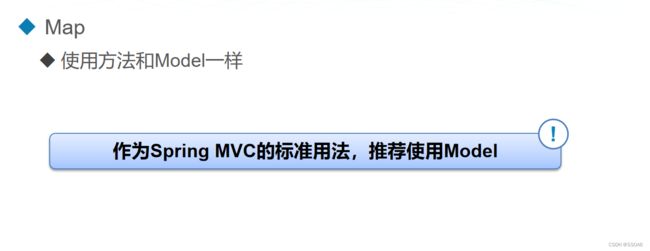
这里建议用 model 出参
package com.example.a1207SpringmvcCh9.control;

import org.springframework.stereotype.Controller;
import org.springframework.ui.Model;
import org.springframework.web.bind.annotation.PathVariable;
import org.springframework.web.bind.annotation.RequestMapping;
import org.springframework.web.bind.annotation.RequestMethod;
import org.springframework.web.bind.annotation.RequestParam;
import org.springframework.web.servlet.ModelAndView;

import javax.management.modelmbean.ModelMBean;
import java.util.Map;

@Controller
public class HelloControl1 {

//    @RequestMapping(value = "/hello1",method = RequestMethod.GET)
    @RequestMapping("/hello1")
    public String hello1(){
    // 返回给哪个 jsp 页面
        return "hello";
    }

    // 入参 不加value的话要和传过来的值的变量名要一致
    @RequestMapping("/hello2")
    public String hello2(@RequestParam(value = "aid") int id){
        System.out.println(id);
        return "hello";
    }

    // 出参 ModelAndView
    @RequestMapping("/hello3")
    public ModelAndView hello3(){
        ModelAndView mav = new ModelAndView();
        mav.addObject("text","你好");
        mav.setViewName("hello1");
        return mav;
    }

    // 出参 model
    @RequestMapping("/hello4")
    public String hello4(Model m){
        m.addAttribute("text","你好1207");
        return "hello1";
    }

    // 出参 map
    @RequestMapping("/hello5")
    public String hello5(Map m){
        m.put("text","你好,我是渣渣会");
        return "hello1";
    }
}
使用注解

使用 spring MVC

示例 MVC 的基本使用
导入这两个 jar 包
<dependency>
            <groupId>org.springframework</groupId>
            <artifactId>spring-web</artifactId>
            <version>5.3.19</version>
        </dependency>
        <dependency>
            <groupId>org.springframework</groupId>
            <artifactId>spring-webmvc</artifactId>
            <version>5.3.19</version>
        </dependency>
在 web.xml 里面添加
<?xml version="1.0" encoding="UTF-8"?>
<web-app xmlns="http://xmlns.jcp.org/xml/ns/javaee"
         xmlns:xsi="http://www.w3.org/2001/XMLSchema-instance"
         xsi:schemaLocation="http://xmlns.jcp.org/xml/ns/javaee http://xmlns.jcp.org/xml/ns/javaee/web-app_4_0.xsd"
         version="4.0">
<!--    配置前端控制器-->
    <servlet>
        <servlet-name>springmvc</servlet-name>
        <servlet-class>org.springframework.web.servlet.DispatcherServlet</servlet-class>
        <init-param>
            <param-name>contextConfigLocation</param-name>
            <param-value>classpath:springmvc-servlet.xml</param-value>
        </init-param>
    </servlet>
    <servlet-mapping>
        <servlet-name>springmvc</servlet-name>
        <url-pattern>/</url-pattern>
    </servlet-mapping>
</web-app>

方法一
新建control包,在新建类名为helloControl ,让他继承 AbstractController

使用方法一的话有一个响应就得写一个bean
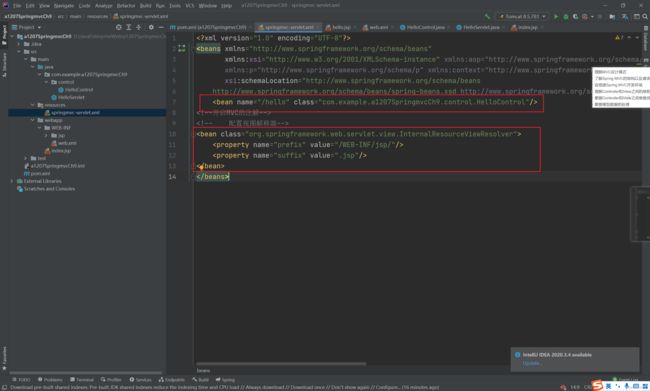

这样就可以显示了
方式二 注解的方式
新建 helloControl1
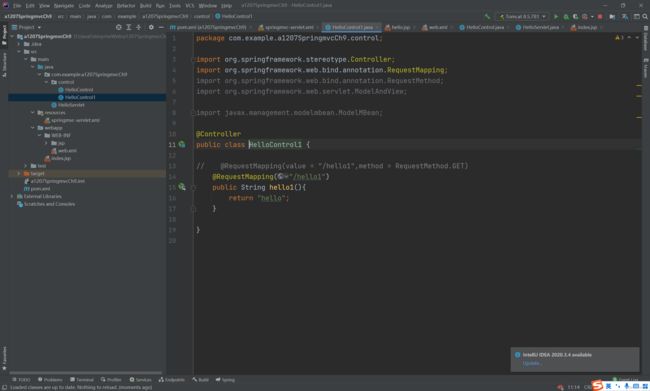
就出来了,比上面的简单多了,所有更多用这个

单例模式及统一异常处理

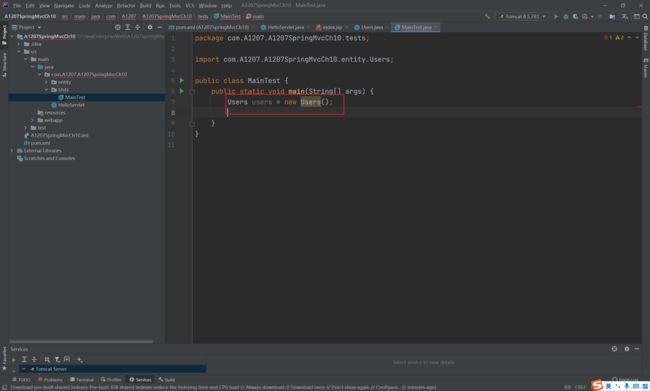
单列模式


示例
package com.A1207.A1207SpringMvcCh10.entity;
// 设计成为单列
public class Users {
// 2. 设置当前类型的属性并且设置为静态私有的
private static Users u = new Users();
// 1.私有构造函数
private Users() {
}
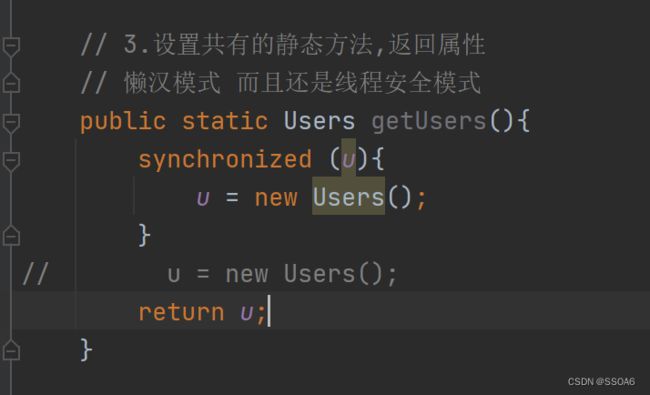
// 3.设置共有的静态方法,返回属性
public static Users getUsers(){
return u;
}
}
可有看到不可以直接调用
这里使用 getUsers 方法可以看到两次的都是Users 对象
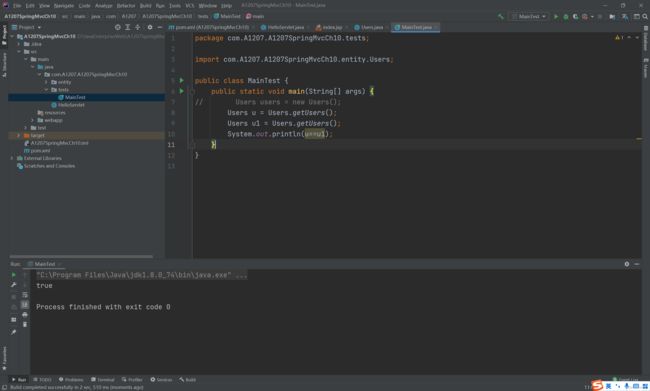
注意使用上面的方法会出现问题,线程不安全

懒汉模式

使用这个模式会出现线程不安全,要给代码上锁(synchronized)
饿汉模式
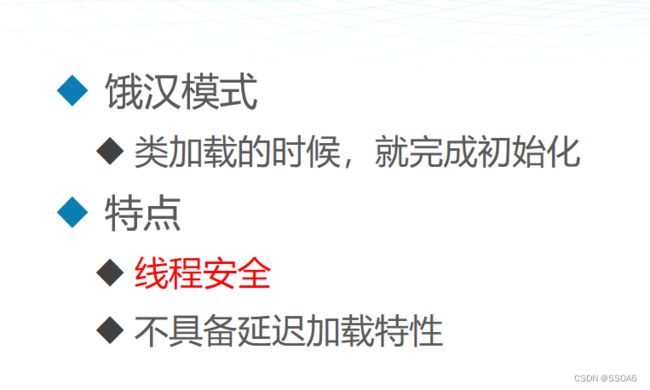
饿汉模式很安全,但是不具备延迟加载
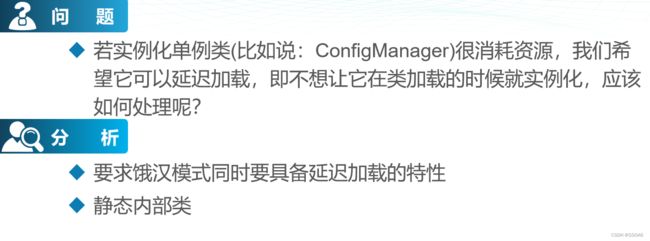
饿汉模式实现延迟加载(使用内部内)
新建 Stu 类
package com.A1207.A1207SpringMvcCh10.entity;

// 实现饿汉模式延迟加载
public class Stu {

    private static Stu s ;

    private Stu() {


    }

    public static Stu getStu() {
        Stunbl sn = new Stunbl();
        s = sn.getStu();
        return s;
    }

    // 使用内部内来实现延迟加载
    static class Stunbl {
        static Stu s = new Stu();
        public Stu getStu() {
            return s;
        }
    }
}

Spring MVC中的单例模式

Spring MVC 的整合

实例
首先先新建

UserControl 控制类代码
package com.A1207.A1207SpringMvcCh10.control;

import com.A1207.A1207SpringMvcCh10.service.UserService;
import org.springframework.beans.factory.annotation.Autowired;
import org.springframework.stereotype.Controller;
import org.springframework.ui.Model;
import org.springframework.web.bind.annotation.RequestMapping;

@Controller
public class UserControl {
    @Autowired
    UserService us;

    @RequestMapping("/msg")
    public String getMsg(Model m) {
        m.addAttribute("msg",us.getMsg());
        return "msg";
    }
}
UserService 中的代码
package com.A1207.A1207SpringMvcCh10.service;

import org.springframework.stereotype.Service;

@Service
public class UserService {

    public String getMsg(){
        return "获取类业务运行完毕";
    }
}
在新建这连个文件

applicationContext 文件代码
<?xml version="1.0" encoding="UTF-8"?>
<beans xmlns="http://www.springframework.org/schema/beans"
       xmlns:xsi="http://www.w3.org/2001/XMLSchema-instance" xmlns:aop="http://www.springframework.org/schema/aop"
       xmlns:p="http://www.springframework.org/schema/p" xmlns:context="http://www.springframework.org/schema/context"
       xsi:schemaLocation="http://www.springframework.org/schema/beans
    http://www.springframework.org/schema/beans/spring-beans.xsd http://www.springframework.org/schema/aop https://www.springframework.org/schema/aop/spring-aop.xsd http://www.springframework.org/schema/context https://www.springframework.org/schema/context/spring-context.xsd">
<!--    开启注解-->
<context:component-scan base-package="com.A1207.A1207SpringMvcCh10.service"/>
</beans>
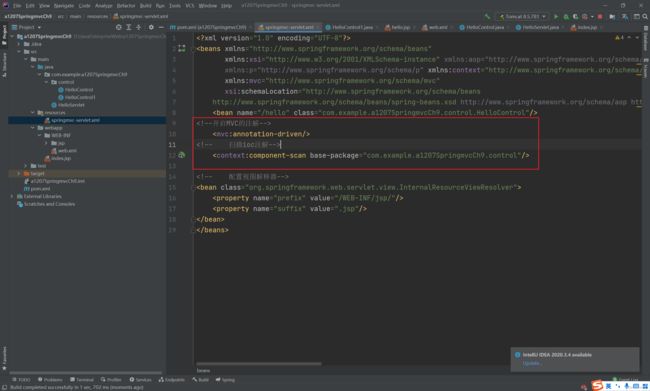
springmvc-servlet 文件代码
<?xml version="1.0" encoding="UTF-8"?>
<beans xmlns="http://www.springframework.org/schema/beans"
       xmlns:xsi="http://www.w3.org/2001/XMLSchema-instance"
       xmlns:mvc="http://www.springframework.org/schema/mvc"
       xmlns:context="http://www.springframework.org/schema/context"
       xsi:schemaLocation="http://www.springframework.org/schema/beans
    http://www.springframework.org/schema/beans/spring-beans.xsd   http://www.springframework.org/schema/mvc https://www.springframework.org/schema/mvc/spring-mvc.xsd http://www.springframework.org/schema/context https://www.springframework.org/schema/context/spring-context.xsd">
    <!--mvc注解开启-->
    <mvc:annotation-driven/>
    <!--    springioc注解-->
    <context:component-scan base-package="com.A1207.A1207SpringMvcCh10.control"/>

<!--    视图解释器-->
    <bean class="org.springframework.web.servlet.view.InternalResourceViewResolver">
        <property name="prefix" value="/WEB-INF/jsp/"/>
        <property name="suffix" value=".jsp"/>
    </bean>
<!--设置静态资源的映射-->
    <mvc:resources mapping="/statics/*" location="/statics/"/>
</beans>
然后在 web.xml 里面编写
<?xml version="1.0" encoding="UTF-8"?>
<web-app xmlns="http://xmlns.jcp.org/xml/ns/javaee"
         xmlns:xsi="http://www.w3.org/2001/XMLSchema-instance"
         xsi:schemaLocation="http://xmlns.jcp.org/xml/ns/javaee http://xmlns.jcp.org/xml/ns/javaee/web-app_4_0.xsd"
         version="4.0">
        <!--    配置前端控制器-->
        <servlet>
            <servlet-name>springmvc</servlet-name>
            <servlet-class>org.springframework.web.servlet.DispatcherServlet</servlet-class>
            <init-param>
                <param-name>contextConfigLocation</param-name>
                <param-value>classpath:springmvc-servlet.xml</param-value>
            </init-param>
        </servlet>
        <servlet-mapping>
            <servlet-name>springmvc</servlet-name>
            <url-pattern>/</url-pattern>
        </servlet-mapping>
<!--    监听器-->
    <listener>
        <listener-class>org.springframework.web.context.ContextLoaderListener</listener-class>
    </listener>
<!--    加载spring 配置文件-->
    <context-param>
        <param-name>contextConfigLocation</param-name>
        <param-value>classpath:applicationContext.xml</param-value>
    </context-param>
</web-app>
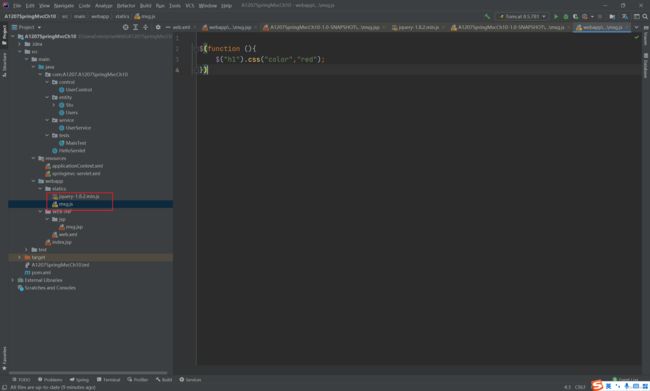
导入js 代码
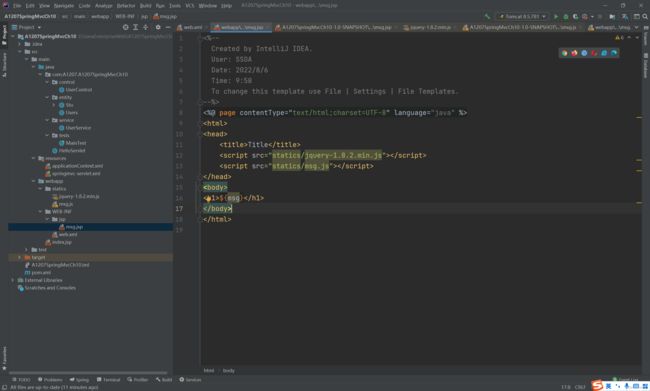
最后编写页面
异常处理

局部异常处理
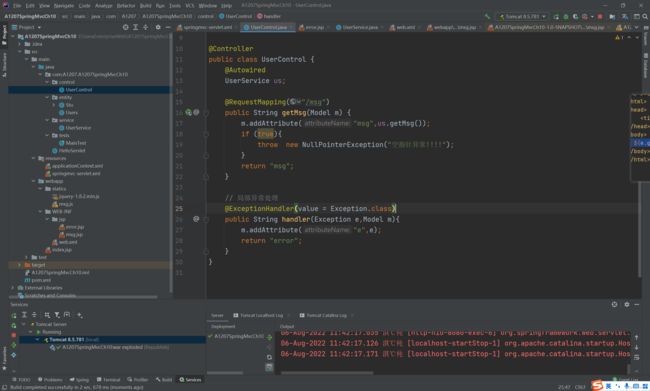
全局异常处理


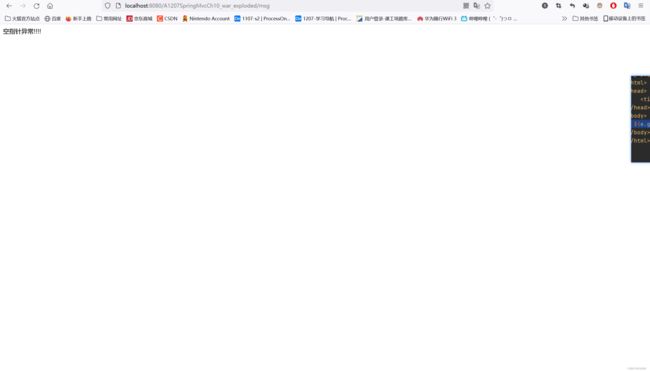
可以看到跳转到这个页面了,但是没有显示异常,因为全局异常处理只可以条转到对应的页面,不可以把异常对象传过来

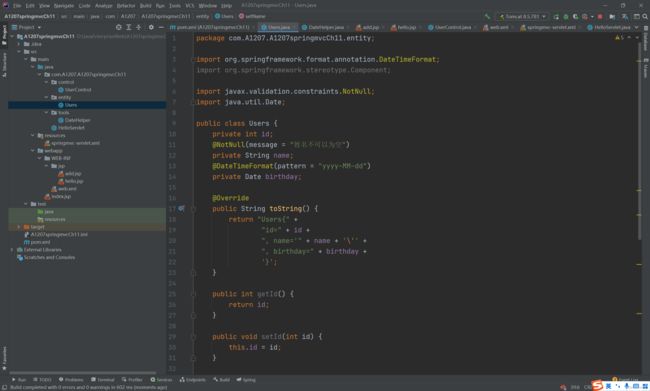
数据校验及文件上传
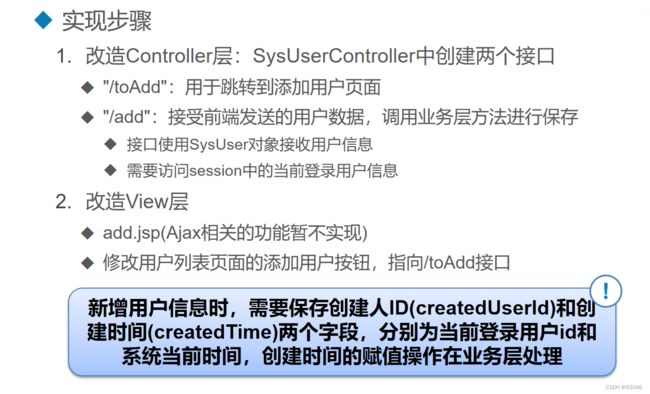
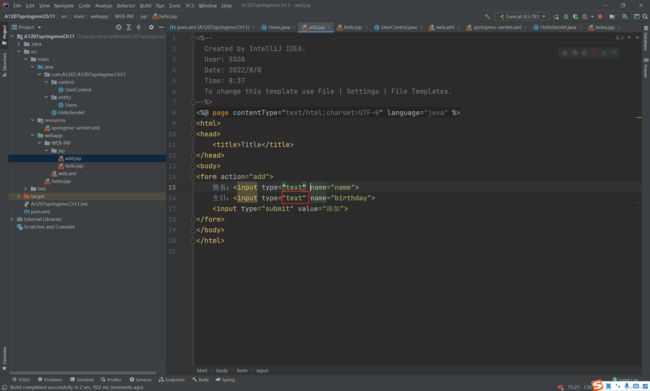
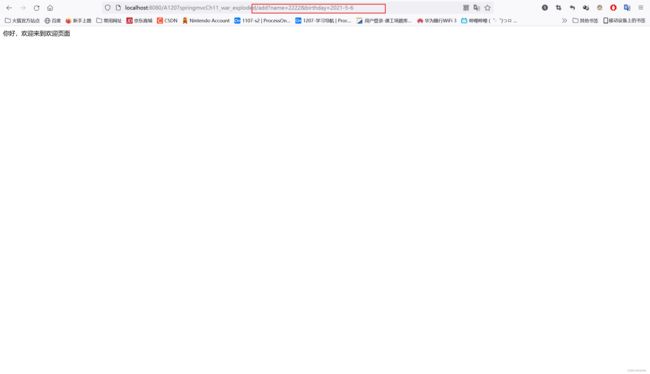
改造添加功能

体验
pom 导入jar 包
编写 springmvc-servlet

编写 web.xml


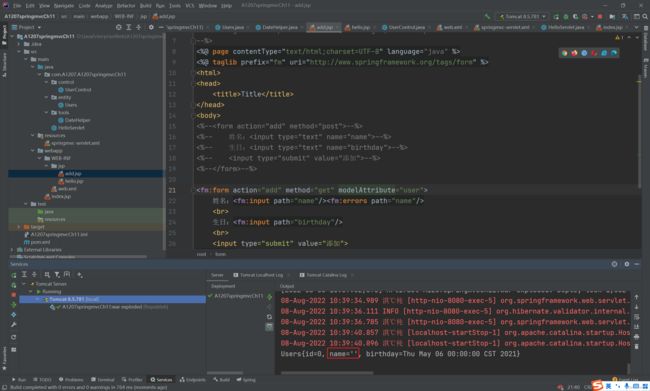
可以看到我们传过去的生日 是 String 类型的,但我控制层接受的是Date 类型的(控制层里面接受的是Users 类型的 Users 类型里面的生日是 Date )
可以看到下面报错
有几种解决办法比如把Date 类型改成String 类型
但是很麻烦,这里有个更好的方法
解决这个问题 添加一个注释就可以解决

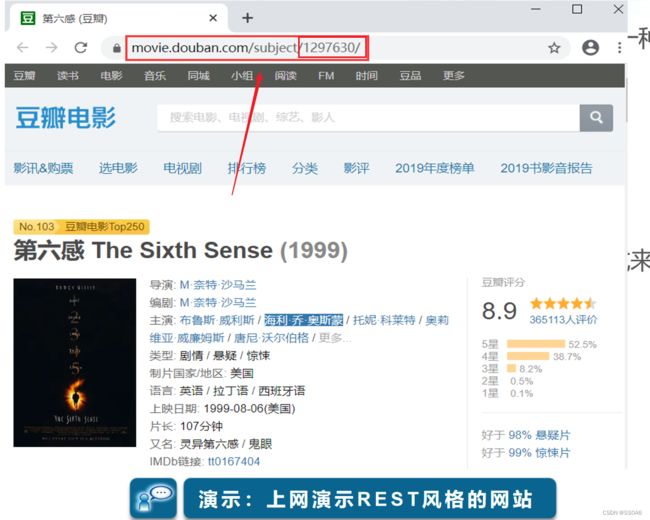
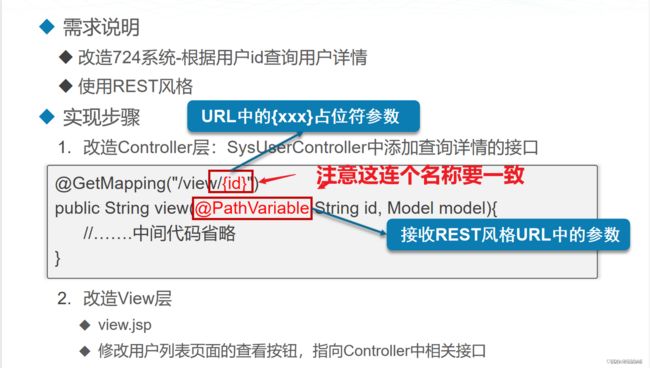
REST 风格
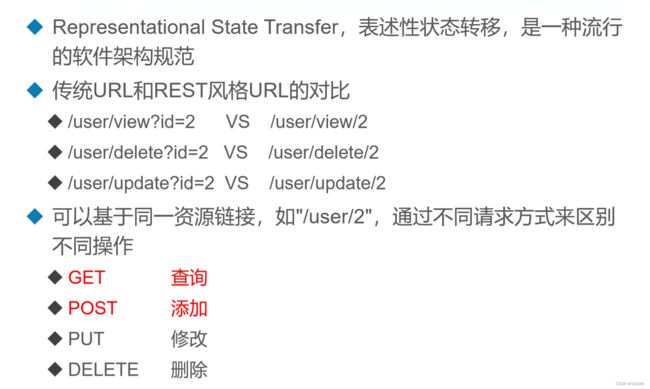
看一下,下面豆瓣的例子
改造查询功能

演示
分别添加下面的代码


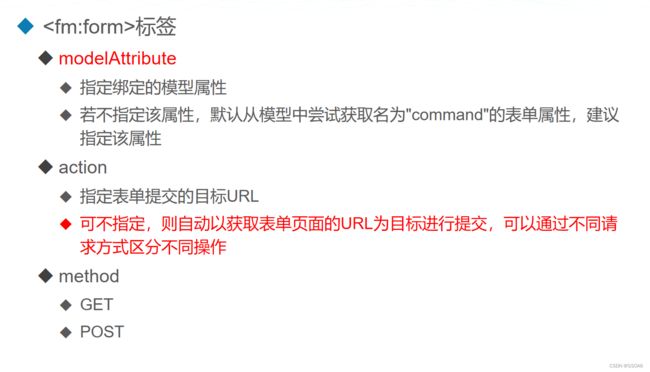
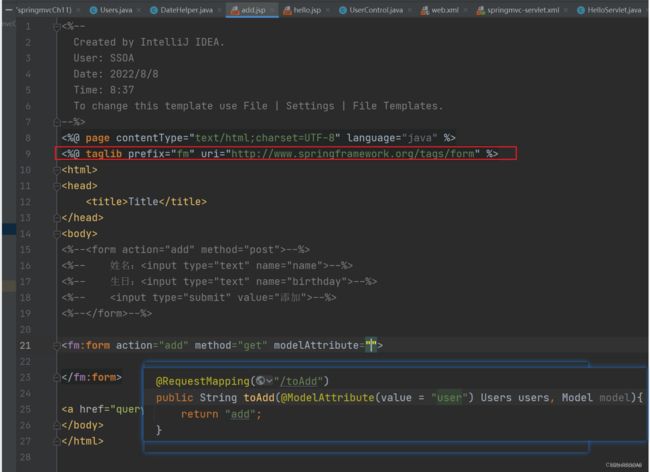
Spring 表单标签

Spring 常用标签


体验

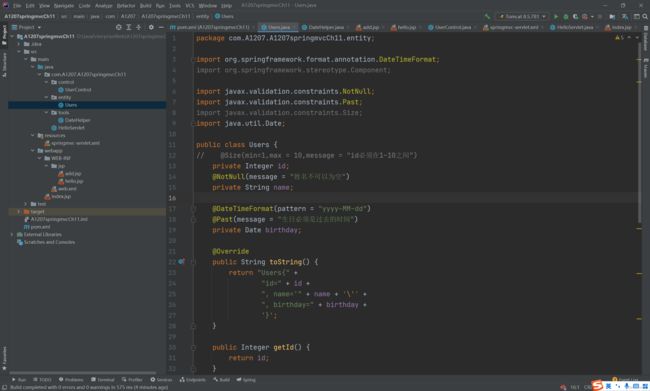
数据校验


实例


可以看到可以跳转,控制台输出的name 是为 “” 但是还是可以跳转,所以这里校验个人感觉不是很好用
这里再试试是生日


Spring MVC的文件上传
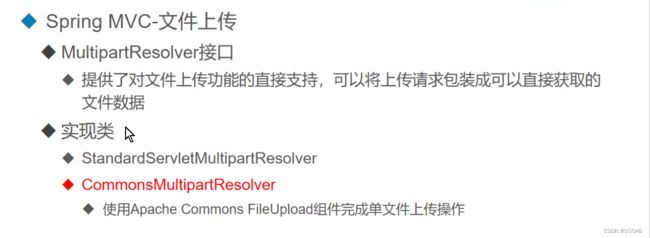
依赖jar 包


体验
在 pom.xml 中导入jar包
<dependency>
            <groupId>commons-io</groupId>
            <artifactId>commons-io</artifactId>
            <version>2.2</version>
        </dependency>
        <dependency>
            <groupId>commons-fileupload</groupId>
            <artifactId>commons-fileupload</artifactId>
            <version>1.3.2</version>
        </dependency>
然后在页面编写
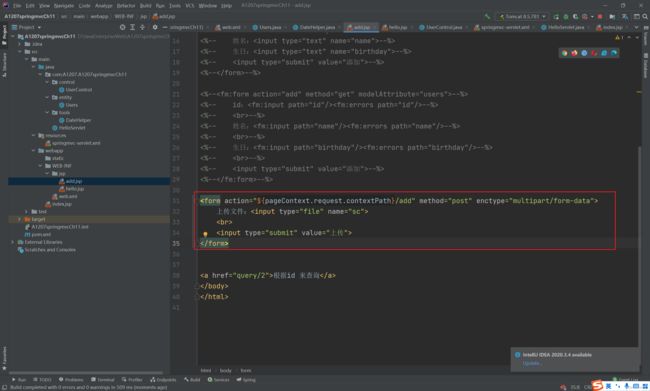
<form action="${pageContext.request.contextPath}/add" method="post" enctype="multipart/form-data">
    上传文件:<input type="file" name="sc">
    <br>
    <input type="submit" value="上传">
</form>
然后到 springmvc-servlet.xml 中设置文件大小和文件类型(图片还是文本)

我这里只设置文件上传大小
    <bean id="multipartResolver" class="org.springframework.web.multipart.commons.CommonsMultipartResolver">
        <property name="maxUploadSize" value="500000"/>
    </bean>
再到控制层编写
// 因为文件上传是 post 请求所以这里用 PostMapping
@PostMapping("/add")
    public String add(@RequestParam(value = "sc") MultipartFile file) throws IOException {
   		 // 获取文件名称
        System.out.println("文件名称"+file.getOriginalFilename());
        // 获取文件大小
        System.out.println("文件大小"+file.getSize());
        // 获取文件类型
        System.out.println("文件类型"+file.getContentType());
        // 新建文件对象,传一个路径 + 文件名称
        File file1 = new File("D:\\JavaEnterpriseWeb\\A1207springmvcCh11\\src\\main\\webapp\\static\\"+file.getOriginalFilename());
        // 文件上传
        file.transferTo(file1);
        // 返回页面
        return "hello";
    }

如果是多文件上传就在外面加上 for ,接受的是数组
演示
这里为了方便,就多添加一个 input
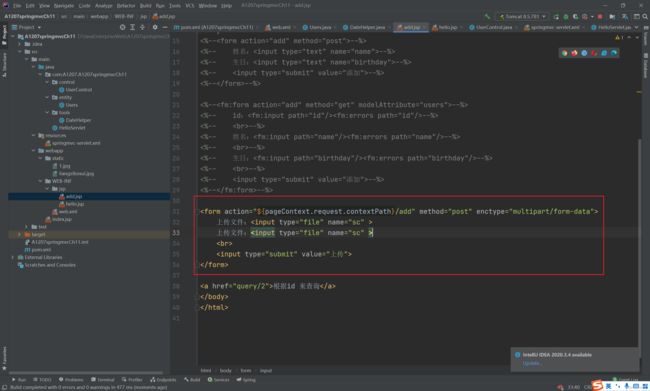
<form action="${pageContext.request.contextPath}/add" method="post" enctype="multipart/form-data">
    上传文件:<input type="file" name="sc" id="aa">
    上传文件:<input type="file" name="sc" id="bb">
    <br>
    <input type="submit" value="上传">
</form>
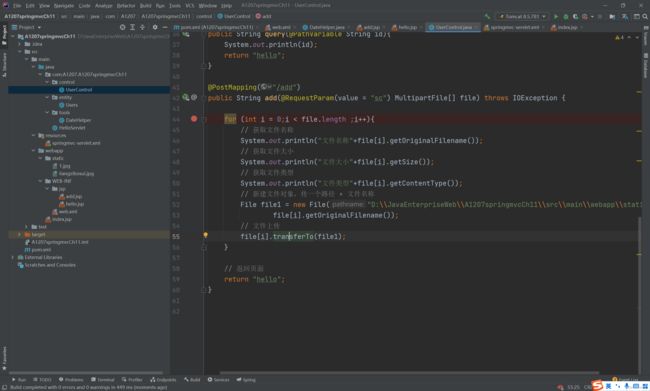
    @PostMapping("/add")
    public String add(@RequestParam(value = "sc") MultipartFile[] file) throws IOException {

        for (int i = 0;i < file.length ;i++){
            // 获取文件名称
            System.out.println("文件名称"+file[i].getOriginalFilename());
            // 获取文件大小
            System.out.println("文件大小"+file[i].getSize());
            // 获取文件类型
            System.out.println("文件类型"+file[i].getContentType());
            // 新建文件对象,传一个路径 + 文件名称
            File file1 = new File("D:\\JavaEnterpriseWeb\\A1207springmvcCh11\\src\\main\\webapp\\static\\"+
                    file[i].getOriginalFilename());
            // 文件上传
            file[i].transferTo(file1);
        }

        // 返回页面
        return "hello";
    }
Spring MVC扩展和SSM框架整合
JSON数据的传递处理
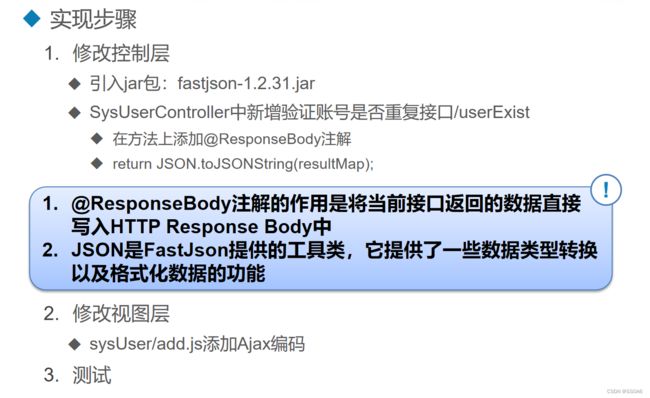

直接把返回结果添加到response 头文件中,不经过视图解释器
@ResponseBody
演示
先导入jar包
 <dependency>
            <groupId>com.alibaba</groupId>
            <artifactId>fastjson</artifactId>
            <version>2.0.7</version>
        </dependency>
编写页面
<%--
  Created by IntelliJ IDEA.
  User: SSOA
  Date: 2022/8/8
  Time: 8:37
  To change this template use File | Settings | File Templates.
--%>
<%@ page contentType="text/html;charset=UTF-8" language="java" %>
<%@ taglib prefix="fm" uri="http://www.springframework.org/tags/form" %>
<html>
<head>
    <title>Title</title>
    <script src="statics/js/jquery-1.8.2.min.js"></script>

    <script>
        function exitsName (){
            var name = $("#name").val()
            $.ajax({
                url:"exitsName?name="+name,
                type:"json",
                success:function (res){
                    if (res.check){
                        $("#ts").text("用户名可用")
                    }else{
                        $("#ts").text("用户名不可用")
                    }
                }
            })
        }

            function queryById(){
                $.ajax({
                    url:"queryById",
                    type: "json",
                    success:function (res){
                        $("#xs").text(res);
                    }
                })
            }

    </script>
</head>
<body>
<%--<form action="add" method="post">--%>
<%--    姓名:<input type="text" name="name">--%>
<%--    生日:<input type="text" name="birthday">--%>
<%--    <input type="submit" value="添加">--%>
<%--</form>--%>

<%--<fm:form action="add" method="get" modelAttribute="users">--%>
<%--    id:<fm:input path="id"/><fm:errors path="id"/>--%>
<%--    <br>--%>
<%--    姓名:<fm:input path="name"/><fm:errors path="name"/>--%>
<%--    <br>--%>
<%--    生日:<fm:input path="birthday"/><fm:errors path="birthday"/>--%>
<%--    <br>--%>
<%--    <input type="submit" value="添加">--%>
<%--</fm:form>--%>

<%--<form action="${pageContext.request.contextPath}/add" method="post" enctype="multipart/form-data">--%>
<%--    上传文件:<input type="file" name="sc" id="aa">--%>
<%--    上传文件:<input type="file" name="sc" id="bb">--%>
<%--    <br>--%>
<%--    <input type="submit" value="上传">--%>
<%--</form>--%>

<form action="add">
    姓名:<input type="text" name="name" id="name" onblur="exitsName()"/><span id="ts"></span><br>
    生日:<input type="text" name="birthday"/><br>

    <input type="submit" value="注册">
</form>

<a href="queryById" onclick="queryById()">根据id 来查询</a>

<div id="xs">

</div>
</body>
</html>
在 springmvc-servlet 添加静态路径映射
<?xml version="1.0" encoding="UTF-8"?>
<beans xmlns="http://www.springframework.org/schema/beans"
       xmlns:xsi="http://www.w3.org/2001/XMLSchema-instance" xmlns:aop="http://www.springframework.org/schema/aop"
       xmlns:p="http://www.springframework.org/schema/p" xmlns:mvc="http://www.springframework.org/schema/mvc"
       xmlns:context="http://www.springframework.org/schema/context"
       xsi:schemaLocation="http://www.springframework.org/schema/beans
    http://www.springframework.org/schema/beans/spring-beans.xsd http://www.springframework.org/schema/aop https://www.springframework.org/schema/aop/spring-aop.xsd http://www.springframework.org/schema/mvc https://www.springframework.org/schema/mvc/spring-mvc.xsd http://www.springframework.org/schema/context https://www.springframework.org/schema/context/spring-context.xsd">
<!--    开启mvc注解-->
    <mvc:annotation-driven/>
<!--    ioc 注解-->
    <context:component-scan base-package="com.A1207.A1207springmvcCh11.control"/>
<!--    静态路径映射-->
    <mvc:resources mapping="/statics/**" location="/statics/"/>
<!--    视图解析器-->
    <bean class="org.springframework.web.servlet.view.InternalResourceViewResolver">
        <property name="prefix" value="/WEB-INF/jsp/"/>
        <property name="suffix" value=".jsp"/>
    </bean>

<!--    设置上传文件的大小-->
    <bean id="multipartResolver" class="org.springframework.web.multipart.commons.CommonsMultipartResolver">
        <property name="maxUploadSize" value="500000"/>
    </bean>


</beans>
编写控制层
package com.A1207.A1207springmvcCh11.control;

import com.A1207.A1207springmvcCh11.entity.Users;
import com.alibaba.fastjson.JSON;
import org.springframework.stereotype.Controller;
import org.springframework.ui.Model;
import org.springframework.validation.BindingResult;
import org.springframework.web.bind.annotation.*;
import org.springframework.web.multipart.MultipartFile;

import javax.validation.Valid;
import java.awt.font.MultipleMaster;
import java.io.File;
import java.io.IOException;
import java.util.Date;

@Controller
public class UserControl {

    @RequestMapping("/toAdd")
    public String toAdd(@ModelAttribute(value = "users") Users users, Model model){
//        model.addAttribute("user",u);
        return "add";
    }

    @RequestMapping("/add")
    public String add(@Valid Users u, BindingResult br,Model m) {
        if (br.hasErrors()){// 校验是否通过
//            m.addAttribute("user",this.u);
            System.out.println(br.getModel());
            return "add";
        }
        System.out.println(u);
        return "hello";
    }

    @RequestMapping("/query/{id}")
    public String query(@PathVariable String id){
        System.out.println(id);
        return "hello";
    }

    @PostMapping("/add")
    public String add(@RequestParam(value = "sc") MultipartFile[] file) throws IOException {

        for (int i = 0;i < file.length ;i++){
            // 获取文件名称
            System.out.println("文件名称"+file[i].getOriginalFilename());
            // 获取文件大小
            System.out.println("文件大小"+file[i].getSize());
            // 获取文件类型
            System.out.println("文件类型"+file[i].getContentType());
            // 新建文件对象,传一个路径 + 文件名称
            File file1 = new File("D:\\JavaEnterpriseWeb\\A1207springmvcCh11\\src\\main\\webapp\\static\\"+
                    file[i].getOriginalFilename());
            // 文件上传
            file[i].transferTo(file1);
        }

        // 返回页面
        return "hello";
    }

    // 验证用户名是否可用
    @RequestMapping("/exitsName")
    @ResponseBody // 直接把返回结果添加到response 头文件中,不经过视图解释器
    public String exits(@RequestParam String name){
        if ("a1207".equals(name)){// 不可用
            // {"check":true}
            return "{\"check\":false}";
        }else {// 可用
            return "{\"check\":true}";
        }
    }

    @RequestMapping("/queryById")
    @ResponseBody
    public String queryById(){
        Users u = new Users();
        u.setId(1);
        u.setName("张三");
        u.setBirthday(new Date());
        return JSON.toJSONString(u);
    }

}
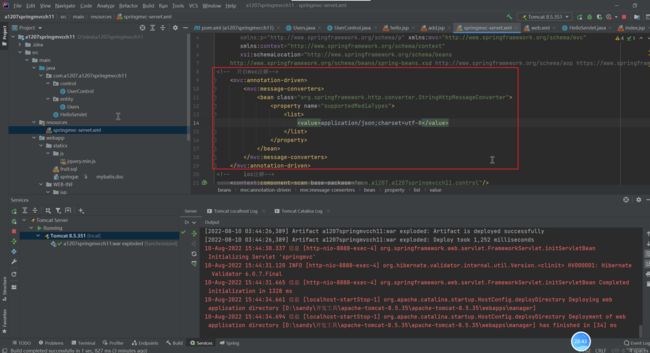
JSON数据传递过程中的中文乱码和日期问题
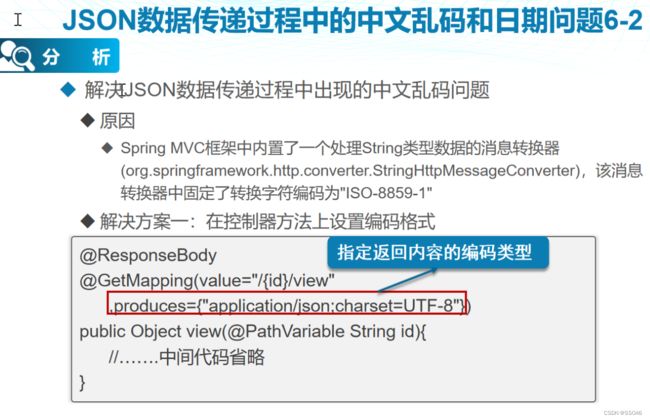

解决中文乱码
第一种写法


这里是不行的,必须要 res.什么 才可以


第二种方法

这个也可以

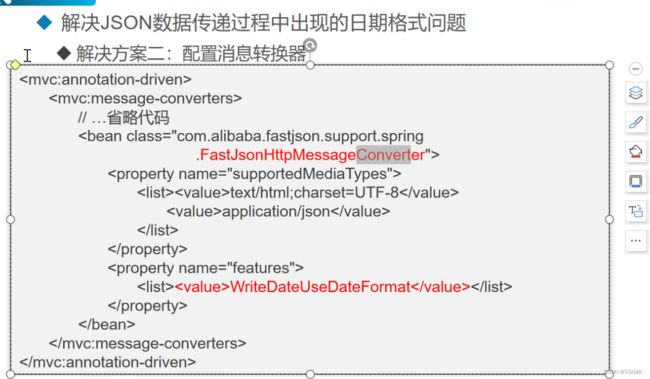
解决日期乱码问题

第一种


第二种方法(这里版本问题就不演示了)
我的版本
IntelliJ IDEA 2020.3.1 (Ultimate Edition)
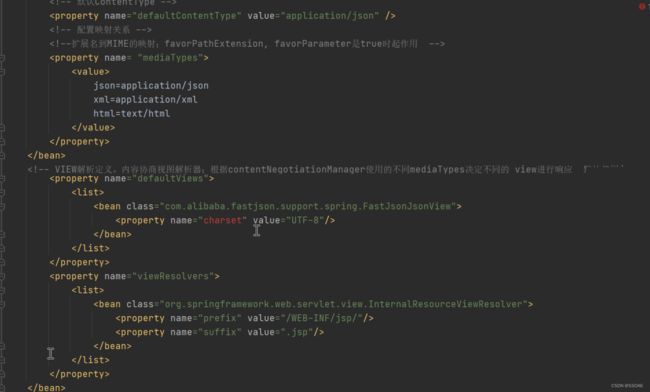
多视图解释器


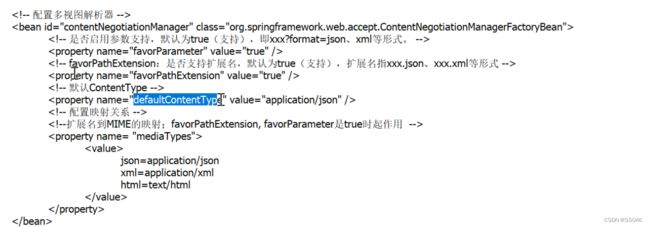
多视图解释器
 <bean id="contentNegotiationManager" class="org.springframework.web.accept.ContentNegotiationManagerFactoryBean">
        <!-- 是否启用参数支持,默认为true(支持),即xxx?format=json、xml等形式。 -->
        <property name="favorParameter" value="true" />
        <!-- favorPathExtension:是否支持扩展名,默认为true(支持),扩展名指xxx.json、xxx.xml等形式 -->
        <property name="favorPathExtension" value="true" />
        <!-- 默认ContentType -->
        <property name="defaultContentType" value="application/json" />
        <!-- 配置映射关系 -->
        <!--扩展名到MIME的映射;favorPathExtension, favorParameter是true时起作用  -->
        <property name= "mediaTypes">
            <value>
                json=application/json
                xml=application/xml
                html=text/html
            </value>
        </property>
    </bean>
    <!-- VIEW解析定义。内容协商视图解析器;根据contentNegotiationManager使用的不同mediaTypes决定不同的 view进行响应  默认使用json-->
    <bean class="org.springframework.web.servlet.view.ContentNegotiatingViewResolver">
        <!-- 内容协商管理器 用于决定media type -->
        <property name="contentNegotiationManager" ref="contentNegotiationManager"/>
        <!-- 默认视图 解析 -->
        <property name="defaultViews">
            <list>
                <bean class="com.alibaba.fastjson.support.spring.FastJsonJsonView">
<!--                    <property name="charset" value="UTF-8"/>-->
                </bean>
            </list>
        </property>
        <property name="viewResolvers">
            <list>
                <bean class="org.springframework.web.servlet.view.InternalResourceViewResolver">
                    <property name="prefix" value="/WEB-INF/jsp/"/>
                    <property name="suffix" value=".jsp"/>
                </bean>
            </list>
        </property>
    </bean>
Spring MVC框架中的数据格式转换


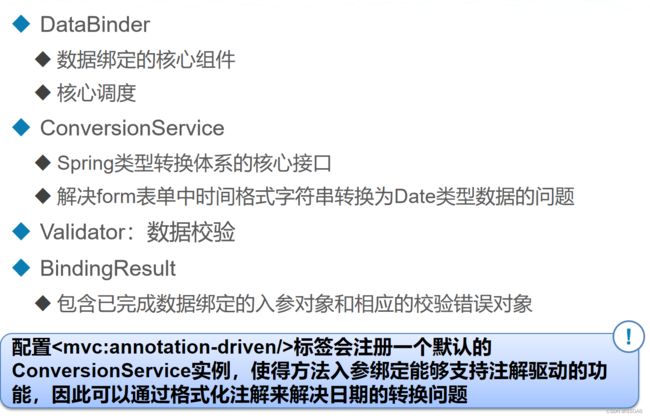
编写自定义转换器


我们一开始用的是这个注解
这个是入参格式设置

SSM整合


具体项目见 Spring+springmvc+mybatis 文章
分页框架
分页插件 pageHelper
导入jar 包
 <dependency>
            <groupId>com.github.pagehelpergroupId>
            <artifactId>pagehelperartifactId>
            <version>5.1.4version>
        dependency>
添加配置
mybatis-config.xml


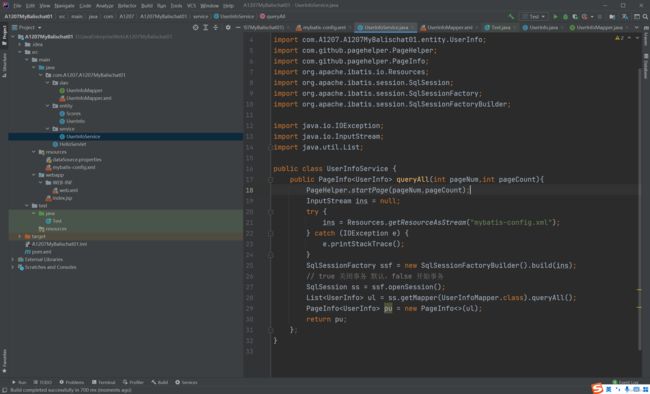

拦截器
新建拦截器类
interceptor 包
SysInterceptor 类
然后继承 HandlerInterceptorAdapter 有一个横杠是因为这个拦截器不建议使用,有更好的方法
然后重写 preHandle 方法
这里面判断作用域中有没有用户,没有的话进行拦截,并跳转到 403页面

然后再 springmvc-servlet.xml 里面添加 拦截器配置
path 设置拦截的路径
bean class 设置使用那个拦截器类
    <mvc:interceptors>
        <mvc:interceptor>
            <mvc:mapping path="/manager/backend/**"/>
            <bean class="com.A1207.A1207Game.interceptor.SysInterceptor"/>
        mvc:interceptor>
    mvc:interceptors>