深度神经网络TensorFlow基础学习(1)
继续人工智能和神经网络的学习后,我们开始深度学习的入门。回顾神经网路
Udacity Tensorflow Learning是一个比较好的基础课,推荐给大家。
np.argmax() 获得最大索引
手写数字识别里面的标准数据库是美国国家标准与技术研究院(National Institute of Standards and Technology,即 MNIST 中 的 NIST)提供的。
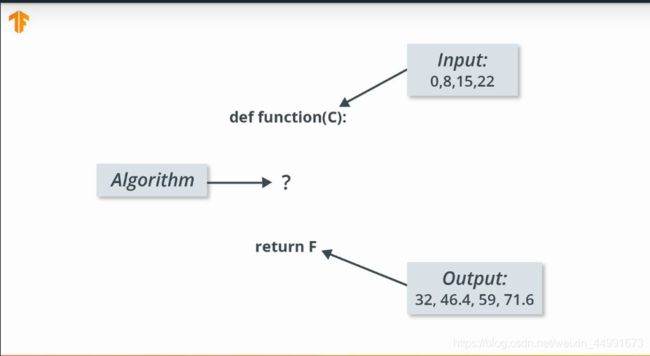
温度单位转换
| 输入 | 输出 |
|---|---|
| 0 | 32 |
| 8 | 46.4 |
| 15 | 59 |
| 22 | 71.6 |
| 32 | ? |
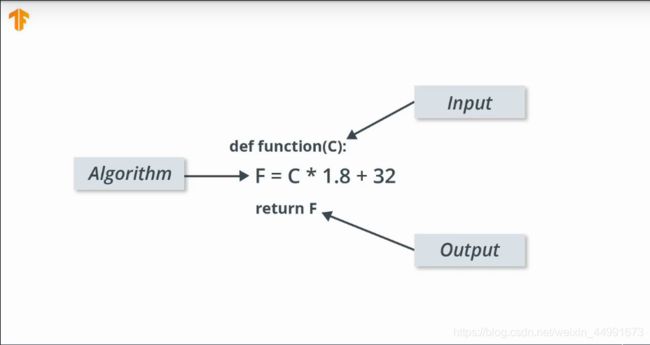
我们思考的角度是已知输入输出的数据如何确定这其中的函数关系,传统计算机编程则是知道输入数据编写相应的逻辑得到输出结果。


AttributeError解决方案
(base) warmtree@warmtree-HP-Pavilion-Laptop-15-cc5xx:~/下载/M1_ComputerVision/La$ python Celsius2Fahrenheit.py
Traceback (most recent call last):
  File "Celsius2Fahrenheit.py", line 2, in <module>
    tf.compat.v1.logging.set_verbosity(tf.logging.ERROR)
AttributeError: module 'tensorflow' has no attribute 'logging'
(base) warmtree@warmtree-HP-Pavilion-Laptop-15-cc5xx:~/下载/M1_ComputerVision/La$ python Celsius2Fahrenheit.py
-40.0 degree celsius = -40.0 degree Fahrenheit
-10.0 degree celsius = 14.0 degree Fahrenheit
0.0 degree celsius = 32.0 degree Fahrenheit
8.0 degree celsius = 46.0 degree Fahrenheit
15.0 degree celsius = 59.0 degree Fahrenheit
22.0 degree celsius = 72.0 degree Fahrenheit
38.0 degree celsius = 100.0 degree Fahrenheit
特征:模型的输入
样本:用于训练流程的输入/输出对
标签:模型的输出
层级:神经网络中相互连接的节点集合。
模型:神经网络的表示法
密集全连接层 (FC):一个层级中的每个节点都与上个层级中的每个节点相连。
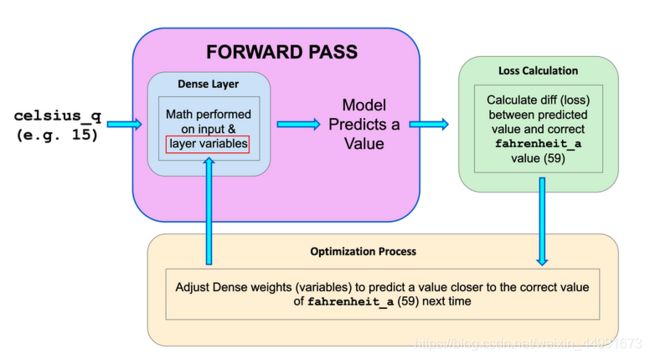
权重和偏差:模型的内部变量
损失:期望输出和真实输出之间的差值
MSE:均方误差,一种损失函数,它会将一小部分很大的差值视作比大量很小的差值更糟糕。
梯度下降法:每次小幅调整内部变量,从而逐渐降低损失函数的算法。
优化器:梯度下降法的一种具体实现方法。(有很多算法。在这门课程中,我们将仅使用“Adam”优化器,它是 ADAptive with Momentum 的简称,并且被视为最佳优化器。)
学习速率:梯度下降过程中的损失改进“步长”。
批次:在训练神经网络的过程中使用的一组样本。
周期:完全经过整个训练数据集一轮
前向传播:根据输入计算输出值
反向传播:根据优化器算法计算内部变量的调整幅度,从输出层级开始,并往回计算每个层级,直到抵达输入层。
一个简单的练习,用来熟悉Tensorflow的使用方法。
import tensorflow as tf
from tensorflow import keras
tf.compat.v1.logging.set_verbosity(tf.compat.v1.logging.ERROR)

import numpy as np

celsius_q = np.array([-40,-10,0,8,15,22,38],dtype = float)
fahrenheit_a=np.array([-40,14,32,46,59,72,100],dtype = float)

for i,c in enumerate(celsius_q):
	print("{} degree celsius = {} degree Fahrenheit".format(c,fahrenheit_a[i]))

l0 = tf.keras.layers.Dense(units=1, input_shape=[1])
model = tf.keras.Sequential([l0])
model.compile(loss='mean_squared_error', optimizer=tf.keras.optimizers.Adam(0.1))
history = model.fit(celsius_q, fahrenheit_a, epochs=500, verbose=False)
model.predict([100.0])
但是这里面没有出来结果,好烦(
2020-03-19 20:27:29.106580: I tensorflow/core/platform/cpu_feature_guard.cc:142] Your CPU supports instructions that this TensorFlow binary was not compiled to use: AVX2 FMA
2020-03-19 20:27:29.131101: I tensorflow/core/platform/profile_utils/cpu_utils.cc:94] CPU Frequency: 2699905000 Hz
2020-03-19 20:27:29.131974: I tensorflow/compiler/xla/service/service.cc:168] XLA service 0x5562f9bed4f0 executing computations on platform Host. Devices:
2020-03-19 20:27:29.132059: I tensorflow/compiler/xla/service/service.cc:175]   StreamExecutor device (0): Host, Default Version
解决方法为Set environment variables before running.
Windows:
$ set TF_CPP_MIN_LOG_LEVEL=2
Linux/MacOS:
$ export TF_CPP_MIN_LOG_LEVEL=2
In general,when we do machine learning,we just try different neural networks with different numbers of layers and neurons in a trial and error away,
