COCO_04 展示COCO格式数据集 目标框与分割mask
文章目录
- 1 前言
- 2 绘制GT
-
- 2.1 绘制目标框与类别
- 2.2 绘制分割mask
- 3 Appendix
-
- A. mask polygon格式转化为图片格式
- 参考
1 前言
上篇文章介绍了如何制作COCO个数数据集的Dataset与Dataloader,并绘制了dataloader->batch的返回的信息,https://blog.csdn.net/qq_44776065/article/details/128698022,接下来我们直接根据标注文件来绘制标注信息,来更好的认识数据集以及其操作方法
2 绘制GT
指定标注文件以及数据集根路径之后,按照图片索引展示标注
创建COCO数据集对象
from pycocotools import mask as coco_mask
from pycocotools.coco import COCO

def get_COCO(dataset_root, anno_file):
    anno_path = os.path.join(dataset_root, anno_file)
    anno = COCO(anno_path)
    return anno
    pass

if __name__ == "__main__":
    dataset_root = r"D:\Learning\OCT\oct-dataset-master\dataset\dataset_stent_coco"
    anno_file = r"P13_1_IMG002_annotations.json"
    coco = get_COCO(dataset_root, anno_file)

    # show_bbox(coco, index=1, cat_id=2, dataset_root=dataset_root)
    show_seg(coco, index=1, cat_id=2, dataset_root=dataset_root, alpha=0.5)

    pass
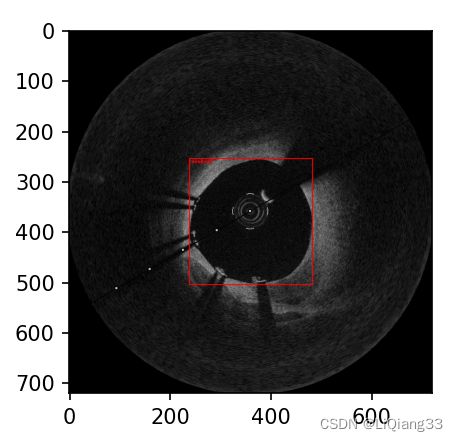
2.1 绘制目标框与类别
在获取bbox信息之后,根据坐标绘制矩形框即可,一个图像的标注含有1到多个bbox,需要逐个绘制
绘制目标框使用PIL.ImageDraw,绘制目标框有两种方式ImageDraw.rectangle()和ImageDraw.line
使用ImageDraw.rectangle()无法指定边界颜色来表示种类
使用ImageDraw.line()可以指定颜色来表示种类,更加灵活
Code:
anno:COCO标注对象index:图片索引cat_id:种类dataset_root:数据集根路径
# 绘制图片中某类的bbox
def show_bbox(anno, index, cat_id, dataset_root):
    image_ids = anno.getImgIds()
    image_id = image_ids[index]

    # 加载图片
    image_filename = anno.loadImgs(image_id)[0]["file_name"]
    image_filepath = os.path.join(dataset_root, image_filename)
    img = Image.open(image_filepath).convert('RGB')

    # 加载标注
    ann_ids = anno.getAnnIds(imgIds=image_id, catIds=cat_id)
    annos = anno.loadAnns(ann_ids)

    # 获取类别
    cat = anno.loadCats(cat_id)

    # 创建绘制对象
    draw = ImageDraw.Draw(img)

    # 绘制标签
    for ann in annos:
        x, y, w, h = ann["bbox"]
        x_min, y_min, x_max, y_max = x, y, int(x + w), int(y + h)

        # 1 绘制矩形
        # draw.rectangle((x_min, y_min, x_max, y_max), width=1)   # 不用fill参数, 会填充区域

        # 2 绘制直线
        # 确定四个点
        left_top , left_bottom, right_top, right_bottom = (x, y), (x, y+h), (x+w, y), (x+w, y+h)
        draw.line([left_top, left_bottom, right_bottom, right_top, left_top], fill="red", width=2)
        draw.text((x_min, y_min), cat[0]["name"], fill="red")

    plt.imshow(img)    # 默认为RGB空间
    plt.show()
    ...
指定类别为1的效果:
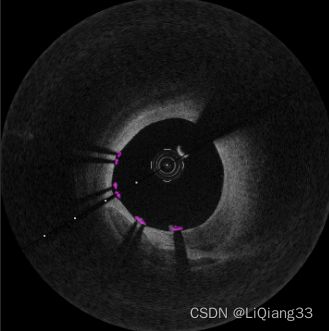
2.2 绘制分割mask
与bbox一样,一个图片的标注含有多个mask,遍历每个mask进行绘制
绘制过程为:将mask前景转换为bool类型的矩阵,对图片含有目标前景的部分进行颜色赋值;本此使用的数据集均无重叠目标
透明mask的实现方法:img = img * (1 - alpha) + img_copy * alpha
根据种类cats定义颜色的RGB:color ={"1": (255, 255, 0), "2": (255, 0, 255)},可以根据自己的种类定义颜色
def show_seg(anno, index, cat_id, dataset_root, color ={"1": (255, 255, 0), "2": (255, 0, 255)}, alpha=0.5):
    image_ids = anno.getImgIds()
    image_id = image_ids[index]

    # 加载图片
    image_filename = anno.loadImgs(image_id)[0]["file_name"]
    image_path = os.path.join(dataset_root, image_filename)
    img = Image.open(image_path).convert('RGB')

    # 加载类别
    cats = anno.loadCats(cat_id)

    # 加载标注
    anno_ids = anno.getAnnIds(image_id, cat_id)
    anns = anno.loadAnns(anno_ids)

    # 处理mask, 保存为数组
    img_w, img_h = img.size   # 获取图片大小, w与h
    cats, masks = [], []    # 存储每个obj信息
    for ann in anns:
        cats.append(ann["category_id"])
        polygons = ann["segmentation"]
        # 转化为rle,再转化为mask, mask维度为3 [h, w, 1]
        rles = coco_mask.frPyObjects(pyobj=polygons, h=img_h, w=img_w)
        mask = coco_mask.decode(rles)
        # 降低维度, 转化为2值图像
        mask = np.squeeze(mask, axis=2)
        masks.append(mask)

    # 转化为numpy数组
    if masks:
        masks = np.stack(masks, axis=0)
    else:
        masks = np.zeros((0, img_h, img_w), dtype=np.uint8)   # uint8类型图像

    masks = np.where(masks > 0.5, True, False)

    # 不同颜色显示
    img = np.array(img)   # 一份拷贝
    img_to_draw = np.copy(img)

    # 按照obj个数绘制, 颜色数不好确定
    # colors = [(255, 255, 0), (0, 255, 255), (255, 176, 8), (123, 232, 78), (23, 234, 111), (132, 231, 232)]
    # for mask, color in zip(masks, colors):
    #     img_to_draw[mask] = color

    # 怎么与cats类别信息结合
    for mask, cat in zip(masks, cats):
        img_to_draw[mask] = color[str(cat)]

    img = img * (1 - alpha) + img_to_draw * alpha
    out = np.array(img, dtype=np.uint8)  # 需要转化为uint8进行保存

    # img_save = Image.fromarray(img)
    # img_save.save(f"./test_cat{cat_id}.png")

    plt.imshow(out)   # 展示彩色图像
    plt.show()
指定为2的效果
3 Appendix
A. mask polygon格式转化为图片格式
从标注中获取polygon数据,将其转化为rle格式,再将rle格式转化为mask,对前景mask进行转化:[h, w, c]->[h, w] c只有一个维度,最后合并为numpy.ndarray
cats, masks = [], []    # 存储每个obj信息
for ann in anns:
    cats.append(ann["category_id"])
    polygons = ann["segmentation"]
    # 转化为rle,再转化为mask, mask维度为3 [h, w, 1]
    rles = coco_mask.frPyObjects(pyobj=polygons, h=img_h, w=img_w)
    mask = coco_mask.decode(rles)
    # 降低维度, 转化为2值图像
    mask = np.squeeze(mask, axis=2)
    masks.append(mask)

# 转化为numpy数组
if masks:
    masks = np.stack(masks, axis=0)
else:
    masks = np.zeros((0, img_h, img_w), dtype=np.uint8)
注意:对于mask处理常常将其转化为bool数组masks = np.where(masks > 0.5, True, False)
参考
COCO数据集介绍:https://blog.csdn.net/qq_37541097/article/details/113247318