Spring cloud alibaba--Seata分布式事务
目录
1.Seata是什么
1.1seata的三大角色
1.2分布式事务理论基础
1.3AT模式(auto transcation)
1.4TCC模式(Try Confirm Cancel)
2.Seata的AT模式
3.Seata快速开始
3.1db存储模式+Nacos(注册&配置中心)部署
4.Seata Client快速开始
4.1创建一个订单系统工程
4.2创建一个库存系统工程
4.3启动系统,访问接口,测试数据
4.4@Transactional事务,系统执行异常
4.5搭建Seata客户端
4.6Seata运行原理
1.Seata是什么
Seate是一款开源的分布式事务解决方案,致力于提供高性能和简单易用的分布式事务服务。Seate将为用户提供了AT、TCC、SAGA和XA事务模式,为用户打造一站式的分布式解决方案。AT模式是阿里首推的模式。
1.1seata的三大角色
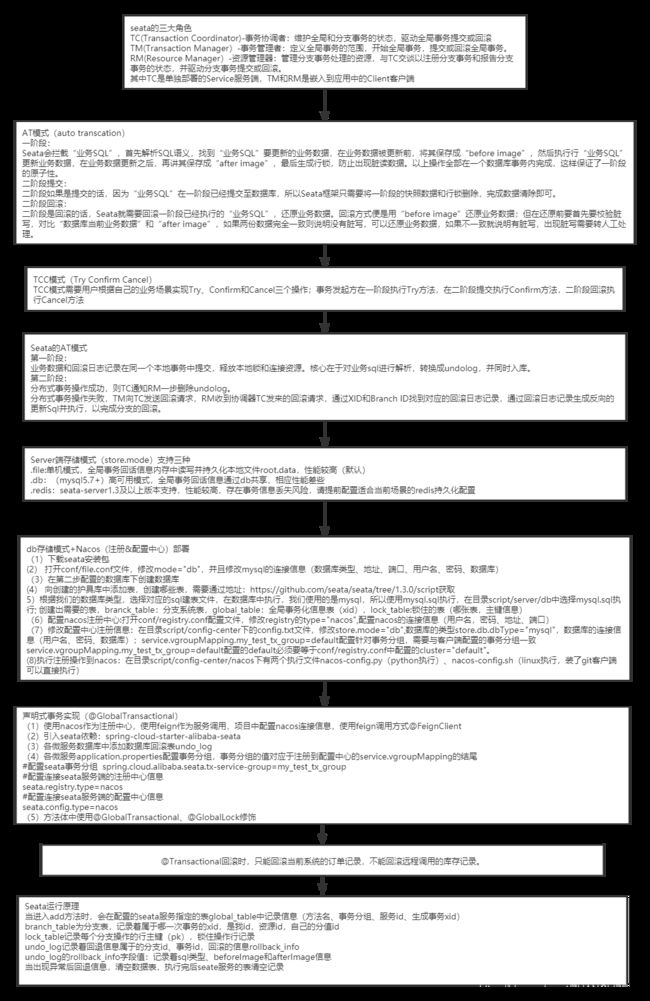
TC(Transaction Coordinator)-事务协调者:维护全局和分支事务的状态,驱动全局事务提交或回滚
TM(Transaction Manager)-事务管理者:定义全局事务的范围,开始全局事务,提交或回滚全局事务。
RM(Resource Manager)-资源管理器:管理分支事务处理的资源,与TC交谈以注册分支事务和报告分支事务的状态,并驱动分支事务提交或回滚。
其中TC是单独部署的Service服务端,TM和RM是嵌入到应用中的Client客户端。
1.2分布式事务理论基础
解决分布式事务,也有相应的规范和协议。分布式事务相关的协议有2PC、3PC。目前绝大多数分布式事务解决方案都是以两阶段提交协议2PC为基础的。
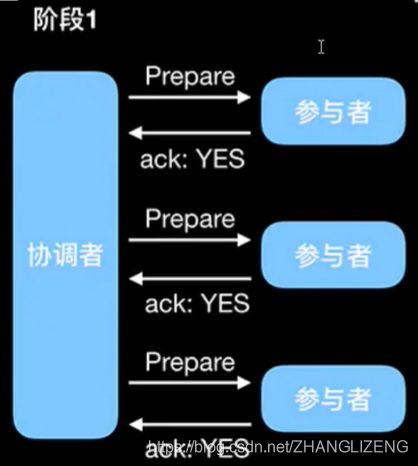
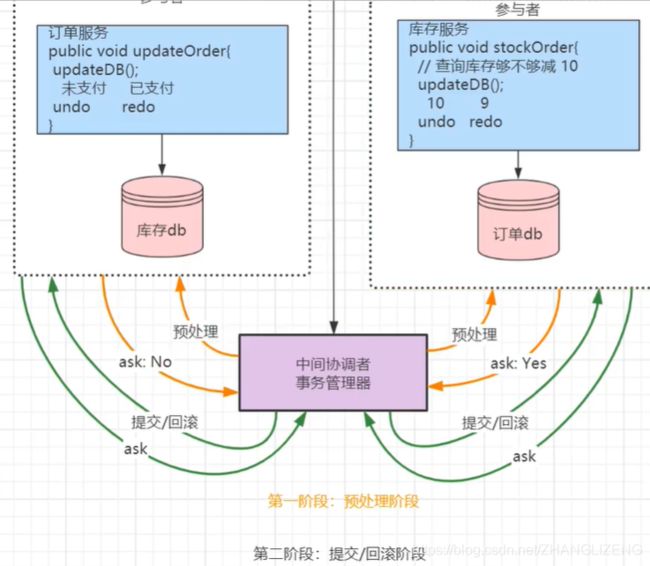
2PC两阶段提交协议:分为两个阶段,Prepare和Commit
Prepare:提交事务请求
基本流程如下:
(1)询问:协调者向所有参与者发送事务请求,询问是否可执行事务操作,然后等待各个参与者响应。
(2)执行:各个参与者接收到协调者事务请求后,执行事务操作(例如更新一个关系型数据库表的记录),并将Undo和Redo信息记录事务日志中。
(3)响应 :如果参与者成功执行了事务并写入Undo和Redo信息,则向协调者返回YES响应,否则返回NO响应。当然,餐椅这也可能宕机,从而不会返回响应
Commit:执行事务提交
基本流程:
(1)commit请求:协调者向所有参与者发送Commit请求。
(2)事务提交:参与者收到Commit请求后,执行事务提交,提交完成后释放事务执行期占用的所有资源。
(3)返回结果:参与制执行事务提交后向协调者发送Ack响应。
(4)完成事务:接收大奥所有参与者的Ack响应后,完成事务提交。
中断事务:
在执行Prepare步骤过程中,如果某些参与者执行事务失败、宕机或与协调者之间的网络中断,那么协调者就无法接收到所有参与者的YES响应,或者某个参与者返回了NO响应,此时,协调者就会进入回退流程,对事务进行回退。
1.3AT模式(auto transcation)
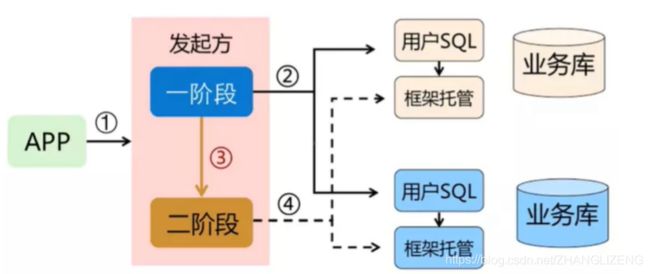
AT模式是一种无侵入的分布式事务解决方案。阿里Seata框架,实现了该模式。在AT模式下,用户只需关注自己的“业务SQL”,用户的“业务SQL”作为一阶段,Seata框架会自动生成事务的二阶段提交和回滚操作。
AT模式如何做到对业务的无侵入:
一阶段:
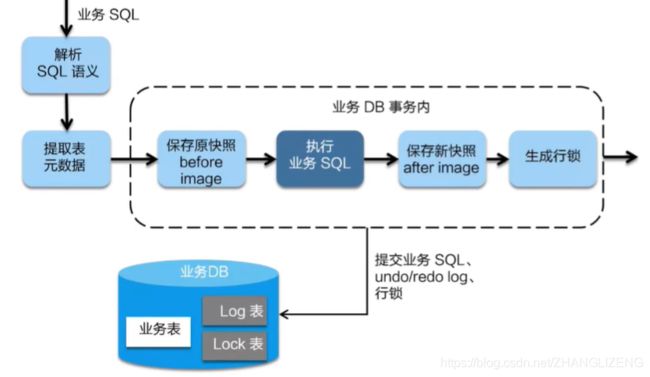
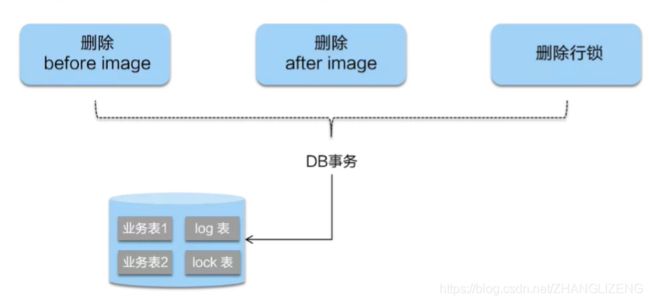
Seata会拦截“业务SQL”,首先解析SQL语义,找到“业务SQL”要更新的业务数据,在业务数据被更新前,将其保存成“before image”,然后执行行“业务SQL”更新业务数据,在业务数据更新之后,再讲其保存成“after image”,最后生成行锁,防止出现脏读数据。以上操作全部在一个数据库事务内完成,这样保证了一阶段的原子性。
二阶段提交:
二阶段如果是提交的话,因为“业务SQL”在一阶段已经提交至数据库,所以Seata框架只需要将一阶段的快照数据和行锁删除,完成数据清除即可。
二阶段回滚:
二阶段是回滚的话,Seata就需要回滚一阶段已经执行的“业务SQL”,还原业务数据。回滚方式便是用“before image”还原业务数据;但在还原前要首先要校验脏写,对比“数据库当前业务数据”和“after image”,如果两份数据完全一致则说明没有脏写,可以还原业务数据,如果不一致就说明有脏写,出现脏写需要转人工处理。
1.4TCC模式(Try Confirm Cancel)
(1)侵入性比较强,并且得自己实现相关事务逻辑控制。
(2)在整个过程基本没有锁
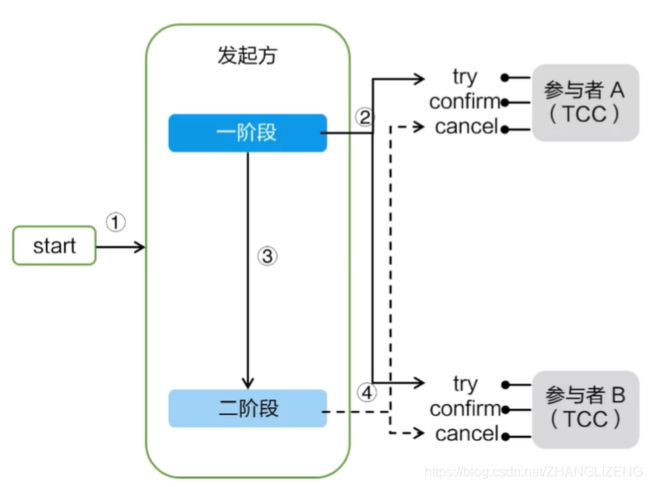
TCC模式需要用户根据自己的业务场景实现Try、Confirm和Cancel三个操作;事务发起方在一阶段执行Try方法,在二阶段提交执行Confirm方法,二阶段回滚执行Cancel方法。
2.Seata的AT模式
第一阶段:
业务数据和回滚日志记录在同一个本地事务中提交,释放本地锁和连接资源。核心在于对业务sql进行解析,转换成undolog,并同时入库。
第二阶段:
分布式事务操作成功,则TC通知RM一步删除undolog。
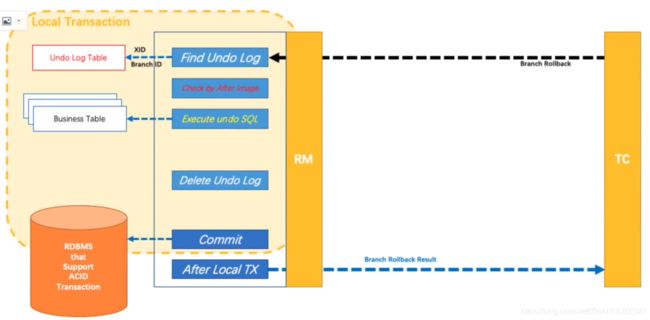
分布式事务操作失败,TM向TC发送回滚请求,RM收到协调器TC发来的回滚请求,通过XID和Branch ID找到对应的回滚日志记录,通过回滚日志记录生成反向的更新Sql并执行,以完成分支的回滚。
3.Seata快速开始
使用文档参考:https://seata.io/zh-cn/docs/ops/deploy-guide-beginner.html
Server端存储模式(store.mode)支持三种:
.file:单机模式,全局事务回话信息内存中读写并持久化本地文件root.data,性能较高(默认)
.db:(mysql5.7+)高可用模式,全局事务回话信息通过db共享,相应性能差些
.redis:seata-server1.3及以上版本支持,性能较高,存在事务信息丢失风险,请提前配置适合当前场景的redis持久化配置
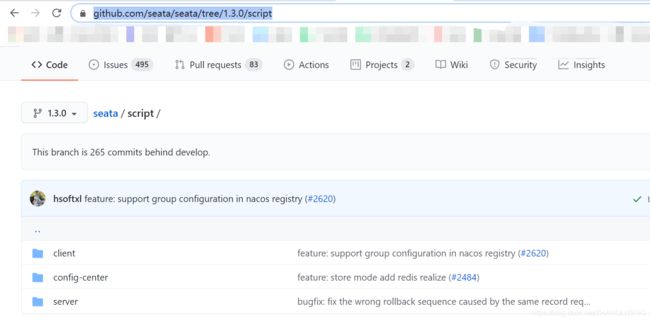
资源目录:https://github.com/seata/seata/tree/1.3.0/script
client:存放client端sql脚本,参数配置
config-center:各个配置中心参数导入脚本,config.txt(包含server和client,原名nacos-config。txt)
server:server端数据库脚本及各个容器配置
3.1db存储模式+Nacos(注册&配置中心)部署
(1)下载安装包
地址:https://github.com/seata/seata/releases
(2)解析下载的zip文件
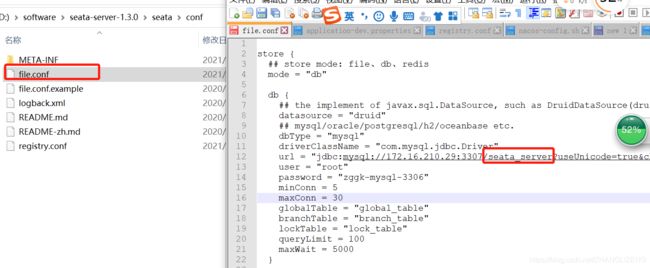
打开conf/file.conf文件,修改mode="db",并且修改mysql的连接信息(数据库类型、地址、端口、用户名、密码、数据库)
store {
  ## store mode: file、db、redis
  mode = "db"

  db {
    ## the implement of javax.sql.DataSource, such as DruidDataSource(druid)/BasicDataSource(dbcp)/HikariDataSource(hikari) etc.
    datasource = "druid"
    ## mysql/oracle/postgresql/h2/oceanbase etc.
    dbType = "mysql"
    driverClassName = "com.mysql.jdbc.Driver"
    url = "jdbc:mysql://127.0.0.1:3306/seata"
    user = "root"
    password = "root"
    minConn = 5
    maxConn = 30
    globalTable = "global_table"
    branchTable = "branch_table"
    lockTable = "lock_table"
    queryLimit = 100
    maxWait = 5000
  }

}
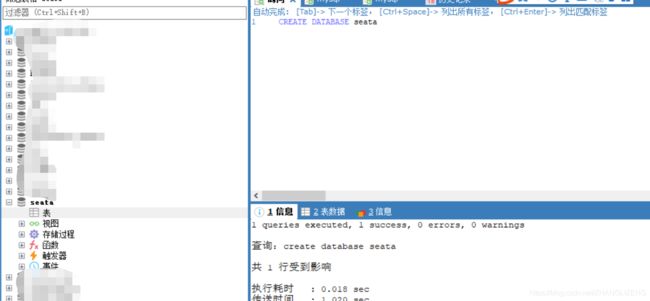
(3)在第二步配置的数据库下创建数据库
(4) 向创建的护具库中添加表,创建哪些表,需要通过地址:https://github.com/seata/seata/tree/1.3.0/script获取
直接返回1.3.0的上一级,下载这个目录
解压zip文件
把script文件整个都拷贝到seate目录下
(5)根据我们的数据库类型,选择对应的sql建表文件,在数据库中执行,我们使用的是mysql,所以使用mysql.sql执行,在目录script/server/db中选择mysql.sql执行
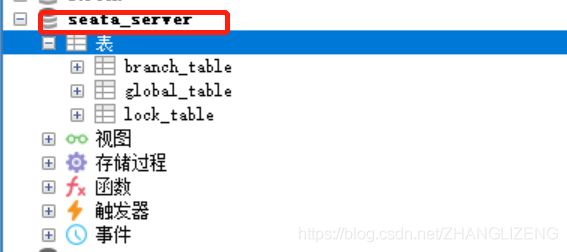
创建出需要的表,branck_table:分支系统表,global_table:全局事务化信息表(xid),lock_table:锁住的表(哪张表,主键信息)
(6)配置nacos注册中心
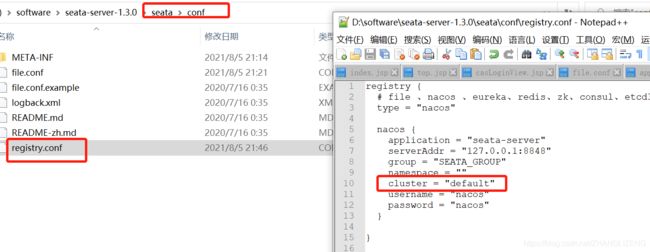
打开conf/registry.conf配置文件,修改registry的type="nacos",配置nacos的连接信息(用户名,密码、地址、端口)
registry {
  # file 、nacos 、eureka、redis、zk、consul、etcd3、sofa
  type = "nacos"

  nacos {
    application = "seata-server"
    serverAddr = "127.0.0.1:8848"
    group = "SEATA_GROUP"
    namespace = ""
    cluster = "default"
    username = "nacos"
    password = "nacos"
  }

}
(7)配置配置中心
打开conf/registry.conf配置文件,修改config的type="nacos",配置nacos的连接信息(用户名,密码、地址、端口)
config {
  # file、nacos 、apollo、zk、consul、etcd3
  type = "nacos"

  nacos {
    serverAddr = "127.0.0.1:8848"
    namespace = ""
    group = "SEATA_GROUP"
    username = "nacos"
    password = "nacos"
  }
}
(8)修改配置中心注册信息
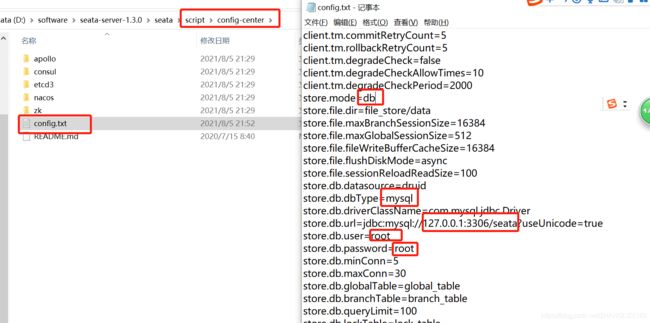
在目录script/config-center下的config.txt文件,修改store.mode="db",数据库的类型store.db.dbType="mysql",数据库的连接信息(用户名、密码、数据库)
service.vgroupMapping.my_test_tx_group=default配置针对事务分组,需要与客户端配置的事务分组一致。防止异地机房停电机制,my_test_tx_group可以自定义(Guangzhou、shanghai),对应的client也需要配置
seata.service.vgroup-mapping.projectA=Guangzhouservice.vgroupMapping.my_test_tx_group=default配置的default必须要等于conf/registry.conf中配置的cluster="default"。
(9)启动nacos服务器
(10)执行注册操作
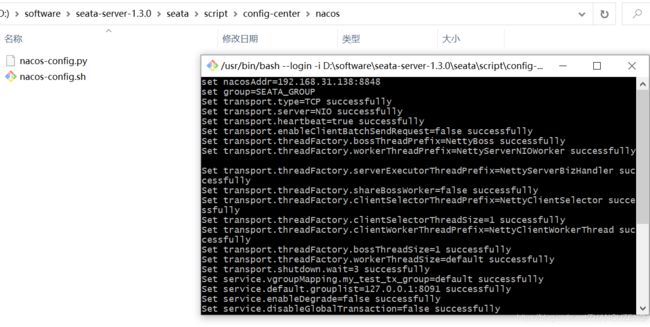
在目录script/config-center/nacos下有两个执行文件nacos-config.py(python执行)、nacos-config.sh(linux执行,装了git客户端可以直接执行)
双击nacos-config.sh执行
若是nacos的连接信息不是本地,可以编辑nacos-config.sh文件,配置nacos连接信息
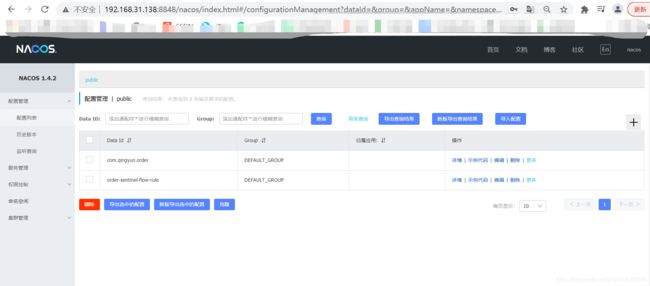
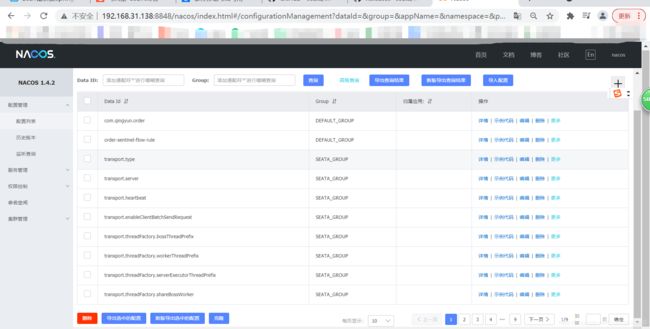
执行完成后,这些配置信息已经注册到我们的nacos服务列表
注册的内容一条记录对应我们config.txt的一行记录
(11)启动seate服务
在bin/seata.bat双击启动服务,为了后续方便,我们还是把数据库由seata改为seata_server
修改数据库名为seate_server
在conf/file.conf中修改数据库为seate_server
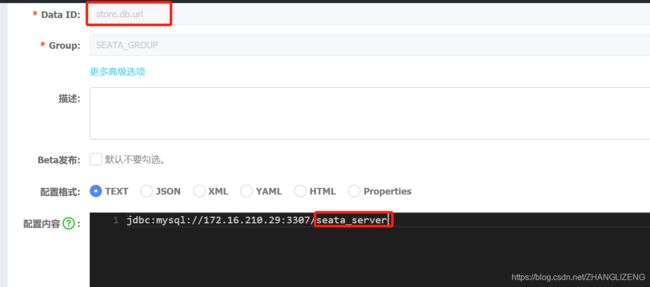
在已经注册的nacos服务中,对store.db.url修改为seate_server
双击启动文件,启动成功,默认监听8091端口
4.Seata Client快速开始
声明式事务实现(@GlobalTransactional)
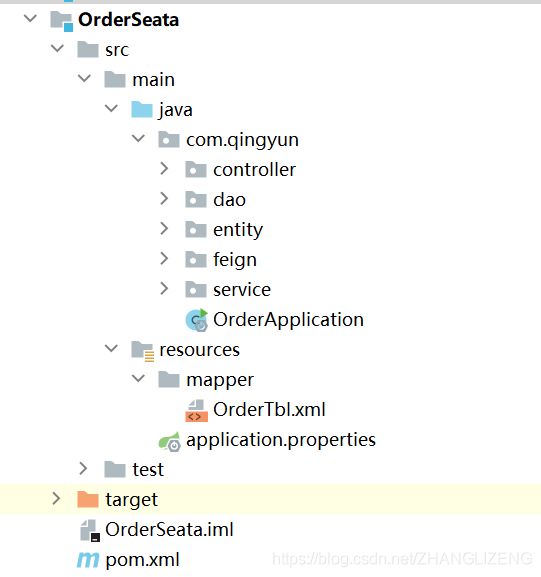
4.1创建一个订单系统工程
使用mybati操作数据库,向数据库中添加订单,同时调用库存服务更新库存数据库。
(1)创建数据库seata_order,创建一张订单表
create database seata_order;
use seata_order;

CREATE TABLE `order_tbl` (
  `id` int(11) NOT NULL AUTO_INCREMENT,
  `product_id` varchar(200) DEFAULT NULL,
  `total_amount` decimal(10,3) DEFAULT NULL,
  `statu` int(11) DEFAULT NULL,
  PRIMARY KEY (`id`)
) ENGINE=InnoDB AUTO_INCREMENT=9 DEFAULT CHARSET=utf8
(2)创建maven工程,使用mybatis连接数据库
(3)pom.xml依赖jar包添加
        springcloudalibaba
        com.qingyun
        0.0.1-SNAPSHOT

    4.0.0

    OrderSeata


            com.alibaba.cloud
            spring-cloud-starter-alibaba-nacos-discovery


            org.springframework.cloud
            spring-cloud-starter-openfeign


                    org.springframework
                    spring-web


                    org.springframework.cloud
                    spring-cloud-commons


            org.springframework.boot
            spring-boot-starter-web


            org.springframework.boot
            spring-boot-starter-jdbc
            2.3.5.RELEASE


            org.mybatis.spring.boot
            mybatis-spring-boot-starter
            1.3.2


                    org.springframework.boot
                    spring-boot-starter-jdbc


            mysql
            mysql-connector-java
            8.0.18
            runtime


            com.alibaba
            druid-spring-boot-starter
            1.1.9
(4)application.properties配置信息
server.port=8084
#应用名称,nacos会将该名称当做服务名称
spring.application.name=order-seata
#nacos服务连接地址
spring.cloud.nacos.server-addr=127.0.0.1:8848
#nacos discovery连接用户名
spring.cloud.nacos.discovery.username=nacos
#nacos discovery连接密码
spring.cloud.nacos.discovery.password=nacos
#nacos discovery工作空间
spring.cloud.nacos.discovery.workspace=public


#开始配置mysql连接驱动以及数据库连接池参数
spring.datasource.name=mysql_test
spring.datasource.type=com.alibaba.druid.pool.DruidDataSource
spring.datasource.druid.filters=stat
spring.datasource.druid.driver-class-name=com.mysql.jdbc.Driver
spring.datasource.druid.url=jdbc:mysql://172.16.210.29:3307/seata_order?useUnicode=true&characterEncoding=UTF-8&allowMultiQueries=true&serverTimezone=GMT
spring.datasource.druid.username=root
spring.datasource.druid.password=zggk-mysql-3306

#这里可以不用配置,有默认参数,根据自己需求
spring.datasource.druid.initial-size=1
spring.datasource.druid.min-idle=1
spring.datasource.druid.max-active=20
spring.datasource.druid.max-wait=6000
spring.datasource.druid.time-between-eviction-runs-millis=60000
spring.datasource.druid.min-evictable-idle-time-millis=300000
spring.datasource.druid.validation-query=SELECT 'x'
spring.datasource.druid.test-while-idle=true
spring.datasource.druid.test-on-borrow=false
spring.datasource.druid.test-on-return=false
spring.datasource.druid.pool-prepared-statements=false
spring.datasource.druid.max-pool-prepared-statement-per-connection-size=20

#开始配置mybatis
mybatis.mapper-locations=classpath:mapper/*.xml
mybatis.type-aliases-package=com.qingyun.entity
(5)程序启动类,开启openfeign远程调用,配置mybatis的扫描路径
@SpringBootApplication
@MapperScan("com.qingyun.dao")
@EnableFeignClients
public class OrderApplication {
    public static void main(String[] args) {
        SpringApplication.run(OrderApplication.class,args);
    }
}
(6)controller层,调用本服务添加订单信息,调用远程服务更新库存
@RestController
@RequestMapping("/order")
public class OrderController {

    @Autowired
    OrderService orderService;

    @Autowired
    StockOpenFeign stockOpenFeign;

    @RequestMapping("/add")
    public String add(){

        OrderTbl orderTbl = new OrderTbl();
        orderTbl.setProduct_id("10");
        orderTbl.setTotal_amount(new BigDecimal(3000));
        orderTbl.setStatu(0);
        orderService.insert(orderTbl);

        String reduct = stockOpenFeign.reduct(orderTbl.getProduct_id());
        return "add order "+reduct;
    }
}
(7)远程更新库存的接口
@FeignClient(value = "stock-seata",path ="/stock" )
public interface StockOpenFeign {

    @RequestMapping("/reduct")
    String reduct(@RequestParam("product_id")String product_id);


}
(8)更新本系统订单的service层
@Service
public class OrderService {

    @Autowired
    OrderDao orderDao;

    public void insert(OrderTbl orderTbl) {
        orderDao.insert(orderTbl);
    }
}
(9)更新本系统订单的dao接口
@Repository
public interface OrderDao {

    void insert(OrderTbl orderTbl);
}
(10)订单表实体OrderTbl
public class OrderTbl {

    private Integer id;
    private String product_id;
    private BigDecimal total_amount;
    private Integer statu;

    public OrderTbl() {
    }

    public Integer getId() {
        return id;
    }

    public void setId(Integer id) {
        this.id = id;
    }

    public String getProduct_id() {
        return product_id;
    }

    public void setProduct_id(String product_id) {
        this.product_id = product_id;
    }

    public BigDecimal getTotal_amount() {
        return total_amount;
    }

    public void setTotal_amount(BigDecimal total_amount) {
        this.total_amount = total_amount;
    }

    public Integer getStatu() {
        return statu;
    }

    public void setStatu(Integer statu) {
        this.statu = statu;
    }

    @Override
    public String toString() {
        return "OrderTbl{" +
                "id=" + id +
                ", product_id='" + product_id + '\'' +
                ", total_amount=" + total_amount +
                ", statu=" + statu +
                '}';
    }
}
(11)添加记录到订单的映射XML文件
        insert into seata_order.order_tbl(product_id,total_amount,statu) values(
            #{product_id},
            #{total_amount},
            #{statu}
        );
4.2创建一个库存系统工程
使用mybatis操作数据库,等待订单系统调用,根据商品id更新库存。
(1)创建数据库seata_stock,创建一张库存表
create database seata_stock;
use seata_stock;

CREATE TABLE `stock_tbl` (
  `id` int(11) NOT NULL AUTO_INCREMENT,
  `product_id` varchar(200) DEFAULT NULL,
  `count` int(11) DEFAULT NULL,
  PRIMARY KEY (`id`)
) ENGINE=InnoDB AUTO_INCREMENT=2 DEFAULT CHARSET=utf8
(2)创建后台maven工程
(3)pom.xml依赖jar包添加
        springcloudalibaba
        com.qingyun
        0.0.1-SNAPSHOT

    4.0.0

    StockSeata


            com.alibaba.cloud
            spring-cloud-starter-alibaba-nacos-discovery


            org.springframework.boot
            spring-boot-starter-web


            org.springframework.boot
            spring-boot-starter-jdbc
            2.3.5.RELEASE


            org.mybatis.spring.boot
            mybatis-spring-boot-starter
            1.3.2


                    org.springframework.boot
                    spring-boot-starter-jdbc


            mysql
            mysql-connector-java
            8.0.18
            runtime


            com.alibaba
            druid-spring-boot-starter
            1.1.9
(4)application.properties配置信息
server.port=8085
#应用名称,nacos会将该名称当做服务名称
spring.application.name=stock-seata
#nacos服务连接地址
spring.cloud.nacos.server-addr=127.0.0.1:8848
#nacos discovery连接用户名
spring.cloud.nacos.discovery.username=nacos
#nacos discovery连接密码
spring.cloud.nacos.discovery.password=nacos
#nacos discovery工作空间
spring.cloud.nacos.discovery.workspace=public
#永久实例,服务宕机后也不会被剔除,默认是true临时实例
#spring.cloud.nacos.discovery.ephemeral=false


#开始配置mysql连接驱动以及数据库连接池参数
spring.datasource.name=mysql_test
spring.datasource.type=com.alibaba.druid.pool.DruidDataSource
spring.datasource.druid.filters=stat
spring.datasource.druid.driver-class-name=com.mysql.jdbc.Driver
spring.datasource.druid.url=jdbc:mysql://172.16.210.29:3307/seata_stock?useUnicode=true&characterEncoding=UTF-8&allowMultiQueries=true&serverTimezone=GMT
spring.datasource.druid.username=root
spring.datasource.druid.password=zggk-mysql-3306

#这里可以不用配置,有默认参数,根据自己需求
spring.datasource.druid.initial-size=1
spring.datasource.druid.min-idle=1
spring.datasource.druid.max-active=20
spring.datasource.druid.max-wait=6000
spring.datasource.druid.time-between-eviction-runs-millis=60000
spring.datasource.druid.min-evictable-idle-time-millis=300000
spring.datasource.druid.validation-query=SELECT 'x'
spring.datasource.druid.test-while-idle=true
spring.datasource.druid.test-on-borrow=false
spring.datasource.druid.test-on-return=false
spring.datasource.druid.pool-prepared-statements=false
spring.datasource.druid.max-pool-prepared-statement-per-connection-size=20

#开始配置mybatis
mybatis.mapper-locations=classpath:mapper/*.xml
mybatis.type-aliases-package=com.qingyun.entity
(5)程序启动类,开启openfeign远程调用,配置mybatis的扫描路径
@SpringBootApplication
@MapperScan("com.qingyun.dao")
public class StockApplication {
    public static void main(String[] args) {
        SpringApplication.run(StockApplication.class,args);
    }
}
(6)controller层,提供根据订单id扣减库存的接口
@RestController
@RequestMapping("/stock")
public class StockController {

    @Autowired
    StockService stockService;

    @Value("${server.port}")
    String port;

    @RequestMapping("/reduct")
    public String reduct(@RequestParam(value = "product_id") String product_id){
        return stockService.updateStock(product_id);
    }

}
(7)处理扣减库存的service层
@Service
public class StockService {
     @Autowired
     StockDao stockDao;

    public String updateStock(String product_id) {
        try {
            stockDao.updateStock(product_id);
            return "扣减库存成功";
        }catch (Exception e){
            return "更新库存失败";
        }
    }
}
(8)扣减库存的dao接口
@Repository
public interface StockDao {

    void updateStock(@Param("product_id")String product_id);
}
(9)库存表实体StockTbl
public class StockTbl {

    private Integer id;
    private String product_id;
    private Integer count;

    public Integer getId() {
        return id;
    }

    public void setId(Integer id) {
        this.id = id;
    }

    public String getProduct_id() {
        return product_id;
    }

    public void setProduct_id(String product_id) {
        this.product_id = product_id;
    }

    public Integer getCount() {
        return count;
    }

    public void setCount(Integer count) {
        this.count = count;
    }
}
(10)更新库存的映射XML文件
update seata_stock.stock_tbl SET count= count-1 where product_id=#{product_id}
4.3启动系统,访问接口,测试数据
订单表order_tbl一开始是空表
库存表有一个商品id为10,库存为100的记录
调用下单服务接口,下单成功
订单表增加一行记录
库存表减少一个库存
4.4@Transactional事务,系统执行异常
当订单服务已经添加完成,已经使用rpc远程调用库存服务,系统出现异常,@Transactional回滚时,只能回滚当前系统的订单记录,不能回滚远程调用的库存记录。
调用下单接口,在调用完rpc后添加一个异常代码1/0,使程序异常回滚
此时订单表没有记录
而库存表已经扣减库存
这样的程序肯定是不健壮的。
4.5搭建Seata客户端
(1)启动Seata server,Seata server使用nacos作为注册中心和配置中心(步骤3.1已经完成)
(2)配置微服务整合Seata
①订单和库存项目的pom.xml中添加seata依赖
            com.alibaba.cloud
            spring-cloud-starter-alibaba-seata
            2.2.6.RELEASE


                   io.seata
                   seata-all


            io.seata
            seata-all
            1.3.0


                    com.alibaba
                    druid


                    com.google.protobuf
                    protobuf-java


                    com.github.ben-manes.caffeine
                    caffeine
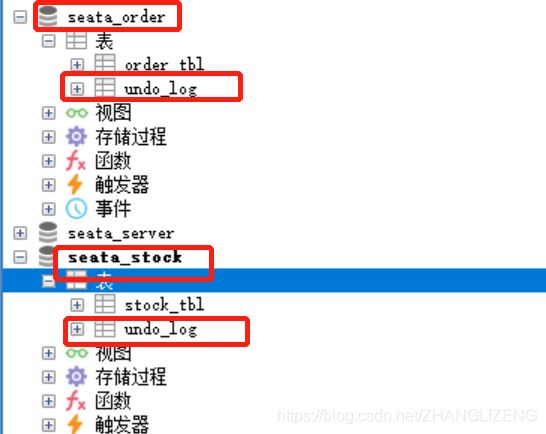
②各微服务数据库中添加数据库回滚表undo_log
CREATE TABLE `undo_log` (
  `id` bigint(20) NOT NULL AUTO_INCREMENT,
  `branch_id` bigint(20) NOT NULL,
  `xid` varchar(100) NOT NULL,
  `context` varchar(128) NOT NULL,
  `rollback_info` longblob NOT NULL,
  `log_status` int(11) NOT NULL,
  `log_created` datetime NOT NULL,
  `log_modified` datetime NOT NULL,
  `ext` varchar(100) DEFAULT NULL,
  PRIMARY KEY (`id`),
  UNIQUE KEY `ux_undo_log` (`xid`,`branch_id`)
) ENGINE=InnoDB AUTO_INCREMENT=1 DEFAULT CHARSET=utf8;
③各微服务application.properties配置事务分组,事务分组的值对应于注册到配置中心的service.vgroupMapping的结尾
#配置seata事务分组
spring.cloud.alibaba.seata.tx-service-group=my_test_tx_group
④各微服务application.properties中配置连接seata服务器和配置中心信息
#配置连接seata服务端的注册中心信息
seata.registry.type=nacos
#seata server 所在的nacos服务地址
seata.registry.nacos.server-addr=127.0.0.1:8848
#seata server 服务名称,在conf/registry.conf中设置的
seata.registry.nacos.application=seata-server
#seata server 所在组,在conf/registry.conf中设置的
seata.registry.nacos.namespace=public
seata.registry.nacos.group=SEATA_GROUP
seata.registry.nacos.password=nacos
seata.registry.nacos.username=nacos
⑤方法体中使用@GlobalTransactional修饰,再调用下单的方法,程序运行异常
订单表没有添加记录(回滚)
库存表也没有扣减记录(回滚)
说明分布式事务回滚成功
4.6Seata运行原理
在订单模块发生异常前设置断点
当进入add方法时,会在配置的seata服务指定的表global_table中记录信息(方法名、事务分组、服务id、生成事务xid)
branch_table为分支表,记录着属于哪一次事务的xid,是我id,资源id,自己的分值id
记录每个分支操作的行主键(pk),锁住操作行记录
此时订单表中已经有记录产生
undo_log记录着回退信息属于的分值id、事务id,回滚的信息rollback_info
库存信息表已经进行扣减库存操作
回退日志undo_log表记录中分支id、事务id,rollback_info回退信息
undo_log的rollback_info字段值:记录着sql类型、beforeImage和afterImage信息
当出现异常后回退信息,清空数据表,执行完后seate服务的表清空记录
添加的订单记录页删除
回退完undo_log表也清除记录
库存信息被回滚
