【笔记整理】SpringBoot集成腾讯云短信
前言
记录一下最近使用SpringBoot基础腾讯云里的短信产品功能的体验。
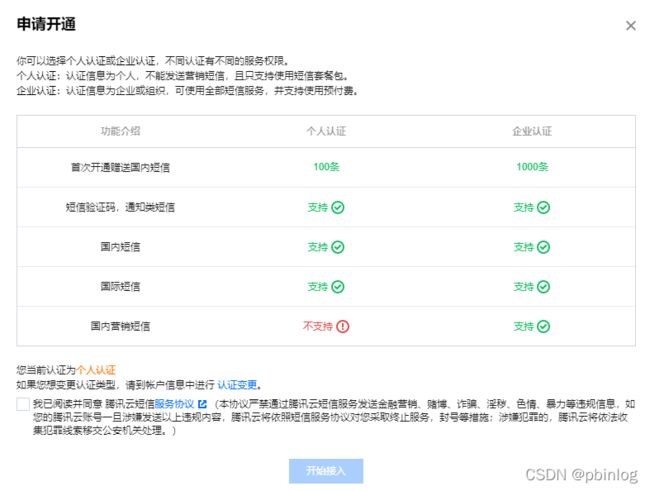
1、腾讯云申请开通短信服务。
2、配置短信内容:分别创建签名、模板和群发短信。
3、使用SpringBoot工程集成测试。
【注意】
- 如果是自用的,需要有网站、APP、公众号、小程序其中的一个。
- 在腾讯云控制台操作,创建签名、创建模板、群发短信都是需要审核时间的。
1、申请开通短信服务
地址:云产品免费试用_云服务免费体验_免费云产品试用 - 腾讯云
通过上面地址找到0元试用短信服务即可,开通后赠送100条短信,有效期3个月。
2、配置短信内容
申请成功后可以看一下帮助文档,配置短信内容。
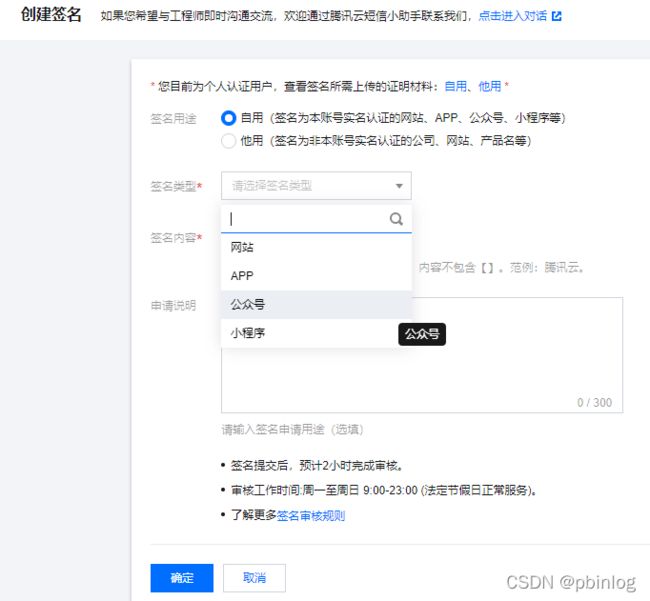
2.1、创建签名
需要注意的是:如果是自用的,签名用途为网站、APP、公众号或者小程序才能申请。同时申请是需要审核时间的,不过都比较快。
具体根据自己的实际情况吧,这里以公众号为例子:
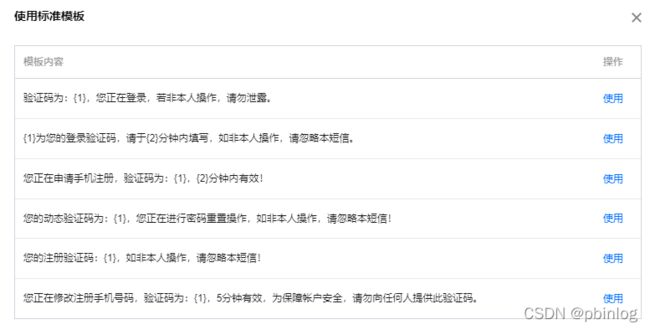
2.2、创建正文模板
签名审核通过后就可以创建正文模板了。可以使用提供的标准模板或者自定义模板都行。
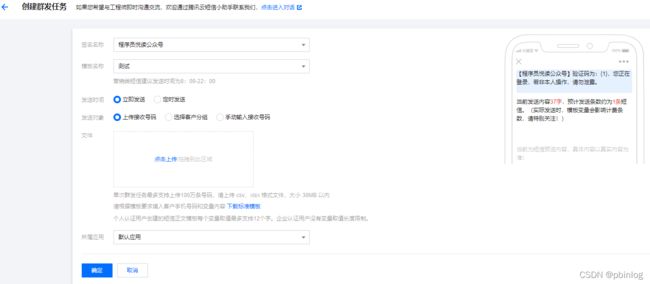
2.3、创建群发任务
模板审核通过后就可以进行短信的群发了。
群发审核完即可完成短信的发送,手机就可以收到验证码了。
3、使用SpringBoot集成测试
3.1、集成前准备:
JavaSDK地址:短信 Java SDK - SDK 文档 - 文档中心 - 腾讯云
短信的调用地址为sms.tencentcloudapi.com
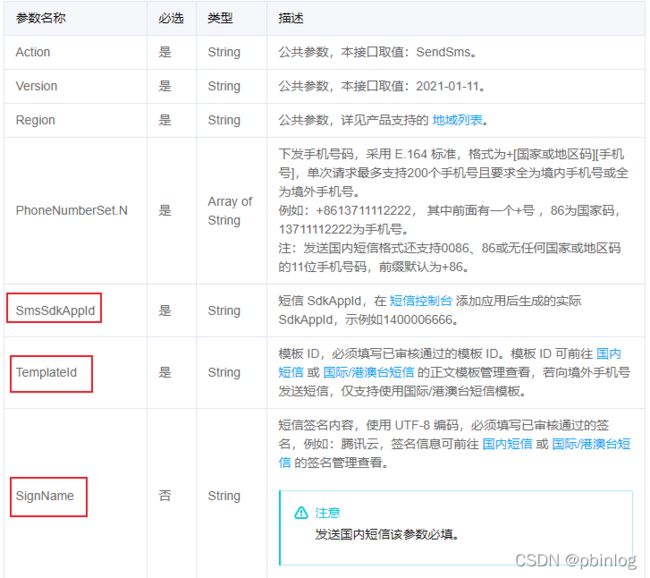
模板id:
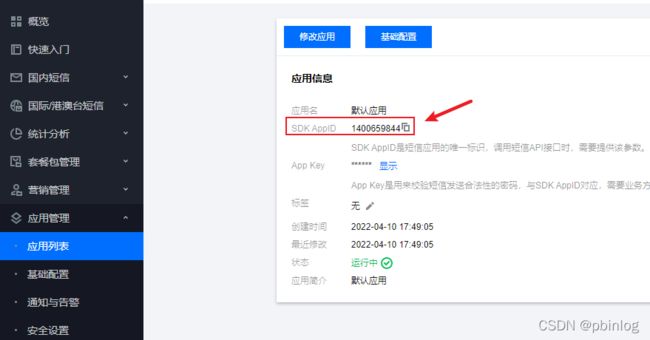
应用列表的SDK AppId
签名SignName:
签名内容,这里就是创建的公众号名称:程序员悦读公众号
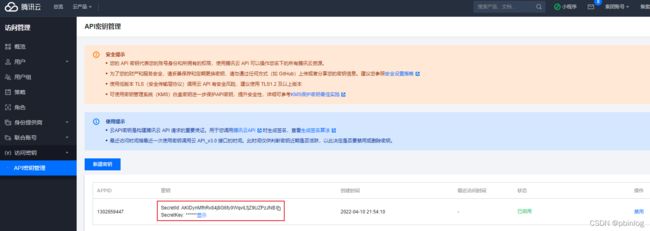
还有就是账号密钥 Secretid、SecretKey
地址:登录 - 腾讯云
3.2、代码编写
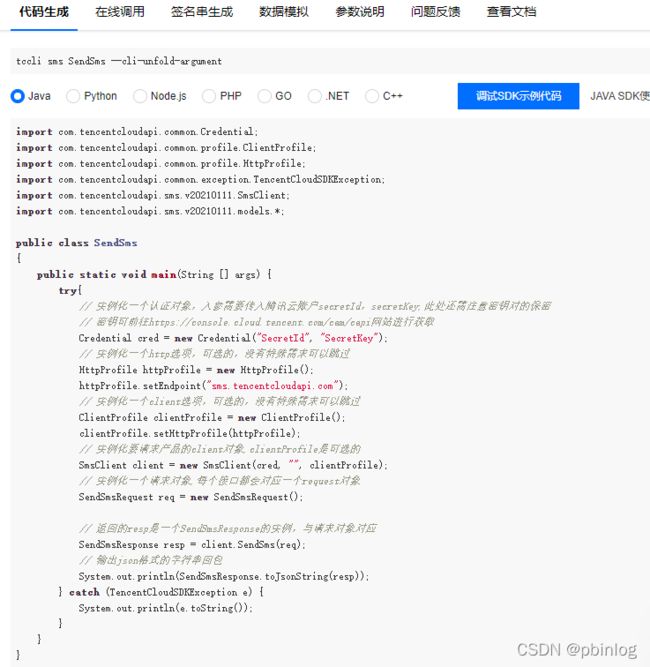
建议直接使用腾讯的SDK工具进行调用,非常方便。
Java SDK地址:短信 Java SDK - SDK 文档 - 文档中心 - 腾讯云
(1)创建SpringBoot工程后,在pom里添加依赖:
    com.tencentcloudapi
    tencentcloud-sdk-java
    3.1.390
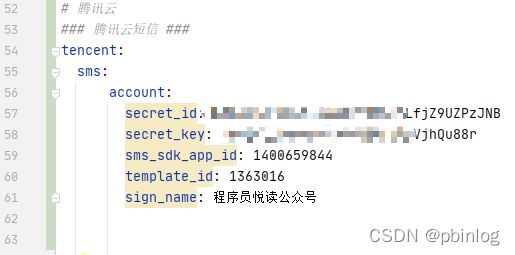
(2)然后配置环境添加腾讯云账号和短信资料
(3)SmsClient编写
可以参考腾讯云的API Explorer,地址:登录 - 腾讯云
可以创建一个config文件,新建TencentSmsConfig类,参考如下:
package com.binlog.study.tencentSms.config;
import com.tencentcloudapi.common.Credential;
import com.tencentcloudapi.common.profile.ClientProfile;
import com.tencentcloudapi.common.profile.HttpProfile;
import com.tencentcloudapi.sms.v20190711.SmsClient;
import org.springframework.beans.factory.annotation.Value;
import org.springframework.context.annotation.Bean;
import org.springframework.context.annotation.Configuration;
/**
 * @Describe: 腾讯云短信配置
 * 发送短信接入文档:https://cloud.tencent.com/document/api/382/55981
 * 使用SDK调用
 * 参考使用腾讯云的API Explorer
 * @Author:
 * @Date: 2022/4/11 9:05
 */
@Configuration
public class TencentSmsConfig {
    /**
     * API相关
     */
    private static String URL ="sms.tencentcloudapi.com";
    private static final String REGION = "ap-guangzhou";
    /**
     * 账号相关
     */
    @Value("${tencent.sms.account.secret_id}")
    private String SECRET_ID;
    @Value("${tencent.sms.account.secret_key}")
    private String SECRET_KEY;


    @Bean
    public SmsClient smsClient(){
        // 实例化一个认证对象,入参需要传入腾讯云账户secretId,secretKey,此处还需注意密钥对的保密
        // 密钥可前往https://console.cloud.tencent.com/cam/capi网站进行获取
        Credential cred = new Credential(SECRET_ID, SECRET_KEY);
        // 实例化一个http选项,可选的,没有特殊需求可以跳过
        HttpProfile httpProfile = new HttpProfile();
        httpProfile.setEndpoint(URL);
        // 实例化一个client选项,可选的,没有特殊需求可以跳过
        ClientProfile clientProfile = new ClientProfile();
        clientProfile.setHttpProfile(httpProfile);
        //实例化 SMS 的 client 对象
        return new SmsClient(cred, REGION, clientProfile);
    }
}
(4)编写业务逻辑service类,组装数据并发送短信。
public interface SmsService {
    /**
     * 发送短信的验证码
     * @param phone
     * @return
     */
    String sendSms(String phone);
    /**
     * 验证验证码
     * @param phone
     * @param code
     * @return
     */
    Boolean validationCode(String phone, String code);
}
package com.binlog.study.tencentSms.service.impl;
import com.binlog.study.tencentSms.service.SmsService;
import com.tencentcloudapi.common.exception.TencentCloudSDKException;
import com.tencentcloudapi.sms.v20190711.SmsClient;
import com.tencentcloudapi.sms.v20190711.models.SendSmsRequest;
import com.tencentcloudapi.sms.v20190711.models.SendSmsResponse;
import lombok.extern.slf4j.Slf4j;
import org.apache.commons.lang3.RandomStringUtils;
import org.springframework.beans.factory.annotation.Autowired;
import org.springframework.beans.factory.annotation.Value;
import org.springframework.data.redis.core.StringRedisTemplate;
import org.springframework.stereotype.Service;
import java.util.concurrent.TimeUnit;
/**
* @Describe: 腾讯云短信实现类
* @Author:
* @Date: 2022/4/11 8:58
*/
@Service
@Slf4j
public class SmsServiceImpl implements SmsService {
@Autowired
private SmsClient smsClient;
@Value("${tencent.sms.account.sms_sdk_app_id}")
private String SMS_SDK_APP_ID;
@Value("${tencent.sms.account.template_id}")
private String TEMPLATE_ID;
@Value("${tencent.sms.account.sign_name}")
private String SIGN_NAME;
/**
* 短信验证码长度
*/
private final Integer LENGTH = 6;
/**
* redis 缓存
*/
@Autowired
private StringRedisTemplate redisTemplate;
@Override
public String sendSms(String phone) {
String[] phoneNumbers = {"+86" + phone};
//生成随机验证码
final String code = generateCode();
//加入数组
String[] templateParams = {code};
//实例请求,组装参数
SendSmsRequest sendSmsRequest = new SendSmsRequest();
sendSmsRequest.setSmsSdkAppid(SMS_SDK_APP_ID);
sendSmsRequest.setTemplateID(TEMPLATE_ID);
sendSmsRequest.setSign(SIGN_NAME);
//发送的手机号
sendSmsRequest.setPhoneNumberSet(phoneNumbers);
//发送的内容(验证码)
sendSmsRequest.setTemplateParamSet(templateParams);
try {
//发送
final SendSmsResponse sendSmsResponse = smsClient.SendSms(sendSmsRequest);
log.info("短信发送成功:{}", sendSmsResponse.toString());
//加入缓存
redisTemplate.opsForValue().set(phone, code, 5, TimeUnit.MINUTES);
return "OK";
} catch (TencentCloudSDKException e) {
log.error("发送失败,或者剩余短信数量不足", e);
}
return "发送失败,或者剩余短信数量不足";
}
@Override
public Boolean validationCode(String phone, String code) {
final String data = (String) redisTemplate.opsForValue().get(phone);
if (code.equals(data)) {
return true;
} else {
return false;
}
}
/**
* 生成随机的验证码
*
* @return
*/
public String generateCode() {
return RandomStringUtils.randomNumeric(LENGTH);
}
}(5)编写controller类进行接口的测试:
package com.binlog.study.tencentSms.controller;
import com.binlog.study.apiDesignCode.Result;
import com.binlog.study.tencentSms.service.SmsService;
import io.swagger.annotations.ApiImplicitParam;
import io.swagger.annotations.ApiImplicitParams;
import io.swagger.annotations.ApiOperation;
import org.apache.commons.lang3.StringUtils;
import org.springframework.beans.factory.annotation.Autowired;
import org.springframework.web.bind.annotation.*;
import javax.validation.constraints.NotEmpty;
import javax.validation.constraints.Pattern;
import java.io.IOException;
/**
 * @Describe: 腾讯云短信接口测试
 * @Author:
 * @Date: 2022/4/11 9:52
 */
@RestController
@RequestMapping("/api/tencentSms")
public class TencentSmsController {
    @Autowired
    private SmsService smsService;
    @ApiOperation(value = "发送短信和验证")
    @GetMapping("/send")
    @ApiImplicitParams({
            @ApiImplicitParam(name = "phone", value = "手机号", required = true, example = "13800000000", paramType = "query", dataTypeClass = Integer.class),
            @ApiImplicitParam(name = "code", value = "验证码验证", required = false, example = "889520", paramType = "query")
    })
    public Result sendSms(@NotEmpty(message = "非法的手机号") @Pattern(regexp = "^1[0-9]{10}$", message = "非法的手机号") String phone, String code) throws IOException {
        if (StringUtils.isNotBlank(code)) {
            if (smsService.validationCode(phone, code)) {
                return Result.success("验证码正确");
            }
            return Result.success("验证码错误");
        }
        String result = smsService.sendSms(phone);
        return Result.success(result);
    }
}
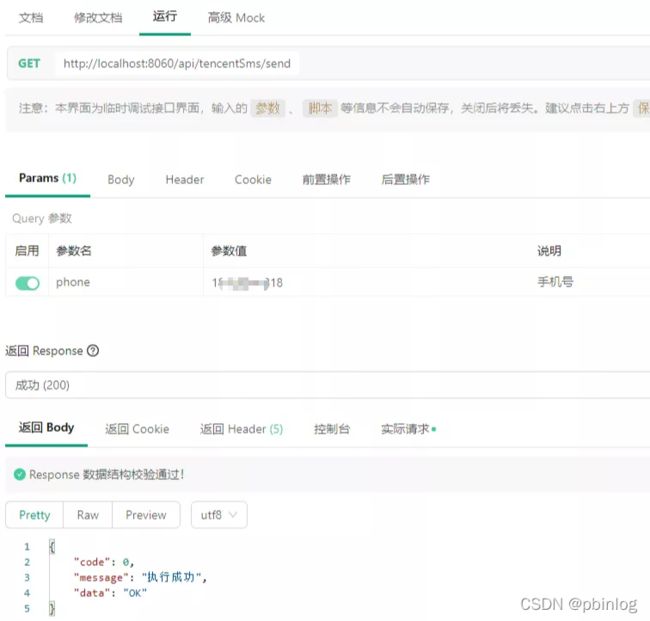
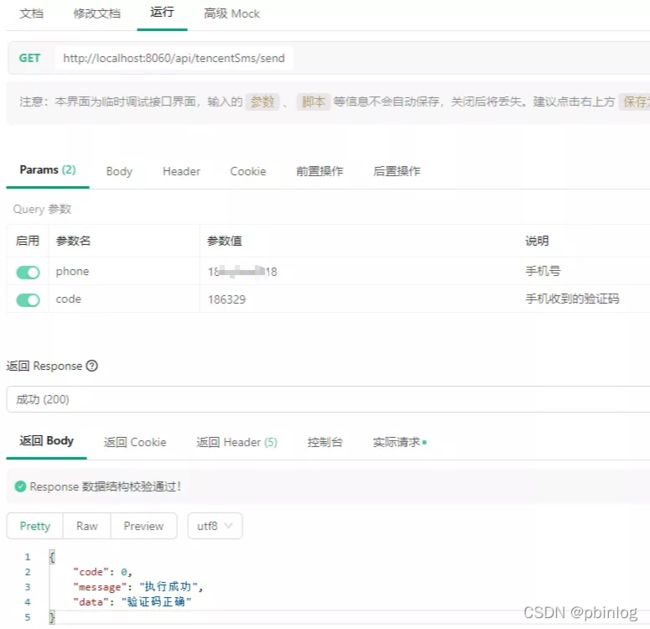
(6)最后在postman或者其它API工具进行接口的测试,结果如下:
首先,调用接口发送短信:
然后,验证一下手机收到的验证码是否与缓存的一样:
至此,一个简单的腾讯云发送短信功能就完成了,有兴趣的可以动手操作一下!
