Linux——基础IO

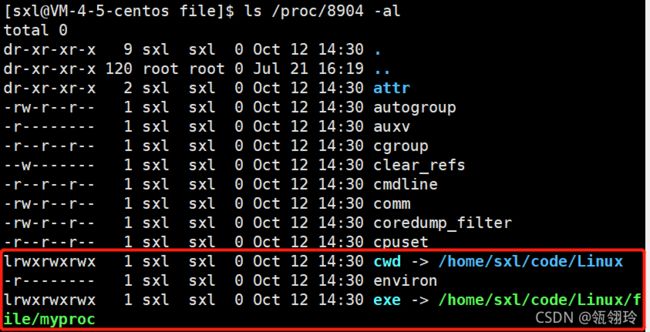
一、当前路径:进程运行时所处的路径

另:查看进程ID
Linux——基础IO_第1张图片

运行的是:
在这里插入图片描述

Linux——基础IO_第2张图片
运行的是:
在这里插入图片描述

Linux——基础IO_第3张图片

二、文件的写入与读取操作

Linux——基础IO_第4张图片

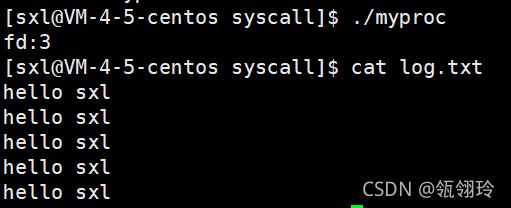
1.文件的写入

#include
#include
int main()
{
  FILE *fp = fopen("log.txt","w");
  if(NULL == fp)
  {
    perror("fopen");
    return 1;
  }
  
 int ct = 5; while(ct)
  {
    fputs("hello sxl\n",fp);
    ct--;
  }

  fclose(fp);
  
  return 0;

}

结果:
Linux——基础IO_第5张图片
利用fwrite写入文件数据
Linux——基础IO_第6张图片

2.从文件读取数据

#include
#include
int main()
{
  FILE *fp = fopen("log.txt","r");
  if(NULL == fp)
  {
    perror("fopen");
    return 1;
  }

  char buffer[64];
  int ct = 5;
  while(ct)
  {
  //首地址 读多少个字节 从哪里读取
    fgets(buffer,sizeof(buffer),fp);
    printf(buffer);
    ct--;
  }
  fclose(fp);
  
  return 0;

}

结果:
Linux——基础IO_第7张图片

三、进程的三个输入输出流

1.任何进程在运行的时候,默认打开三个输入输出流:
stdin:对应键盘 标准输入
stdout:显示器 标准输出
stderr:显示器 标准错误

2.理解:三个默认的标识符分别是0 1 2,另外的标识符从3开始
extern FILE *stdin;
extern FILE *stdout;
extern FILE *stderr;

#include
#include
#include
#include
#include

int main()
{
  umask(0);
  int fd = open("log.txt",O_WRONLY|O_CREAT,0666);
  if(fd < 0)
  {
    printf("open error!\n");
    return 1;
  }

  int fd1 = open("log.txt",O_WRONLY|O_CREAT,0666);
  int fd2 = open("log.txt",O_WRONLY|O_CREAT,0666);
  int fd3 = open("log.txt",O_WRONLY|O_CREAT,0666);
  int fd4 = open("log.txt",O_WRONLY|O_CREAT,0666);
  int fd5 = open("log.txt",O_WRONLY|O_CREAT,0666);

  printf("fd:%d\n",fd);

  printf("fd1:%d\n",fd1);
  printf("fd2:%d\n",fd2);
  printf("fd3:%d\n",fd3);
  printf("fd4:%d\n",fd4);
  printf("fd5:%d\n",fd5);
  close(fd);
  return 0;
}

Linux——基础IO_第8张图片

3.程序
三个输入输出流从键盘写入和打印到显示器一样的操作
(1)stdin:从键盘读入一句,显示器上显示一句,读取到buffer中

#include
#include
int main()
{
  FILE *fp = fopen("log.txt","r");
  if(NULL == fp)
  {
    perror("fopen");
    return 1;
  }

  char buffer[64];
  int ct = 5;
  while(ct)
  {
    fgets(buffer,sizeof(buffer),stdin);
    printf(buffer);
    ct--;
  }

  fclose(fp);
  
  return 0;

}

Linux——基础IO_第9张图片
(2)stdout/stderr:往显示器中写入

#include
#include
int main()
{
  FILE *fp = fopen("log.txt","w");
  if(NULL == fp)
  {
    perror("fopen");
    return 1;
  }
  
 int ct = 5; while(ct)
  {
    fputs("hello sxl\n",stdout);
    ct--;
  }

  fclose(fp);
  
  return 0;

}

Linux——基础IO_第10张图片
注意:
a:追加,也是写入,从结尾写
w:从开始写(覆盖式写入)

四、用系统接口写入、读取文件

可以把文件里的程序清除,打开为空白文件
在这里插入图片描述

1.打开文件:open函数

(1)函数声明

int open(const char *pathname, int flags, mode_t mode);

*pathname:文件路径
flags:标识符

标识符 意义
O_RDONLY 只读
O_ERONLY 只写
O_RDWR 读写
O_APPEND 追加
O_CREAT 创建
mode:权限(例如:666)

(2)包含头文件

	   #include 
       #include 
       #include 

(3)程序

#include
#include
#include
#include

int main()
{
  umask(0);
  int fd = open("log.txt",O_WRONLY|O_CREAT,0666);

  printf("fd:%d\n",fd);
  return 0;
}

Linux——基础IO_第11张图片

注意:
a.标识符要组合使用,O_ERONLY与O_CREAT一起使用才会创建并别入文件
b.open的返回类型是int,返回-1说明程序错误,大于0说明运行正确
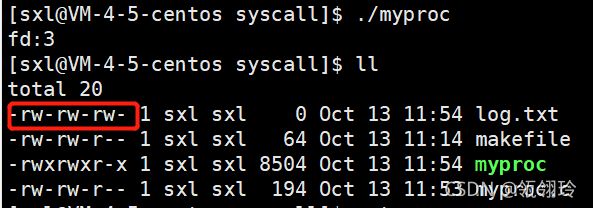
c.文件的权限不是666,受umask的影响,要设置为0,使其不受umask的影响
d.权限的数字要补齐4位,因为umask默认为4位

另:系统函数参数传参标志位:int 32bit 理论上传递32个标志位
判断标志位

//二进制序列中,只有一个比特位是1
#define X 0x1
#define Y 0x2
#define Z 0x3

open(arg1,arg2 = X| Y, arg3)
{
	if(arg2 & X)
	{
		//为真,X是标志位
	}
	if(arg2 & Y)
	{
		//为真,Y是标志位
	}
}

2.写入文件:write函数

(1)头文件以及函数声明

#include 
ssize_t write(int fd, const void *buf, size_t count);
//fd:想写入的文件
//*buf:实际上写入的内容
//count:期望写入的多少

(2)程序

#include
#include
#include
#include
#include
#include

int main()
{
  umask(0);
  int fd = open("log.txt",O_WRONLY|O_CREAT,0666);
  if(fd < 0)
  {
    printf("open error!\n");
    return 1;
  }

  int ct = 5;
  const char *msg = "hello sxl\n";
  while(ct)
  {
    write(fd,msg,strlen(msg));
    ct--;
  }

  printf("fd:%d\n",fd);
  close(fd);
  return 0;
}

Linux——基础IO_第12张图片

3.读取文件:read函数

(1)头文件以及函数声明

#include 

ssize_t read(int fd, void *buf, size_t count);
//fd:文件名
//*buf:读取的内容
//count:期望读取的个数

(2)程序

#include
#include
#include
#include
#include
#include

int main()
{
  umask(0);
  int fd = open("log.txt",O_RDONLY,0666);
  if(fd < 0)
  {
    printf("open error!\n");
    return 1;
  }
  char c;
  while(1)
  {
  	ssize_t s = read(fd,&c,1);
 	 if(s <= 0)
	  {
  	  break;
	  }
	  write(1,&c,1);   //1实际上是stdout的代替
  }

  printf("fd:%d\n",fd);
  close(fd);
  return 0;
}

Linux——基础IO_第13张图片

五、文件描述符

磁盘文件;
文件=内容+属性(元信息)
内存文件:
已经打开的文件,会用struct file结构体利用双链表链接起来

1.文件描述符的本质就是数组下标

文件描述符就是从0开始的小整数。当我们打开文件时,操作系统在内存中要创建相应的数据结构来描述目标文件。于是就有了file结构体。表示一个已经打开的文件对象。而进程执行open系统调用,所以必须让进程和文件关联起来。每个进程都有一个指针*files, 指向一张表files_struct,该表最重要的部分就是包涵一个指针数组,每个元素都是一个指向打开文件的指针!所以,本质上,文件描述符就是该数组的下标。所以,只要拿着文件描述符,就可以找到对应的文件。
Linux——基础IO_第14张图片

2.文件描述符的分配规则

从最小的但是没有被使用的开始分配,即关闭0/2,文件描述符就从0/2开始分配
输出重定向的原始原理:

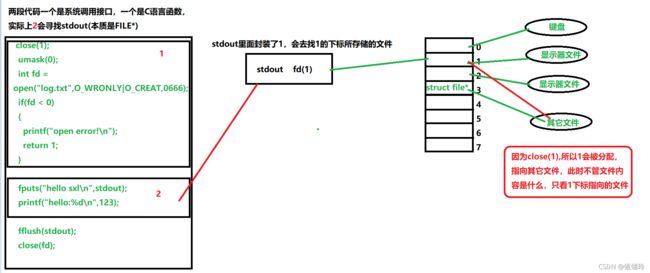
3.重定向:本质是修改文件描述符fd下标对应的struct file*的内容

输出重定向

**输出重定向的原始原理:**找到stdout里面封装的下标为1指向的文件

Linux——基础IO_第15张图片

(1)关闭了1,致使不能写入显示器,但是write函数仍然是写入1,所以显示内容写入了log.txt

#include
#include
#include
#include
#include
#include

int main()
{
  close(1);
  umask(0);
  int fd = open("log.txt",O_WRONLY|O_CREAT,0666);
  if(fd < 0)
  {
    printf("open error!\n");
    return 1;
  }

  //close(1);
  write(1,"hello sxl\n",10);

  write(1,"hello\n",6);
  write(1,"hello\n",6);
  write(1,"hello\n",6);
  write(1,"hello\n",6);
  write(1,"hello\n",6);
  write(1,"hello\n",6);
  close(fd);
  return 0;
}

Linux——基础IO_第16张图片
(2)不用write函数,直接close(1),用printf函数,理应会重定向到log.txt中,结果是显示器与log.txt文件中都没有内容,是因为printf输出内容会有一个缓冲区,需要设置一个fflush(stdout),致使内容重定向到log.txt中

#include
#include
#include
#include
#include
#include

int main()
{
  close(1);
  umask(0);
  int fd = open("log.txt",O_WRONLY|O_CREAT,0666);
  if(fd < 0)
  {
    printf("open error!\n");
    return 1;
  }
  
  printf("hello:%d\n",123);
  printf("hello:%c\n",'c');
  printf("hello:%f\n",3.14);

  fflush(stdout);
  close(fd);

  return 0;
}

Linux——基础IO_第17张图片
(3)利用fputs函数进行重定向(输出重定向)

#include
#include
#include
#include
#include
#include

int main()
{
  close(1);
  umask(0);
  int fd = open("log.txt",O_WRONLY|O_CREAT,0666);
  if(fd < 0)
  {
    printf("open error!\n");
    return 1;
  }
  fputs("hello sxl\n",stdout);
  fputs("hello sxl\n",stdout);
  fputs("hello sxl\n",stdout);
  fputs("hello sxl\n",stdout);
  fputs("hello sxl\n",stdout);

  fflush(stdout);
  close(fd);
  return 0;
}

Linux——基础IO_第18张图片
FILE是一个结构体,内部封装了fd
fopen究竟在做什么?
1.给调用的用户申请struct FILE结构体变量,并返回地址(FILE*)
2.在底层通过open打开文件,并返回fd,把fd填充进FILE变量中的fileno
(fread,fwrite,fclose,fputs,fgets等都是通过FILE*找到fd使用的)

输入重定向

即把文件中的内容直接重定向输出至显示器上

#include
#include
#include
#include
#include
#include

int main()
{
 
  
 // close(1);
  close(0);  //关闭的是stdin
  umask(0);
 // int fd = open("log.txt",O_WRONLY|O_CREAT,0666);
  int fd = open("log.txt",O_RDONLY);
  if(fd < 0)
  {
    printf("open error!\n");
    return 1;
  }

  fputs("hello sxl\n",stdout);

  fputs("hello sxl\n",stdout);
  fputs("hello sxl\n",stdout);
  fputs("hello sxl\n",stdout);
  fputs("hello sxl\n",stdout);
  char buffer[100];
  fgets(buffer,100,stdin); //读进buffer,读100个,从stdin里面读取
  printf("%s\n",buffer);

  fflush(stdout);

  close(fd);
  return 0;
}

Linux——基础IO_第19张图片

追加重定向

每执行一次程序,输出的内容就会追加到log.txt文件中

#include
#include
#include
#include
#include
#include

int main()
{
 
  close(1);
  umask(0);
  int fd = open("log.txt",O_WRONLY|O_APPEND);
  if(fd < 0)
  {
    printf("open error!\n");
    return 1;
  }

  fputs("hello sxl\n",stdout);
  fputs("hello sxl\n",stdout);
  
  fflush(stdout);

  close(fd);
  return 0;
}

Linux——基础IO_第20张图片
注意:O_APPEND不能单独使用,要与其它配合一起使用

Linux——基础IO_第21张图片

六、小知识点

凡是显示到显示器上的内容都是字符
凡是从键盘读取的内容都是字符
键盘和显示器都称为字符设备

批量化替换makefile文件
底行模式:%s/myproc/test/ (只替换可执行程序的名字,myproc被替换成test)
底行模式:%s/myproc/test/g (myproc全部被替换成test,包括myproc.c换成test.c)

七、缓冲区

1.缓冲区分类

无缓冲
行缓冲:常见的对显示器进行刷新数据时(效用和可用性做的平衡)
可采用\n或者fflush(stdout)强制行缓冲
全缓冲:对文件写入时采用全缓冲

2.相关问题

(1)重定向会更改进程的缓冲方式
(2)C接口打印一次,OS API打印两次,

如果往显示器打印,因为带有\0,所以是进行行刷新,打印的是3行;
若执行fork(),转变缓冲方式,行刷新只是实现打印功能,没有被刷新,相当于是一个父进程的数据,进程具有独立性,此时会发生写时拷贝,刷新两份,即打印了两份
Linux——基础IO_第22张图片

#include
#include
#include

int main()
{
  //C语言函数
  printf("printf\n");
  fprintf(stdout,"fprintf\n");  //往stdout写

  //系统调用接口函数
  const char *msg = "write\n";
  write(1,msg,strlen(msg));

  fork();
  return 0;
}

Linux——基础IO_第23张图片

缓冲区在哪里?
C语言提供,在FILE中维护,即在struct FILE结构体中,不仅包括fd,还包括用户缓冲区

这个缓冲区是谁提供的?
C语言自带,在FILE维护(fd、用户缓冲区),若缓冲区是OS提供的,那么所有的都会打印两次
OS也是有缓冲的,和文件缓冲有什么区别?

3.fflush(stdout)

关闭fflush(stdout),打印的数据不能重定向到log.txt中
原因:因为close(1),关闭了stdout,最后close(fd)关闭文件后,要想刷新,要找到1,此时已经发现文件描述符1关闭,不能从缓冲区里面刷新出来,如果最后使用fclose(stdout),可以重定向写入文件,因为程序退出时,stdout会从缓冲区里刷新数据

#include
#include
#include
#include
#include
#include

int main()
{
  close(1);
 // close(0);
  umask(0);
 // int fd = open("log.txt",O_WRONLY|O_CREAT,0666);
 // int fd = open("log.txt",O_RDONLY);
  int fd = open("log.txt",O_WRONLY);
  if(fd < 0)
  {
    printf("open error!\n");
    return 1;
  }

  fputs("hello sxl\n",stdout);
  fputs("hello sxl\n",stdout);
//  fflush(stdout);
 
  close(fd);
  return 0;
}

在这里插入图片描述
替换成fclose(stdout)后

#include
#include
#include
#include
#include
#include

int main()
{
  close(1);
 // close(0);
  umask(0);
 // int fd = open("log.txt",O_WRONLY|O_CREAT,0666);
 // int fd = open("log.txt",O_RDONLY);
  int fd = open("log.txt",O_WRONLY);
  if(fd < 0)
  {
    printf("open error!\n");
    return 1;
  }

  fputs("hello sxl\n",stdout);
  fputs("hello sxl\n",stdout);
  fclose(stdout);
 // close(fd);

  return 0;
}

Linux——基础IO_第24张图片

八、dup2

1.输出重定向:把本该显示到显示器上的文字重定向到文件中

注意:也可以close(1),但是close(1)尽量与dup2(fd,1)写在一起,防止文件描述符1被别的文件使用。

#include
#include
#include
#include
#include
#include

int main()
{
 
  
//  close(1);
 // close(0);
  umask(0);
 // int fd = open("log.txt",O_WRONLY|O_CREAT,0666);
 // int fd = open("log.txt",O_RDONLY);
  int fd = open("log.txt",O_WRONLY);
  if(fd < 0)
  {
    printf("open error!\n");
    return 1;
  }
  dup2(fd,1); //1是fd的一份拷贝
  fputs("hello sxl\n",stdout);
  fputs("hello sxl\n",stdout);

  fflush(stdout);

  close(fd);

  return 0;
}

Linux——基础IO_第25张图片
另外:
子进程会继承父进程的文件信息
进程替换不会影响进程打开的文件信息

九、inode:保存元信息的结构

inode:任何一个文件的属性集合,Linux中几乎每一个文件都有一个inode,可能存在大量的inode,区分inode,使用inode编号

内存文件就是加载磁盘文件来的
文件 = 文件属性(元信息)+文件内容(在磁盘直接存储)

1.查看inode编号:ls -l -i

Linux——基础IO_第26张图片

2.文件系统

(1)磁盘相关概念
磁盘:机械设备,效率低,永久性存储介质(目前所有的 普通文件都是在磁盘中存储的)
扇区:盘片被分成许多扇形的区域,一般一个扇区512KB
磁道:盘片上以盘片中心为圆心,不同半径的同心圆
柱面:硬盘中,不同盘片相同半径的磁道所组成的圆柱
磁盘寻址方案:盘面→柱面→扇区
磁盘:抽象为线性结构
Linux——基础IO_第27张图片

(2)描述一下创建一个文件的过程?以及写入1kb数据的过程(文件:test.c)?
创建一个文件的过程:
遍历inode位图寻找未使用的inode,修改位图,再填充inode属性信息到inode table里面
写入1kb数据的过程:
先找到test.c的inode,再找到inode blocks,申请空间,扫描block Bitmap,发现空的块填入inode blocks中,最后把1kb数据写入到这个块中
(3)删除一个文件是做什么?
对inode Bitmap与block Bitmap两个位图中的对应文件进行清空即可
(4)删除文件,为何可以被恢复?
删除的是inode位图和block位图,inode属性信息和数据还在
(5)删除文件,没有删除属性信息,下次写入时可被覆盖
已经删除inode位图和block位图信息,证明所对用块是无效的,下一次写入可以直接覆盖
(6)如何理解目录创建的过程?
目录也有自己的inode
目录里的内容存放:当前目录下的文件名,对应文件的inode指针(inode号),即:1.文件名没有在inode中保存,包括目录本身;2.目录(文件名->inode编号)也是数据

3.软硬链接
建立软链接:ln -s mytest mytest-s 意思:mytest-s链接mytest
硬链接:ln mytest mytest-h
软硬链接的区别:
(1)软链接是一个独立的文件,有自己的inode,硬链接没有独立的inode
(2)软连接相当于快捷方式(若源文件删除,软连接不能正常指向);
硬链接本质没有创建文件,只是创建了一个文件名和已有的inode的映射关系,并写入当前目录(相当于取别名),在删除源文件的时候,系统则将链接数减1,当链接数为0的时候,inode就会被系统回收,文件的内容才会被删除。
Linux——基础IO_第28张图片

硬链接一个作用:方便目录之间通过相对路径方式进行跳转
可以通过链接数判断该目录下有多少个子目录:链接数-2(.+该目录)
[看到一篇讲述的软硬链接,不错,更详细](https://blog.csdn.net/mahao1107/article/details/46851969?ops_request_misc=%257B%2522request%255Fid%2522%253 A%2522165216927616781818772126%2522%252C%2522scm%2522%253A%252220140713.130102334.pc%255Fall.%2522%257D&request_id=165216927616781818772126&biz_id=0&utm_medium=distribute.pc_search_result.none-task-blog-2allfirst_rank_ecpm_v1~rank_v31_ecpm-4-46851969-null-null.142%5Ev9%5Epc_search_result_cache,157%5Ev4%5Econtrol&utm_term=%E8%BD%AF%E8%BF%9E%E6%8E%A5%E5%92%8C%E7%A1%AC%E9%93%BE%E6%8E%A5%E7%9A%84%E5%BA%94%E7%94%A8&spm=1018.2226.3001.4187)

另外,关于acm(三个时间)
access:文件最后访问时间
modify:文件最后修改时间
change:文件属性最后修改时间

stat test.c   //查看acm

十、动静态库

1.概念

本质是可执行程序的“半成品”
所有库的本质是:一堆.o的集合,不包含main,但是包含了大量的方法
ldd:查看可执行程序可依赖的库
Linux——基础IO_第29张图片

2.认识动静态库

Linux中
.so:动态库
.a:静态库
libc.so.6:C动态库(去掉前缀lib,去掉后缀.so,.a,剩下的就是库名字)
Win中
.dll:动态库
.lib:静态库
在这里插入图片描述

3.动静态库各自的特征

优缺点 动态库 静态库
优点 节省空间(库文件通过地址空间进行共享) 与库无关,不需要库
缺点 必须依赖库,没有库,无法运行 占空间(自身大、多个C静态程序加载时,在内存中存在大量的重复代码)
动态库就是映射在堆栈之间的共享区,被所有该库使用进程

4.如何打包动静态库

(1)生成静态库
makefile文件:

mylib=libcal.a
CC=gcc

$(mylib):add.o sub.o
	ar -rc $(mylib) $^    //把所有.o文件打包生成静态库

%.o:%.c
	$(CC) -c $<    //.c文件生成.o文件

.PHONY:clean
clean:
	rm -f $(mylib) *.o

add文件:
add.h

#include

extern int add(int x,int y);

add.c文件

#include"add.h"

int add(int x,int y)
{
	return x + y;
}

sub文件同add一样
运行生成了libcal.a静态库文件
Linux——基础IO_第30张图片
(2)把生成的静态库打包利用(若要给别人使用自己写的库,直接给mathlib即可)
makefile文件

mylib=libcal.a
CC=gcc


$(mylib):add.o sub.o
	ar -rc $(mylib) $^

%.o:%.c
	$(CC) -c $<

.PHONY:clean
clean:
	rm -f $(mylib) *.o

.PHONY:output
output:
	mkdir -p mathlib/lib
	mkdir -p mathlib/include
	cp *.h mathlib/include
	cp *.a mathlib/lib

把.h文件放在include中,把.a文件放在lib中
Linux——基础IO_第31张图片
-I:头文件在哪里
-L:库文件在哪里
-l:链接哪一个库
在这里插入图片描述
可以把所写的库复制到系统的库中(默认路径,但是时间久了容易错乱)

(3)生成动态库:gcc -fPIC -c
a.形成.o文件
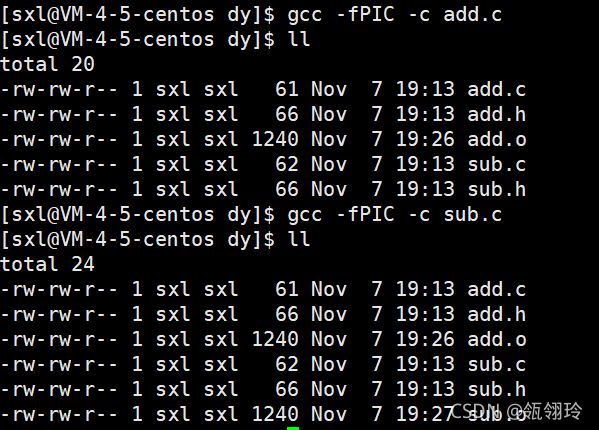
Linux——基础IO_第32张图片
b.形成动态库:打包:gcc -shared
Linux——基础IO_第33张图片
c.生成可执行文件
先把*.h文件放在include目录下,把libcal.so放在lib目录下,然后把这两个目录放在mlib目录下

Linux——基础IO_第34张图片
e.运行可执行程序会出现错误,解决方法如下 ;
导出环境变量,再运行程序

export LD_LIBRARY_PATH=$LD_LIBRARY_PATH:/home/sxl/code/Linux/testlib/mlib/lib

Linux——基础IO_第35张图片
注意:
1.安装库本质是把头文件和库文件拷贝到系统路径下
2.第三方库,使用的时候,一般要指明库的名称

你可能感兴趣的:(Linux,linux)