【自然语言处理】情感分析(二):基于 scikit-learn 的 Naive Bayes 实现
情感分析(二):基于 scikit-learn 的 Naive Bayes 实现
在上一篇博客 情感分析(一):基于 NLTK 的 Naive Bayes 实现 中,我们介绍了基于 NLTK 实现朴素贝叶斯分类的方法,本文将基于 scikit-learn 再次介绍朴素贝叶斯分类的实现方法。
本文代码已上传至 我的GitHub,需要可自行下载。
1.导入包
import pandas as pd
import sys
sys.path.append("..") # Adds higher directory to python modules path.
from NLPmoviereviews.data import load_data_sent
from NLPmoviereviews.utilities import preprocessing
from sklearn.feature_extraction.text import CountVectorizer, TfidfVectorizer
from sklearn.naive_bayes import MultinomialNB, ComplementNB
from sklearn.model_selection import cross_validate
from sklearn.metrics import ConfusionMatrixDisplay, classification_report
2.导入数据
我们仍然使用的是 tensorflow-datasets 提供的 imdb_reviews 数据集。
# load data
X_train, y_train, X_test, y_test = load_data_sent(percentage_of_sentences=10)
# create dataframe from data
d = {'text': X_train, 'sentiment': y_train}
df = pd.DataFrame(d)

df.head()

原数据集提供了 25000 25000 25000 条训练数据,取 10 % 10\% 10% 即 2500 2500 2500 条。
# check shape
df.shape
![]()
# check class balance (it's pretty balanced)
df.sentiment.value_counts()
![]()
df.text[0]

3.数据预处理
删除自定义停用词可提高分数(可忽略不计,约提高 0.002 % 0.002\% 0.002%)。
# remove custom stop-words (improves accuracy)
def rm_custom_stops(sentence):
    '''
    Custom stop word remover
    Parameters:
        sentence (str): a string of words
    Returns:
        list_of_words (list): cleaned sentence as a list of words
    '''
    words = sentence.split()
    stop_words = {'br', 'movie', 'film'}
    cleaned_words = [w for w in words if not w in stop_words]
    return ' '.join(cleaned_words)
# clean text data
df['text'] = df.text.apply(preprocessing)
df['text'] = df.text.apply(rm_custom_stops)
df.head()

注:调整 n-gram 似乎用处不大。N-grams 是要考虑目标单词周围的单词数量:增加 n-grams 可以帮助机器在其上下文中理解单词,从而更好地分析单词的含义。
示例:
- vectorizer = CountVectorizer(ngram_range = (2,2)) # 得到较低的准确率 78 % 78\% 78%
- vectorizer = CountVectorizer(ngram_range = (5,5)) # 得到更低的准确率 50 % 50\% 50%
将文本通过 词袋模型 转化为向量。
# vectorize text (convert collection of texts to a matrix of token counts)
vectorizer = CountVectorizer()
X_train_count = vectorizer.fit_transform(df.text)
处理测试数据。
# process test data
d_test = {'text': X_test}
df_test = pd.DataFrame(d_test)      # create dataframe
df_test['text'] = df_test.text.apply(preprocessing)     # preprocess
df_test['text'] = df_test.text.apply(rm_custom_stops)
X_test_count = vectorizer.transform(df_test.text)     # vectorize
4.交叉验证模型
scikit-learn 官网提供了 5 5 5 种朴素贝叶斯算法:
| 全称 | 导入 |
|---|---|
Gaussian Naive Bayes |
from sklearn.naive_bayes import GaussianNB |
Multinomial Naive Bayes |
from sklearn.naive_bayes import MultinomialNB |
Complement Naive Bayes |
from sklearn.naive_bayes import ComplementNB |
Bernoulli Naive Bayes |
from sklearn.naive_bayes import BernoulliNB |
Categorical Naive Bayes |
from sklearn.naive_bayes import CategoricalNB |
# initialize & cross validate a basic model
naivebayes = MultinomialNB()
cv_nb = cross_validate(naivebayes,
                       X_train_count,
                       y_train,
                       scoring = "accuracy")
# evaluate accuracy
cv_nb['test_score'].mean()
![]()
拟合交叉验证模型。
# fit model
naivebayes.fit(X_train_count, y_train)
![]()
5.评估模型
# get accuracy score
naivebayes.score(X_test_count, y_test)
![]()
# Plot confusion matrix
disp = ConfusionMatrixDisplay.from_estimator(naivebayes,
                             X_test_count, y_test,
                             cmap="Blues");

# 160 false positives, 323 false negatives
注意:ConfusionMatrixDisplay.from_estimator 需要 scikit-learn 1.0 1.0 1.0 以上版本。

解决方案:ConfusionMatrixDisplay.from_estimator missing #21775
根据官网提示,如果你使用的是 Python 3.6 版本,是装不上 scikit-learn 1.0 1.0 1.0 版本及以上的。


解决完这个 bug 后,工作继续。
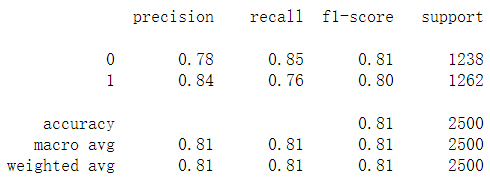
# print classification report
Y_predict = naivebayes.fit(X_train_count, y_train).predict(X_test_count)
print(classification_report(y_test, Y_predict))
6.优化模型
6.1 使用 TF-IDF 构建词向量
关于 TF-IDF,想详细了解可以浏览我的这篇博客【自然语言处理】BOW和TF-IDF详解。
vectorizer = TfidfVectorizer(max_df=0.3) # ignore words with a frequency higher than this %
X_train_vec = vectorizer.fit_transform(df.text)
X_test_vec = vectorizer.transform(df_test.text)
model = MultinomialNB() # 多项式朴素贝叶斯分类器
model.fit(X_train_vec, y_train)
model.score(X_test_vec, y_test)
![]()
6.2 使用 ComplementNB 模型
ComplementNB 是 MultinomialNB 模型的一个变种,实现了 补码朴素贝叶斯(CNB)算法。CNB 是 标准多项式朴素贝叶斯(MNB)算法的一种改进,比较适用于不平衡的数据集,在文本分类上的结果通常比 MultinomialNB 模型好,具体来说,CNB 使用来自每个类的补数的统计数据来计算模型的权重。CNB 的发明者的研究表明,CNB 的参数估计比 MNB 的参数估计更稳定。
vectorizer = CountVectorizer()
X_train_vec = vectorizer.fit_transform(df.text)
X_test_vec = vectorizer.transform(df_test.text)
model = ComplementNB()
model.fit(X_train_vec, y_train)
model.score(X_test_vec, y_test)
![]()
6.3 清除 HTML 标签
import re

# function to remove html tags from text
def cleanHtml(review):
    cleanreg = re.compile('<.*?>')
    cleantxt = re.sub(cleanreg, ' ', review)
    return cleantxt

# load data
X_train, y_train, X_test, y_test = load_data_sent(percentage_of_sentences=10)

# process train data
df = pd.DataFrame({'text': X_train})
df.text = df.text.apply(cleanHtml)
df['text'] = df.text.apply(preprocessing)
df['text'] = df.text.apply(rm_custom_stops)
# process test data
df_test = pd.DataFrame({'text': X_test})
df_test.text = df_test.text.apply(cleanHtml)
df_test['text'] = df_test.text.apply(preprocessing)
df_test['text'] = df_test.text.apply(rm_custom_stops)

# modelling
vectorizer = CountVectorizer()
X_train_vec = vectorizer.fit_transform(df.text)
X_test_vec = vectorizer.transform(df_test.text)
model = ComplementNB()
model.fit(X_train_vec, y_train)
model.score(X_test_vec, y_test)
![]()
7.获取词频分布的方法(补充)
# create a new column with words and word counts
vectorizer = CountVectorizer()
analyzer = vectorizer.build_analyzer()

def wordcounts(s):
    c = {}
    if analyzer(s):
        d = {}
        w = vectorizer.fit_transform([s]).toarray()
        vc = vectorizer.vocabulary_
        for k,v in vc.items():
            d[v]=k # d -> index:word
        for index,i in enumerate(w[0]):
            c[d[index]] = i # c -> word:count
    return  c

df['Word Counts'] = df.text.apply(wordcounts)
df.head()
w 示例输出 [[1 1 2 1 1 1 1 1 1 1 1 1 1 2 1 1 1 1 1 1 1 1 1 1 1 1 2 1 1 1 1 1 1 1 1 1 1 1 1 1 2 1 1 1 1 1]]
vc 示例输出 {'big': 3, 'step': 34, 'surprisingly': 36, 'enjoyable': 5, 'original': 23, 'sequel': 29, 'isnt': 12, 'nearly': 19, 'fun': 9, 'part': 24, 'one': 21, 'instead': 10, 'spend': 32, 'much': 18, 'time': 40, 'plot': 26, 'development': 4, 'tim': 39, 'thomerson': 38, 'still': 35, 'best': 2, 'thing': 37, 'series': 30, 'wisecrack': 45, 'tone': 41, 'entry': 7, 'performance': 25, 'adequate': 1, 'script': 28, 'let': 14, 'action': 0, 'merely': 16, 'routine': 27, 'mildly': 17, 'interest': 11, 'need': 20, 'lot': 15, 'silly': 31, 'laugh': 13, 'order': 22, 'stay': 33, 'entertain': 6, 'trancers': 42, 'unfortunately': 43, 'far': 8, 'watchable': 44}

import operator

first_review = df['Word Counts'].iloc[0]
sorted_by_value = sorted(first_review.items(), key=operator.itemgetter(1),reverse=True)
print(sorted_by_value )
