双向lstm 命名实体识别
In this article, we shall discuss on how to use a recurrent neural network to solve Named Entity Recognition (NER) problem. NER is a common task in NLP systems. Given a text document, a NER system aims at extracting the entities (e.g., persons, organizations, locations, etc.) from the text. Here, a BiLSTM (bi-directional long short term memory) will be used to recognize the named entities from Twitter texts. This problem appears as an assignment in the Coursera course Natural Language Processing by National Research University Higher School of Economics, it’s a part of Advanced Machine Learning Specialization. The problem is taken from the assignment.
在本文中,我们将讨论如何使用递归神经网络解决命名实体识别 ( NER )问题。 NER是NLP系统中的常见任务。 给定文本文档,NER系统旨在从文本中提取实体(例如,人员,组织,位置等)。 在这里,将使用BiLSTM (双向长期短期记忆)来识别Twitter文本中的命名实体。 这个问题是国立研究大学经济学院在Coursera课程“ 自然语言处理”中的一项作业,它是“ 高级机器学习专业”的一部分。 问题出自作业。
命名实体识别问题 (Named Entity Recognition Problem)
Let’s try to understand by a few examples. The following figure shows three examples of Twitter texts from the training corpus that we are going to use, along with the NER tags corresponding to each of the tokens from the texts.
让我们尝试通过一些例子来理解。 下图显示了我们将要使用的来自训练语料库的Twitter文本的三个示例,以及对应于文本中每个标记的NER标签 。
Let’s say we want to extract
假设我们要提取
the person names
人名
the company names
公司名称
the location names
地点名称
the music artist names
音乐艺术家的名字
the tv show names
电视节目名称
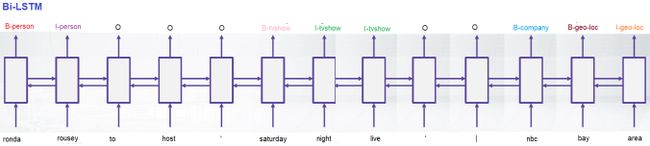
from the texts. Then a perfect NER model needs to generate the following sequence of tags, as shown in the next figure.
从文本。 然后,理想的NER模型需要生成以下标签序列,如下图所示。
Where B- and I- prefixes stand for the beginning and inside of the entity, while O stands for out of tag or no tag. Markup with the prefix scheme is called BIO markup. This markup is introduced for distinguishing of consequent entities with similar types.
其中B-和I-前缀代表实体的开始和内部,而O代表标签之外或没有标签。 具有前缀方案的标记称为BIO标记 。 引入此标记是为了区分具有相似类型的后续实体。
In this article we shall use a recurrent neural network (RNN), particularly, a Bi-Directional Long Short-Term Memory Networks (Bi-LSTMs), to predict the NER tags given the input text tokens. The BiLSTM model is needed to b e trained first, so that it can be used for prediction. The RNN architecture that is used for NER is shown below.
在本文中,我们将使用递归神经网络( RNN ),特别是双向长期短期记忆网络( Bi-LSTMs ),根据给定的输入文本标记来预测NER标签。 首先需要对BiLSTM模型进行训练,以便可以将其用于预测。 用于NER的RNN架构如下所示。
双向LSTM (Bi-directional LSTM)
- provides a universal approach for sequence tagging 提供序列标记的通用方法
- several layers can be stacked + linear layers can be added on top 可以堆叠几层+可以在上面添加线性层
- is trained by cross-entropy loss coming from each position 通过来自每个位置的交叉熵损失进行训练
加载Twitter命名实体识别语料库 (Load the Twitter Named Entity Recognition corpus)
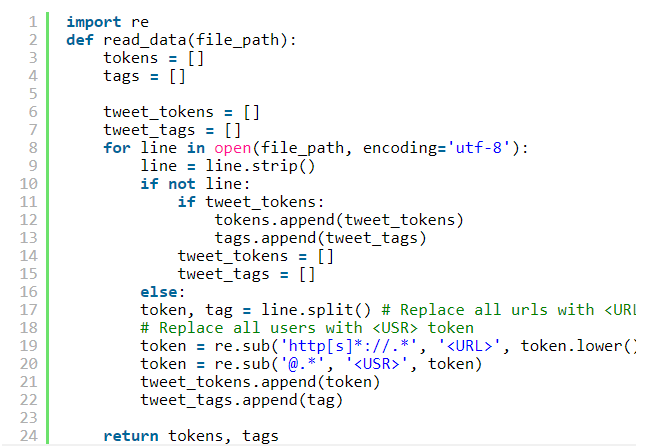
The corpus to be used here contains tweets with NE tags. Every line of a file contains a pair of a token (word/punctuation symbol) and a tag, separated by a whitespace. Different tweets are separated by an empty line.
这里要使用的语料库包含带有NE标签的推文。 文件的每一行都包含一对标记(单词/标点符号)和一个标记,由空格分隔。 不同的tweet用空行分隔。
The function read_data reads a corpus from the file_path and returns two lists: one with tokens and one with the corresponding tags. A user’s nickname in a tweet needs to be replaced by the
函数read_data从file_path中读取一个语料库,并返回两个列表:一个带有标记,另一个带有相应的标记。 用户在推文中的昵称需要替换为
And now we can load three separate parts of the dataset:
现在我们可以加载数据集的三个独立部分:
train data for training the model;
训练数据以训练模型;
validation data for evaluation and hyperparameters tuning;
用于评估和超参数调整的验证数据;
test data for final evaluation of the model.
测试数据用于模型的最终评估。
train_tokens, train_tags = read_data('data/train.txt') validation_tokens, validation_tags = read_data('data/validation.txt') test_tokens, test_tags = read_data('data/test.txt')
train_tokens, train_tags = read_data('data/train.txt') validation_tokens, validation_tags = read_data('data/validation.txt') test_tokens, test_tags = read_data('data/test.txt')
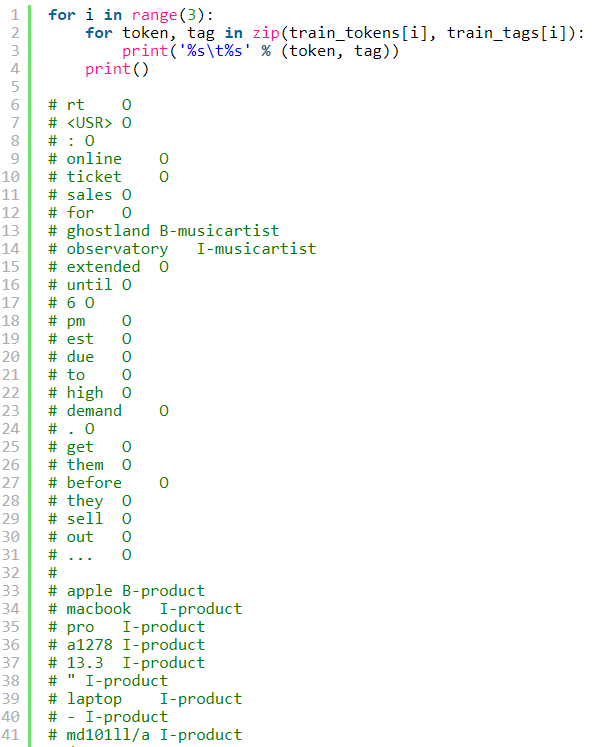
We should always understand what kind of data you deal with. For this purpose, let’s print the data running the following cell:
我们应该始终了解您处理的是哪种数据。 为此,让我们打印运行以下单元格的数据:
准备字典 (Prepare dictionaries)
To train a neural network, we will use two mappings:
为了训练神经网络,我们将使用两个映射:
{token} → {token id}: address the row in embeddings matrix for the current token;
{token}→{token id}:在嵌入矩阵中找到当前令牌的行;
{tag} → {tag id}: one-hot-encoding ground truth probability distribution vectors for computing the loss at the output of the network.
{tag}→{tag id}: 一种用于对网络输出处的损耗进行计算的单编码地面真相概率分布矢量。
Now let’s implement the function build_dict which will return {token or tag} → {index} and vice versa.
现在,让我们实现build_dict函数,该函数将返回{token或tag}→{index},反之亦然。
After implementing the function build_dict we can create dictionaries for tokens and tags. Special tokens in our case will be:
在实现build_dict函数之后,我们可以为标记和标签创建字典。 在我们的情况下,特殊令牌将是:
special_tokens = [' ['O']# Create dictionariestoken2idx, idx2token = build_dict(train_tokens + validation_tokens, special_tokens)tag2idx, idx2tag = build_dict(train_tags, special_tags)
special_tokens = [' ['O']# Create dictionariestoken2idx, idx2token = build_dict(train_tokens + validation_tokens, special_tokens)tag2idx, idx2tag = build_dict(train_tags, special_tags)
We can see from the below output that there are 21 tags for the named entities in the corpus.
从下面的输出中我们可以看到,语料库中有21个标签用于命名实体。

The next additional functions will be helpful for creating the mapping between tokens and ids for a sentence.
接下来的其他功能将有助于在句子的标记和ID之间创建映射。
产生批次 (Generate batches)
Neural Networks are usually trained with batches. It means that weight updates of the network are based on several sequences at every single time. The tricky part is that all sequences within a batch need to have the same length. So we will pad them with a special
神经网络通常分批进行训练。 这意味着网络的权重更新每次都基于多个序列。 棘手的部分是批处理中的所有序列都必须具有相同的长度。 因此,我们将使用特殊的

建立一个递归神经网络 (Build a recurrent neural network)
This is the most important part where we shall specify the network architecture based on TensorFlow building blocks. We shall create an LSTM network which will produce probability distribution over tags for each token in a sentence. To take into account both right and left contexts of the token, we will use Bi-Directional LSTM (Bi-LSTM). Dense layer will be used on top to perform tag classification.
这是我们将基于TensorFlow构建块指定网络体系结构的最重要部分。 我们将创建一个LSTM网络,该网络将为句子中的每个标记生成标签上的概率分布。 为了同时考虑令牌的左右上下文,我们将使用双向LSTM(Bi-LSTM)。 密集层将用于顶部以执行标签分类。
import tensorflow as tfimport numpy as nptf.compat.v1.disable_eager_execution()
import tensorflow as tf import numpy as nptf.compat.v1.disable_eager_execution()
class BiLSTMModel(): pass
BiLSTMModel(): pass class BiLSTMModel(): pass
First, we need to create placeholders to specify what data we are going to feed into the network during the execution time. For this task we will need the following placeholders:
首先,我们需要创建占位符以指定在执行期间要向网络中馈送哪些数据。 对于此任务,我们将需要以下占位符:
input_batch — sequences of words (the shape equals to [batch_size, sequence_len]);
input_batch —单词序列(形状等于[batch_size,sequence_len]);
ground_truth_tags — sequences of tags (the shape equals to [batch_size, sequence_len]);
ground_truth_tags —标签序列(形状等于[batch_size,sequence_len]);
lengths — lengths of not padded sequences (the shape equals to [batch_size]);
lengths —未填充序列的长度(形状等于[batch_size]);
dropout_ph — dropout keep probability; this placeholder has a predefined value 1;
dropout_ph —退出保持概率; 该占位符的预定义值为1;
learning_rate_ph — learning rate; we need this placeholder because we want to change the value during training.
learning_rate_ph —学习率; 我们需要这个占位符,因为我们想在培训过程中改变价值。
It could be noticed that we use None in the shapes in the declaration, which means that data of any size can be fed.
可以注意到,我们在声明的形状中使用了None ,这意味着可以输入任何大小的数据。
Now, let us specify the layers of the neural network. First, we need to perform some preparatory steps:
现在,让我们指定神经网络的层。 首先,我们需要执行一些准备步骤:
Create embeddings matrix with tf.Variable. Specify its name (embeddings_matrix), type (tf.float32), and initialize with random values.
使用tf.Variable创建嵌入矩阵。 指定其名称( embeddings_matrix ),键入( tf.float32 ),然后使用随机值进行初始化。
Create forward and backward LSTM cells. TensorFlow provides a number of RNN cells ready for you. We suggest that you use LSTMCell, but we can also experiment with other types, e.g. GRU cells. This blogpost could be interesting if you want to learn more about the differences.
创建向前和向后的LSTM单元。 TensorFlow为您准备了许多RNN单元。 我们建议您使用LSTMCell ,但是我们也可以尝试其他类型,例如GRU单元。 如果您想更多地了解这些差异,那么这篇博客文章可能会很有趣。
Wrap cells with DropoutWrapper. Dropout is an important regularization technique for neural networks. Specify all keep probabilities using the dropout placeholder that we created before.
用DropoutWrapper包装细胞。 辍学是神经网络的重要正则化技术。 使用我们之前创建的辍学占位符指定所有保持概率。
After that, we can build the computation graph that transforms an input_batch:
之后,我们可以构建用于转换input_batch的计算图:
Look up embeddings for an input_batch in the prepared embedding_matrix.
在准备好的embedding_matrix中 查找 input_batch的嵌入 。
Pass the embeddings through Bidirectional Dynamic RNN with the specified forward and backward cells. Use the lengths placeholder here to avoid computations for padding tokens inside the RNN.
通过具有指定的前向和后向单元格的双向动态RNN传递嵌入。 在此处使用长度占位符可以避免计算RNN内部的填充令牌。
- Create a dense layer on top. Its output will be used directly in loss function. 在顶部创建一个密集层。 其输出将直接用于损耗函数。

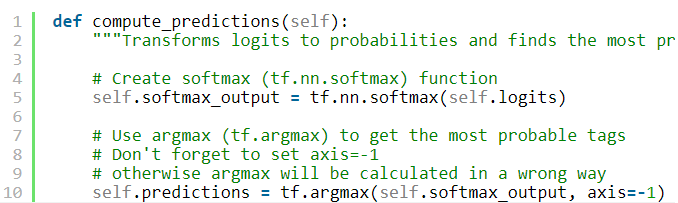
To compute the actual predictions of the neural network, we need to apply softmax to the last layer and find the most probable tags with argmax.
为了计算神经网络的实际预测,我们需要将softmax应用于最后一层,并使用argmax找到最可能的标签。
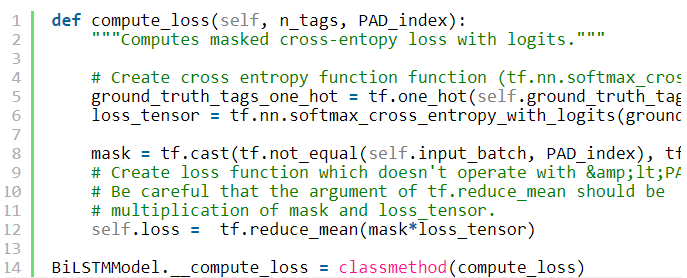
During training we do not need predictions of the network, but we need a loss function. We will use cross-entropy loss, efficiently implemented in TF as cross entropy with logits. Note that it should be applied to logits of the model (not to softmax probabilities!). Also note, that we do not want to take into account loss terms coming from
在训练期间,我们不需要网络的预测,但是我们需要损失函数。 我们将使用在TF中有效实现的交叉熵损失作为与logits的交叉熵 。 请注意,应将其应用于模型的logit(而不是softmax概率!)。 另请注意,我们不想考虑来自
The last thing to specify is how we want to optimize the loss. Let’s use Adam optimizer with a learning rate from the corresponding placeholder. We shall also need to apply clipping to eliminate exploding gradients. It can be easily done with the function clip_by_norm.
最后要说明的是我们如何优化损耗。 让我们将Adam优化器与来自相应占位符的学习率一起使用。 我们还需要应用裁剪以消除爆炸梯度。 使用功能clip_by_norm可以轻松完成此操作 。
Now we have specified all the parts of your network. It can be noticed, that we didn’t deal with any real data yet, so what we have written is just recipes on how the network should function. Now we will put them to the constructor of our Bi-LSTM class to use it in the next section.
现在,我们已经指定了您网络的所有部分。 可以注意到,我们还没有处理任何实际数据,因此我们所写的只是有关网络应如何运作的秘诀。 现在,我们将它们放入Bi-LSTM类的构造函数中,以在下一部分中使用它。

训练网络并预测标签 (Train the network and predict tags)
Session.run is a point which initiates computations in the graph that we have defined. To train the network, we need to compute self.train_op, which was declared in perform_optimization. To predict tags, we just need to compute self.predictions. Anyway, we need to feed actual data through the placeholders that we defined before.
Session.run是一个在我们定义的图形中启动计算的点。 要训练网络,我们需要计算self.train_op ,它是在perform_optimization中声明的。 要预测标签,我们只需要计算self.predictions即可 。 无论如何,我们需要通过之前定义的占位符来提供实际数据。
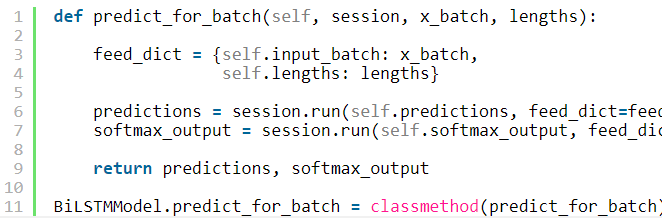
Let’s implement the function predict_for_batch by initializing feed_dict with input x_batch and lengths and running the session for self.predictions.
让我们通过初始化与输入x_batch和长度 feed_dict和self.predictions运行会话实现功能predict_for_batch。
We finished with necessary methods of our BiLSTMModel model and almost ready to start experimenting.
我们完成了BiLSTMModel模型的必要方法,几乎准备开始进行实验。
评价 (Evaluation)
To simplify the evaluation process let’s use the two functions:
为了简化评估过程,我们使用以下两个功能:
predict_tags: uses a model to get predictions and transforms indices to tokens and tags;
Forecast_tags :使用模型获取预测并将索引转换为令牌和标签;
eval_conll: calculates precision, recall and F1 for the results.
eval_conll :计算结果的精度,召回率和F1。
- The function precision_recall_f1() is implemented / used to compute these metrics with training and validation data. 函数precision_recall_f1()已实现/用于通过训练和验证数据计算这些指标。

运行实验 (Run the experiment)
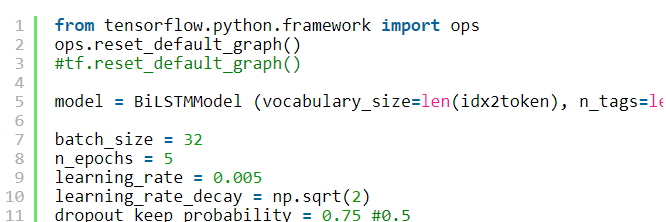
Create BiLSTMModel model with the following parameters:
使用以下参数创建BiLSTMModel模型:
vocabulary_size — number of tokens;
vocabulary_size —令牌数;
n_tags — number of tags;
n_tags —标签数;
embedding_dim — dimension of embeddings, recommended value: 200;
embedding_dim — 嵌入尺寸,建议值:200;
n_hidden_rnn — size of hidden layers for RNN, recommended value: 200;
n_hidden_rnn — RNN的隐藏层大小,建议值:200;
PAD_index — an index of the padding token (
PAD_index —填充令牌(
Set hyperparameters. We might want to start with the following recommended values:
设置超参数。 我们可能要从以下推荐值开始:
batch_size: 32;
batch_size :32;
- 4 epochs; 4个纪元;
starting value of learning_rate: 0.005
learning_rate的起始值:0.005
learning_rate_decay: a square root of 2;
learning_rate_decay :2的平方根;
dropout_keep_probability: try several values: 0.1, 0.5, 0.9.
dropout_keep_probability :尝试几个值: 0.1、0.5、0.9 。
However, we can conduct more experiments to tune hyperparameters, to obtain higher accuracy on the held-out validation dataset.
但是,我们可以进行更多的实验来调整超参数,以在保留的验证数据集上获得更高的准确性。
Finally, we are ready to run the training!
最后,我们准备好进行培训了!
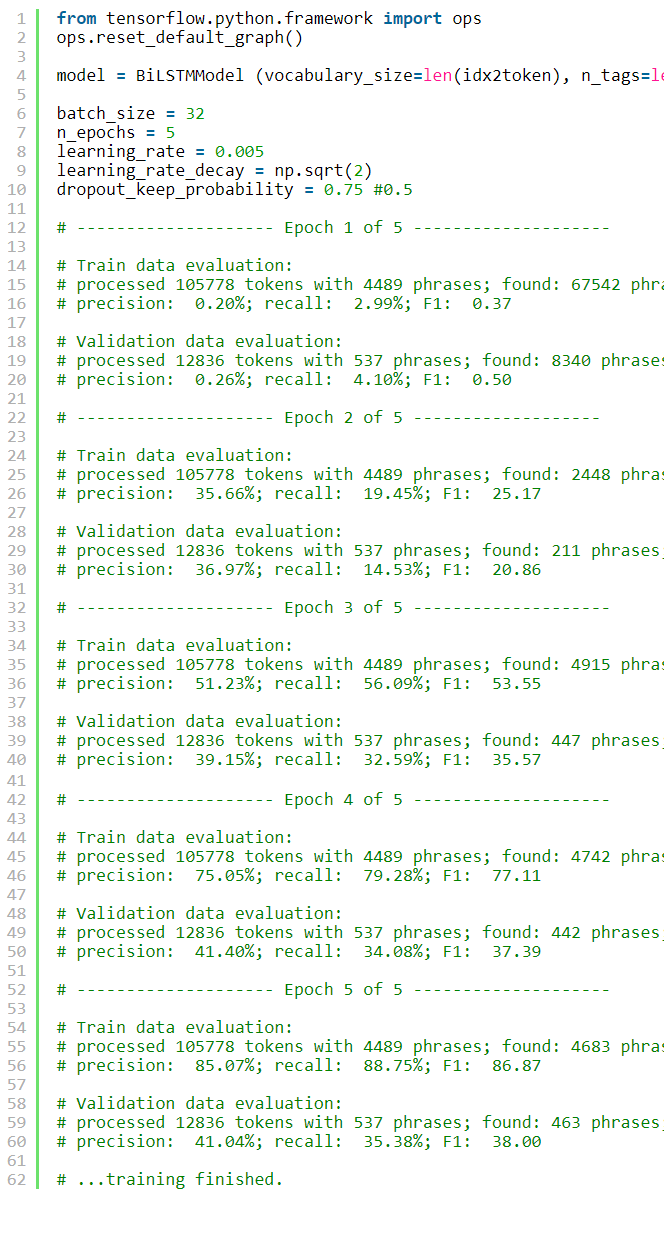
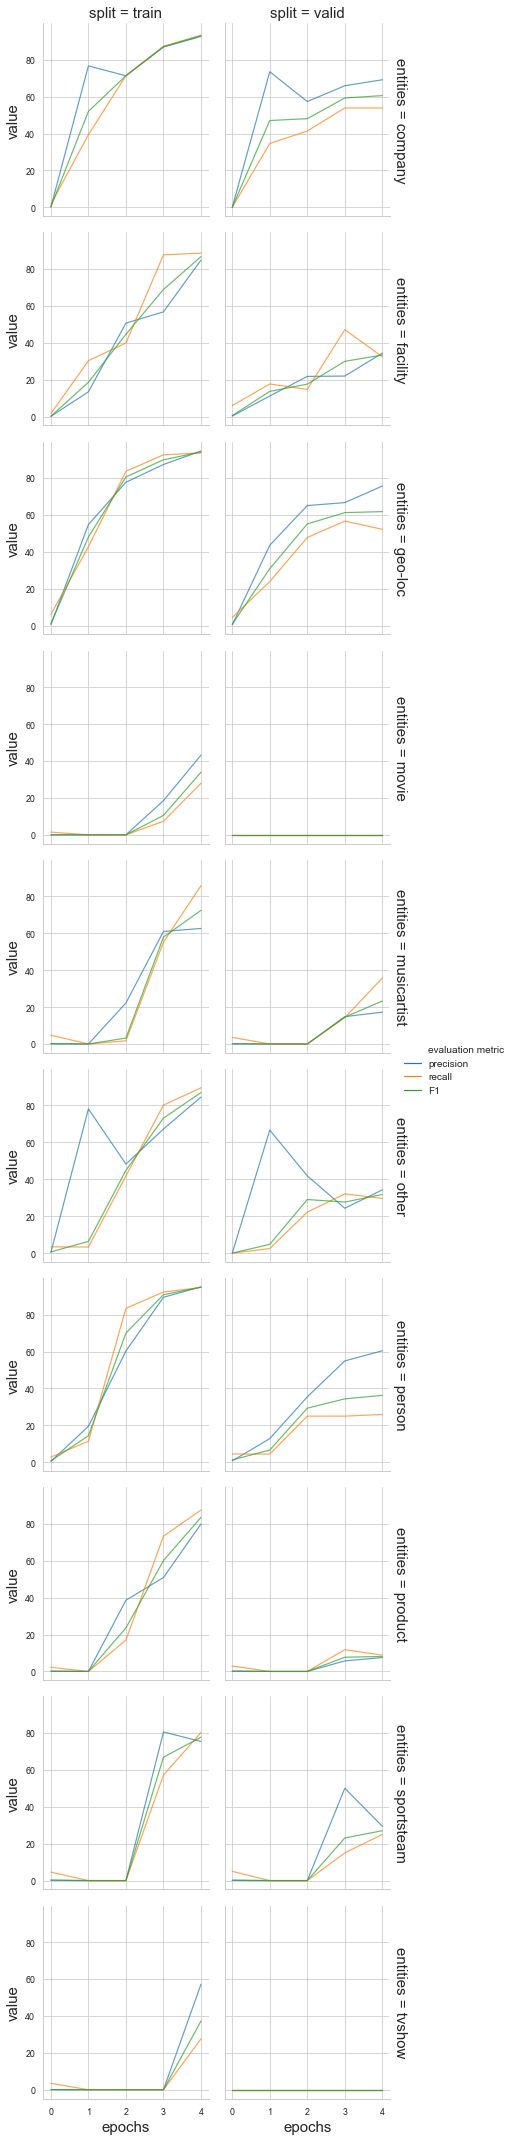
The following figure shows how the precision / recall and F1 score changes on the training and validation datasets while training, for each of the entities.
下图显示了每个实体在训练时在训练和验证数据集上的精度/召回率和F1得分如何变化。
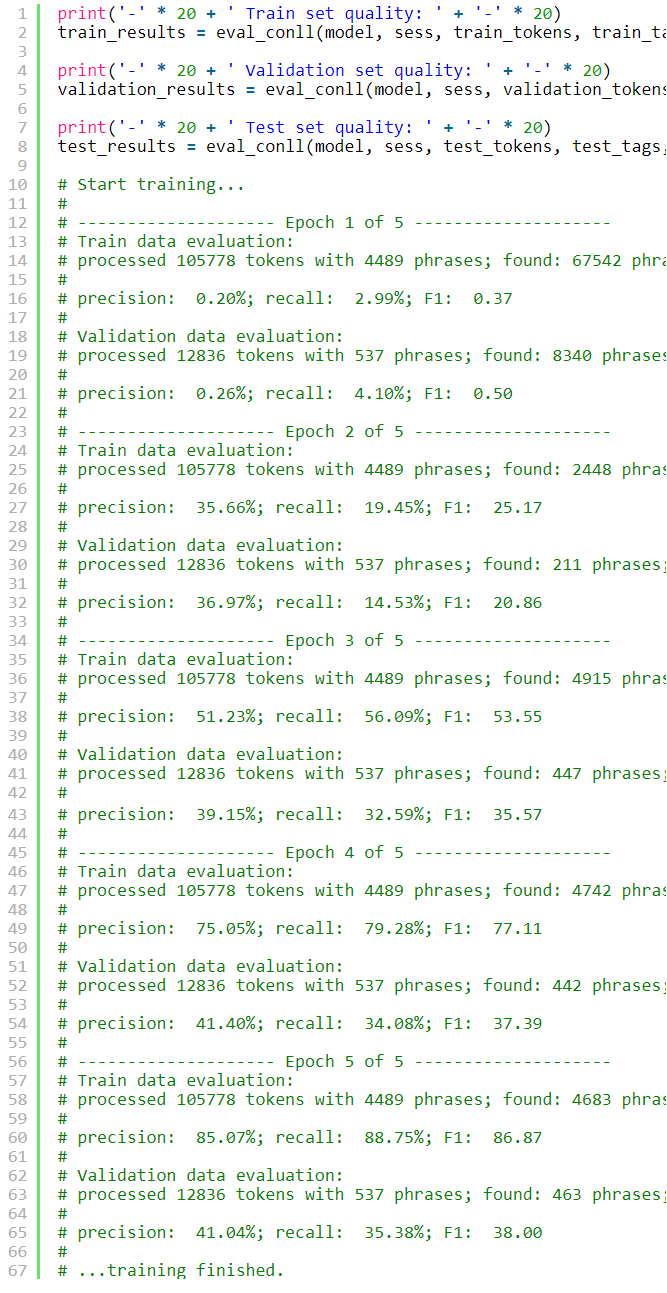
Now let us see full quality reports for the final model on train, validation, and test sets.
现在,让我们查看有关火车,验证和测试集的最终模型的完整质量报告。
The following animation shows the softmax probabilities corresponding to the NER tags predicted by the BiLSTM model on the tweets from the test corpus.
以下动画显示了与BiLSTM模型在来自测试语料库的推文上预测的NER标签相对应的softmax概率。
Also, visualized in another way, the following two animations show the tweet text, the probabilities for different NE tags, predicted by the BiLSTM NER model and the ground-truth tag.
另外,以另一种方式可视化,以下两个动画显示了推文文本,BiLSTM NER模型和地面真相标签预测的不同NE标签的概率。
结论 (Conclusions)
Nowadays, Bi-LSTM is one of the state of the art approaches for solving NER problem and it outperforms other classical methods. Despite the fact that we used small training corpora (in comparison with usual sizes of corpora in Deep Learning), our results are quite good. In addition, in this task there are many possible named entities and for some of them we have only several dozens of trainig examples, which is definately small. However, the implemented model outperforms classical CRFs for this task. Even better results could be obtained by some combinations of several types of methods, e.g. (refer to this paper).
如今,Bi-LSTM是解决NER问题的最先进方法之一,其性能优于其他经典方法。 尽管我们使用了较小的训练语料库(与深度学习中通常的语料库大小相比),但我们的结果还是不错的。 此外,在此任务中,有许多可能的命名实体,对于其中的一些实体,我们只有几十个训练样本,这些样本确实很小。 但是,对于此任务,已实现的模型优于传统的CRF。 甚至更好的结果可以通过几种方法,例如(指的是有些组合来获得这种纸)。
翻译自: https://medium.com/@sandipan.dey/named-entity-recognition-ner-on-twitter-using-bi-directional-lstm-with-tensorflow-in-python-8b85cccc649c
双向lstm 命名实体识别