CameraX 遇见 tensorflow lite--Android开发
文章目录
-
- cameraX是啥
- tensorflow lite是啥
- 开发环境和版本
- 本文使用的模型
- 导入库
- 权限请求
- 开始编写程序
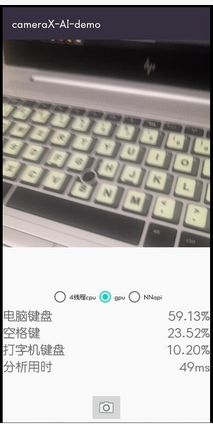
- 成品分享
cameraX是啥
CameraX 是一个 Jetpack 支持库,旨在帮助您简化相机应用的开发工作。它提供一致且易于使用的 API 界面,适用于大多数 Android 设备,并可向后兼容至 Android 5.0(API 级别 21)。虽然它利用的是 camera2 的功能,但使用的是更为简单且基于用例的方法,该方法具有生命周期感知能力。它还解决了设备兼容性问题,因此您无需在代码库中包含设备专属代码。这些功能减少了将相机功能添加到应用时需要编写的代码量。
上面都是我复制的,在我看来,它最大的好处就在于易用和兼容,在各种设备上都可以获得相近的图片格式,简化了开发难度。
tensorflow lite是啥
TensorFlow Lite 是一种用于设备端推断的开源深度学习框架。
简单地说,就是将现在正火的深度学习搬到手机上。在手机上使用你训练的模型。
开发环境和版本
Android Studio 4.0 Beta 3
‘com.android.tools.build:gradle:4.0.0-beta03’
camerax_version = “1.0.0-alpha10”
tensorflow-lite:0.0.0-nightly
本文使用的模型
谷歌的官方图像识别
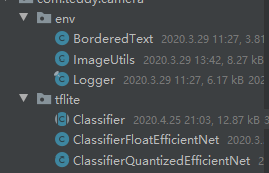
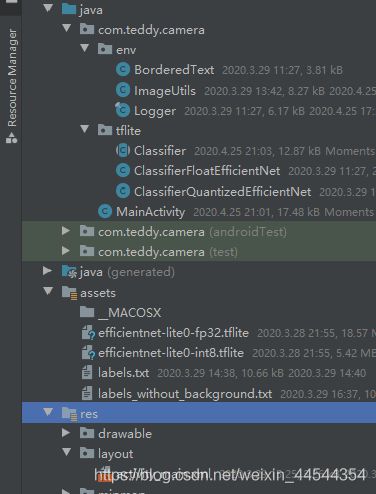
节约篇幅,我们不从零开始构建,本文主要介绍CameraX和tensorflow lite的合并使用,模型及相关代码使用官方demo,减少学习难度少翻车(我开始的是自己训练的汉字手写识别app,但是模型没训练好我一直以为是安卓端的问题,累)clone项目后,取出项目里的env文件夹和tflite文件夹。至少包含如下文件

第二步,取出模型文件和标签文件(在assets文件夹下),为了节省体积请至少包含如下文件

导入库
这里我尽可能全导入了
dependencies {
    implementation fileTree(dir: "libs", include: ["*.jar"])
    implementation 'androidx.appcompat:appcompat:1.2.0-alpha03'
    implementation 'androidx.constraintlayout:constraintlayout:1.1.3'
    testImplementation 'junit:junit:4.12'
    androidTestImplementation 'androidx.test.ext:junit:1.1.1'
    androidTestImplementation 'androidx.test.espresso:espresso-core:3.2.0'
    def camerax_version = "1.0.0-alpha10"
    implementation "androidx.camera:camera-camera2:${camerax_version}"
    // If you want to use the CameraX View class
    implementation "androidx.camera:camera-view:1.0.0-alpha08"
    // If you want to use the CameraX Extensions library
    implementation "androidx.camera:camera-extensions:1.0.0-alpha08"
    // If you want to use the CameraX Lifecycle library
    implementation "androidx.camera:camera-lifecycle:${camerax_version}"

    implementation('org.tensorflow:tensorflow-lite:0.0.0-nightly') { changing = true }
    implementation('org.tensorflow:tensorflow-lite-gpu:0.0.0-nightly') { changing = true }
    implementation('org.tensorflow:tensorflow-lite-support:0.0.0-nightly') { changing = true }
}
android {
    defaultConfig {
        ndk {
            abiFilters 'armeabi-v7a', 'arm64-v8a'//不使用x86等so,节约体积
        }
    }
    compileOptions {
        sourceCompatibility JavaVersion.VERSION_1_8
        targetCompatibility JavaVersion.VERSION_1_8
    }
    aaptOptions {
        noCompress "tflite"  //表示不让aapt压缩的文件后缀
    }
}
权限请求
相机和储存权限,安卓10的话储存可以不用,这里为了低版本安卓。
动态权限申请代码如下,oncreate里调用checkPermission()即可
 String[] permissions = new String[]{Manifest.permission.CAMERA, Manifest.permission.WRITE_EXTERNAL_STORAGE};
    List<String> mPermissionList = new ArrayList<>();

    private static final int PERMISSION_REQUEST = 1;

    // 检查权限
    private void checkPermission() {
        mPermissionList.clear();

        //判断哪些权限未授予
        for (String permission : permissions) {
            if (ContextCompat.checkSelfPermission(this, permission) != PackageManager.PERMISSION_GRANTED) {
                mPermissionList.add(permission);
            }
        }

        //判断是否为空
        if (mPermissionList.isEmpty()) {//未授予的权限为空,表示都授予了
            Log.d("Permission","success");
        } else {//请求权限方法
            @SuppressWarnings("ToArrayCallWithZeroLengthArrayArgument") String[] permissions = mPermissionList.toArray(new String[mPermissionList.size()]);//将List转为数组
            ActivityCompat.requestPermissions(MainActivity.this, permissions, PERMISSION_REQUEST);
        }
    }

    /**
     * 响应授权
     * 这里不管用户是否拒绝,都进入首页,不再重复申请权限
     */
    @Override
    public void onRequestPermissionsResult(int requestCode, @NonNull String[] permissions, @NonNull int[] grantResults) {
        super.onRequestPermissionsResult(requestCode, permissions, grantResults);
        if (requestCode == PERMISSION_REQUEST) {
            Log.d("Permission","success");
        } else {
            super.onRequestPermissionsResult(requestCode, permissions, grantResults);
            checkPermission();
            Toast.makeText(MainActivity.this, "给我权限吧,我不会做坏事的", Toast.LENGTH_LONG).show();
            finish();
        }
    }
开始编写程序
最开始打算使用viewbinding的,如果要用的话可以去翻我的其他博客
	PreviewView Mpreview;//预览界面
    TextView tx;//预测物体的名字
    TextView TAG;//概率
    ImageButton take_picture;//拍照按钮
    //拍照、分析、预览
    ImageCapture imageCapture;
    ImageAnalysis imageAnalyzer;
    Preview preview;
	@Override
    protected void onCreate(Bundle savedInstanceState) {
        super.onCreate(savedInstanceState);
        setContentView(R.layout.activity_main);
        //("佛系代码,能跑就好");
        checkPermission();
        Mpreview = findViewById(R.id.view_finder);
        take_picture=findViewById(R.id.take_picture);
        tx=findViewById(R.id.result);
        TAG=findViewById(R.id.TAG_name);
        Mpreview.post(new Runnable() {
            @Override
            public void run() {
                startCamera(MainActivity.this);
            }
        });
    }
界面布局
<TextView
        android:id="@+id/TAG_name"
        android:layout_width="250dp"
        android:layout_height="150dp"
        android:text="名字"
        android:textAlignment="viewStart"
        android:textSize="24sp"
        app:layout_constraintBottom_toBottomOf="@+id/result"
        app:layout_constraintEnd_toStartOf="@+id/result"
        app:layout_constraintHorizontal_bias="0.016"
        app:layout_constraintStart_toStartOf="parent"
        app:layout_constraintTop_toTopOf="@+id/result"
        app:layout_constraintVertical_bias="0.0" />

    <ImageButton
        android:id="@+id/take_picture"
        android:layout_width="wrap_content"
        android:layout_height="wrap_content"
        app:layout_constraintBottom_toBottomOf="parent"
        app:layout_constraintEnd_toEndOf="parent"
        app:layout_constraintStart_toStartOf="parent"
        app:srcCompat="@android:drawable/ic_menu_camera" />

    <TextView
        android:id="@+id/result"
        android:layout_width="100dp"
        android:layout_height="150dp"
        android:text="结果概率"
        android:textAlignment="viewEnd"
        android:textSize="24sp"
        app:layout_constraintBottom_toTopOf="@+id/take_picture"
        app:layout_constraintEnd_toEndOf="parent" />

    <RadioGroup
        android:id="@+id/mood"
        android:layout_width="wrap_content"
        android:layout_height="wrap_content"

        android:orientation="horizontal"
        app:layout_constraintBottom_toTopOf="@+id/TAG_name"
        app:layout_constraintEnd_toEndOf="parent"
        app:layout_constraintStart_toStartOf="parent">

        <RadioButton
            android:id="@+id/cpu"
            android:layout_width="wrap_content"
            android:layout_height="wrap_content"
            android:checked="true"
            android:padding="0dp"
            android:singleLine="true"
            android:text="4线程cpu"
            android:textSize="12sp" />

        <RadioButton
            android:id="@+id/gpu"
            android:layout_width="wrap_content"
            android:layout_height="wrap_content"
            android:text="gpu"
            android:textSize="12sp" />

        <RadioButton
            android:id="@+id/nnapi"
            android:layout_width="wrap_content"
            android:layout_height="wrap_content"
            android:text="NNapi"
            android:textSize="12sp" />
    </RadioGroup>

    <androidx.camera.view.PreviewView
        android:id="@+id/view_finder"
        android:layout_width="wrap_content"
        android:layout_height="wrap_content"
        app:layout_constraintEnd_toEndOf="parent"
        app:layout_constraintStart_toStartOf="parent"
        app:layout_constraintTop_toTopOf="parent" />
相机实现,做了简单的注释
    private void startCamera(Context context) {

        ListenableFuture cameraProviderFuture = ProcessCameraProvider.getInstance(context);


//这里可以切换前后摄像头
        CameraSelector cameraSelector = new CameraSelector.Builder().requireLensFacing(CameraSelector.LENS_FACING_BACK).build();

        cameraProviderFuture.addListener(new Runnable() {
            @Override
            public void run() {
                try {
                //预览
                    ProcessCameraProvider processCameraProvider= (ProcessCameraProvider) cameraProviderFuture.get();
                    preview = new Preview.Builder()
                            .setTargetAspectRatio(AspectRatio.RATIO_16_9)
                            .setTargetRotation(Mpreview.getDisplay().getRotation())
                            .build();
                    preview.setSurfaceProvider(Mpreview.getPreviewSurfaceProvider());

				//拍照
                    imageCapture = new ImageCapture.Builder()
                            .setCaptureMode(ImageCapture.CAPTURE_MODE_MINIMIZE_LATENCY)
                            .setTargetAspectRatio(AspectRatio.RATIO_16_9)
                            .setTargetRotation(Mpreview.getDisplay().getRotation())
                            .build();
				//分析
                    imageAnalyzer = new ImageAnalysis.Builder()
                            .setTargetAspectRatio(AspectRatio.RATIO_16_9)
                            .setTargetRotation(Mpreview.getDisplay().getRotation())
                            .build();

                    ExecutorService cameraExecutor = Executors.newSingleThreadExecutor();
                    imageAnalyzer.setAnalyzer(cameraExecutor, new ImageAnalysis.Analyzer() {
                        @SuppressLint("UnsafeExperimentalUsageError")
                        @Override
                        public void analyze(@NonNull ImageProxy image) {
                            Log.d("分析","start");
                            classification(image);//后面的分类部分
                            image.close();
                        }
                    });
//每次绑定生命周期前需要先解绑
                    processCameraProvider.unbindAll();
                    processCameraProvider.bindToLifecycle((LifecycleOwner) context,cameraSelector,preview,imageCapture,imageAnalyzer);
                } catch (ExecutionException e) {
                    e.printStackTrace();
                } catch (InterruptedException e) {
                    e.printStackTrace();
                }

            }
        }, ContextCompat.getMainExecutor(context));

//按下拍照键拍照
        take_picture.setOnClickListener(new View.OnClickListener() {
            @Override
            public void onClick(View v) {
                String filename=context.getExternalFilesDir(Environment.DIRECTORY_DOCUMENTS) + File.separator + "name.jpg";
                File file=new File(filename);
                ImageCapture.OutputFileOptions outputFileOptions= new ImageCapture.OutputFileOptions.Builder(file).build();
                ExecutorService cameraExecutor = Executors.newSingleThreadExecutor();

//保存照片,拍照的回调
                ImageCapture.OnImageSavedCallback Callback=new ImageCapture.OnImageSavedCallback() {

                    @Override
                    public void onImageSaved(@NonNull ImageCapture.OutputFileResults outputFileResults) {

                        try {
                            MediaStore.Images.Media.insertImage(MainActivity.this.getContentResolver(), file.getAbsolutePath(), filename, null);
                        } catch (FileNotFoundException e) {
                            e.printStackTrace();
                        }
                        MainActivity.this.sendBroadcast(new Intent(Intent.ACTION_MEDIA_SCANNER_SCAN_FILE, Uri.fromFile(new File(file.getPath()))));
                        Looper.prepare();
                        Toast.makeText(context,"咔嚓",Toast.LENGTH_LONG).show();
                        Looper.loop();
                    }

                    @Override
                    public void onError(@NonNull ImageCaptureException exception) {
                        Looper.prepare();
                        Toast.makeText(context,"erro:"+exception.getMessage(),Toast.LENGTH_LONG).show();
                        Looper.loop();
                    }
                };
                imageCapture.takePicture(outputFileOptions, cameraExecutor,Callback );
            }
        });

//a是切换按钮,切换不同硬件
        RadioGroup a=findViewById(R.id.mood);
        a.setOnCheckedChangeListener(new RadioGroup.OnCheckedChangeListener() {
            @Override
            public void onCheckedChanged(RadioGroup group, int checkedId) {
                switch (group.getCheckedRadioButtonId()) {
                    case R.id.cpu://使用cpu需要指定核心数
                        Device cdevice = Device.CPU;
                        Model cmodel = Model.QUANTIZED_EFFICIENTNET;

                        runInBackground(() ->  recreateClassifier(cmodel, cdevice, 4));
                        break;
                    case R.id.gpu://使用gpu请注意部分模型不支持gpu
                        Device gdevice = Device.GPU;
                        Model gmodel = Model.FLOAT_EFFICIENTNET;
                        runInBackground(() ->  recreateClassifier(gmodel, gdevice, -1));

                        break;
                    case R.id.nnapi://使用nnapi请保证安卓版本大于8.1
                        Device ndevice = Device.NNAPI;
                        Model nmodel = Model.FLOAT_EFFICIENTNET;
                        runInBackground(() ->  recreateClassifier(nmodel, ndevice, -1));
                        break;
                }
            }
        });
        recreateClassifier(model,device,numThreads);//创建模型
    }
下面就是开始分类啦,先是一些(打杂函数,这里就不介绍了)
  protected int getScreenOrientation() {
        switch (getWindowManager().getDefaultDisplay().getRotation()) {
            case Surface.ROTATION_270:
                return 270;
            case Surface.ROTATION_180:
                return 180;
            case Surface.ROTATION_90:
                return 90;
            default:
                return 0;
        }
    }

    protected int[] getRgbBytes() {
        imageConverter.run();
        return rgbBytes;
    }
    protected synchronized void runInBackground(final Runnable r) {
        if (handler != null) {
            handler.post(r);
        }
    }

    private void recreateClassifier(Model model, Device device, int numThreads) {
        if (classifier != null) {
            classifier.close();
            classifier = null;
        }
        try {
            classifier = Classifier.create(this, model, device, numThreads);
        } catch (IOException e) {
           Log.e(e.getMessage(), "Failed to create classifier.");
        }

    }
    @Override//这个别忘了
    protected void onResume() {
        super.onResume();
        handlerThread = new HandlerThread("inference");
        handlerThread.start();
        handler = new Handler(handlerThread.getLooper());
    }
这个函数可以放入imageUtils文件下作为补充
public static byte[] getBytes(ImageProxy image, int width, int height) {
    int format = image.getFormat();
    if (format != ImageFormat.YUV_420_888) {
      //抛出异常
    }
    //创建一个ByteBuffer i420对象,其字节数是height*width*3/2,存放最后的I420图像数据
    int size = height * width * 3 / 2;
    //TODO:防止内存抖动
    if (i420 == null || i420.capacity() < size) {
      i420 = ByteBuffer.allocate(size);
    }
    i420.position(0);
    //YUV planes数组
    ImageProxy.PlaneProxy[] planes = image.getPlanes();
    //TODO:取出Y数据,放入i420
    int pixelStride = planes[0].getPixelStride();
    ByteBuffer yBuffer = planes[0].getBuffer();
    int rowStride = planes[0].getRowStride();
    //1.若rowStride等于Width,skipRow是一个空数组
    //2.若rowStride大于Width,skipRow就刚好可以存储每行多出来的几个byte
    byte[] skipRow = new byte[rowStride - width];
    byte[] row = new byte[width];
    for (int i = 0; i < height; i++) {
      yBuffer.get(row);
      i420.put(row);
      //1.若不是最后一行,将无效占位数据放入skipRow数组
      //2.若是最后一行,不存在无效无效占位数据,不需要处理,否则报错
      if (i < height - 1) {
        yBuffer.get(skipRow);
      }
    }

    //TODO:取出U/V数据,放入i420
    for (int i = 1; i < 3; i++) {
      ImageProxy.PlaneProxy plane = planes[i];
      pixelStride = plane.getPixelStride();
      rowStride = plane.getRowStride();
      ByteBuffer buffer = plane.getBuffer();

      int uvWidth = width / 2;
      int uvHeight = height / 2;

      //一次处理一行
      for (int j = 0; j < uvHeight; j++) {
        //一次处理一个字节
        for (int k = 0; k < rowStride; k++) {
          //1.最后一行
          if (j == uvHeight - 1) {
            //1.I420:UV没有混合在一起,rowStride大于等于Width/2,如果是最后一行,不理会占位数据
            if (pixelStride == 1 && k >= uvWidth) {
              break;
            }
            //2.NV21:UV混合在一起,rowStride大于等于Width-1,如果是最后一行,不理会占位数
            if (pixelStride == 2 && k >= width - 1) {
              break;
            }
          }
          //2.非最后一行
          byte b = buffer.get();
          //1.I420:UV没有混合在一起,仅保存索引为偶数的有效数据,不理会占位数据
          if (pixelStride == 1 && k < uvWidth) {
            i420.put(b);
            continue;
          }
          //2.NV21:UV混合在一起,仅保存索引为偶数的有效数据,不理会占位数据
          if (pixelStride == 2 && k < width - 1 && k % 2 == 0) {
            i420.put(b);
            continue;
          }
        }
      }
    }

    //TODO:将i420数据转成byte数组,执行旋转,并返回
    int srcWidth = image.getWidth();
    int srcHeight = image.getHeight();
    byte[] result = i420.array();

    return result;
  }
分类开始┗|`O′|┛ 嗷~~
这里的图片处理大多还是用的官方的demo,这里可以改用TensorImage和ImageProcessor,改大小改方向更简单
private void classification(ImageProxy image){//将分析接口传来的图片转换为数组
        if(running)//没处理完就不管了
            return;
        running=true;
        byte[] imageBytes = ImageUtils.getBytes(image,image.getWidth(),image.getHeight());
        yuvBytes[0]=imageBytes;
        previewHeight = image.getHeight();
        previewWidth = image.getWidth();
        rgbBytes = new int[previewWidth * previewHeight];
        rgbFrameBitmap = Bitmap.createBitmap(previewWidth, previewHeight, Bitmap.Config.ARGB_8888);
        sensorOrientation = 90 - getScreenOrientation();
        imageConverter =
                new Runnable() {
                    @Override
                    public void run() {
                        ImageUtils.convertYUV420SPToARGB8888(imageBytes, previewWidth, previewHeight, rgbBytes);
                    }
                };
        image.close();
        processImage();
    }
 protected void processImage(){
        rgbFrameBitmap.setPixels(getRgbBytes(), 0, previewWidth, 0, 0, previewWidth, previewHeight);

//得到结果,取前三
        runInBackground(
                new Runnable() {
                    @Override
                    public void run() {
                        Mresult="";
                        MTAG="";
                        if (classifier != null) {
                            final long startTime = SystemClock.uptimeMillis();
                            final List<Classifier.Recognition> results =
                                    classifier.recognizeImage(rgbFrameBitmap, sensorOrientation);
                            lastProcessingTimeMs = SystemClock.uptimeMillis() - startTime;
                            Log.d("time",lastProcessingTimeMs+"ms");
                            runOnUiThread(
                                    new Runnable() {
                                        @Override
                                        public void run() {
                                            if (results != null && results.size() >= 3) {
                                                Classifier.Recognition recognition = results.get(0);
                                                if (recognition != null) {
                                                    if (recognition.getTitle() != null)
                                                        if (recognition.getConfidence() != null) {
                                                            MTAG += (recognition.getTitle()+"\n");
                                                            Mresult += (String.format("%.2f", (100 * recognition.getConfidence())) + "%\n");
                                                        }
                                                }
                                                Classifier.Recognition recognition1 = results.get(1);
                                                if (recognition1 != null) {
                                                    if (recognition1.getTitle() != null)
                                                    if (recognition1.getConfidence() != null){
                                                        MTAG+=recognition1.getTitle()+"\n";
                                                        Mresult+=(String.format("%.2f", (100 * recognition1.getConfidence())) + "%\n");
                                                    }
                                                }
                                                Classifier.Recognition recognition2 = results.get(2);
                                                if (recognition2 != null) {
                                                    if (recognition2.getTitle() != null)
                                                    if (recognition2.getConfidence() != null) {
                                                        MTAG += recognition2.getTitle()+"\n";
                                                        Mresult += (String.format("%.2f", (100 * recognition2.getConfidence())) + "%\n");
                                                    }
                                                }
                                                MTAG +="分析用时";
                                                Mresult+=lastProcessingTimeMs+"ms";
                                                tx.setText(Mresult);
                                                TAG.setText(MTAG);
                                            }
                                            running=false;
                                        }
                                    });
                        }
                    }
                });
    }
成品分享

已经编译好的app安装包
App链接:pan.baidu.com/s/1xmESfnc7r2SgSpYom2-X4Q
提取码:45hw
项目也已经整体达成一个压缩包传csdn了
