ChildWindow -父窗体交互
原文链接:http://www.cnblogs.com/daizhj/archive/2009/07/23/1529323.html
在Silverlight中写一个弹窗功能并不难,但必定也要自己写代码,定义模式去实现,而
在SilverlightToolKit3中,提供了一个叫“ChildWindow”的类,位于:
使用它,我们可以很容易的将任何想放在新窗口中显示的内容,以弹窗的形式显示显示。
下面演示一下效果:
1.点击弹窗按钮。
2.弹出子窗体,并输入数据。
3.点击“提交”按钮返回父窗体。

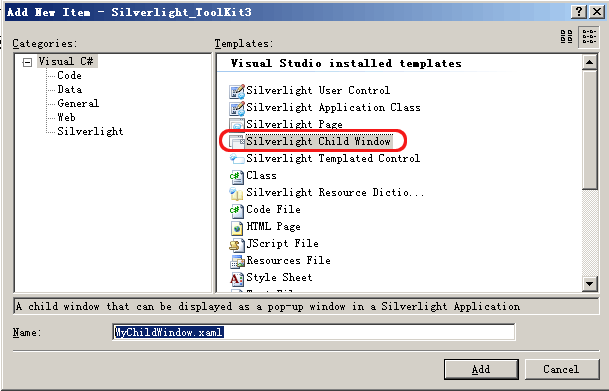
下面就简要介绍一下其用法,如果之前我们执行了Silverlight ToolKit 3 的安装包。我
们只要在相应的SL应用项目上击鼠标右键,选“添加”--> "新建项",就可以在弹出窗口中
看到新加了一个“Silverlight Child Window”模板,这时我们选中它,并将新创建的子窗口
命名为:MyChildWindow.xaml

这样,我们在可以在这个新建的XAML文件中加入任何我们想弹窗显示的元素了,比如:
 代码
代码
      <

      controls:ChildWindow x:Class

      =

      "

      Silverlight_ToolKit3.MyChildWindow

      "


 xmlns

      =

      "

      http://schemas.microsoft.com/winfx/2006/xaml/presentation

      "


 xmlns:x

      =

      "

      http://schemas.microsoft.com/winfx/2006/xaml

      "


 xmlns:controls

      =

      "

      clr-namespace:System.Windows.Controls;assembly=System.Windows.Controls

      "


 Width

      =

      "

      400

      "

       Height

      =

      "

      180

      "

      >


      <

      Grid x:Name

      =

      "

      LayoutRoot

      "

       Background

      =

      "

      White

      "

      >


      <

      Grid.ColumnDefinitions

      >


      <

      ColumnDefinition Width

      =

      "

      100

      "

      />


      <

      ColumnDefinition Width

      =

      "

      300

      "

      />


      </

      Grid.ColumnDefinitions

      >


      <

      Grid.RowDefinitions

      >


      <

      RowDefinition Height

      =

      "

      50

      "

      />


      <

      RowDefinition Height

      =

      "

      50

      "

      />


      <

      RowDefinition Height

      =

      "

      50

      "

      />


      </

      Grid.RowDefinitions

      >


      <

      TextBlock Text

      =

      "

      用户名:

      "

       Grid.Column

      =

      "

      0

      "

       Grid.Row

      =

      "

      0

      "


      />


      <

      TextBox Width

      =

      "

      200

      "

       x:Name

      =

      "

      UserName

      "

       Grid.Column

      =

      "

      1

      "

       Grid.Row

      =

      "

      0

      "

       Height

      =

      "

      30

      "

      />


      <

      TextBlock Text

      =

      "

      密码:

      "

       Grid.Column

      =

      "

      0

      "

       Grid.Row

      =

      "

      1

      "

      />


      <

      TextBox Width

      =

      "

      200

      "

       x:Name

      =

      "

      PassWord

      "

       Grid.Column

      =

      "

      1

      "

       Grid.Row

      =

      "

      1

      "

       Height

      =

      "

      30

      "

      />


      <

      StackPanel Grid.ColumnSpan

      =

      "

      2

      "

       Orientation

      =

      "

      Horizontal

      "

       HorizontalAlignment

      =

      "

      Center

      "

       Grid.Row

      =

      "

      2

      "

      >


      <

      Button Content

      =

      "

      提交

      "

       Width

      =

      "

      75

      "

       Height

      =

      "

      25

      "

       x:Name

      =

      "

      Submit

      "

       Click

      =

      "

      Submit_Click

      "

      />


      <

      Button Content

      =

      "

      取消

      "

       Width

      =

      "

      75

      "

       Height

      =

      "

      25

      "

       x:Name

      =

      "

      Cancel

      "

       Click

      =

      "

      Cancel_Click

      "

      />


      </

      StackPanel

      >


      </

      Grid

      >


      </

      controls:ChildWindow

      >
我们看到上面的XAML中的按钮有两个单击事件,分别对应提交和取消操作,相应事件处理
代码如下:
     private


     void

      Submit_Click(

     object

      sender, RoutedEventArgs e)
{


     this

     .DialogResult

     =


     true

     ;
}


     private


     void

      Cancel_Click(

     object

      sender, RoutedEventArgs e)
{


     this

     .DialogResult

     =


     false

     ;
}
代码比较简单,主要是将当前对话框的结果(关闭时状态)传递给父窗口。
下面我们就来看一下父窗口是如果实现弹窗功能的。
首先我们在父窗口放置一个Button元素,并将Click事件进行绑定如下:
     <

     Button Content

     =

     "

     显示子窗口

     "

      Height

     =

     "

     23

     "

      Grid.Column

     =

     "

     0

     "

      Grid.Row

     =

     "

     0

     "

      Click

     =

     "

     ShowWindow_Click

     "

     />
然后向父窗口的XAML.CS文件中复制如下代码:
 代码
代码
       MyChildWindow myChildWindow

      =


      new

       MyChildWindow();


      public

       MainPage()
 {
 InitializeComponent();


      //

      子窗口事件绑定


       myChildWindow.Closed

      +=


      new

       EventHandler(myChildWindow_Closed);
 }


      #region

       子窗口事件代码


      void

       myChildWindow_Closed(

      object

       sender, EventArgs e)
 {


      if

       (myChildWindow.DialogResult

      ==


      true

      )
 Message.Text

      =


      string

      .Format(

      "

      用户名:{0} 密码:{1}

      "

      , myChildWindow.UserName.Text, myChildWindow.PassWord.Text);


      else


 Message.Text

      =


      "

      取消

      "

      ;
 }


      private


      void

       ShowWindow_Click(

      object

       sender, RoutedEventArgs e)
 {
 myChildWindow.Title

      =


      "

      子窗口信息

      "

      ;
 myChildWindow.OverlayBrush

      =


      new

       SolidColorBrush(Colors.Yellow);
 myChildWindow.Opacity

      =


      0.9

      ;
 myChildWindow.HasCloseButton

      =


      true

      ;
 myChildWindow.Foreground

      =


      new

       SolidColorBrush(Colors.Red);
 myChildWindow.FontSize

      =


      14

      ;


      //

      myChildWindow.OverlayOpacity = 0.9;


      //

      myChildWindow.IsEnabled = false;


 myChildWindow.Show();
 }


      #endregion
上述代码首先声明一个MyChildWindow实例,用于进行相关弹窗操作。然后在构程方法中
对该实例的Closed事件绑定事件处理代码“myChildWindow_Closed”, 在该事件中我们可
以通过对DialogResult的判断(之前子窗口中已通过相关CLICK事件进行了绑定),来获取子
窗口中的输入数据信息并进行显示。
最后的事件就是弹窗事件代码了,在这里可以对窗体背景的透明度Opacity,子窗口是否包
括关闭按钮(窗体右上方),子弹体是否有效等属性进行设置,并最终调用Show()方法来显示
子窗体。
好了,今天的内容就先到这里了。
源码下载:http://files.cnblogs.com/daizhj/Silverlight_ToolKit3.rar
原文链接:http://www.cnblogs.com/daizhj/archive/2009/07/23/1529323.html
