微服务架构的环境搭建及简单测试
目录
一、系统架构的演变过程
1.0 前言
1.1 单体应用架构
1.2 垂直应用架构
1.3 分布式架构
1.4 SOA架构
1.5 微服务架构
二、微服务架构搭建
2.1 微服务架构简介
2.2 微服务案例准备
2.3 创建父工程、基础模块
2.4 创建微服务
一、系统架构的演变过程
1.0 前言
随着互联网的发展,网站应用的规模也在不断的扩大,进而导致系统架构也在不断的进行变化。 从互联网早起到现在,系统架构大体经历了下面几个过程:
单体应用架构--->垂直应用架构--->分布 式架构--->SOA架构--->微服务架构
当然还有悄然兴起的Service Mesh(服务网格化)。
接下来我们就来了解一下每种系统架构是什么样子的, 以及各有什么优缺点吧~
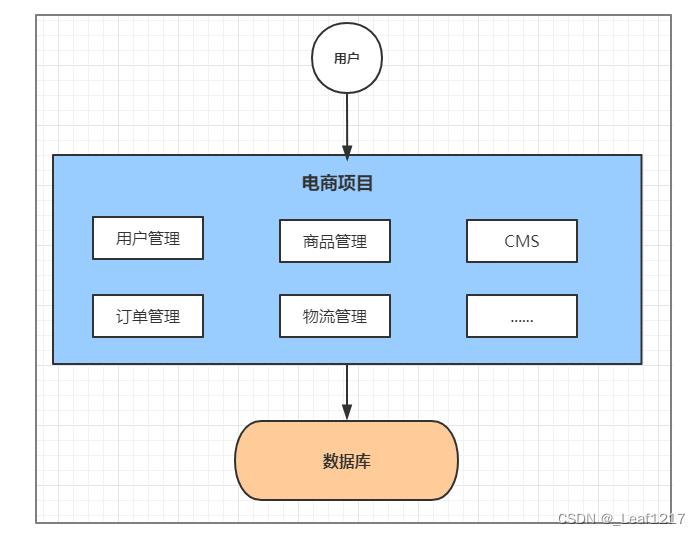
1.1 单体应用架构
互联网早期,一般的网站应用流量较小,只需一个应用,将所有功能代码都部署在一起就可以,这 样可以减少开发、部署和维护的成本。 比如说一个电商系统,里面会包含很多用户管理,商品管理,订单管理,物流管理等等很多模块, 我们会把它们做成一个web项目,然后部署到一台tomcat服务器上。
优点:
-
项目架构简单,小型项目的话, 开发成本低
-
项目部署在一个节点上, 维护方便
缺点:
-
全部功能集成在一个工程中,对于大型项目来讲不易开发和维护
-
项目模块之间紧密耦合,单点容错率低
-
无法针对不同模块进行针对性优化和水平扩展
1.2 垂直应用架构
随着访问量的逐渐增大,单一应用只能依靠增加节点来应对,但是这时候会发现并不是所有的模块 都会有比较大的访问量. 还是以上面的电商为例子, 用户访问量的增加可能影响的只是用户和订单模块, 但是对消息模块 的影响就比较小. 那么此时我们希望只多增加几个订单模块, 而不增加消息模块. 此时单体应用就做不 到了, 垂直应用就应运而生了. 所谓的垂直应用架构,就是将原来的一个应用拆成互不相干的几个应用,以提升效率。比如我们可 以将上面电商的单体应用拆分成:
-
电商系统(用户管理 商品管理 订单管理)
-
后台系统(用户管理 订单管理 客户管理)
-
CMS系统(广告管理 营销管理)
这样拆分完毕之后,一旦用户访问量变大,只需要增加电商系统的节点就可以了,而无需增加后台 和CMS的节点。

优点:
-
系统拆分实现了流量分担,解决了并发问题,而且可以针对不同模块进行优化和水平扩展
-
一个系统的问题不会影响到其他系统,提高容错率
缺点:
-
系统之间相互独立, 无法进行相互调用
-
系统之间相互独立, 会有重复的开发任务
1.3 分布式架构
当垂直应用越来越多,重复的业务代码就会越来越多。这时候,我们就思考可不可以将重复的代码 抽取出来,做成统一的业务层作为独立的服务,然后由前端控制层调用不同的业务层服务呢? 这就产生了新的分布式系统架构。它将把工程拆分成表现层和服务层两个部分,服务层中包含业务 逻辑。表现层只需要处理和页面的交互,业务逻辑都是调用服务层的服务来实现。

优点:
-
抽取公共的功能为服务层,提高代码复用性
缺点:
-
系统间耦合度变高,调用关系错综复杂,难以维护
1.4 SOA架构
在分布式架构下,当服务越来越多,容量的评估,小服务资源的浪费等问题逐渐显现,此时需增加 一个调度中心对集群进行实时管理。此时,用于资源调度和治理中心(SOA Service Oriented Architecture,面向服务的架构)是关键。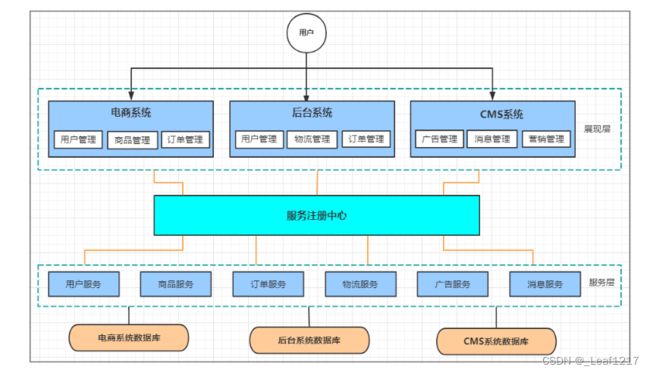
优点:
-
使用注册中心解决了服务间调用关系的自动调节
缺点:
-
服务间会有依赖关系,一旦某个环节出错会影响较大( 服务雪崩 )
-
服务关系复杂,运维、测试部署困难
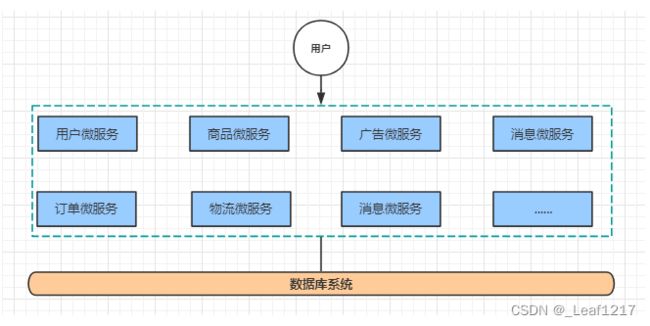
1.5 微服务架构
微服务架构在某种程度上是面向服务的架构SOA继续发展的下一步,它更加强调服务的"彻底拆分"。
优点:
-
服务原子化拆分,独立打包、部署和升级,保证每个微服务清晰的任务划分,利于扩展
-
微服务之间采用Restful等轻量级http协议相互调用
缺点:
-
分布式系统开发的技术成本高(容错、分布式事务等)
二、微服务架构搭建
2.1 微服务架构简介
微服务架构, 简单的说就是将单体应用进一步拆分,拆分成更小的服务,每个服务都是一个可以独 立运行的项目。
2.2 微服务案例准备
上面都是讲的关于系统架构的演变过程以及各个架构的简单介绍,然后咱们今天主要就是以微服务架构为例,看看如何搭建一个微服务架构并且测试;
我们本次是使用的电商项目中的商品、订单、用户为案例进行讲解。
模块设计
springcloud-shop父工程
shop-common 公共模块【实体类】
shop-user 用户微服务 【端口: 8070】
shop-product 商品微服务 【端口: 8080】
shop-order 订单微服务 【端口: 8090】

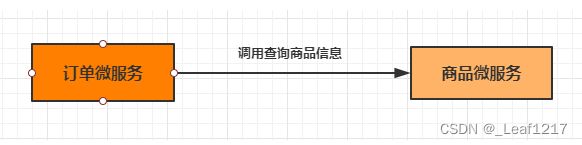
微服务调用
在微服务架构中,最常见的场景就是微服务之间的相互调用。我们以电商系统中常见的用户下单为 例来演示微服务的调用:客户向订单微服务发起一个下单的请求,在进行保存订单之前需要调用商品微 服务查询商品的信息。 我们一般把服务的主动调用方称为服务消费者,把服务的被调用方称为服务提供者。 在这种场景下,订单微服务就是一个服务消费者, 商品微服务就是一个服务提供者。
2.3 创建父工程、基础模块
创建一个maven项目作为父工程,不用勾选任何配置;
然后添加以下pom依赖:
    4.0.0

    com.leaf
    spcloud-shop
    1.0-SNAPSHOT

        shop-common

    pom


        1.8
        UTF-8
        UTF-8
        2.3.2.RELEASE
        Hoxton.SR9
        2.2.6.RELEASE


                org.springframework.boot
                spring-boot-dependencies
                ${spring-boot.version}
                pom
                import
然后再创建一个基础模块,同样也是maven项目;
添加以下pom依赖:
        spcloud-shop
        com.leaf
        1.0-SNAPSHOT

    4.0.0

    shop-common


            org.springframework.boot
            spring-boot-starter-data-jpa


            org.projectlombok
            lombok


            com.alibaba
            fastjson
            1.2.56
2.4 创建微服务
接下来就是分别创建我们的三个微服务,这些就是都为springboot项目;
并且导入以下pom依赖
        spcloud-shop
        com.leaf
        1.0-SNAPSHOT


    4.0.0
    shop-user


            org.springframework.boot
            spring-boot-starter-web


            com.leaf
            shop-common
            1.0-SNAPSHOT
然后我们就可以创建我们的controller层进行一个简单的测试啦:
UserController
package com.leaf.shopuser.controller;

import com.leaf.model.User;
import org.springframework.web.bind.annotation.PathVariable;
import org.springframework.web.bind.annotation.RequestMapping;
import org.springframework.web.bind.annotation.RestController;

/**
 * @author Leaf
 * @site 2977819715
 * @company 玉渊工作室
 * @create  2022-11-25 2:12
 */
@RestController
@RequestMapping("/user")
public class UserController {

    @RequestMapping("/get/{id}")
    public User get(@PathVariable("id") Integer id){
        return new User(id,"Leaf","999","123456789");
    }

}
ProductController
package com.leaf.shopproduct.controller;

import com.leaf.model.Product;
import org.springframework.web.bind.annotation.PathVariable;
import org.springframework.web.bind.annotation.RequestMapping;
import org.springframework.web.bind.annotation.RestController;

/**
 * @author Leaf
 * @site 2977819715
 * @company 玉渊工作室
 * @create  2022-11-25 2:16
 */
@RestController
@RequestMapping("/product")
public class ProductController {

    @RequestMapping("/get/{pid}")
    public Product get(@PathVariable("pid") Integer pid){
        return new Product(pid,"《西游记》",99d,36);
    }

}
OrderController
package com.leaf.shoporder.controller;

import com.leaf.model.Order;
import com.leaf.model.Product;
import com.leaf.model.User;
import org.springframework.beans.factory.annotation.Autowired;
import org.springframework.web.bind.annotation.PathVariable;
import org.springframework.web.bind.annotation.RequestMapping;
import org.springframework.web.bind.annotation.RestController;
import org.springframework.web.client.RestTemplate;

/**
 * @author Leaf
 * @site 2977819715
 * @company 玉渊工作室
 * @create  2022-11-25 2:11
 */
@RestController
@RequestMapping("/order")
public class OrderController {

    @Autowired
    private RestTemplate restTemplate;

    @RequestMapping("/get/{uid}/{pid}")
    public Order get(@PathVariable("uid") Integer uid,
                     @PathVariable("pid") Integer pid){

        /**
         * 在订单微服务中调用:用户微服务、商品微服务,也就是跨项目调用
         */
        User user = restTemplate.getForObject("http://localhost:8070/user/get/" + uid, User.class);
        Product product = restTemplate.getForObject("http://localhost:8080/product/get/" + pid, Product.class);
        Order order = new Order();
        order.setUsername(user.getUsername());
        order.setUid(user.getUid());
        order.setPprice(product.getPprice());
        order.setPname(product.getPname());
        order.setPid(product.getPid());
        order.setOid(System.currentTimeMillis());
        order.setNumber(product.getStock());
        return order;
    }

}
这里就要注意,我们是在订单的微服务项目中调用其他两个服务,所用到的RestTemplate需要在订单服务的启动类加入Bean管理;
代码如下:
package com.leaf.shoporder;

import org.springframework.boot.SpringApplication;
import org.springframework.boot.autoconfigure.SpringBootApplication;
import org.springframework.boot.autoconfigure.jdbc.DataSourceAutoConfiguration;
import org.springframework.context.annotation.Bean;
import org.springframework.web.client.RestTemplate;

@SpringBootApplication(exclude= DataSourceAutoConfiguration.class)
public class ShopOrderApplication {

    public static void main(String[] args) {
        SpringApplication.run(ShopOrderApplication.class, args);
    }

    @Bean
    public RestTemplate restTemplate(){
        return new RestTemplate();
    }

}
然后我们把三个微服务全部启动,直接运行访问http://localhost:8090/order/get/5/9就好啦:
