【Bert】(四)句子关系判断--源码解析(解析数据)
论文:https://arxiv.org/pdf/1810.04805.pdf
官方代码:GitHub - google-research/bert: TensorFlow code and pre-trained models for BERT
1. 读取数据
具体代码位于run_classifier.py文件中。这里就是将数据一行行读取出来。
基础数据类,后续的数据类都继承于该类。
class DataProcessor(object):
  """Base class for data converters for sequence classification data sets."""

  def get_train_examples(self, data_dir):
    """Gets a collection of `InputExample`s for the train set."""
    raise NotImplementedError()

  def get_dev_examples(self, data_dir):
    """Gets a collection of `InputExample`s for the dev set."""
    raise NotImplementedError()

  def get_test_examples(self, data_dir):
    """Gets a collection of `InputExample`s for prediction."""
    raise NotImplementedError()

  def get_labels(self):
    """Gets the list of labels for this data set."""
    raise NotImplementedError()

  @classmethod
  def _read_tsv(cls, input_file, quotechar=None):
    """Reads a tab separated value file."""
    with tf.gfile.Open(input_file, "r") as f:
      reader = csv.reader(f, delimiter="\t", quotechar=quotechar)
      lines = []
      for line in reader:
        lines.append(line)
      return lines
MrpcProcessor类主要处理MRPC数据。
class MrpcProcessor(DataProcessor):
  """Processor for the MRPC data set (GLUE version)."""

  def get_train_examples(self, data_dir):
    """See base class."""
    return self._create_examples(
        self._read_tsv(os.path.join(data_dir, "train.tsv")), "train")

  def get_dev_examples(self, data_dir):
    """See base class."""
    return self._create_examples(
        self._read_tsv(os.path.join(data_dir, "dev.tsv")), "dev")

  def get_test_examples(self, data_dir):
    """See base class."""
    return self._create_examples(
        self._read_tsv(os.path.join(data_dir, "test.tsv")), "test")

  def get_labels(self):
    """See base class."""
    return ["0", "1"]

  def _create_examples(self, lines, set_type):
    """Creates examples for the training and dev sets."""
    examples = []
    for (i, line) in enumerate(lines):
      if i == 0:
        continue
      guid = "%s-%s" % (set_type, i)
      text_a = tokenization.convert_to_unicode(line[3]) #这里其实就是将读取的内容转变成常规字符串
      text_b = tokenization.convert_to_unicode(line[4])
      if set_type == "test":
        label = "0"
      else:
        label = tokenization.convert_to_unicode(line[0])
      examples.append(
          InputExample(guid=guid, text_a=text_a, text_b=text_b, label=label))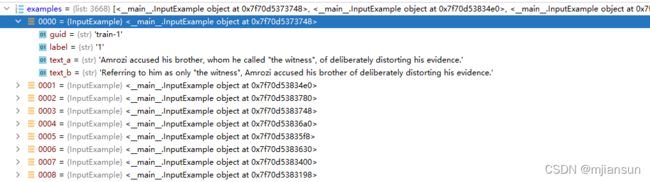
return examples通过_read_tsv(cls, input_file, quotechar=None)得到的lines的内容为:

经过_create_examples(self, lines, set_type)函数和InputExample(object)类,InputExample(object)类属于数据结构的定义,抽象出来的数据概念,后续处理新的数据时,其他随便写,只要最终的数据使用的是InputExample(object)类即可。
最终得到的数据为:
2. 数据处理
当看到上述text的句子时,最先产生的疑惑,如何将句子转变成向量?
从代码顺序来看的话,首先会碰到 file_based_convert_examples_to_features(examples, label_list, max_seq_length, tokenizer, output_file)函数,该函数主要是将数据保存为tfrecord,因为当训练的数据量特别庞大时,使用该方式能加速读取速度。这个加速是由于将处理过的文件持续化保存到本地,然后程序再次读取时,减少了处理的时间,另外tfrecord这种格式读取也非常快。
下面回到刚刚的疑问,如何将句子向量化,关键就在convert_single_example(ex_index, example, label_list, max_seq_length, tokenizer)函数。
针对该函数,我们通过举例来实现:

2.1 将label转变成从0开始的编码
  label_map = {}
  for (i, label) in enumerate(label_list):
label_map[label] = i 
2.2 tokenizer
  tokens_a = tokenizer.tokenize(example.text_a)
  tokens_b = None
  if example.text_b:
    tokens_b = tokenizer.tokenize(example.text_b)
这里的 tokenizer的方法来自于tokenization.py的文件的class FullTokenizer(object)中。
2.2.1 读取vocabulary词汇表
self.vocab = load_vocab(vocab_file)
self.inv_vocab = {v: k for k, v in self.vocab.items()} 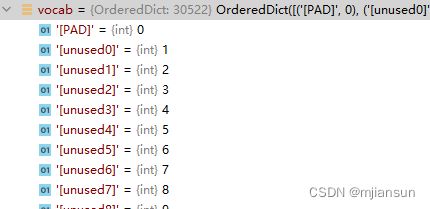

看到词汇表的数据格式,应该就能猜到,有了这个词汇表,只需要将上述的text_a变成词汇表中的词汇对应的字号就行。
这里又会有一个问题,如果text_a中的词在词汇表中不存在怎么办?
最朴素的方法就是在词汇表中加入新的词构成新的词汇表。
但是我们可以观察一下他们的名字,千奇百怪,总不能把名字都加进去吧,另外很多词又很多种形态,例如ing的进行时,'s的简写等。
为了能够涵盖这些内容,同时考虑到这些词汇的规则,需要将text_a中的词拆分,使得拆分过得词能在词汇表中出现,这样就能向量化了。针对这个问题,大佬们想出了tokenizer的方式,tokenizer由basic_tokenizer和wordpiece_tokenizer共同实现完成。
2.2.2 词语拆分basic_tokenizer
下面只看关键代码,主要了解思想。
_clean_text(self, text)删除无效字符,因为有时候数据从网络上爬下来,会有NULL,\t, \n等一些无效字符,对一些特殊的空格转变为正常的空格。(unicode转换后Zs的含义请参考博客[383]python unicodedata用法_周小董-CSDN博客_unicodedata)
此时text_a变为了'Amrozi accused his brother, whom he called "the witness", of deliberately distorting his evidence.'
text = self._tokenize_chinese_chars(text)判断是否为中文字符,如果是中文字符,在中文字符的前后都加上空格。(这是由于中文一个字就是一个词,这是我个人理解,如有错误请指正)。
此时text_a变为'Amrozi accused his brother, whom he called "the witness", of deliberately distorting his evidence.'
orig_tokens = whitespace_tokenize(text)将text_a按照空格进行切分,具体切分结果如下:
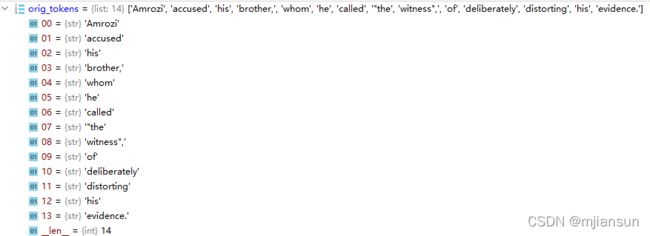
    orig_tokens = whitespace_tokenize(text)
    split_tokens = []
    for token in orig_tokens:
      if self.do_lower_case:
        token = token.lower()
        token = self._run_strip_accents(token)
split_tokens.extend(self._run_split_on_punc(token))通过_run_strip_accents将切分过的单词进行规范化处理,不能因为原始编码的不同产生了单词有差异。通过_run_split_on_punc将字符和标点符号切分开。unicodedata.normalize的用法请参考
unicodedata.normalize的用法请参考Python unicodedata.normalize 将Unicode文本标准化_Through Da Storm-CSDN博客_unicodedata.normalize
text_a处理结果为:
'amrozi accused his brother , whom he called " the witness " , of deliberately distorting his evidence .'output_tokens = whitespace_tokenize(" ".join(split_tokens))通过whitespace_tokenize函数使用空白字符将text_a进行进行切割,具体内容为:

小结:basic_tokenizer方法其实就是将单词和符号切分出来。其中包含的所有操作紧紧是为了排除掉原始数据中异常内容,使得最终的内容是规范化的。
2.2.3 词语拆分wordpiece_tokenizer
      chars = list(token)
      if len(chars) > self.max_input_chars_per_word:
        output_tokens.append(self.unk_token)
        continue
检查单词是否异常,这里默认单词的字母长度小于等于设定的200阈值,如果大于该阈值则认为该字符不识别,将该字符变成[UNK]。
      while start < len(chars):
        end = len(chars)
        cur_substr = None
        while start < end:
          substr = "".join(chars[start:end])
          if start > 0:
            substr = "##" + substr
          if substr in self.vocab:
            cur_substr = substr
            break
          end -= 1
        if cur_substr is None:
          is_bad = True
          break
        sub_tokens.append(cur_substr)
        start = end

      if is_bad:
        output_tokens.append(self.unk_token)
      else:
        output_tokens.extend(sub_tokens)
将单词切分,使得切分后的单词在词汇表中存在,由于是一个单词切分而来,所以出第一部分外,对第二、三等部分前面加上##,使得他们最终能组合成原来的词。
Vocab表示已知的词汇表。
具体的流程如下图所示。

最终输出的text_a的结果为:

2.3 限定输入语句长度
  if tokens_b:
    # Modifies `tokens_a` and `tokens_b` in place so that the total
    # length is less than the specified length.
    # Account for [CLS], [SEP], [SEP] with "- 3"
    _truncate_seq_pair(tokens_a, tokens_b, max_seq_length - 3)
  else:
    # Account for [CLS] and [SEP] with "- 2"
    if len(tokens_a) > max_seq_length - 2:
      tokens_a = tokens_a[0:(max_seq_length - 2)]
由于本任务是处理2个句子,所以会进入上面的判断。
_truncate_seq_pair(tokens_a, tokens_b, max_seq_length - 3)表示text_a和text_b这两个句子的总长度小于128-3=125,如果长度大于125,那就从text_a和text_b中删除部分单词(这里描述不好描述,请看该处的源码,源码量很少,也很容易理解)。其中128是我们设定的长度,因为网络的输入必须是一个固定长度的序列,不然bert模型无法处理,如果你的显存够大,也可以设置更高值,但就不好使用bert的预训练模型。
减3是由于需要在这两句话中间加入一些特殊符号来起到特定作用,在整个句子的最前面加入[CLS],这个的作用是为了分类啥的进行使用,具体的功能请参考后续博客,在第一个句子的最后插入[SEP]表示句子的结束,在第二个句子的结束出插入[SEP]表示句子的结束。
2.4 形成原始的tokens和segment_ids
  tokens = []
  segment_ids = []
  tokens.append("[CLS]")
  segment_ids.append(0)
  for token in tokens_a:
    tokens.append(token)
    segment_ids.append(0)
  tokens.append("[SEP]")
  segment_ids.append(0)

  if tokens_b:
    for token in tokens_b:
      tokens.append(token)
      segment_ids.append(1)
    tokens.append("[SEP]")
segment_ids.append(1)这里这个[CLS]和[SEP]就和我上面讲到的一样,没区别。最终的语句会形成tokens。
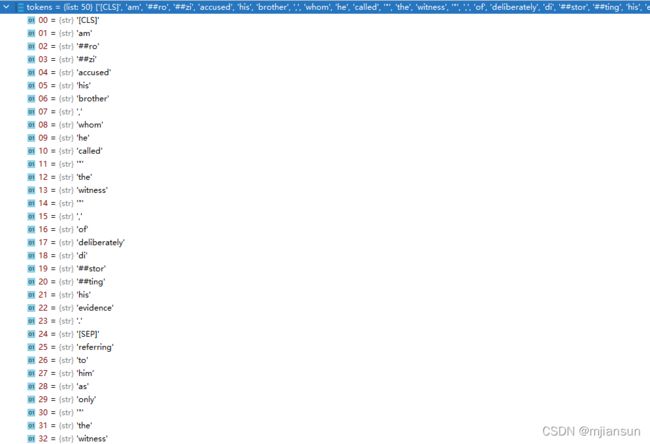
其中segment_ids表示哪些是第一句话(这里的第一句话包括[CLS]、第一句话的内容、第一句话结束符[SEP]),哪些是第二句话(这里的第二句话包括第二句话的内容和第二句话的结束符[SEP]),其实segment_ids是为了训练的时候更准确,如果其实也能训练,就是结果稍差一点。结果为

2.5 将tokens的内容转化成vocab中单词对应的索引值
  input_ids = tokenizer.convert_tokens_to_ids(tokens)

  # The mask has 1 for real tokens and 0 for padding tokens. Only real
  # tokens are attended to.
input_mask = [1] * len(input_ids)input_ids就是vocab中单词对应的索引值,具体结果为

其中input_mask中的1表示为哪些句子是真实的句子,哪些是padding出来的部分。
到这里,是不是有点向量化那味了,至少一句话被用一堆数字进行了表示,但还不能直接使用,请看 【Bert】(六)句子关系判断--源码解析(bert基础模型)。
2.6 根据限定长度,补齐相应值
  while len(input_ids) < max_seq_length:
    input_ids.append(0)
    input_mask.append(0)
    segment_ids.append(0)
这就是我前面提到的,由于限定的句子长度为128,所以相应的句子,标签都需要补齐到128这个长度。
input_ids:形状为(128,),表示一整个句子对应的词汇表的索引值。
input_mask:形状为(128,),1表示真实的部分,0表示虚假的补齐的部分。
segment_ids:形状为(128,),一开始的0表示第一句话信息,1表示第二句话信息,接着补齐的0表示虚假的信息。
2.7 单个样本形成一个特征类
  feature = InputFeatures(
      input_ids=input_ids,
      input_mask=input_mask,
      segment_ids=segment_ids,
      label_id=label_id,
is_real_example=True)得到最终的特征数据,这里说明一下label_id表示这两句话是否相同,1表示相同,0表示不同。