如何用pyTorch改造基于Keras的MIT情感理解模型
作者 | Thomas Wolf
编译 | 雁惊寒
情感情绪检测是自然语言理解的关键要素。最近,我们改造出了一个好用的情感理解集成系统,该系统前身是MIT媒体实验室的情感检测模型DeepMoji。
开源代码:https://github.com/huggingface/torchMoji
该模型最初的设计使用了TensorFlow、Theano和Keras,接着我们将其移植到了pyTorch上。与Keras相比,pyTorch能让我们更自由地开发和测试各种定制化的神经网络模块,并使用易于阅读的numpy风格来编写代码。在这篇文章中,我将详细说明在移植过程中出现的几个有趣的问题:
-
如何使用自定义激活功能定制pyTorch LSTM
-
PackedSequence对象的工作原理及其构建
-
如何将关注层从Keras转换成pyTorch
-
如何在pyTorch中加载数据:DataSet和Smart Batching
-
如何在pyTorch中实现Keras的权重初始化
首先,我们来看看torchMoji/DeepMoji的模型。它是一个相当标准而强大的人工语言处理神经网络,具有两个双LSTM层,其后是关注层和分类器:
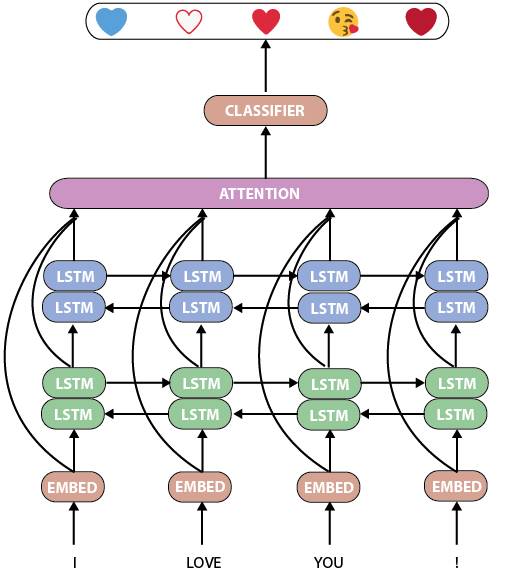
torchMoji/DeepMoji模型
构建一个定制化的pyTorch LSTM模块
DeepMoji有一个很不错的特点:Bjarke Felbo及其协作者能够在一个拥有16亿条记录的海量数据集上训练该模型。因此,预先训练的模型在此训练集中具有非常丰富的情感和情绪表征,我们可以很方便地使用这个训练过的模型。
该模型是使用针对LSTM的回归内核的Theano/Keras默认激活函数hard sigmoid训练的,而pyTorch是基于NVIDIA的cuDNN库建模的,这样,可获得原生支持LSTM的GPU加速与标准的sigmoid回归激活函数:

Keras默认的LSTM和pyTorch默认的LSTM
因此,我写了一个具有hard sigmoid回归激活函数的自定义LSTM层:
def LSTMCell(input, hidden, w_ih, w_hh, b_ih=None, b_hh=None):
"""
A modified LSTM cell with hard sigmoid activation on the input, forget and output gates.
"""
hx, cx = hidden
gates = F.linear(input, w_ih, b_ih) + F.linear(hx, w_hh, b_hh)
ingate, forgetgate, cellgate, outgate = gates.chunk(4, 1)
ingate = hard_sigmoid(ingate)
forgetgate = hard_sigmoid(forgetgate)
cellgate = F.tanh(cellgate)
outgate = hard_sigmoid(outgate)
cy = (forgetgate * cx) + (ingate * cellgate)
hy = outgate * F.tanh(cy)
return hy, cy
def hard_sigmoid(x):
"""
Computes element-wise hard sigmoid of x.
See e.g. https://github.com/Theano/Theano/blob/master/theano/tensor/nnet/sigm.py#L279
"""
x = (0.2 * x) + 0.5
x = F.threshold(-x, -1, -1)
x = F.threshold(-x, 0, 0)
return x
这个LSTM单元必须集成在一个完整的模块中,这样才可以使用pyTorch所有的功能。这个集成相关的代码很长,建议直接引用到Github中的相关源代码。
Keras和pyTorch中的关注层
模型的关注层是一个有趣的模块,我们可以分别在Keras和pyTorch的代码中进行比较:
class Attention(Module):
"""
Computes a weighted average of channels across timesteps (1 parameter pr. channel).
"""
def __init__(self, attention_size, return_attention=False):
""" Initialize the attention layer
# Arguments:
attention_size: Size of the attention vector.
return_attention: If true, output will include the weight for each input token
used for the prediction
"""
super(Attention, self).__init__()
self.return_attention = return_attention
self.attention_size = attention_size
self.attention_vector = Parameter(torch.FloatTensor(attention_size))
def __repr__(self):
s = '{name}({attention_size}, return attention={return_attention})'
return s.format(name=self.__class__.__name__, **self.__dict__)
def forward(self, inputs, input_lengths):
""" Forward pass.
# Arguments:
inputs (Torch.Variable): Tensor of input sequences
input_lengths (torch.LongTensor): Lengths of the sequences
# Return:
Tuple with (representations and attentions if self.return_attention else None).
"""
logits = inputs.matmul(self.attention_vector)
unnorm_ai = (logits - logits.max()).exp()
# Compute a mask for the attention on the padded sequences
# See e.g. https://discuss.pytorch.org/t/self-attention-on-words-and-masking/5671/5
max_len = unnorm_ai.size(1)
idxes = torch.arange(0, max_len, out=torch.LongTensor(max_len)).unsqueeze(0)
if torch.cuda.is_available():
idxes = idxes.cuda()
mask = Variable((idxes < input_lengths.unsqueeze(1)).float())
# apply mask and renormalize attention scores (weights)
masked_weights = unnorm_ai * mask
att_sums = masked_weights.sum(dim=1, keepdim=True) # sums per sequence
attentions = masked_weights.div(att_sums)
# apply attention weights
weighted = torch.mul(inputs, attentions.unsqueeze(-1).expand_as(inputs))
# get the final fixed vector representations of the sentences
representations = weighted.sum(dim=1)
return (representations, attentions if self.return_attention else None)
class AttentionWeightedAverage(Layer):
"""
Computes a weighted average of the different channels across timesteps.
Uses 1 parameter pr. channel to compute the attention value for a single timestep.
"""
def __init__(self, return_attention=False, **kwargs):
self.init = initializers.get('uniform')
self.supports_masking = True
self.return_attention = return_attention
super(AttentionWeightedAverage, self).__init__(** kwargs)
def build(self, input_shape):
self.input_spec = [InputSpec(ndim=3)]
assert len(input_shape) == 3
self.W = self.add_weight(shape=(input_shape[2], 1),
name='{}_W'.format(self.name),
initializer=self.init)
self.trainable_weights = [self.W]
super(AttentionWeightedAverage, self).build(input_shape)
def call(self, x, mask=None):
# computes a probability distribution over the timesteps
# uses 'max trick' for numerical stability
# reshape is done to avoid issue with Tensorflow
# and 1-dimensional weights
logits = K.dot(x, self.W)
x_shape = K.shape(x)
logits = K.reshape(logits, (x_shape[0], x_shape[1]))
ai = K.exp(logits - K.max(logits, axis=-1, keepdims=True))
# masked timesteps have zero weight
if mask is not None:
mask = K.cast(mask, K.floatx())
ai = ai * mask
att_weights = ai / K.sum(ai, axis=1, keepdims=True)
weighted_input = x * K.expand_dims(att_weights)
result = K.sum(weighted_input, axis=1)
if self.return_attention:
return [result, att_weights]
return result
def get_output_shape_for(self, input_shape):
return self.compute_output_shape(input_shape)
def compute_output_shape(self, input_shape):
output_len = input_shape[2]
if self.return_attention:
return [(input_shape[0], output_len), (input_shape[0], input_shape[1])]
return (input_shape[0], output_len)
def compute_mask(self, input, input_mask=None):
if isinstance(input_mask, list):
return [None] * len(input_mask)
else:
return None
如你所见,主要的算法大致相同,但PyTorch代码中的大部分都是注释,而Keras则需要编写几个附加函数并进行调用。
在编写和调试自定义模块和层时,pyTorch是一个更快的选择;而对于快速训练和测试由标准层构建的模型时,Keras显然更加合适。
PackedSequence对象的工作原理
Keras有一个不错的掩码功能可以用来处理可变长度序列。那么在pyTorch中又该如何处理这个呢?可以使用PackedSequences! pyTorch文档中有关PackedSequence的介绍并不是很详细,所以这里会详细描述它的细节。

一个拥有5个序列18个令牌的典型NLP批次
假设我们有一批可变长度的序列(在NLP应用中通常就是这样的)。为了在GPU上并行计算这样一个批次,我们希望:
-
尽可能多地并行处理这个序列,因为LSTM隐藏状态依赖于每个序列的前一个时间步长,以及
-
以正确的时间步长(每个序列的结尾)停止每个序列的计算。
这可以通过使用pyTorch中的PackedSequence类来实现。我们首先通过减少长度来对序列进行排序,并将它们放到在张量中。然后对张量和序列长度列表调用pack_padded_sequence函数
# input_seqs is a batch of input sequences as a numpy array of integers (word indices in vocabulary) padded with zeroas
input_seqs = Variable(torch.from_numpy(input_seqs.astype('int64')).long())
# First: order the batch by decreasing sequence length
input_lengths = torch.LongTensor([torch.max(input_seqs[i, :].data.nonzero()) + 1 for i in range(input_seqs.size()[0])])
input_lengths, perm_idx = input_lengths.sort(0, descending=True)
input_seqs = input_seqs[perm_idx][:, :input_lengths.max()]
# Then pack the sequences
packed_input = pack_padded_sequence(input_seqs, input_lengths.cpu().numpy(), batch_first=True)
PackedSequence对象包括:
-
一个data对象:一个torch.Variable(令牌的总数,每个令牌的维度),在这个简单的例子中有五个令牌序列(用整数表示):(18,1)
-
一个batch_sizes对象:每个时间步长的令牌数列表,在这个例子中为:[6,5,2,4,1]
用pack_padded_sequence函数来构造这个对象非常的简单:
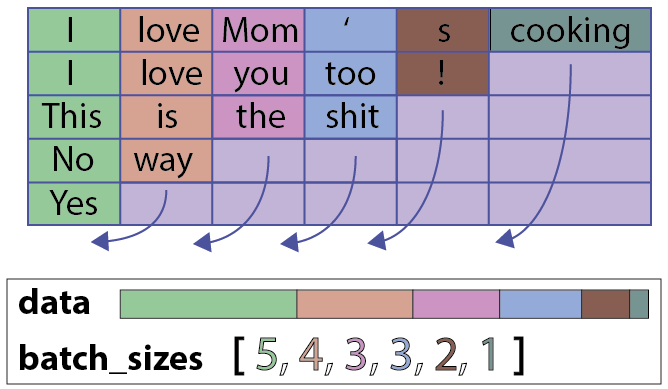
如何构造一个PackedSequence对象(batch_first = True)
PackedSequence对象有一个很不错的特性,就是我们无需对序列解包(这一步操作非常慢)即可直接在PackedSequence数据变量上执行许多操作。特别是我们可以对令牌执行任何操作(即对令牌的顺序/上下文不敏感)。当然,我们也可以使用接受PackedSequence作为输入的任何一个pyTorch模块(pyTorch 0.2)。
例如,在我们的NLP模型中,我们可以在对PackedSequence对象不解包的情况下连接两个LSTM模块的输出,并在此对象上应用LSTM。我们还可以在不解包的情况下执行关注层的一些操作。
pyTorch中的智能数据加载:DataSets和Batches
在Keras中,数据加载和批处理通常隐藏在fit_generator函数中。重申一遍,如果你想要快速地测试模型,Keras很好用,但这也意味着我们不能完全控制模型中的重要部分。
在pyTorch中,我们将使用三个类来完成这个任务:
-
一个DataSet类,用于保存、预处理和索引数据集
-
一个BatchSampler类,用于控制样本如何批量收集
-
一个DataLoader类,负责将这些批次提供给模型
我们的DataSet类非常简单:
class DeepMojiDataset(Dataset):
""" A simple Dataset class.
# Arguments:
X_in: Inputs of the given dataset.
y_in: Outputs of the given dataset.
# __getitem__ output:
(torch.LongTensor, torch.LongTensor)
"""
def __init__(self, X_in, y_in):
# Check if we have Torch.LongTensor inputs (assume Numpy array otherwise)
if not isinstance(X_in, torch.LongTensor):
X_in = torch.from_numpy(X_in.astype('int64')).long()
if not isinstance(y_in, torch.LongTensor):
y_in = torch.from_numpy(y_in.astype('int64')).long()
self.X_in = torch.split(X_in, 1, dim=0)
self.y_in = torch.split(y_in, 1, dim=0)
def __len__(self):
return len(self.X_in)
def __getitem__(self, idx):
return self.X_in[idx].squeeze(), self.y_in[idx].squeeze()
我们BatchSampler则更有趣。
我们有几个小的NLP数据集,用于微调情感情绪检测模型。这些数据集有着不同的长度和某些不平衡的种类,所以我们想设计这么一个批量采样器:
-
在预先定义的样本数中收集批次,这样我们的训练过程就可以不依赖于批次的长度
-
能够从不平衡的数据集中以平衡的方式进行采样。
在PyTorch中,BatchSampler是一个可以迭代生成批次的类,BatchSampler的每个批处理都包含一个列表,其中包含要在DataSet中选择的样本的索引。
因此,我们可以定义一个用数据集类标签向量来初始化的BatchSampler对象,以构建满足我们需求的批次列表:
class DeepMojiBatchSampler(object):
"""A Batch sampler that enables larger epochs on small datasets and
has upsampling functionality.
# Arguments:
y_in: Labels of the dataset.
batch_size: Batch size.
epoch_size: Number of samples in an epoch.
upsample: Whether upsampling should be done. This flag should only be
set on binary class problems.
seed: Random number generator seed.
# __iter__ output:
iterator of lists (batches) of indices in the dataset
"""
def __init__(self, y_in, batch_size, epoch_size, upsample, seed):
self.batch_size = batch_size
self.epoch_size = epoch_size
self.upsample = upsample
np.random.seed(seed)
if upsample:
# Should only be used on binary class problems
assert len(y_in.shape) == 1
neg = np.where(y_in.numpy() == 0)[0]
pos = np.where(y_in.numpy() == 1)[0]
assert epoch_size % 2 == 0
samples_pr_class = int(epoch_size / 2)
else:
ind = range(len(y_in))
if not upsample:
# Randomly sample observations in a balanced way
self.sample_ind = np.random.choice(ind, epoch_size, replace=True)
else:
# Randomly sample observations in a balanced way
sample_neg = np.random.choice(neg, samples_pr_class, replace=True)
sample_pos = np.random.choice(pos, samples_pr_class, replace=True)
concat_ind = np.concatenate((sample_neg, sample_pos), axis=0)
# Shuffle to avoid labels being in specific order
# (all negative then positive)
p = np.random.permutation(len(concat_ind))
self.sample_ind = concat_ind[p]
label_dist = np.mean(y_in.numpy()[self.sample_ind])
assert(label_dist > 0.45)
assert(label_dist < 0.55)
def __iter__(self):
# Hand-off data using batch_size
for i in range(int(self.epoch_size/self.batch_size)):
start = i * self.batch_size
end = min(start + self.batch_size, self.epoch_size)
yield self.sample_ind[start:end]
def __len__(self):
# Take care of the last (maybe incomplete) batch
return (self.epoch_size + self.batch_size - 1) // self.batch_size
从Keras到pyTorch:不要忘记初始化
将Keras/Tensorflow/Theano代码移植到pyTorch的过程中,最后需要注意的事情是对权重的初始化。
Keras在开发速度方面的另一个强大特点是层的默认初始化。
相反,pyTorch并没有初始化权重,而是由开发者自己来决定。为了在微调权重时获得一致的结果,我们将像如下代码那样复制默认的Keras权重初始化:
def init_weights(self):
"""
Here we reproduce Keras default initialization weights to initialize Embeddings/LSTM weights
"""
ih = (param.data for name, param in self.named_parameters() if 'weight_ih' in name)
hh = (param.data for name, param in self.named_parameters() if 'weight_hh' in name)
b = (param.data for name, param in self.named_parameters() if 'bias' in name)
nn.init.uniform(self.embed.weight.data, a=-0.5, b=0.5)
for t in ih:
nn.init.xavier_uniform(t)
for t in hh:
nn.init.orthogonal(t)
for t in b:
nn.init.constant(t, 0)
结论
当我们针对一个模型比较Keras和pyTorch这两个框架时,我们可以感觉到它们有着不同的哲学和目标。
根据笔者的经验来看:
-
Keras非常适合于快速测试在给定任务上组合标准神经网络块的各种方法;
-
pyTorch非常适合于快速开发和测试自定义的神经网络模块,因为它有着很大的自由度和易于阅读的numpy风格的代码。
原文:https://medium.com/huggingface/understanding-emotions-from-keras-to-pytorch-3ccb61d5a983
SDCC 2017“人工智能技术实战线上峰会”将在CSDN学院以直播互动的方式举行。
作为SDCC系列技术峰会的一部分,来自阿里巴巴、微软、商汤科技、第四范式、微博、出门问问、菱歌科技的AI专家,将针对机器学习平台、系统架构、对话机器人、芯片、推荐系统、Keras、分布式系统、NLP等热点话题进行分享。先行者们正在关注哪些关键技术?如何从理论跨越到企业创新实践?你将从本次峰会找到答案。每个演讲时段均设有答疑交流环节,与会者和讲师可零距离互动。