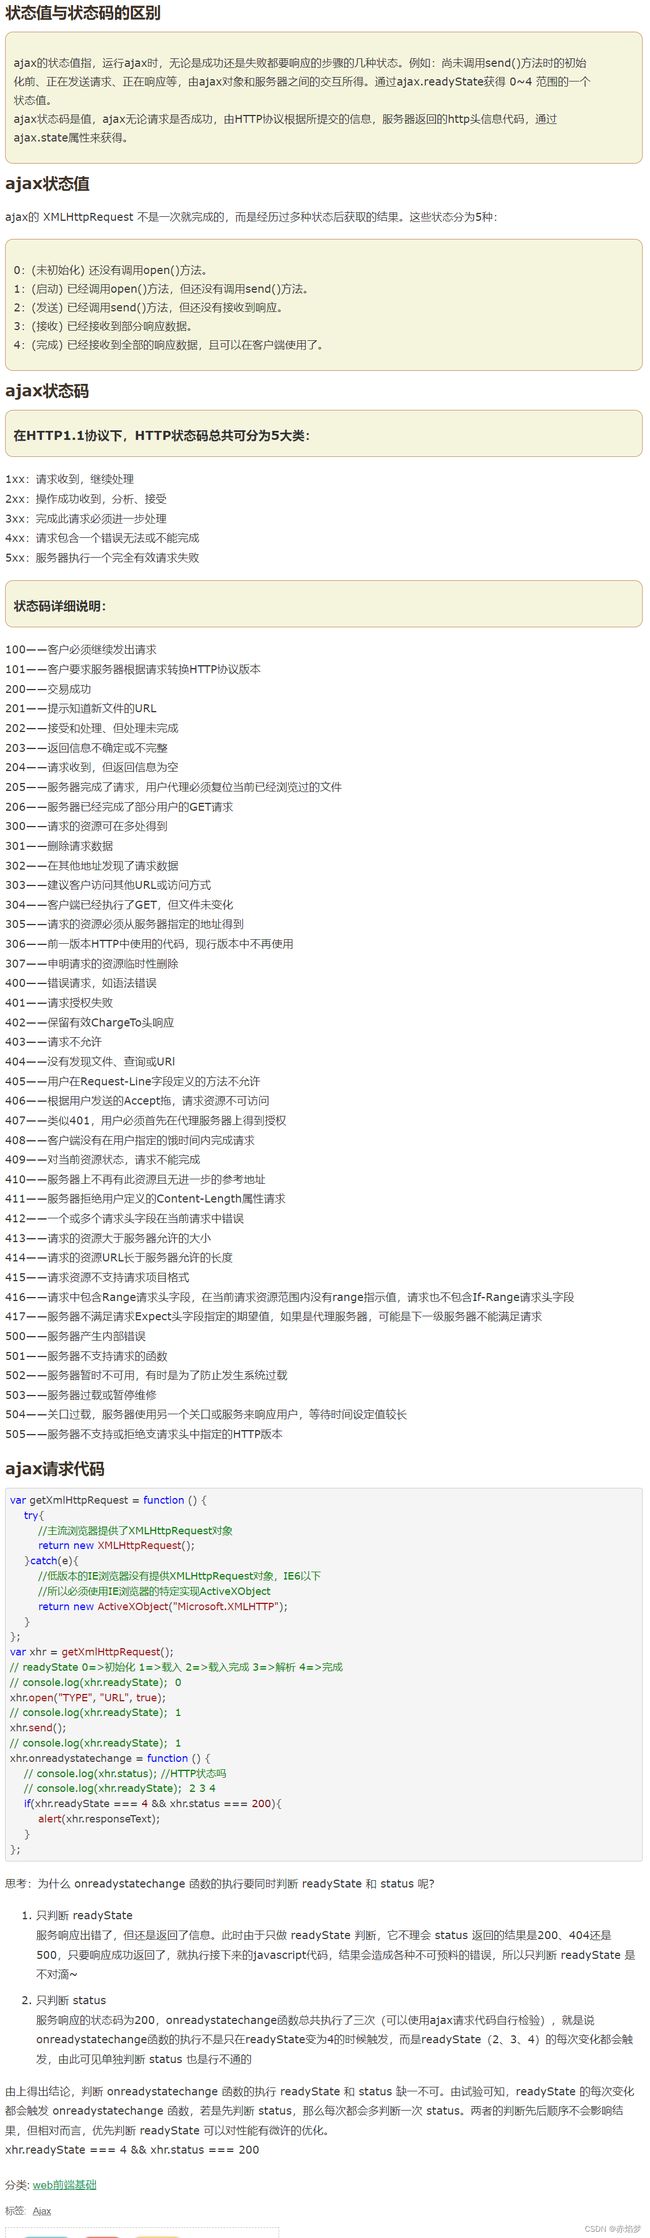
千峰学习【Ajax】总结
1.同步和异步

2.Ajax状态码
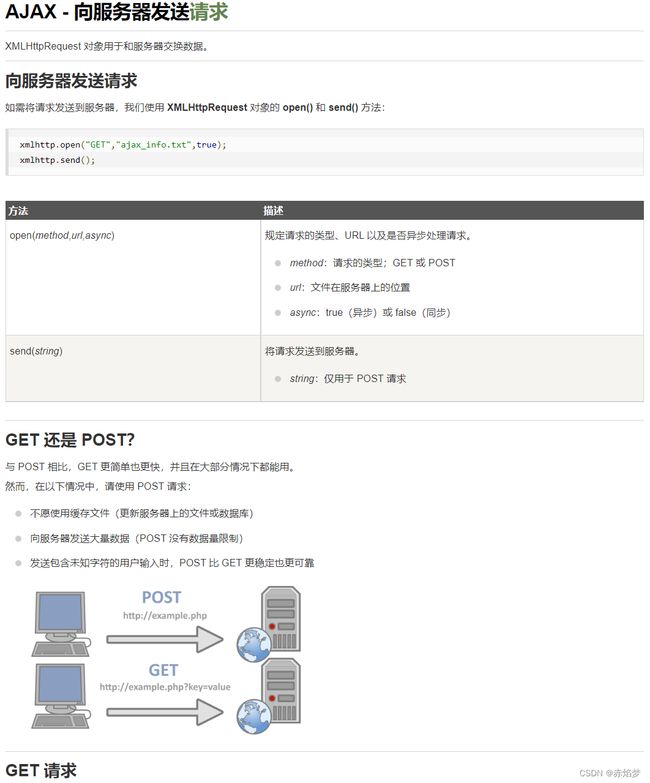
3.创建对象,发送请求
<script>
    //1.创建XHR: new XMLHttpRequest():
    var xhr = new XMLHttpRequest();
    // console.log(xhr);

    //2,配置open(请求方式,请求地址,是否异步(默认为异步))  localhost:本机域名。127.0.0.1:本机ip
    xhr.open("GET", "http://localhost:5500/基础内容/1.json");
    // xhr.open("GET", "http://localhost:5500/基础内容/1.txt");

    //3.send
    xhr.send();

    //4.接受数据,注册一个事件
    xhr.onreadystatechange = function () {
      console.log(xhr.readyState)
      //一般来说,成功连接状态码是200,判断:xhr.status===200,也可以用正则来匹配200-299:/^2\d{2|$/.test(xhr.status)
      if (xhr.readyState === 4 && /^2\d{2|$/.test(xhr.status)) {
        // console.log("数据解析完成", xhr.responseText);
        // console.log(JSON.parse(xhr.responseText));
        //确定连接成功,把内容显示到页面
        document.write(xhr.responseText);
      } else if (xhr.status === 404 && xhr.readyState === 4) {
        console.error("没有找到这个页面");
        location.href = "404界面.html";
      }
    };
  script>
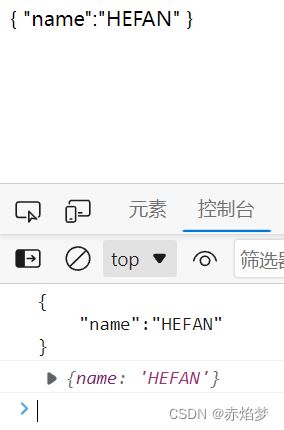
1.json:
{
    "name":"HEFAN"
}

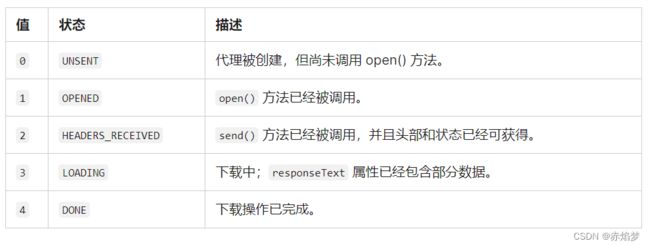
onreadystatechange 事件
当请求被发送到服务器时,我们需要执行一些基于响应的任务。
每当 readyState 改变时,就会触发 onreadystatechange 事件。
readyState 属性存有 XMLHttpRequest 的状态信息。
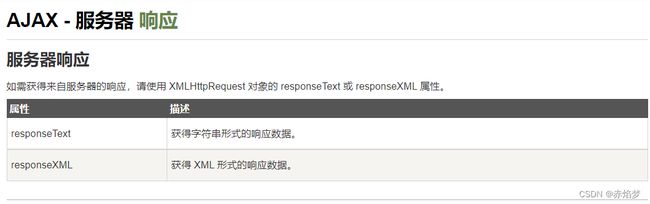
XMLHttpRequest.responseText
当处理一个异步 request 的时候,尽管当前请求并没有结束,responseText 的返回值是当前从后端收到的内容。
当请求状态 readyState 变为 XMLHttpRequest.DONE (4),且 status 值为 200(“OK”)时,responseText 是全部后端的返回数据
Ajax 两种请求方式的区别onload和onreadystatechange
XMLHttpRequest对象有一个属性readyState,将其(xhr.readyState)打印后发现。进入onreadystatechange请求方式中时,可以打印其状态为2,状态为3,状态为4。
进入onload之后,只出现了状态码4。也就是说,只有处于状态码4,请求已完成,响应已就绪的情况下,才会进入onload。只要进入onload请求中,一定是已经到4这个状态了
所以,这种写法更加简单:
// 另一种简单写法:
    xhr.onload = function () {
      // console.log(xhr.responseText)
      if (xhr.status === 200) {
        // document.write(xhr.responseText)
        console.log(JSON.parse(xhr.responseText));
      } else if (xhr.status === 404) {
        console.error("没有找到这个页面");
        location.href = "404界面.html";
      }
    };
JSON.parse方法:
form和Ajax的不同
4.请求方式
GET
POST
PUT
DELECT
json-serve
node.js的安装以及json-server的使用
写一个json文件:
{
  "users": [
    {
      "username": "hahah",
      "password": "0900",
      "id": 1
    },
    {
      "username": "her",
      "password": "345",
      "id": 3
    },
    {
      "name": "patch",
      "value": "77",
      "id": 4,
      "password": "000"
    },
    {
      "username": "her",
      "password": "345",
      "id": 5
    }
  ],
  "list": [
    "1",
    "2",
    "3"
  ]
}
DOCTYPE html>
<html lang="en">
<head>
    <meta charset="UTF-8">
    <meta http-equiv="X-UA-Compatible" content="IE=edge">
    <meta name="viewport" content="width=device-width, initial-scale=1.0">
    <title>Documenttitle>
head>
<body>
    <button id="myget">GETbutton>
    <button id="mypost">POSTbutton>
    <button id="myput">PUTbutton>
    <button id="mypatch">PATCHbutton>
    <button id="mydelete">DELETEbutton>

body>
<script>
    // 查找
    myget.onclick = function(){
        var xhr=new XMLHttpRequest();
        //全部查找
        // xhr.open("GET", "http://localhost:3000/users")
        // 精准查找
        xhr.open("GET", "http://localhost:3000/users?username=her")
        //用id查找也可以
        // xhr.open("GET", "http://localhost:3000/users?id=4")

        xhr.onload=function() {
            if (xhr.status === 200) {
                console.log(JSON.parse(xhr.responseText))
            }
        }
        xhr.send();
    }
    // 插入
    mypost.onclick = function(){
        var xhr=new XMLHttpRequest();
        xhr.open("POST", "http://localhost:3000/users")
        xhr.onload=function() {
            if (/^2\d{2}|$/.test(xhr.status) ) {
                console.log(JSON.parse(xhr.responseText))
            }
        }
        //提交信息  支持两种格式:name=hefan&age=21 或者   {"name":"hefan"}
        //告知传输数据格式:
        // xhr.setRequestHeader("Content-Type","application/x-ww-form-urlencoded")
        // xhr.send(`username=xiaoming && password=3456787`);
        xhr.setRequestHeader("Content-Type","application/json",)
        xhr.send(JSON.stringify({
            username: "her",
            password:"345"
        }))

    }
   //修改:put:全部覆盖
    myput.onclick = function(){
        var xhr=new XMLHttpRequest();
        //把id=1的进行全部修改(更新)
        xhr.open("PUT", "http://localhost:3000/users/1")
        xhr.onload=function() {
            if (/^2\d{2}|$/.test(xhr.status)) {
                console.log(JSON.parse(xhr.responseText))
            }
        }
        xhr.setRequestHeader("Content-Type", "application/json")
        xhr.send(JSON.stringify({
            username: "hahah",
            password:"0900"
        }));
    }
    //patch:部分覆盖(修改)
    mypatch.onclick = function(){
        var xhr=new XMLHttpRequest();
        //把id=2的进行部分修改(更新)
        xhr.open("PATCH", "http://localhost:3000/users/2")
        xhr.onload=function() {
            if (/^2\d{2}|$/.test(xhr.status)) {
                console.log(JSON.parse(xhr.responseText))
            }
        }
        xhr.setRequestHeader("Content-Type", "application/json")
        xhr.send(JSON.stringify({
            username: "erer",
            password:"090540",
        }));
    }

//delete:删除
    mydelete.onclick = function(){
        var xhr=new XMLHttpRequest();
        //把id=4的进行删除(只能通过id去删除)
        xhr.open("DELETE", "http://localhost:3000/users/4")
        xhr.onload=function() {
            if (/^2\d{2}|$/.test(xhr.status)) {
                console.log(JSON.parse(xhr.responseText))
            }
        }
      xhr.send();
    }
script>
html>
POST,PUT,PATCH方法之间的区别
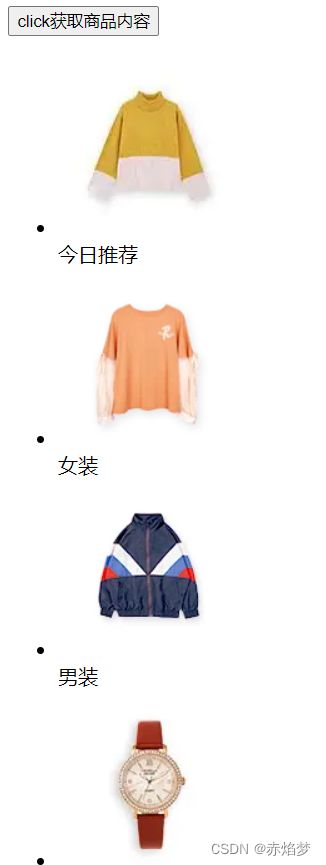
4.1案例,通过接口获取数据进行渲染页面
接口URL:http://www.xiongmaoyouxuan.com/api/tabs
DOCTYPE html>
<html lang="en">
<head>
<meta charset="UTF-8">
<meta http-equiv="X-UA-Compatible" content="IE=edge">
<meta name="viewport" content="width=device-width, initial-scale=1.0">
<title>Documenttitle>
head>
<body>
<button id="btn">click获取商品内容button>
<ul id="mylist">ul>
body>
<script>
document.getElementById("btn").onclick=function() {
var xhr = new XMLHttpRequest();
xhr.open("GET","http://www.xiongmaoyouxuan.com:80/api/tabs")
xhr.send();
xhr.onload=function() {
if (xhr.status === 200) {
var jsondata=JSON.parse(xhr.responseText);
//渲染页面
render(jsondata)
}
}
}
function render(jsondata){
console.log(jsondata.data.list)
//获取里面的图片
var html=jsondata.data.list.map(item=>
`
 ${item.imageUrl}
 "/>
${item.name}
`)
mylist.innerHTML=html.join(" ")
}
script>
html>
5.封装ajax
function queryStringify(obj) {
    let str = ''
    for (let k in obj) str += `${k}=${obj[k]}&`

    //username=kerwin&password=789&
    return str.slice(0, -1)
  }

  // 封装 ajax
  function ajax(options) {
    let defaultoptions = {
      url: "",
      method: "GET",
      async: true,
      data: {},
      headers: {},
      success: function () { },
      error: function () { }
    }
    let { url, method, async, data, headers, success, error } = {
      ...defaultoptions,
      ...options
    }

    // console.log(url, method, async, data, headers, success, error)

    if (typeof data === 'object' && headers["content-type"]?.indexOf("json") > -1) {
      data = JSON.stringify(data)
    }
    else {
      data = queryStringify(data)
    }
    // // 如果是 get 请求, 并且有参数, 那么直接组装一下 url 信息
    if (/^get$/i.test(method) && data) url += '?' + data

    // // 4. 发送请求
    const xhr = new XMLHttpRequest()
    xhr.open(method, url, async)
    xhr.onload = function () {
      if (!/^2\d{2}$/.test(xhr.status)) {
        // console.log(error)
        error(`错误状态码:${xhr.status}`) //回调
        return
      }

      // 执行解析


      try {
        let result = JSON.parse(xhr.responseText)
        success(result)
      } catch (err) {
        error('解析失败 ! 因为后端返回的结果不是 json 格式字符串')
      }
    }

    // console.log(22222)

    // // 设置请求头内的信息
    for (let k in headers) xhr.setRequestHeader(k, headers[k])
    if (/^get$/i.test(method)) {
      xhr.send()
    } else {
      xhr.send(data)
    }

    // xhr.send(data)
  }
这里建议安装一个插件:
Preview on Web Servervs-code插件 – Preview on Web Server 插件 使用 及设置默认浏览器
使用live server打开执行post请求会不停存入数据,所以在学习ajax时,还是用Preview on Web Serve去执行程序才不会不停存储数据
接下来分析一下封装ajax的代码:
 function ajax(options) {
    let defaultoptions = {
      url: "",
      method: "GET",
      async: true,
      data: {},
      headers: {},
      success: function () { },
      error: function () { }
    }
    let { url, method, async, data, headers, success, error } = {
      ...defaultoptions,
      ...options
    }

    // console.log(url, method, async, data, headers, success, error)
options是指你使用get获取数据,还是post存储数据
method:GET(默认为get)get方法只需要URL、data、以及成功和失败的处理。
const xhr = new XMLHttpRequest()
    xhr.open(method, url, async)
    xhr.onload = function () {
      if (!/^2\d{2}$/.test(xhr.status)) {
        // console.log(error)
        error(`错误状态码:${xhr.status}`) //回调
        return
      }
这里是指如果status不在200-299以内,就是连接失败,让错误的状态码显示在控制台上。error()是一个函数,当连接失败,就调用error函数。
error: function (err) {
        console.log("error", err);
      },
比如URL写错了,结果就是:

当连接成功就执行:
 success: function (res) {
        console.log("success-get", res);
      },

但是这会还要判断数据是否是json格式的:是就走success()函数,将内容显示在控制台,否则就报错
 try {
        let result = JSON.parse(xhr.responseText)
        success(result)
      } catch (err) {
        error('解析失败 ! 因为后端返回的结果不是 json 格式字符串')
      }
    }
try…catch不会影响后面代码的执行,但是不写且直接报错的话,后面代码可能执行不了,像下面这种字符串不是json格式,就会报错:
// let result = JSON.parse("111")
    //     success(result)
    //     console.log("22")
json格式:{ “firstName”: “Brett” }
GET请求代码:
 //GET方法
    ajax({
      url: "http://localhost:3000/users",
      data: {
        username: "h",
        password: "7",
      },
      success: function (res) {
        console.log("success-get", res);
      },
      error: function (err) {
        console.log("error", err);
      },
    });
JSON文件内容:
{
  "users": [
    {
      "username": "hefan222",
      "password": "789",
      "id": 1
    },
    {
      "username": "h",
      "password": "7",
      "id": 2
    },
    {
      "username": "h",
      "password": "7",
      "id": 3
    },
    {
      "username": "h",
      "password": "7",
      "id": 4
    }
  ]
}
post请求代码:
 //POST方法
    ajax({
      url: "http://localhost:3000/users",
      method: "POST",
      // data:"username=hefan&password=1980",

      // data: JSON.stringify({
      //   name: "post",
      //   value: "hello",
      // }),
      data: {
        username: "h",
        password: "7",
      },
      headers: {
        "content-type": "application/json",
      },
      success: function (res) {
        console.log("success-post", res);
      },
      error: function (err) {
        console.log("error", err);
      },
    });
method、data、headers需要上传:
data是添加的数据,headers是添加数据使用的数据类型
1.application/json: JSON数据格式
{
      "username": "ximen",
      "password": "789",
      "id": 5
    },
2.application/x-www-form-urlencoded : 中默认的encType,form表单数据被编码为key/value格式发送到服务器(表单默认的提交数据的格式)
data:"username=hefan&password=1980"
如果是字符串格式,封装ajax的代码可以少写为这样:
也就是去掉queryStringify(obj)方法:
// 封装 ajax
function ajax(options) {
  let defaultoptions = {
    url: "",
    method: "GET",
    async: true,
    data: {},
    headers: {},
    success: function () {},
    error: function () {},
  };
  let { url, method, async, data, headers, success, error } = {
    ...defaultoptions,
    ...options,
  };

  // // 如果是 get 请求, 并且有参数, 那么直接组装一下 url 信息
  if (/^get$/i.test(method) && data) url += "?" + data;

  // // 4. 发送请求
  const xhr = new XMLHttpRequest();
  xhr.open(method, url, async);
  xhr.onload = function () {
    if (!/^2\d{2}$/.test(xhr.status)) {
      error(`错误状态码:${xhr.status}`); //回调
      return;
    }

    // 执行解析

    try {
      let result = JSON.parse(xhr.responseText);
      success(result);
    } catch (err) {
      error("解析失败 ! 因为后端返回的结果不是 json 格式字符串");
    }
  };

  // // 设置请求头内的信息
  for (let k in headers) xhr.setRequestHeader(k, headers[k]);
  if (/^get$/i.test(method)) {
    xhr.send();
  } else {
    xhr.send(data);
  }
}
我们写数据喜欢使用对象格式:
 data: {
          username: "kerwin3333",
          password: "789",
        },
这个函数的作用就是把对象解析成字符串:
function queryStringify(obj) {
  let str = "";
  for (let k in obj) str += `${k}=${obj[k]}&`;


  return str.slice(0, -1);
}
原来的数据:
// data: {
        //   username: "kerwin3333",
        //   password: "789",
        // },
解析后的数据:
`//username=kerwin&password=789&
输出判断:是否是json数据类型以及是否是对象格式:
if (
    typeof data === "object" &&
    headers["content-type"]?.indexOf("json") > -1
  ) {
    data = JSON.stringify(data);
  } else {
    data = queryStringify(data);
  }
一共是三种格式:字符串、json以及对象。
对象的话,两种Content-Type都可以,需要调用queryStringify(data)方法
字符串:
 headers: {
          "content-type": "application/x-www-form-urlencoded",
        },
json:
 headers: {
           "content-type": "application/json",
         },
6.封装请求方式
DOCTYPE html>
<html lang="en">
<head>
<meta charset="UTF-8" />
<meta http-equiv="X-UA-Compatible" content="IE=edge" />
<meta name="viewport" content="width=device-width, initial-scale=1.0" />
<title>封装请求方式title>
head>
<body>
<button id="myget">GETbutton>
<button id="mypost">POSTbutton>
<button id="myput">PUTbutton>
<button id="mypatch">PATCHbutton>
<button id="mydelete">DELETEbutton>
<script src="until1.js">script>
body>
<script>
// 查找
myget.onclick = function () {
ajax({
url: "http://localhost:3000/users",
data: {
username: "her",
password: "345",
},
success: function (res) {
console.log("success", res);
},
error: function (err) {
console.log("error", err);
},
});
};
// 插入
mypost.onclick = function () {
ajax({
url: "http://localhost:3000/users",
method: "POST",
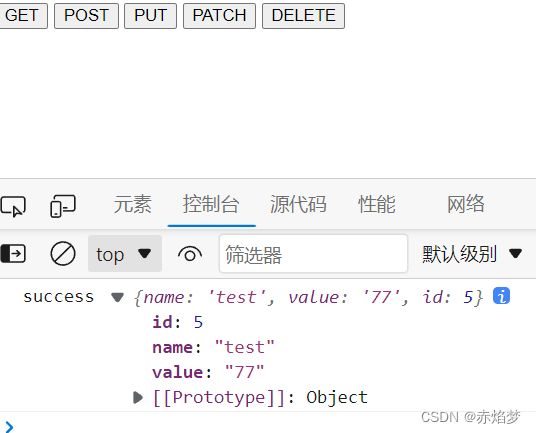
data: { name: "test", value: "77" },
headers: {
"content-type": "application/json",
},
success: function (res) {
console.log("success", res);
},
error: function (err) {
console.log("error", err);
},
});
};
//修改:put:全部覆盖
myput.onclick = function () {
ajax({
url: "http://localhost:3000/users/4",
method: "PUT",
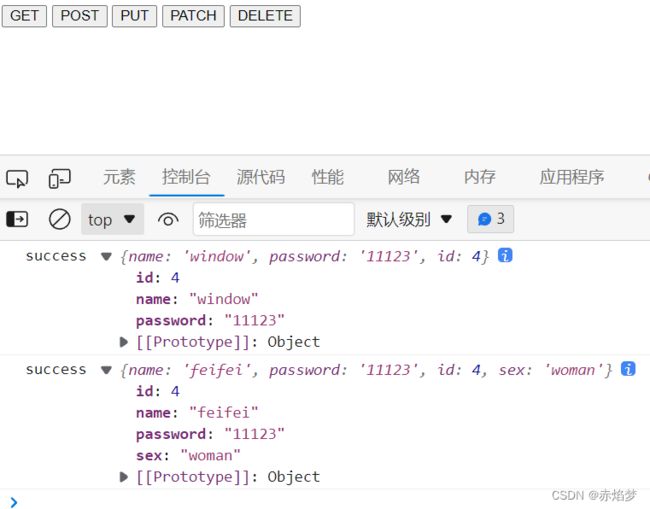
data: { name: "window", password: "11123" },
headers: {
"content-type": "application/x-www-form-urlencoded",
},
success: function (res) {
console.log("success", res);
},
error: function (err) {
console.log("error", err);
},
});
};
//patch:部分覆盖(修改)
mypatch.onclick = function () {
ajax({
url: "http://localhost:3000/users/4",
method: "PATCH",
data: { naem: "feifei", sex: "woman" },
headers: {
"content-type": "application/x-www-form-urlencoded",
},
success: function (res) {
console.log("success", res);
},
error: function (err) {
console.log("error", err);
},
});
};
//delete:删除
mydelete.onclick = function () {
ajax({
url: "http://localhost:3000/users/7",
method: "DELETE",
headers: {
"content-type": "application/x-www-form-urlencoded",
},
success: function (res) {
console.log("success", res);
},
error: function (err) {
console.log("error", err);
},
});
};
script>
html>
点击post按钮(插入数据):
点击put按钮(修改数据):

patch按钮(添加,相同key值进行覆盖)
delete根据id值进行删除。
7.案例:前后端交互(界面渲染):

点击add按钮把数据存放在json文件中,并显示在界面上:
DOCTYPE html>
<html lang="en">
<head>
<meta charset="UTF-8">
<meta name="viewport" content="width=device-width, initial-scale=1.0">
<title>Documenttitle>
head>
<body>
<input type="text" name="" id="mytext">
<button id="myadd">addbutton>
<ul class="list">
ul>
<script type="module">
import ajax from './util.js'
// console.log(ajax)
class TodoList{
constructor(select){
this.listEle = document.querySelector(select)
this.listdata = [] //列表数据
this.init()
}
init(){
//初始化
this.bindEvent()
//获取数据的方法
this.getList()
}
bindEvent(){
this.listEle.onclick = (evt) => {
// console.log(evt.target)
if(evt.target.nodeName==="BUTTON"){
this.removeItem(evt.target)
}
}
}
getList(){
//获取
ajax({
url:"http://localhost:3000/list",
success:(res) => {
this.listdata = res
this.render()
},
error:function(){
}
})
}
//渲染页面
render(){
// console.log("render")
this.listEle.innerHTML = this.listdata.map(item=>`
${item.text}
`).join("")
}
addItem(text){
// console.log(text)
//在”数据库“添加后, 成功回调里, 页面添加
ajax({
url:`http://localhost:3000/list`,
method:"POST",
data:{
text
},
success:(res) => {
// console.log("成功",res)
// location.reload() //全局刷新页面
this.listdata = [...this.listdata,res]
this.render()
},
error:function(){
}
})
}
removeItem(target){
target.parentNode.remove()
// console.log(target.dataset.index)
//删除任务
ajax({
url:`http://localhost:3000/list/${target.dataset.index}`,
method:"DELETE",
success:(res) => {
console.log("删除成功")
},
error:function(){
}
})
}
updateItem(){
}
}
var obj = new TodoList(".list")
console.log(obj)
myadd.onclick = function(){
// console.log(mytext.value)
obj.addItem(mytext.value)
}
script>
body>
html>
json文件:
{
  "list": [
    {
      "text": "aaa",
      "id": 1
    },
    {
      "text": "bbb",
      "id": 2
    },
    {
      "text": "1111",
      "id": 3
    },
    {
      "text": "3333",
      "id": 5
    },
    {
      "text": "1122",
      "id": 6
    },
    {
      "text": "333",
      "id": 7
    },
    {
      "text": "333",
      "id": 8
    },
    {
      "text": "111",
      "id": 9
    }
  ]
}
7.回调地狱问题
在使用JavaScript时,为了实现某些逻辑经常会写出层层嵌套的回调函数,如果嵌套过多,会极大影响代码可读性和逻辑,这种情况也被成为回调地狱。比如说你要把一个函数 A 作为回调函数,但是该函数又接受一个函数 B 作为参数,甚至 B 还接受 C 作为参数使用,就这样层层嵌套,人称之为回调地狱,代码阅读性非常差。
案例:
<script>
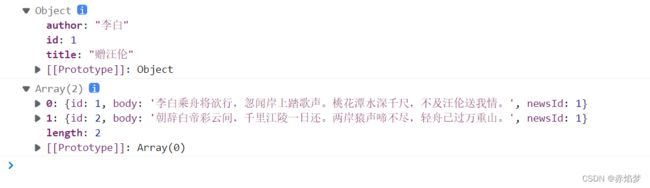
//嵌套Ajax
ajax({
url:"http://localhost:3000/news",
data: {author:"李白"},
success: function(res){
console.log(res[0])
ajax({
// url:"http://localhost:3000/comments?newsId=1",
url:"http://localhost:3000/comments",
data: {
newsId:res[0].id
},
success: function(res){
console.log(res)
}
})
}
})
script>
json文件:
{
    "news":[
        {"id":1,"title":"赠汪伦","author":"李白"},
        {"id":2,"title":"鹿柴","author":"王维"}
    ],
    "comments":[
        {"id":1,"body":"李白乘舟将欲行,忽闻岸上踏歌声。桃花潭水深千尺,不及汪伦送我情。","newsId":1},
        {"id":2,"body":"朝辞白帝彩云间,千里江陵一日还。两岸猿声啼不尽,轻舟已过万重山。","newsId":1},
        {"id":3,"body":"空山不见人,但闻人语响。返景入深林,复照青苔上。","newsId":2},
        {"id":4,"body":"独坐幽篁里,弹琴复长啸。深林人不知,明月来相照。","newsId":2}

    ]
}
结果:
篇幅太长,在下一篇更新promise,千峰ajax到此结束