SpringCloud RabbitMQ Docker Redis 搜索 分布式 - 2
Docker Day3,2022年4月3日
1、初始-Docker
docker 架构
我们要使用Docker来操作镜像、容器,就必须要安装Docker。
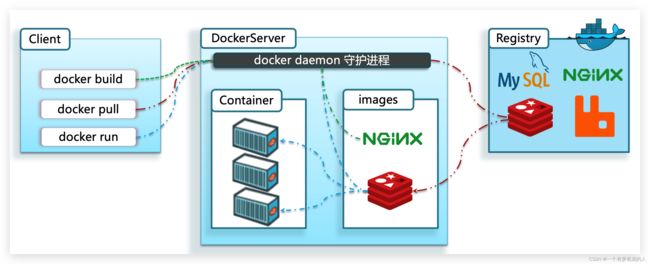
Docker是一个CS架构的程序,由两部分组成:
- 服务端(server):Docker守护进程,负责处理Docker指令,管理镜像、容器等
- 客户端(client):通过命令或RestAPI向Docker服务端发送指令。可以在本地或远程向服务端发送指令。

镜像: - 将应用程序及其依赖、环境、配置打包在一起
容器: - 镜像运行起来就是容器,一个镜像可以运行多个容器
Docker结构: - 服务端:接收命令或远程请求,操作镜像或容器
- 客户端:发送命令或者请求到Docker服务端
DockerHub: - 一个镜像托管的服务器,类似的还有阿里云镜像服务,统称为DockerRegistry
2、安装Docker
如果之前安装过旧版本的Docker,可以使用下面命令卸载:
yum remove docker \
                  docker-client \
                  docker-client-latest \
                  docker-common \
                  docker-latest \
                  docker-latest-logrotate \
                  docker-logrotate \
                  docker-selinux \
                  docker-engine-selinux \
                  docker-engine \
                  docker-ce
安装yum工具
yum install -y yum-utils \
           device-mapper-persistent-data \
           lvm2 --skip-broken
然后更新本地镜像源:
# 设置docker镜像源
yum-config-manager \
    --add-repo \
    https://mirrors.aliyun.com/docker-ce/linux/centos/docker-ce.repo

sed -i 's/download.docker.com/mirrors.aliyun.com\/docker-ce/g' /etc/yum.repos.d/docker-ce.repo

yum makecache fast
然后输入命令:
yum install -y docker-ce
docker-ce为社区免费版本。稍等片刻,docker即可安装成功。
3、启动docker
Docker应用需要用到各种端口,逐一去修改防火墙设置。非常麻烦,因此建议大家直接关闭防火墙!
启动docker前,一定要关闭防火墙后!!
# 关闭
systemctl stop firewalld
# 禁止开机启动防火墙
systemctl disable firewalld
通过命令启动docker:
systemctl start docker  # 启动docker服务
systemctl stop docker  # 停止docker服务
systemctl restart docker  # 重启docker服务
systemctl status docker # 查看状态
systemctl enable docker # 开机自启
然后输入命令,可以查看docker版本:
docker -v
4、配置镜像加速
docker官方镜像仓库网速较差,我们需要设置国内镜像服务:
参考阿里云的镜像加速文档:https://cr.console.aliyun.com/cn-hangzhou/instances/mirrors
sudo mkdir -p /etc/docker
sudo tee /etc/docker/daemon.json <<-'EOF'
{
  "registry-mirrors": ["https://tujdejyp.mirror.aliyuncs.com"]
}
EOF
sudo systemctl daemon-reload
sudo systemctl restart docker
5、docker的基本操作
①、从dockerhub中获取镜像,根据查看到的镜像名称,拉取自己需要的镜像:
docker pull nginx
注:镜名称一般分两部分组成:[repository]:[tag]。在没有指定tag时,默认是latest,代表最新版本的镜像
②、保存、导入镜像
利用docker save将nginx镜像导出磁盘,然后再通过load加载回来
利用docker xx --help命令查看docker save和docker load的语法
命令格式:
docker save -o [保存的目标文件名称] [镜像名称]
1).使用docker save导出镜像到磁盘
docker save -o nginx.tar nginx:latest
2).使用docker load加载镜像
先删除本地的nginx镜像:
docker rmi nginx:latest
然后运行命令,加载本地文件:
docker load -i nginx.tar
6、docker容器基本操作
容器保护三个状态:
- 运行:进程正常运行
- 暂停:进程暂停,CPU不再运行,并不释放内存
- 停止:进程终止,回收进程占用的内存、CPU等资源
其中:
- docker run:创建并运行一个容器,处于运行状态
- docker pause:让一个运行的容器暂停 docker
- unpause:让一个容器从暂停状态恢复运行
- docker stop:停止一个运行的容器 docker
- start:让一个停止的容器再次运行
- docker rm:删除一个容器
创建并运行nginx容器的命令:
docker run --name containerName -p 80:80 -d nginx
命令解读:
- docker run :创建并运行一个容器
- –name : 给容器起一个名字,比如叫做mn
- -p :将宿主机端口与容器端口映射,冒号左侧是宿主机端口,右侧是容器端口
- -d:后台运行容器
- nginx:镜像名称,例如nginx
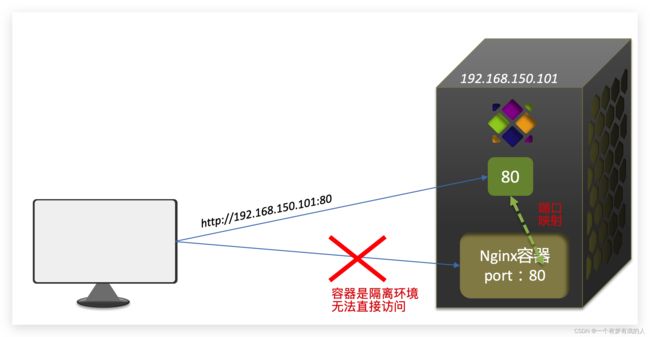
这里的-p参数,是将容器端口映射到宿主机端口。
默认情况下,容器是隔离环境,我们直接访问宿主机的80端口,肯定访问不到容器中的nginx。
现在,将容器的80与宿主机的80关联起来,当我们访问宿主机的80端口时,就会被映射到容器的80,这样就能访问到nginx了:

进入容器修改文件
**需求:**进入Nginx容器,修改HTML文件内容,添加“传智教育欢迎您”
**提示:**进入容器要用到docker exec命令。
步骤:
1)进入容器。进入我们刚刚创建的nginx容器的命令为:
docker exec -it mn bash
命令解读:
- docker exec :进入容器内部,执行一个命令
- -it : 给当前进入的容器创建一个标准输入、输出终端,允许我们与容器交互
- mn :要进入的容器的名称
- bash:进入容器后执行的命令,bash是一个linux终端交互命令
2)进入nginx的HTML所在目录 /usr/share/nginx/html
容器内部会模拟一个独立的Linux文件系统,看起来如同一个linux服务器一样
docker run命令的常见参数有哪些?
- –name:指定容器名称
- -p:指定端口映射
- -d:让容器后台运行
查看容器日志的命令:
- docker logs
- 添加 -f 参数可以持续查看日志
查看容器状态:
- docker ps
- docker ps -a 查看所有容器,包括已经停止的
7、数据卷
数据卷操作数据
docker volume [COMMAND]
docker volume命令是数据卷操作,根据命令后跟随的command来确定下一步的操作:
- create 创建一个volume
- inspect 显示一个或多个volume的信息
- ls 列出所有的volume
- prune 删除未使用的volume
- rm 删除一个或多个指定的volume
创建和查看数据卷
需求:创建一个数据卷,并查看数据卷在宿主机的目录位置
① 创建数据卷
docker volume create html
② 查看所有数据
docker volume ls
③ 查看数据卷详细信息卷
docker volume inspect html
可以看到,我们创建的html这个数据卷关联的宿主机目录为/var/lib/docker/volumes/html/_data目录。
数据卷的作用:
- 将容器与数据分离,解耦合,方便操作容器内数据,保证数据安全
数据卷操作:
- docker volume create:创建数据卷
- docker volume ls:查看所有数据卷
- docker volume inspect:查看数据卷详细信息,包括关联的宿主机目录位置
- docker volume rm:删除指定数据卷
- docker volume prune:删除所有未使用的数据卷
挂载数据卷
docker run \
  --name mn \
  -v html:/root/html \
  -p 8080:80
  nginx \
这里的-v就是挂载数据卷的命令:
- -v html:/root/htm :把html数据卷挂载到容器内的/root/html这个目录中
创建mysql容器
docker run \
--name mysql \
-e MYSQL_ROOT_PASSWORD=12356 \
-p 3306:3306 \
-v /tmp/mysql/conf/hmy.cnf:/home/lyd/mysql/conf/hmy.cnf \
-v /tmp/mysql/data:/home/lyd/mysql/data/ms \
-d \
mysql:5.7.25
RabbitMQ Day4,2022年4月6日
1、初始MQ
csdn上好多博客都有介绍
2、RabbitMQ
1)、下载镜像
方式一:在线获取
docker pull rabbitmq:3-management
方式二:本地加载
上传到虚拟机中后,使用命令加载镜像即可:
2)、安装MQ
docker run \
 -e RABBITMQ_DEFAULT_USER=itcast \
 -e RABBITMQ_DEFAULT_PASS=123456 \
 --name mq \
 --hostname mq1 \
 -p 15672:15672 \
 -p 5672:5672 \
 -d \
 rabbitmq:3-management
15672:ui管理端口
生产者:发送消息
// 1.建立连接
ConnectionFactory factory = new ConnectionFactory();
// 1.1.设置连接参数,分别是:主机名、端口号、vhost、用户名、密码
factory.setHost("192.168.237.128");
factory.setPort(5672);
factory.setVirtualHost("/");
factory.setUsername("itcast");
factory.setPassword("123456");
// 1.2.建立连接
Connection connection = factory.newConnection();

// 2.创建通道Channel
Channel channel = connection.createChannel();

// 3.创建队列
String queueName = "simple.queue";
channel.queueDeclare(queueName, false, false, false, null);

// 4.发送消息
String message = "hello, rabbitmq!";
channel.basicPublish("", queueName, null, message.getBytes());
System.out.println("发送消息成功:【" + message + "】");

// 5.关闭通道和连接
channel.close();
connection.close();
消费者
// 1.建立连接
ConnectionFactory factory = new ConnectionFactory();
// 1.1.设置连接参数,分别是:主机名、端口号、vhost、用户名、密码
factory.setHost("192.168.237.128");
factory.setPort(5672);
factory.setVirtualHost("/");
factory.setUsername("itcast");
factory.setPassword("123456");
// 1.2.建立连接
Connection connection = factory.newConnection();

// 2.创建通道Channel
Channel channel = connection.createChannel();

// 3.创建队列
String queueName = "simple.queue";
channel.queueDeclare(queueName, false, false, false, null);

// 4.消息订阅
channel.basicConsume(queueName, true, new DefaultConsumer(channel){
    @Override
    public void handleDelivery(String consumerTag, Envelope envelope, AMQP.BasicProperties properties, byte[] body) throws IOException {
        // 5.处理消息
        String message = new String(body);
        System.out.println("接收消息成功:【" + message + "】");
    }
});
System.out.println("等待接收消息...");
基本消息队列的消息发送流程:
- 建立connection
- 创建channel
- 利用channel声明队列
- 利用channel向队列发送消息
基本消息队列的消息接收流程:
- 建立connection
- 创建channel
- 利用channel声明队列
- 定义consumer的消费行为handleDelivery()
- 利用channel将消费者与队列绑定
3、SpringAMQP
Basic Queue 简单队列模型
发送消息
在父工程mq-demo中引入依赖
<dependency>
    <groupId>org.springframework.bootgroupId>
    <artifactId>spring-boot-starter-amqpartifactId>
dependency>
首先配置MQ地址,在publisher服务的application.yml中添加配置:
spring:
  rabbitmq:
    host: 192.168.150.101 # 主机名
    port: 5672 # 端口
    virtual-host: / # 虚拟主机
    username: itcast # 用户名
    password: 123321 # 密码
然后在publisher服务中编写测试类SpringAmqpTest,并利用RabbitTemplate实现消息发送:
package cn.itcast.mq.spring;
import org.junit.Test;
import org.junit.runner.RunWith;
import org.springframework.amqp.rabbit.core.RabbitTemplate;
import org.springframework.beans.factory.annotation.Autowired;
import org.springframework.boot.test.context.SpringBootTest;
import org.springframework.test.context.junit4.SpringRunner;
@RunWith(SpringRunner.class)
@SpringBootTest
public class SpringAmqpTest {
@Autowired
private RabbitTemplate rabbitTemplate;
@Test
public void testSimpleQueue() {
// 队列名称
String queueName = "simple.queue";
// 消息
String message = "hello, spring amqp!";
// 发送消息
rabbitTemplate.convertAndSend(queueName, message);
}
}
消息接收
首先配置MQ地址,在consumer服务的application.yml中添加配置:
spring:
  rabbitmq:
    host: 192.168.150.101 # 主机名
    port: 5672 # 端口
    virtual-host: / # 虚拟主机
    username: itcast # 用户名
    password: 123321 # 密码
然后在consumer服务的cn.itcast.mq.listener包中新建一个类SpringRabbitListener,代码如下:
package cn.itcast.mq.listener;
import org.springframework.amqp.rabbit.annotation.RabbitListener;
import org.springframework.stereotype.Component;
@Component
public class SpringRabbitListener {
@RabbitListener(queues = "simple.queue")
public void listenSimpleQueueMessage(String msg) throws InterruptedException {
System.out.println("spring 消费者接收到消息:【" + msg + "】");
}
}
ElasticSearch Day5 2022年4月7日
mysql与elasticsearch
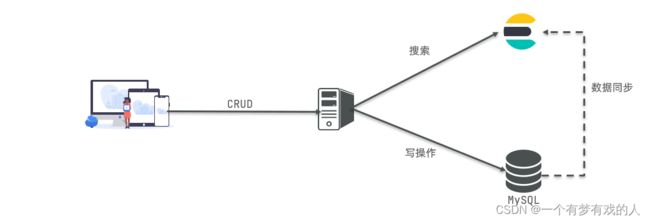
- Mysql:擅长事务类型操作,可以确保数据的安全和一致性
- Elasticsearch:擅长海量数据的搜索、分析、计算
因此在企业中,往往是两者结合使用:
mapping映射属性
mapping是对索引库中文档的约束,常见的mapping属性包括:
- type:字段数据类型,常见的简单类型有:
字符串:text(可分词的文本)、keyword(精确值,例如:品牌、国家、ip地址)
数值:long、integer、short、byte、double、float、
布尔:boolean
日期:date
对象:object - index:是否创建索引,默认为true
- analyzer:使用哪种分词器
- properties:该字段的子字段
索引库的CRUD
创建索引库和映射
基本语法:
- 请求方式:PUT
- 请求路径:/索引库名,可以自定义
- 请求参数:mapping映射
格式:
PUT /索引库名称
{
  "mappings": {
    "properties": {
      "字段名":{
        "type": "text",
        "analyzer": "ik_smart"
      },
      "字段名2":{
        "type": "keyword",
        "index": "false"
      },
      "字段名3":{
        "properties": {
          "子字段": {
            "type": "keyword"
          }
        }
      },
      // ...略
    }
  }
}
示例:
 PUT /heima
{
  "mappings": {
    "properties": {
      "info":{
        "type": "text",
        "analyzer": "ik_smart"
      },
      "email":{
        "type": "keyword",
        "index": "falsae"
      },
      "name":{
        "properties": {
          "firstName": {
            "type": "keyword"
          }
        }
      },
      // ... 略
    }
  }
}
查询索引库
基本语法:
请求方式:GET
请求路径:/索引库名
请求参数:无
格式:
GET /索引库名
修改索引库
倒排索引结构虽然不复杂,但是一旦数据结构改变(比如改变了分词器),就需要重新创建倒排索引,这简直是灾难。因此索引库一旦创建,无法修改mapping。
虽然无法修改mapping中已有的字段,但是却允许添加新的字段到mapping中,因为不会对倒排索引产生影响。
语法说明:
PUT /索引库名/_mapping
{
  "properties": {
    "新字段名":{
      "type": "integer"
    }
  }
}
删除索引库
语法:
请求方式:DELETE
请求路径:/索引库名
请求参数:无
格式:
DELETE /索引库名
文档操作
新增文档
语法:
POST /索引库名/_doc/文档id
{
    "字段1": "值1",
    "字段2": "值2",
    "字段3": {
        "子属性1": "值3",
        "子属性2": "值4"
    },
    // ...
}
查询文档
语法:
GET /{索引库名称}/_doc/{id}
通过kibana查看数据:
GET /heima/_doc/1
删除文档
删除使用DELETE请求,同样,需要根据id进行删除:
语法:
DELETE /{索引库名}/_doc/id值
示例:
#根据id删除数据
DELETE /heima/_doc/1
修改文档
修改有两种方式:
- 全量修改:直接覆盖原来的文档
- 增量修改:修改文档中的部分字段
全量修改:
全量修改是覆盖原来的文档,其本质是:
- 根据指定的id删除文档
- 新增一个相同id的文档
**注意:**如果根据id删除时,id不存在,第二步的新增也会执行,也就从修改变成了新增操作了。
语法:
PUT /{索引库名}/_doc/文档id
{
    "字段1": "值1",
    "字段2": "值2",
    // ... 略
}
示例:
PUT /heima/_doc/1
{
    "info": "黑马程序员高级Java讲师",
    "email": "[email protected]",
    "name": {
        "firstName": "云",
        "lastName": "赵"
    }
}
增量修改:
增量修改是只修改指定id匹配的文档中的部分字段。
语法:
POST /{索引库名}/_update/文档id
{
    "doc": {
         "字段名": "新的值",
    }
}
示例:
POST /heima/_update/1
{
  "doc": {
    "email": "[email protected]"
  }
}
RestAPI
创建索引库
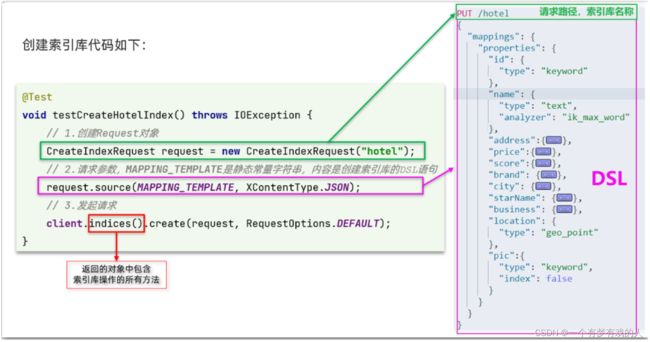
代码分为三步:
- 1)创建Request对象。因为是创建索引库的操作,因此Request是CreateIndexRequest。
- 2)添加请求参数,其实就是DSL的JSON参数部分。因为json字符串很长,这里是定义了静态字符串常量MAPPING_TEMPLATE,让代码看起来更加优雅。
- 3)发送请求,client.indices()方法的返回值是IndicesClient类型,封装了所有与索引库操作有关的方法。

在hotel-demo的cn.itcast.hotel.constants包下,创建一个类,定义mapping映射的JSON字符串常量:
package cn.itcast.hotel.constants;
public class HotelConstants {
public static final String MAPPING_TEMPLATE = "{\n" +
" \"mappings\": {\n" +
" \"properties\": {\n" +
" \"id\": {\n" +
" \"type\": \"keyword\"\n" +
" },\n" +
" \"name\":{\n" +
" \"type\": \"text\",\n" +
" \"analyzer\": \"ik_max_word\",\n" +
" \"copy_to\": \"all\"\n" +
" },\n" +
" \"address\":{\n" +
" \"type\": \"keyword\",\n" +
" \"index\": false\n" +
" },\n" +
" \"price\":{\n" +
" \"type\": \"integer\"\n" +
" },\n" +
" \"score\":{\n" +
" \"type\": \"integer\"\n" +
" },\n" +
" \"brand\":{\n" +
" \"type\": \"keyword\",\n" +
" \"copy_to\": \"all\"\n" +
" },\n" +
" \"city\":{\n" +
" \"type\": \"keyword\",\n" +
" \"copy_to\": \"all\"\n" +
" },\n" +
" \"starName\":{\n" +
" \"type\": \"keyword\"\n" +
" },\n" +
" \"business\":{\n" +
" \"type\": \"keyword\"\n" +
" },\n" +
" \"location\":{\n" +
" \"type\": \"geo_point\"\n" +
" },\n" +
" \"pic\":{\n" +
" \"type\": \"keyword\",\n" +
" \"index\": false\n" +
" },\n" +
" \"all\":{\n" +
" \"type\": \"text\",\n" +
" \"analyzer\": \"ik_max_word\"\n" +
" }\n" +
" }\n" +
" }\n" +
"}";
}
在hotel-demo中的HotelIndexTest测试类中,编写单元测试,实现创建索引:
@Test
void createHotelIndex() throws IOException {
    // 1.创建Request对象
    CreateIndexRequest request = new CreateIndexRequest("hotel");
    // 2.准备请求的参数:DSL语句
    request.source(MAPPING_TEMPLATE, XContentType.JSON);
    // 3.发送请求
    client.indices().create(request, RequestOptions.DEFAULT);
}
删除索引库
删除索引库的DSL语句非常简单:
DELETE /hotel
与创建索引库相比:
- 请求方式从PUT变为DELTE
- 请求路径不变
- 无请求参数
所以代码的差异,注意体现在Request对象上。依然是三步走:
1)创建Request对象。这次是DeleteIndexRequest对象
2)准备参数。这里是无参
3)发送请求。改用delete方法
在hotel-demo中的HotelIndexTest测试类中,编写单元测试,实现删除索引:
@Test
void testDeleteHotelIndex() throws IOException {
    // 1.创建Request对象
    DeleteIndexRequest request = new DeleteIndexRequest("hotel");
    // 2.发送请求
    client.indices().delete(request, RequestOptions.DEFAULT);
}
判断索引库是否存在
判断索引库是否存在,本质就是查询,对应的DSL是:
GET /hotel
因此与删除的Java代码流程是类似的。依然是三步走:
1)创建Request对象。这次是GetIndexRequest对象
2)准备参数。这里是无参
3)发送请求。改用exists方法
@Test
void testExistsHotelIndex() throws IOException {
    // 1.创建Request对象
    GetIndexRequest request = new GetIndexRequest("hotel");
    // 2.发送请求
    boolean exists = client.indices().exists(request, RequestOptions.DEFAULT);
    // 3.输出
    System.err.println(exists ? "索引库已经存在!" : "索引库不存在!");
}
RestClient操作文档
为了与索引库操作分离,我们再次参加一个测试类,做两件事情:
初始化RestHighLevelClient
我们的酒店数据在数据库,需要利用IHotelService去查询,所以注入这个接口
package cn.itcast.hotel;
import cn.itcast.hotel.pojo.Hotel;
import cn.itcast.hotel.service.IHotelService;
import org.junit.jupiter.api.AfterEach;
import org.junit.jupiter.api.BeforeEach;
import org.junit.jupiter.api.Test;
import org.springframework.beans.factory.annotation.Autowired;
import org.springframework.boot.test.context.SpringBootTest;
import java.io.IOException;
import java.util.List;
@SpringBootTest
public class HotelDocumentTest {
@Autowired
private IHotelService hotelService;
private RestHighLevelClient client;
@BeforeEach
void setUp() {
this.client = new RestHighLevelClient(RestClient.builder(
HttpHost.create("http://192.168.237.128:9200")
));
}
@AfterEach
void tearDown() throws IOException {
this.client.close();
}
}
新增文档
我们要将数据库的酒店数据查询出来,写入elasticsearch中。
索引库实体类
数据库查询后的结果是一个Hotel类型的对象。结构如下:
@Data
@TableName("tb_hotel")
public class Hotel {
    @TableId(type = IdType.INPUT)
    private Long id;
    private String name;
    private String address;
    private Integer price;
    private Integer score;
    private String brand;
    private String city;
    private String starName;
    private String business;
    private String longitude;
    private String latitude;
    private String pic;
}
与我们的索引库结构存在差异:
longitude和latitude需要合并为location
因此,我们需要定义一个新的类型,与索引库结构吻合:
package cn.itcast.hotel.pojo;
import lombok.Data;
import lombok.NoArgsConstructor;
@Data
@NoArgsConstructor
public class HotelDoc {
private Long id;
private String name;
private String address;
private Integer price;
private Integer score;
private String brand;
private String city;
private String starName;
private String business;
private String location;
private String pic;
public HotelDoc(Hotel hotel) {
this.id = hotel.getId();
this.name = hotel.getName();
this.address = hotel.getAddress();
this.price = hotel.getPrice();
this.score = hotel.getScore();
this.brand = hotel.getBrand();
this.city = hotel.getCity();
this.starName = hotel.getStarName();
this.business = hotel.getBusiness();
this.location = hotel.getLatitude() + ", " + hotel.getLongitude();
this.pic = hotel.getPic();
}
}
新增文档的DSL语句如下:
POST /{索引库名}/_doc/1
{
    "name": "Jack",
    "age": 21
}
对应的java代码如图:

可以看到与创建索引库类似,同样是三步走:
1)创建Request对象
2)准备请求参数,也就是DSL中的JSON文档
3)发送请求
变化的地方在于,这里直接使用client.xxx()的API,不再需要client.indices()了。
》》》》》》》》》》》》》》》》》》》》》》》》》》》》》》》》
我们导入酒店数据,基本流程一致,但是需要考虑几点变化:
酒店数据来自于数据库,我们需要先查询出来,得到hotel对象
hotel对象需要转为HotelDoc对象
HotelDoc需要序列化为json格式
因此,代码整体步骤如下:
1)根据id查询酒店数据Hotel
2)将Hotel封装为HotelDoc
3)将HotelDoc序列化为JSON
4)创建IndexRequest,指定索引库名和id
5)准备请求参数,也就是JSON文档
6)发送请求
在hotel-demo的HotelDocumentTest测试类中,编写单元测试:
@Test
void testAddDocument() throws IOException {
// 1.根据id查询酒店数据
Hotel hotel = hotelService.getById(61083L);
// 2.转换为文档类型
HotelDoc hotelDoc = new HotelDoc(hotel);
// 3.将HotelDoc转json
String json = JSON.toJSONString(hotelDoc);
// 1.准备Request对象
IndexRequest request = new IndexRequest("hotel").id(hotelDoc.getId().toString());
// 2.准备Json文档
request.source(json, XContentType.JSON);
// 3.发送请求
client.index(request, RequestOptions.DEFAULT);
}
查询文档
查询的DSL语句如下:
GET /hotel/_doc/{id}
非常简单,因此代码大概分两步:
准备Request对象
发送请求
不过查询的目的是得到结果,解析为HotelDoc,因此难点是结果的解析。完整代码如下:

可以看到,结果是一个JSON,其中文档放在一个_source属性中,因此解析就是拿到_source,反序列化为Java对象即可。
与之前类似,也是三步走:
1)准备Request对象。这次是查询,所以是GetRequest
2)发送请求,得到结果。因为是查询,这里调用client.get()方法
3)解析结果,就是对JSON做反序列化
》》》》》》》》》》》》》》》》》》》》》》》》》》》》》》》》
在hotel-demo的HotelDocumentTest测试类中,编写单元测试:
@Test
void testGetDocumentById() throws IOException {
// 1.准备Request
GetRequest request = new GetRequest("hotel", "61082");
// 2.发送请求,得到响应
GetResponse response = client.get(request, RequestOptions.DEFAULT);
// 3.解析响应结果
String json = response.getSourceAsString();
HotelDoc hotelDoc = JSON.parseObject(json, HotelDoc.class);
System.out.println(hotelDoc);
}
删除文档
删除的DSL为是这样的:
DELETE /hotel/_doc/{id}
与查询相比,仅仅是请求方式从DELETE变成GET,可以想象Java代码应该依然是三步走:
1)准备Request对象,因为是删除,这次是DeleteRequest对象。要指定索引库名和id
2)准备参数,无参
3)发送请求。因为是删除,所以是client.delete()方法
在hotel-demo的HotelDocumentTest测试类中,编写单元测试:
@Test
void testDeleteDocument() throws IOException {
    // 1.准备Request
    DeleteRequest request = new DeleteRequest("hotel", "61083");
    // 2.发送请求
    client.delete(request, RequestOptions.DEFAULT);
}
修改文档
修改我们讲过两种方式:
- 全量修改:本质是先根据id删除,再新增
- 增量修改:修改文档中的指定字段值
在RestClient的API中,全量修改与新增的API完全一致,判断依据是ID:
- 如果新增时,ID已经存在,则修改
- 如果新增时,ID不存在,则新增
这里不再赘述,我们主要关注增量修改。
代码示例如图:

与之前类似,也是三步走:
1)准备Request对象。这次是修改,所以是UpdateRequest
2)准备参数。也就是JSON文档,里面包含要修改的字段
3)更新文档。这里调用client.update()方法
》》》》》》》》》》》》》》》》》》》》》》》》》》》》》》》》
在hotel-demo的HotelDocumentTest测试类中,编写单元测试:
@Test
void testUpdateDocument() throws IOException {
    // 1.准备Request
    UpdateRequest request = new UpdateRequest("hotel", "61083");
    // 2.准备请求参数
    request.doc(
        "price", "952",
        "starName", "四钻"
    );
    // 3.发送请求
    client.update(request, RequestOptions.DEFAULT);
}
批量导入文档
案例需求:利用BulkRequest批量将数据库数据导入到索引库中。
步骤如下:
- 利用mybatis-plus查询酒店数据
- 将查询到的酒店数据(Hotel)转换为文档类型数据(HotelDoc)
- 利用JavaRestClient中的BulkRequest批处理,实现批量新增文档
批量处理BulkRequest,其本质就是将多个普通的CRUD请求组合在一起发送。
其中提供了一个add方法,用来添加其他请求:

可以看到,能添加的请求包括:
- IndexRequest,也就是新增
- UpdateRequest,也就是修改
- DeleteRequest,也就是删除
因此Bulk中添加了多个IndexRequest,就是批量新增功能了。示例:

在hotel-demo的HotelDocumentTest测试类中,编写单元测试:
@Test
void testBulkRequest() throws IOException {
    // 批量查询酒店数据
    List<Hotel> hotels = hotelService.list();

    // 1.创建Request
    BulkRequest request = new BulkRequest();
    // 2.准备参数,添加多个新增的Request
    for (Hotel hotel : hotels) {
        // 2.1.转换为文档类型HotelDoc
        HotelDoc hotelDoc = new HotelDoc(hotel);
        // 2.2.创建新增文档的Request对象
        request.add(new IndexRequest("hotel")
                    .id(hotelDoc.getId().toString())
                    .source(JSON.toJSONString(hotelDoc), XContentType.JSON));
    }
    // 3.发送请求
    client.bulk(request, RequestOptions.DEFAULT);
}
文档操作的基本步骤:
- 初始化RestHighLevelClient
- 创建XxxRequest。XXX是Index、Get、Update、Delete、Bulk
- 准备参数(Index、Update、Bulk时需要)
- 发送请求。调用RestHighLevelClient#.xxx()方法,xxx是index、get、update、delete、bulk
- 解析结果(Get时需要)

