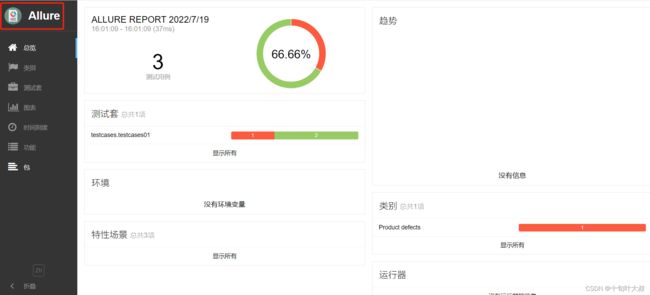
软件测试 pytest pytest的命名规则 用例的前后置 conftest.py 定制allure报告 @pytest.mark.parametrize()装饰器作数据驱动
文章目录
-
- 1 pytest简介
-
- 1.1 pytest的命名规则
- 1.2 运行方式
-
- 1.2.1 主函数方式(少用)
- 1.2.2 命令行方式(少用)
- 1.2.3 pytest.ini的配置文件方式(最经常用)
- 1.3 pytest执行测试用例的顺序
- 1.4 跳过测试用例
-
- 1.4.1 无条件跳转
- 1.4.2 有条件跳转
- 2 用例的前后置
-
- 2.1 使用fixture实现部分用例的前后置
-
- 2.1.1 scpoe参数
- 2.1.2 autouser参数
- 2.1.3 params参数
- 2.1.4 ids参数
- 2.1.5 name参数
- 3 conftest.py
- 4 allure报告
-
- 4.1 生成allure临时文件
- 4.2 生成allure报告
- 4.3 修改allure的logo
-
- 4.3.1 默认的logo
- 4.3.2 插件自带的logo
- 4.3.3 自定义logo
- 4.4 allure报告功能定制
-
- 4.4.1 添加测试用例分类
- 4.4.2 添加bug等级分类
- 4.4.3 添加用例描述
- 4.4.4 添加测试用例链接(不常用)
- 4.4.5 添加测试用例步骤
- 4.4.6 添加附件
- 4.5 allure报告如何在本地访问
- 4.6 allure中的数据驱动装饰器
-
- 4.6.1 列表基本用法
- 4.6.2 列表嵌套用法
- 4.6.3 yml文件驱动
- 4.7 allure报告小结
- 小结
1 pytest简介
pytest是用例管理框架,或者说是单元测试框架。
python有unittest和pytest。
pytest的主要作用:
(1)发现测试用例。从多个py文件里面按照一定的规则找到测试用例。
(2)执行测试用例。按照一定的顺序执行测试用例,并生成结果。
pytest默认从上到下,可以使用装饰器改变顺序。
(3)判断测试结果。运用python的断言。
(4)生成测试报告。与插件pytest-html、allure生成报告。
1.1 pytest的命名规则
python文件命名规则
(1)py文件全小写,多个英文用_分开。
(2)类名首字母大写。
(3)函数名全小写,多个英文用_分开。
pytest的命名规则
(1)模块名(py文件)必须以test_开头或_test结尾。
(2)测试类(class)必须以Test开头,并且不能带init方法。
(3)测试用例(函数)必须以test_开头。
1.2 运行方式
运行方式有3种。
1.2.1 主函数方式(少用)
在main方法中运行。
新建all.py,用于运行测试用例,如下所示:
if __name__ == '__main__':
    pytest.main()
mian()方法里面的参数,如下表格:
| 参数 | 描述 |
|---|---|
| -s | 输入调试信息。如:打印信息等等 |
| -v | 显示更详细的信息,文件名,用例名等等 |
| -n | 多线程或分布式运行测试用例 |
| -x | 表示只要有一个失败用例报错,就停止测试 |
| -maxfial | 出现N个测试用例失败,就停止测试 |
--html=report.html |
生成html的测试报告 |
| - k | 根据测试用例的部分字符串指定测试用例,可以使用and,or |
(1)指定模块运行
if __name__ == '__main__':
    pytest.main(["-vs","testcases/testcases01/test_api3.py"])
(2)指定文件夹运行
if __name__ == '__main__':
    pytest.main(["-vs","testcases/testcases01"])
(3)指定测试用例运行
使用node id的方式。
if __name__ == '__main__':
    pytest.main(["-vs","testcases/testcases01/test_api3.py::TestApi::test_08"])
1.2.2 命令行方式(少用)
pytest
mian()方法和命令行里面的参数,如下表格:
| 参数 | 描述 |
|---|---|
| -s | 输入调试信息。如:打印信息等等 |
| -v | 显示更详细的信息,文件名,用例名等等 |
| -n | 多线程或分布式运行测试用例 |
| -x | 表示只要有一个失败用例报错,就停止测试 |
| -maxfial | 出现N个测试用例失败,就停止测试 |
--html=report.html |
生成html的测试报告 |
| - k | 根据测试用例的部分字符串指定测试用例,可以使用and,or |
1.2.3 pytest.ini的配置文件方式(最经常用)
不管是主函数还是命令行都会读取pytest.ini文件。
在项目的根目录新建文件,文件名为pytest.ini,该文件模板如下:
[pytest]

addopts =

testpaths =

python_files =

python_classes =

python_functions =
| 参数 | 作用 |
|---|---|
| [pytest] | 用于标志这个文件是pytest的配置文件 |
| addopts | 命令行参数,多个参数之间用空格分隔 |
| testpaths | 配置搜索参数用例的范围 |
| python_files | 改变默认的文件搜索规则 |
| python_classes | 改变默认的类搜索规则 |
| python_functions | 改变默认的测试用例的搜索规则 |
| markers | 用于标记 |
例如:
[pytest]

addopts = -vs -m smoke

testpaths = testcases/testcases01/test_api3.py

python_files = test_*.py

python_classes = Test*

python_functions = test_*

marks =
	smoke:smoking
addopts参数值为vs,输入调试信息和更详细信息,m smoke执行标签为smoke的测试用例,testpaths的路径为testcases/testcases01/test_api3.py。按照pytest默认的规则命名模块名、类名和方法名(测试用例名)。
注:
pytset.ini文件尽可能不要出现中文。
1.3 pytest执行测试用例的顺序
默认执行顺序从上到下。
改变测试用例的执行顺序,在测试用例上加上标记,如下:
@pytest.mark.run(order=1)
order=1首先执行该测试用例,以此类推。有order装饰器的优先,等级相同的按照默认的从上到下,order参数值能为0,但不能为复数。
1.4 跳过测试用例
跳过测试用例分为有条件跳转和无条件跳转。
1.4.1 无条件跳转
在测试用例标志,并说明原因,如下所示:
@pytest.mark.skip(reason="不需要该用例")
1.4.2 有条件跳转
在类中定义V=3,在某一条测试用例上用skipif装饰器,如下所示:
@pytest.mark.skipif(V = 1,reason="只测试V3版本的测试用例")
2 用例的前后置
用例的前后置又称用例的固件,用例的夹具,用例的钩子函数。
pytest自带的6个前后置方法,如下表所示:
| 方法 | 描述 |
|---|---|
| setup_module() | 在每个模块之前执行 |
| teardown_module() | 在每个模块之后执行 |
| setup_class() | 在每个类之前执行 |
| teardown_class() | 在每个类之后执行 |
| setup() | 在每个方法(测试用例)之前执行 |
| teardown() | 在每个方法(测试用例)之后执行 |
例如:
    def setup_module(self):
        print("\n调用setup_module")

    def teardown_module(self):
        print("\n调用teardown_modeule")

    def setup_class(self):
        print("\n调用setup_class")

    def teardown_class(self):
        print("\n调用teardown_class")

    def setup(self):
        print("\n调用setup")

    def teardown(self):
        print("\n调用teardown")
2.1 使用fixture实现部分用例的前后置
在项目的根目录或在测试用例文件夹某一文件夹下新建conftest.py,conftest文件可以多个嵌套,如下图所示:
在conftest.py文件写fixture装饰器
语法
@pytest.fixture(scope="",params="",autouser="",ids="",name="")
| 参数 | 描述 | 参数值 |
|---|---|---|
| scope | 该装饰器的作用域 | function,class,module,package/session |
| params | 数据驱动。数据类型有list,tuple,字典列表([{},{},……]),字典元组(({}.{},{},……)) | |
| autouser | 是否自动调用 | True,False |
| ids | 与params参数配合使用 | |
| name | 给装饰器起别名。起了别名,原来的名称无法使用 | " "字符串 |
2.1.1 scpoe参数
(1)function参数值
当scope=“function”时,被@pytest.fixture标记的方法的作用域是函数,即函数内的代码就会被执行。
@pytest.fixture(scope="function")
def execute_sql():
    print("前置:打开数据库")
    yield
    print("后置:关闭数据库")
调用。execute_sql以参数的形式传入到测试用例中,如下所示:
    def test_08(self,execute_sql):
        print("运行test08")
注:
yield VS return
yield是生成器,返回一个对象,对象中可以有多个值,yield后面可以接代码。
return返回一个值,renturn后面不能接代码。
yield与return不能同时使用。
(2)class参数值
在每个类的前后执行一次。
@pytest.fixture(scope="class")
当scope="class"时,常常与autouse=True配合和使用,如下所示:
@pytest.fixture(scope="class",autouse=True)
达到在每个类前后执行夹具。
注:
在类加上装饰器,xx为夹具名,如下:
@pytest.mark.usefixtures("xx")
到达在该类前后执行夹具。
(3)module参数值
在每个模块的前后执行一次,和setup_module,teardown_module效果一样。
定义并直接调用,如下:
@pytest.fixture(scope="module")
(4)package/session参数值
在每个包的前后执行一次。package/session参数值一般与conftest.py文件配合使用。
2.1.2 autouser参数
作用:是否自动执行测试用例。
| 参数值 | 描述 |
|---|---|
| True | 测试用例自动调用该被修饰函数 |
| False | 测试用例不自动调用该被修饰函数 |
2.1.3 params参数
作用:实现数据驱动。
def read_singer():
    return ["王菲","莫文蔚","孙燕姿"]

@pytest.fixture(scope="function",params=read_singer(),ids=["singer01","singer02","singer03"])
def data(request):
    print("\n读取数据")
    print(request.param)
    yield
    print("\n关闭数据")
read_singer()方法用于返回数据,data()是夹具,是被修饰方法,装饰器用read_singer()方法的数据。data()夹具用request接受read_singer()方法的数据,使用request.param逐个读取数据。
在测试用例中,夹具以形参的形式传入测试用例中,达到调用data()夹具的效果。
2.1.4 ids参数
ids与params配合使用,自定义参数名称。很少使用,了解即可。
2.1.5 name参数
对被修饰的夹具取别名,用了别名后,不能使用原来的夹具名,只能使用别名,了解即可。
3 conftest.py
conftest.py文件一般在fixture的scpoe参数值为package或session时配合使用。
名称是固定的,conftest.py,主要用于单独存放fixture夹具(固件)的。
级别为package时,可以在多个包甚至多个py文件里面共享前后置。例如:模块的共性,登录等等。
conftest.py文件里面的fixture不需要导包可以直接使用。
conftest.py可以多个嵌套conftest.py。
作用:
出现重复日志,初始化一次日志对象,避免日志重复。
连接数据库。
关闭数据库。
等一系列一次使用的对象。
conftest.py为function级别时优先级高于setup/teardown
conftest.py为class级别时优先级高于setup_class/teardown_class
conftest.py为package级别时优先级高于setup_module/teardown_module
4 allure报告
allure是一个report框架,支持java的Junit/testng等框架,当然也可以支持python的pytest框架。
4.1 生成allure临时文件
第一,需要安装allure-pytest(在此之前还要安装pytest和allure),安装好allure-pytest,如下图所示:

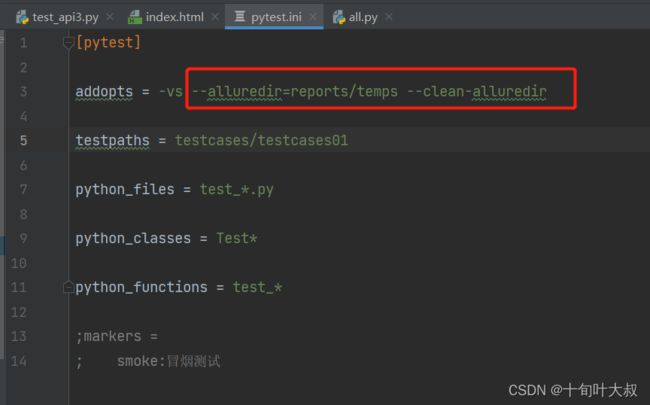
第二,写命令。在pytest.ini文件中的addopts中写allure的生成文件路径,每次运行之前都清空之前的allure报告,如下图所示:
4.2 生成allure报告
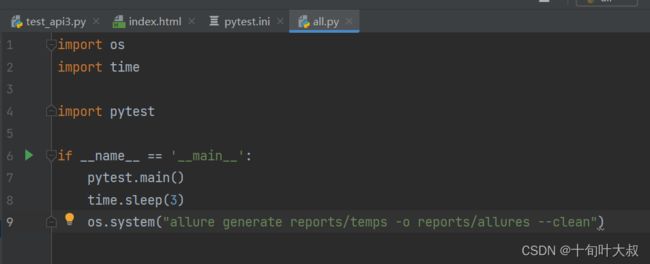
在all.py文件中运行命令。使用allure生成的临时文件,生成allure报告,如下图所示:
4.3 修改allure的logo
修改allure的logo需要找到logo的css。
4.3.1 默认的logo
4.3.2 插件自带的logo
第一,修改allure.yml文件(注:提前下载好allure)
allure-2.18.1\plugins\custom-logo-plugin\static
找到文件路径,如下图所示:

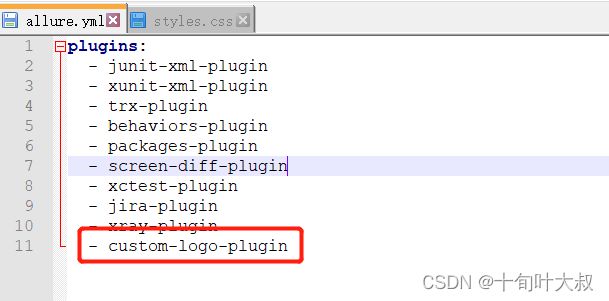
打开allure.yml文件,在最后一行添加 - custom-logo-plugin,如下图所示:
第二,查看插件自带的logo以及其css
找到文件路径

查看插件自带的logo,如下图所示:
4.3.3 自定义logo
第一,将自定义的logo以png格式存放在如下路径:
allure-2.18.1\plugins\custom-logo-plugin\static
4.4 allure报告功能定制
问题1:发现生成的allure报告中的功能中的测试用例没有分类,一旦测试用例多了找不到。
问题2::缺陷等级没有分类等等详细信息,如下图所示:

针对问题1,提出的解决思路,对测试用例进行分类。使用allure的装饰器。
4.4.1 添加测试用例分类
allure针对测试用例分类的装饰器
| 装饰器 | 描述 |
|---|---|
| epic | 史诗。一般是项目名称 |
| feature | 特性。一般是模块名称 |
| story | 分组。一般是功能段,接口名称 |
| title | 测试用例标题 |
title可以放在测试用例外(测试用例上一行),也可以放在测试用例里面。
title放在测试用例外适用于一个装饰器对应一条测试用例。
title放在测试用例里适用于一个方法对用多个测试用例,就是数据驱动的情况。
使用以上装饰器,如下所示:
@allure.epic("项目名称:数码销售系统")
@allure.feature("模块名称:商品管理模块")
class TestApi:
	@allure.story("功能点:增加商品")
    @allure.title("接口:增加商品的id,name,类别,价格")
	def test_08(self):
		print("执行test_08")

	def test_10(self):
		allure.dynamic.title("title在测试用例中")
		print("执行test_10")
4.4.2 添加bug等级分类
针对问题2,使用allure.severity的装饰器。severity参数值如下表:
| 参数值 | 描述 | 场景 |
|---|---|---|
| blocker | 中断缺陷,致命bug | 内存泄漏,用户数据丢失,系统崩溃 |
| critical | 临界缺陷,严重bug | 功能为实现,功能错误,重复提交 |
| normal | 一般缺陷,一般bug | 条件查询有误,大量数据无响应 |
| minor | 次要缺陷,实体bug | 颜色搭配出错,字体排列不整齐,错别字 |
| trivial | 轻微缺陷,轻微bug | 没有使用专业术语,必填项无提示 |
运用allure.severity装饰器如下:
@allure.epic("项目名称:数码销售系统")
@allure.feature("模块名称:商品管理模块")
class TestApi:
    @allure.story("功能点:修改商品")
    @allure.title("接口:修改商品的数量")
    @allure.severity(allure.severity_level.BLOCKER)
    def test_09(self):
        print("运行test09")
        assert 1 == 2

    @allure.story("功能点:查看商品")
    @allure.title("接口:查看商品的数量")
    @allure.severity(allure.severity_level.CRITICAL)
    def test_10(self):
        print("运行test10")
        assert "a" in "123"
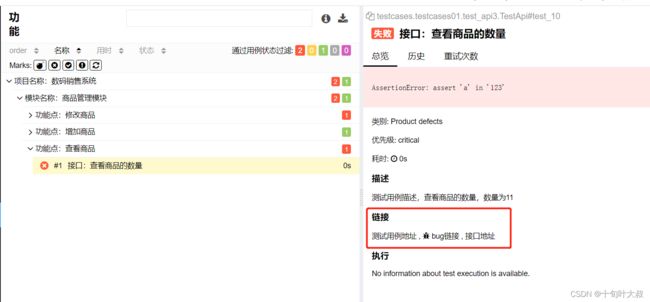
执行结果,如下图所示:

注:allure.severity装饰器可以修饰整个类。
4.4.3 添加用例描述
可以在测试用例外(测试用例的上一行)添加用例描述,也可以在测试用例里添加用例描述,格式如下所示:
# 在测试用例外添加用例描述
@allure.description("测试用例描述")
# 在测试用例里添加用例描述
allure.dynamic.description("测试用例描述")
例如:
要求:在查看商品功能点上的查看商品的接口接口添加测试用例描述。
代码如下所示:
@allure.epic("项目名称:数码销售系统")
@allure.feature("模块名称:商品管理模块")
class TestApi:
    @allure.story("功能点:查看商品")
    @allure.title("接口:查看商品的数量")
    @allure.severity(allure.severity_level.CRITICAL)
    @allure.description("测试用例描述,查看商品的数量,数量为11")
    def test_10(self):
        print("运行test10")
        assert "a" in "123"
运行结果,如下图所示:
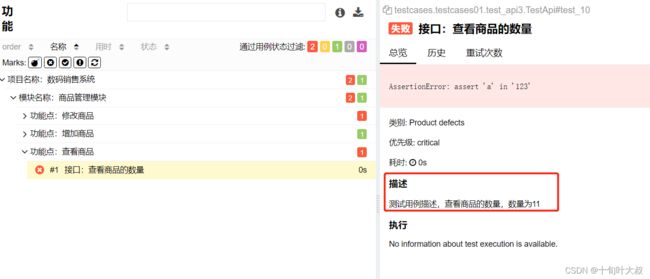
此外,可以放在测试用例中,如下所示:
allure.dynamic.description("测试用例描述,查看商品的数量,数量为123")
注:放在用例里用例描述方法比放在用例外的用例描述方法优先级高。
4.4.4 添加测试用例链接(不常用)
(1)接口地址@allure.link(name=" ",url=" ")
(2)bug地址@allure.isue(" ")
(3)测试用例的地址@lalure.testcase(" ")
例如:
要求在查看商品的数量接口添加链接。
添加3个装饰器,代码如下所示:
@allure.epic("项目名称:数码销售系统")
@allure.feature("模块名称:商品管理模块")
class TestApi:
    @allure.story("功能点:查看商品")
    @allure.title("接口:查看商品的数量")
    @allure.severity(allure.severity_level.CRITICAL)
    @allure.description("测试用例描述,查看商品的数量,数量为11")
    @allure.link(name="接口地址",url="https://api.weixin.qq.com/cgi-bin/token")
    @allure.issue("bug链接")
    @allure.testcase("测试用例地址")
    def test_10(self):
        print("运行test10")
        assert "a" in "123"
4.4.5 添加测试用例步骤
添加测试用例步骤可以在测试用例外添加,但是只能添加一个步骤,不满足使用,所以一般添加测试用例步骤都在测试用例里添加。
添加测试用例步骤语法格式:
#在测试用例外添加测试用例步骤
@allure.step()
#在测试用例里添加测试用例步骤
        for a in range(1,n):
            with allure.step("测试用例步骤"+str(a)):
                print("步骤"+str(a)+"执行的脚本")
在测试用例外添加测试用例步骤,添加代码@allure.testcase("测试用例地址"),如下所示:
@allure.epic("项目名称:数码销售系统")
@allure.feature("模块名称:商品管理模块")
class TestApi:
    @allure.story("功能点:查看商品")
    @allure.title("接口:查看商品的数量")
    @allure.severity(allure.severity_level.CRITICAL)
    @allure.description("测试用例描述,查看商品的数量,数量为11")
    @allure.link(name="接口地址",url="https://api.weixin.qq.com/cgi-bin/token")
    @allure.issue("bug链接")
    @allure.testcase("测试用例地址")
    @allure.step("步骤1")
    def test_10(self):
        print("运行test10")
运行效果,如下图所示:

显然,用例的步骤很多情况都是多步的,所以就应该使用循环添加参数用例的步骤,代码如下所示:
@allure.epic("项目名称:数码销售系统")
@allure.feature("模块名称:商品管理模块")
class TestApi:
    @allure.story("功能点:查看商品")
    @allure.title("接口:查看商品的数量")
    @allure.severity(allure.severity_level.CRITICAL)
    @allure.description("测试用例描述,查看商品的数量,数量为11")
    @allure.link(name="接口地址",url="https://api.weixin.qq.com/cgi-bin/token")
    @allure.issue("bug链接")
    # @allure.step("步骤1")
    def test_10(self):
        print("运行test10")
        # 增加测试步骤
        for a in range(1,10):
            with allure.step("测试用例步骤"+str(a)):
                print("步骤"+str(a)+"执行的脚本")
4.4.6 添加附件
(1)web自动化,语法如下:
with open(" ",mode="rb") as f:
	allure.attach(body=f.read(),name=" ",attachment_type=allure.attachment_type.xx)
例如:
要求:在查看商品的数量,添加错误截图。
思路:在测试用例中添加错误截图,需要读取这张截图,使用allure填加到报告中。
代码如下所示:

运行结果,如下图所示:

(2)接口自动化
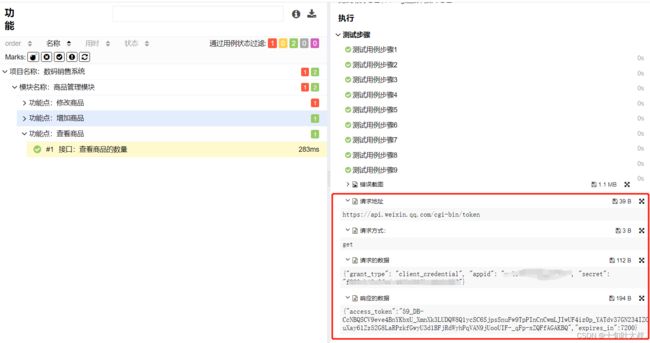
要求:早查看商品的数量接口添加请求地址、请求方式、请求数据和响应数据。
思路:使用allure.attach()方法获取。
代码如下图所示:
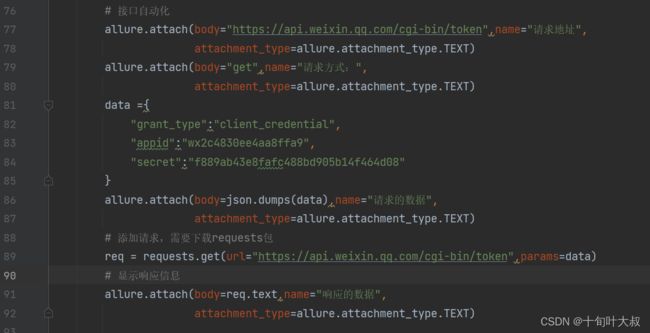
注:需要下载requests包,如下图所示:
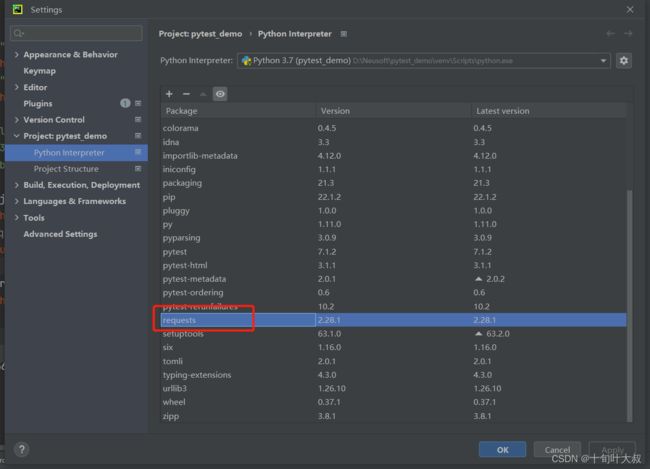
4.5 allure报告如何在本地访问
为什么allure报告可以在pycharm正常打开,将aluure报告复制在其他地方(例如:D盘……)无法查看?
原因:pycharm自带了容器。
方法1:在本地搭建服务器。(不建议使用,工作量大)
方法2:通过启动服务打开allure报告(前提:在局域网内之间才可以查看allure报告)
在命令行输入:allure open ./reports/allures,如下图所示:

局域网内可以通过下图的地址看到allure报告,如下图所示:

4.6 allure中的数据驱动装饰器
使用pytest中的装饰器,并在用例中调用数据,如下:
@pytest.mark.parametrize("参数名",数据)
def test_xxx(self,参数名):
4.6.1 列表基本用法
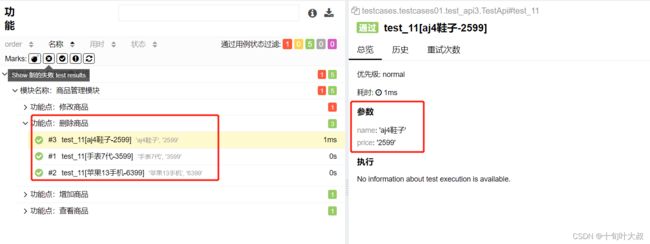
要求:添加test_11用例和删除商品功能点,test_11用例附属于删除商品功能点之下,使用allure数据驱动装饰器,如下图代码所示:

运行结果,如下图所示:
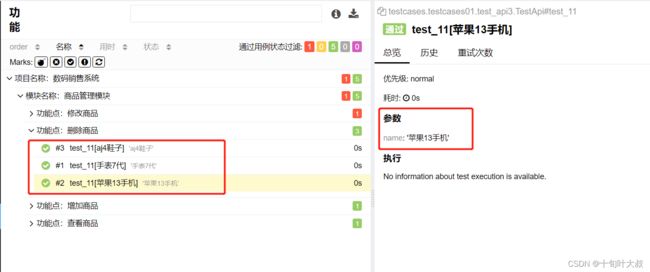
4.6.2 列表嵌套用法
参数为两个name和price,数据为列表嵌套类型,调用时需要写上两个参数,如下图所示:

4.6.3 yml文件驱动
(1)写yaml文件,在测试用例文件夹下新建file,名为get_token.yml,项目结构如下图所示:

内容如下图所示:

注:yaml的文件数据 -开头的代码为list,:键值对。
(2)写读取yaml文件的方法,写在类之外,如下所示:
def read_yaml(yaml_path):
    with open(yaml_path,mode="r",encoding="utf-8") as f:
        value =  yaml.load(f,Loader=yaml.FullLoader)
        return value
注:使用yaml之前,需要安装PyYAML,如下图所示:
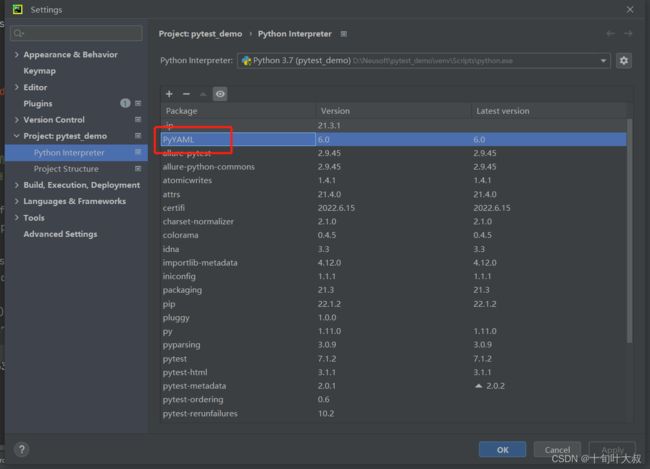
(3)在测试用例上写装饰器,数据名为caseinfo,调用read_yaml()方法,,如下所示:
@pytest.mark.parametrize("caseinfo",read_yaml("./testcases/testcases01/get_token.yml"))
注:yaml_path的相对路径,我是在all.py运行,all.py在项目根路径的下一级所以使用./。
(4)数据以形参的方式传入测试用例,如下所示:
def test_12(self,caseinfo):
(5)在测试用例中使用allure.attach方法获取请求地址、请求方式、请求数据和响应数据,如下所示:
    def test_12(self,caseinfo):
        print("执行test12测试用例")
        print(caseinfo)
        allure.attach(body=caseinfo['request']['url'],name="请求地址",
                      attachment_type=allure.attachment_type.TEXT)
        allure.attach(body=caseinfo['request']['method'],name="请求方式:",
                      attachment_type=allure.attachment_type.TEXT)
        data =caseinfo['request']['data']

        allure.attach(body=json.dumps(data),name="请求的数据",
                      attachment_type=allure.attachment_type.TEXT)
        # 添加请求,需要下载requests包
        req = requests.get(url=caseinfo['request']['url'],params=data)
        # 显示响应信息
        allure.attach(body=req.text,name="响应的数据",
                      attachment_type=allure.attachment_type.TEXT)
运行结果的token值如下图所示:
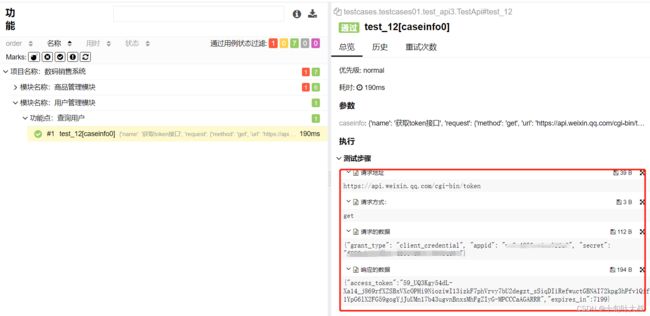
综上使用yaml做数据驱动的代码,如下所示:
def read_yaml(yaml_path):
    with open(yaml_path,mode="r",encoding="utf-8") as f:
        value =  yaml.load(f,Loader=yaml.FullLoader)
        return value

@allure.epic("项目名称:数码销售系统")
@allure.feature("模块名称:商品管理模块")
class TestApi:

    @allure.feature("模块名称:用户管理模块")
    @allure.story("功能点:查询用户")
    @pytest.mark.parametrize("caseinfo",read_yaml("./testcases/testcases01/get_token.yml"))
    def test_12(self,caseinfo):
        print("执行test12测试用例")
        print(caseinfo)
        allure.attach(body=caseinfo['request']['url'],name="请求地址",
                      attachment_type=allure.attachment_type.TEXT)
        allure.attach(body=caseinfo['request']['method'],name="请求方式:",
                      attachment_type=allure.attachment_type.TEXT)
        data =caseinfo['request']['data']

        allure.attach(body=json.dumps(data),name="请求的数据",
                      attachment_type=allure.attachment_type.TEXT)
        # 添加请求,需要下载requests包
        req = requests.get(url=caseinfo['request']['url'],params=data)
        # 显示响应信息
        allure.attach(body=req.text,name="响应的数据",
                      attachment_type=allure.attachment_type.TEXT)
(6)添加appid为空的测试用例和secret为空的测试用例
在get_token.yml文件上加上,如下内容:
-
  name: appid为空
  request:
    method: get
    url: https://api.weixin.qq.com/cgi-bin/token
    data:
      grant_type: client_credential
      appid:
      secret: f889ab43e8fafc488bd905b14f464d08
  validate: None
-
  name: secret为空
  request:
    method: get
    url: https://api.weixin.qq.com/cgi-bin/token
    data:
      grant_type: client_credential
      appid: wx2c4830ee4aa8ffa9
      secret:
  validate: None
注:这里暂时忽略断言。
secret为空的测试用例运行结果,如下图所示:
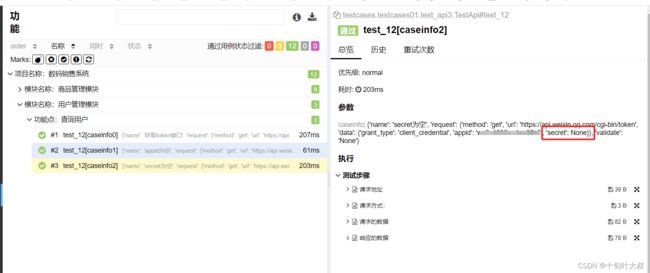
4.7 allure报告小结
安装allure,allure-pytest。
allure报告常用的装饰器或方法:
@allure.epic(" ")
@allure.feature(" ")
@allure.story(" ")
@allure.severity()
@allure.description(" ")
allure.dynamic.title(" ")
allure.step()
allure.attach()
小结
pytest的命名规则
模块名(py文件)必须以test_开头或_test结尾。
测试类(class)必须以Test开头,并且不能带init方法。
测试用例(函数)必须以test_开头。
pytest.ini的配置文件方式运行测试用例。
用例的前后置有pytest自带的6个前后置方法,需要改变用例的前后置可以使用fixture和conftest.py实现部分用例的前后置。
fixture装饰器是修饰夹具的,装饰器和夹具共同写在conftest.py文件中。
fixture装饰器有scope、autouse、params、ids和name参数。
conftest.py文件一般在fixture的scpoe参数值为package或session时配合使用。
pytest和allure配合使用。首先生成以json格式的临时文件,然后生成allure报告,有必要的话可以修改logo。
定制化allure报告从添加测试用例分类、bug等级分类、用例描述、测试用例步骤和附件入手。
allure报告中的数据驱动需要使用@pytest.mark.parametrize()装饰器,可以通过列表和yaml传输数据。


