- Python环境管理新利器:UV工具详解
云水木石
pythonuv开发语言
Python包和环境管理最好的工具无疑是Anaconda,但我在之前的一篇文章《注意,使用这款Python软件可能会带来麻烦》写过,个人使用完全没有问题。如果在公司内使用,就需要格外小心,可能会招来官司。在我们公司,Anaconda(包括Miniconda)就是禁止安装的软件之一。但是在工作中,确实又存在需要切换不同Python版本的需求,比如编译Chromium需要Python3.8以上的版本,
- Python新手入门 python流程控制基础1——条件语句if~~else;if~elif~else;
不爱纸片人
python
提示:文章写完后,目录可以自动生成,如何生成可参考右边的帮助文档文章目录一、条件语句是什么?二、语句使用方法1.if.....2.if.......elif......3.if.......elif......else.......总结一、条件语句是什么?在Python中,条件语句用于根据不同的条件执行不同的代码块二、语句使用方法一共有三种if…if’…elif…if…elif…else…1.if
- 使用 NetworkX 进行图论分析与可视化
aiweker
跟我学python图论python
使用NetworkX进行图论分析与可视化NetworkX是一个用于创建、操作和研究复杂网络的Python库。它提供了丰富的图论算法和数据结构,适用于各种网络分析任务。本文将分点介绍NetworkX的主要功能,并通过代码示例进行详细说明。1.安装NetworkX在开始使用NetworkX之前,首先需要安装它。可以通过pip进行安装:pipinstallnetworkx2.创建图NetworkX支持多
- 使用 UV 管理 Python 项目 | python小知识
aiweker
跟我学pythonuvpython人工智能
使用UV管理Python项目|python小知识1.引言在Python开发中,项目管理工具是必不可少的。常见的工具如pip、pipenv、poetry等,它们各有优缺点。近年来,uv作为一个新兴的Python项目管理工具,逐渐受到开发者的关注。uv旨在提供更快的依赖解析和安装速度,同时保持与现有工具的兼容性。本文将详细介绍uv的功能和应用场景,并通过代码示例展示其使用方法。最后,我们将对比uv与其
- Python 常用内建模块-HTMLParser
赔罪
Python系统学习python开发语言
目录HTMLParser小结练习HTMLParser如果我们要编写一个搜索引擎,第一步是用爬虫把目标网站的页面抓下来,第二步就是解析该HTML页面,看看里面的内容到底是新闻、图片还是视频。假设第一步已经完成了,第二步应该如何解析HTML呢?HTML本质上是XML的子集,但是HTML的语法没有XML那么严格,所以不能用标准的DOM或SAX来解析HTML。好在Python提供了HTMLParser来非
- Python 常用内建模块-venv
赔罪
Python系统学习python开发语言
目录venv小结venv在开发Python应用程序的时候,系统安装的Python3只有一个版本:3.x。所有第三方的包都会被pip安装到Python3的site-packages目录下。如果我们要同时开发多个应用程序,那这些应用程序都会共用一个Python,就是安装在系统的Python3。如果应用A需要jinja2.7,而应用B需要jinja2.6怎么办?这种情况下,每个应用可能需要各自拥有一套“
- python Qt
Solkatt's
最近帮朋友做了一个将文本文件按条件导出到excel里面的小程序。使用了PyQT,发现Python真是一门强大的脚本语言,开发效率极高。首先需要引用fromPyQt4importQtGui,uic,QtCore很多控件像QPushButton是从QtGui的空间中得来的,下面def__init__(self,parent=None)中定义了界面的设计及与控件相互联系的方法。classAddressB
- pyspark学习rdd处理数据方法——学习记录
亭午
学习
python黑马程序员"""文件,按JSON字符串存储1.城市按销售额排名2.全部城市有哪些商品类别在售卖3.上海市有哪些商品类别在售卖"""frompysparkimportSparkConf,SparkContextimportosimportjsonos.environ['PYSPARK_PYTHON']=r"D:\anaconda\envs\py10\python.exe"#创建Spark
- 实时光线追踪技术:Ray Tracing_2024-07-21_02-55-16.Tex
chenjj4003
游戏开发python算法人工智能矩阵线性代数骨骼绑定开发语言
实时光线追踪技术:RayTracing实时光线追踪技术教程基础知识光线追踪原理光线追踪是一种渲染技术,它通过模拟光线在场景中的传播和反射来生成图像。在实时光线追踪中,这一过程被优化以在有限的时间内完成,通常用于游戏和实时动画。其核心原理是逆向追踪,即从观察者(摄像机)发出光线,而不是从光源发出,这样可以减少计算量。示例:光线追踪的基本算法#Python示例代码,展示如何计算光线与场景中物体的交点c
- 图像质量评价学习笔记02:IQA模型性能评价指标(PLCC、SROCC、KROCC、RMSE)
可靠的豆包蟹同志
图像质量评估IQA图像处理计算机视觉人工智能算法
性能好的图像质量评价(IQA)算法,其质量评测分数会与主观质量分数高度一致,IQA有许多评价指标,为了衡量方法测试结果与主观评价之间的一致性,视频质量专家组VQEG(VideoQualityExpertsGroup,目前国际上对视频质量进行标准化及性能测试的权威组织)提出了四个可以验证客观评价结果和主观评价结果之间的紧密程度的四个指标:PLCC、SROCC、KROCC和RMSE,也是目前最常用的I
- PyQt和PySide的区别和比较
PgosOcaml
pyqtmfcc++
PyQt和PySide的区别和比较PyQt和PySide是两个用于创建图形用户界面(GUI)的Python库。它们都是基于Qt框架,Qt是一个跨平台的应用程序和UI开发框架。本文将介绍PyQt和PySide之间的区别和比较,并提供相应的源代码示例。开发者许可证:PyQt的开发者许可证是商业许可证,因此如果您想在商业项目中业项目中使用PyQt,您需要购买相应的许可证。而Py业项目中使用PyQt,您需
- 计算机基础:编码01,无符号数编码
水饺编程
MFC学习笔记Win32学习笔记mfcc++visualstudiowindows
专栏导航本节文章分别属于《Win32学习笔记》和《MFC学习笔记》两个专栏,故划分为两个专栏导航。读者可以自行选择前往哪个专栏。(一)WIn32专栏导航上一篇:计算机基础:二进制基础13,十六进制与二进制的相互转换回到目录下一篇:计算机基础:编码02,有符号数编码,原码(二)MFC专栏导航上一篇:计算机基础:二进制基础13,十六进制与二进制的相互转换回到目录下一篇:计算机基础:编码02,有符号数编
- Python 错误处理
赔罪
Python系统学习python开发语言
目录try调用栈记录错误抛出错误练习小结在程序运行的过程中,如果发生了错误,可以事先约定返回一个错误代码,这样,就可以知道是否有错,以及出错的原因。在操作系统提供的调用中,返回错误码非常常见。比如打开文件的函数open(),成功时返回文件描述符(就是一个整数),出错时返回-1。用错误码来表示是否出错十分不便,因为函数本身应该返回的正常结果和错误码混在一起,造成调用者必须用大量的代码来判断是否出错:
- 【Python Qt 基本概念】深入探讨 PySide6 与 PyQt6:选择、共存与最佳实践
泡沫o0
Qt应用开发-探索Qt的魅力与实践Python基础教程mfcc++qt开发语言python嵌入式linux
目录标题第一章:Python绑定的Qt库——PySide6与PyQt6的比较1.1PySide6与PyQt6的基本介绍1.1.1PySide6:Qt官方推荐的Python绑定1.1.2PyQt6:成熟的第三方Python绑定1.1.3主要差异:许可证1.2两者的相似性与差异性1.2.1功能和性能差异1.2.2API差异与兼容性1.3总结:选择的自由与责任第二章:在VSCode中使用PySide6与
- 《AI大模型趣味实战 》第8集:多端适配 个人新闻头条 基于大模型和RSS聚合打造个人新闻电台(Flask WEB版) 2
带娃的IT创业者
AI大模型趣味实战人工智能flask前端
《AI大模型趣味实战》第8集:多端适配个人新闻头条基于大模型和RSS聚合打造个人新闻电台(FlaskWEB版)2摘要本文末尾介绍了如何实现新闻智能体的方法。在信息爆炸的时代,如何高效获取和筛选感兴趣的新闻内容成为一个现实问题。本文将带领读者通过Python和Flask框架,结合大模型的强大能力,构建一个个性化的新闻聚合平台,不仅能够自动收集整理各类RSS源的新闻,还能以语音播报的形式提供"新闻电台
- LeetCode剑指offer题目记录3
t.y.Tang
LeetCode记录学语言c++leetcode哈希算法
leetcode刷题开始啦,每天记录几道题.目录剑指offer05.替换空格题目描述思路pythonC++剑指offer06.从尾到头打印链表题目描述思路1python思路2pythonC++剑指offer05.替换空格题目描述让我们实现一个函数,把字符串s中的每个空格替换为%20.思路这个题目我只能想到遍历,在空间控制上应该有原地修改的办法会省一些.python如果用python,那直接用spl
- RK3588开发笔记-DDR4降频实战与系统稳定性优化
flypig哗啦啦
RK3588DDR
目录前言一、DDR变频原理与工具准备1.1DDR变频机制1.2工具链配置二、DDR降频操作步骤2.1找到RK3588DDR默认bin文件2.2修改DDRbin文件频率三、进阶优化与调试3.1温控策略调整3.2电源设计优化四、常见问题与解决方案总结前言RK3588作为瑞芯微旗舰级SoC,其DDR4/LPDDR4X内存接口最高支持2112MHz频率,但在实际开发中,高频可能导致系统不稳定或功耗过高。例
- Python 中的 Iterable、Iterator 与生成器
CavenWang
pythonpython开发语言
Python中的Iterable、Iterator与生成器Iterable(可迭代对象)Iterator(迭代器)生成器(Generator)Iterable、Iterator与生成器的关系实际应用生成器的高级用法(send())总结在Python中,Iterable、Iterator和生成器是三个密切相关的概念,它们都与迭代操作有关,但各自扮演不同的角色。本文将深入探讨它们的定义、区别以及实际应
- 先验地图--slam学习笔记
超级璐璐
人工智能机器学习
先验信息(PriorInformation)先验信息指的是在收集新数据之前已有的知识或假设。这种信息可以来自之前的实验、历史数据、理论模型或专家意见。地图信息:在无人驾驶中,车辆通常会预先加载高精度地图数据,这些地图数据提供了道路布局、车道线位置、交叉口结构等信息。这些信息就是先验信息。车辆动力学模型:车辆的动力学模型,包括车辆的物理特性(如质量、轮胎摩擦系数等),这些模型可以帮助预测车辆的行为。
- 计算机网络笔记(四)——1.4计算机网络在我国的发展
xiao--xin
计算机网络计算机网络笔记面试学习
一、早期探索与奠基(1980-1994年)国际联网的起点1986年:中国启动首个国际联网项目“中国学术网(CANET)”,由北京计算机应用技术研究所与德国卡尔斯鲁厄大学合作,目标是实现电子邮件通信。1987年9月20日:中国发出第一封电子邮件《越过长城,走向世界》,标志着中国首次接入国际互联网。科研网络的突破1989年:中关村地区教育与科研示范网络(NCFC)立项,由中国科学院、北京大学、清华大学
- Python Lambda 函数详解
2201_75491841
python开发语言lambda函数
一、引言在Python编程中,我们经常会遇到一些简单的函数,这些函数可能只在某个特定的地方使用一次,而且逻辑非常简单。如果为了这些简单的功能定义一个常规的函数,不仅会增加代码的冗余,还会使代码结构变得不够简洁。这时,lambda函数就派上用场了。lambda函数也被称为匿名函数,它为我们提供了一种简洁的方式来定义小型的、一次性使用的函数。在本文中,我们将深入探讨Python中的lambda函数,包
- 小白学AI量化:DeepSeek+Python构建强大的金融数据挖掘与多维分析机器人
老余捞鱼
AI顾投高级策略AI探讨与学习人工智能python金融deepseek
作者:老余捞鱼原创不易,转载请标明出处及原作者。写在前面的话:在机构主导的量化交易时代,普通投资者如何用一杯奶茶的钱(15元/天)打造专业级智能量化产品?本文将为您揭秘一个革命性的解决方案——基于国产大模型DeepSeek和Python构建的智能数据挖掘分析机器人。它不仅适用于通用网页数据抓取,更能深度应用于金融领域,精准捕捉市场信号。本文“干货”很多,请务必耐心读完。一、颠覆认知的性价比革命1.
- 软考 中级软件设计师 考点知识点笔记总结 day06
莫问alicia
软考中级软件设计师笔记数据结构算法
文章目录6、树和二叉树6.1、树的基本概念6.2、二叉树的基本概念6.3、二叉树的遍历6.4、查找二叉树(二叉排序树)BST6.5、构造霍夫曼树+6.6、线索二叉树6.7、平衡二叉树7、图7.1、存储结构-邻接矩阵7.2、存储结构-邻接表7.3、图的遍历7.4、拓扑排序7.5、最小生成树普利姆算法7.6、克鲁斯卡尔算法6、树和二叉树6.1、树的基本概念结点的度:一个结点的度是指该结点拥有的子树数量
- python processpoolexecutor_Python多进程解决方案multiprocessing ProcessPoolExecutor
weixin_39599046
python
大多数编程语言都会有多线程和多进程的概念,至于线程和进程的概念,大家可以百度一下。作为一门胶水语言,Python毫不意外,也可以利用多线程和多进程处理并发问题,但是多线程由于GIL的存在,起作用范围大打折扣,仅限于在IO等场景可以发挥点作用。所以,今天要跟大家分享的是Python多进程方案,更好地利用系统多核,从而提升性能。基础方案一:利用Process新建一个子进程,在子进程执行任务。我们写一个
- python processpoolexecutor_Python线程和进程池并行编程
三千香蕉三千
python
Python3.2版本之后发布了concurrent.futures模块,用以支持和管理并发编程,内容涵盖了进程和线程池(ThreadandProcessPooling)、非确定性执行流(NondeterministicExecutionFlows)以及进程和线程同步。本文通过将带有可选参数的任务提交(Submit)给执行器(Executor)来实例化futures对象。执行器是线程或者进程执行池
- python 底层原理processpoolexecutor_Python 并发编程:PoolExecutor 篇
风投小虾
python
个人笔记,如有疏漏,还请指正。使用多线程(threading)和多进程(multiprocessing)完成常规的并发需求,在启动的时候start、join等步骤不能省,复杂的需要还要用1-2个队列。随着需求越来越复杂,如果没有良好的设计和抽象这部分的功能层次,代码量越多调试的难度就越大。对于需要并发执行、但是对实时性要求不高的任务,我们可以使用concurrent.futures包中的PoolE
- 机器学习实战 第一章 机器学习基础
LuoY、
MachineLearning机器学习算法人工智能
第一章机器学习1.1何谓机器学习1.2关键术语1.3机器学习的主要任务1.4如何选择合适的算法1.5开发机器学习应用程序的步骤1.6Python语言的优势1.1何谓机器学习 1、简单地说,机器学习就是把无序的数据转换成有用的信息; 2、机器学习能让我们自数据集中受启发,我们会利用计算机来彰显数据背后的真实含义; 3、机器学习横跨计算机科学、工程技术和统计学等多个学科,需要多学科的
- 数据挖掘实战-基于机器学习的垃圾邮件检测模型
艾派森
数据挖掘实战合集数据挖掘机器学习人工智能python
♂️个人主页:@艾派森的个人主页✍作者简介:Python学习者希望大家多多支持,我们一起进步!如果文章对你有帮助的话,欢迎评论点赞收藏加关注+目录1.项目背景2.数据集介绍
- conda篇----在已有conda环境的基础上升级python包
心惠天意
condapythonjvm
conda篇----在已有conda环境的基础上升级python包原先的python版本第一步:condaupdate--all(py11)[xxx@aivrs01xxx]$condaupdate--allCollectingpackagemetadata(current_repodata.json):doneSolvingenvironment:done==>WARNING:Anewervers
- 环境配置(1):笔记本window、虚拟机ubuntu、开发板三者互ping通信,并且虚拟机ubuntu和开发板能上网
lishing6
ubuntulinuxmcu嵌入式硬件arm开发物联网硬件工程
1.配置网络我们配置网络是为了方便后续调试开发板系统或者应用程序时,能够使用tftp协议nfs协议等拷贝文件,以及设置文件系统启动方式为nfs挂载启动。2.设置Ubuntu使用NAT网络NAT是什么意思?NetworkAddressTranslation,网络地址转换。举个例子,在NAT里,Windows就是一个爱护孩子的父亲,Ubuntu就是受保护的小孩。小孩要买东西,都由他父亲代劳,别人根本不
- 用MiddleGenIDE工具生成hibernate的POJO(根据数据表生成POJO类)
AdyZhang
POJOeclipseHibernateMiddleGenIDE
推荐:MiddlegenIDE插件, 是一个Eclipse 插件. 用它可以直接连接到数据库, 根据表按照一定的HIBERNATE规则作出BEAN和对应的XML ,用完后你可以手动删除它加载的JAR包和XML文件! 今天开始试着使用
- .9.png
Cb123456
android
“点九”是andriod平台的应用软件开发里的一种特殊的图片形式,文件扩展名为:.9.png
智能手机中有自动横屏的功能,同一幅界面会在随着手机(或平板电脑)中的方向传感器的参数不同而改变显示的方向,在界面改变方向后,界面上的图形会因为长宽的变化而产生拉伸,造成图形的失真变形。
我们都知道android平台有多种不同的分辨率,很多控件的切图文件在被放大拉伸后,边
- 算法的效率
天子之骄
算法效率复杂度最坏情况运行时间大O阶平均情况运行时间
算法的效率
效率是速度和空间消耗的度量。集中考虑程序的速度,也称运行时间或执行时间,用复杂度的阶(O)这一标准来衡量。空间的消耗或需求也可以用大O表示,而且它总是小于或等于时间需求。
以下是我的学习笔记:
1.求值与霍纳法则,即为秦九韶公式。
2.测定运行时间的最可靠方法是计数对运行时间有贡献的基本操作的执行次数。运行时间与这个计数成正比。
- java数据结构
何必如此
java数据结构
Java 数据结构
Java工具包提供了强大的数据结构。在Java中的数据结构主要包括以下几种接口和类:
枚举(Enumeration)
位集合(BitSet)
向量(Vector)
栈(Stack)
字典(Dictionary)
哈希表(Hashtable)
属性(Properties)
以上这些类是传统遗留的,在Java2中引入了一种新的框架-集合框架(Collect
- MybatisHelloWorld
3213213333332132
//测试入口TestMyBatis
package com.base.helloworld.test;
import java.io.IOException;
import org.apache.ibatis.io.Resources;
import org.apache.ibatis.session.SqlSession;
import org.apache.ibat
- Java|urlrewrite|URL重写|多个参数
7454103
javaxmlWeb工作
个人工作经验! 如有不当之处,敬请指点
1.0 web -info 目录下建立 urlrewrite.xml 文件 类似如下:
<?xml version="1.0" encoding="UTF-8" ?>
<!DOCTYPE u
- 达梦数据库+ibatis
darkranger
sqlmysqlibatisSQL Server
--插入数据方面
如果您需要数据库自增...
那么在插入的时候不需要指定自增列.
如果想自己指定ID列的值, 那么要设置
set identity_insert 数据库名.模式名.表名;
----然后插入数据;
example:
create table zhabei.test(
id bigint identity(1,1) primary key,
nam
- XML 解析 四种方式
aijuans
android
XML现在已经成为一种通用的数据交换格式,平台的无关性使得很多场合都需要用到XML。本文将详细介绍用Java解析XML的四种方法。
XML现在已经成为一种通用的数据交换格式,它的平台无关性,语言无关性,系统无关性,给数据集成与交互带来了极大的方便。对于XML本身的语法知识与技术细节,需要阅读相关的技术文献,这里面包括的内容有DOM(Document Object
- spring中配置文件占位符的使用
avords
1.类
<?xml version="1.0" encoding="UTF-8"?><!DOCTYPE beans PUBLIC "-//SPRING//DTD BEAN//EN" "http://www.springframework.o
- 前端工程化-公共模块的依赖和常用的工作流
bee1314
webpack
题记: 一个人的项目,还有工程化的问题嘛? 我们在推进模块化和组件化的过程中,肯定会不断的沉淀出我们项目的模块和组件。对于这些沉淀出的模块和组件怎么管理?另外怎么依赖也是个问题? 你真的想这样嘛? var BreadCrumb = require(‘../../../../uikit/breadcrumb’); //真心ugly。
- 上司说「看你每天准时下班就知道你工作量不饱和」,该如何回应?
bijian1013
项目管理沟通IT职业规划
问题:上司说「看你每天准时下班就知道你工作量不饱和」,如何回应
正常下班时间6点,只要是6点半前下班的,上司都认为没有加班。
Eno-Bea回答,注重感受,不一定是别人的
虽然我不知道你具体从事什么工作与职业,但是我大概猜测,你是从事一项不太容易出现阶段性成果的工作
- TortoiseSVN,过滤文件
征客丶
SVN
环境:
TortoiseSVN 1.8
配置:
在文件夹空白处右键
选择 TortoiseSVN -> Settings
在 Global ignote pattern 中添加要过滤的文件:
多类型用英文空格分开
*name : 过滤所有名称为 name 的文件或文件夹
*.name : 过滤所有后缀为 name 的文件或文件夹
--------
- 【Flume二】HDFS sink细说
bit1129
Flume
1. Flume配置
a1.sources=r1
a1.channels=c1
a1.sinks=k1
###Flume负责启动44444端口
a1.sources.r1.type=avro
a1.sources.r1.bind=0.0.0.0
a1.sources.r1.port=44444
a1.sources.r1.chan
- The Eight Myths of Erlang Performance
bookjovi
erlang
erlang有一篇guide很有意思: http://www.erlang.org/doc/efficiency_guide
里面有个The Eight Myths of Erlang Performance: http://www.erlang.org/doc/efficiency_guide/myths.html
Myth: Funs are sl
- java多线程网络传输文件(非同步)-2008-08-17
ljy325
java多线程socket
利用 Socket 套接字进行面向连接通信的编程。客户端读取本地文件并发送;服务器接收文件并保存到本地文件系统中。
使用说明:请将TransferClient, TransferServer, TempFile三个类编译,他们的类包是FileServer.
客户端:
修改TransferClient: serPort, serIP, filePath, blockNum,的值来符合您机器的系
- 读《研磨设计模式》-代码笔记-模板方法模式
bylijinnan
java设计模式
声明: 本文只为方便我个人查阅和理解,详细的分析以及源代码请移步 原作者的博客http://chjavach.iteye.com/
import java.sql.Connection;
import java.sql.DriverManager;
import java.sql.PreparedStatement;
import java.sql.ResultSet;
- 配置心得
chenyu19891124
配置
时间就这样不知不觉的走过了一个春夏秋冬,转眼间来公司已经一年了,感觉时间过的很快,时间老人总是这样不停走,从来没停歇过。
作为一名新手的配置管理员,刚开始真的是对配置管理是一点不懂,就只听说咱们公司配置主要是负责升级,而具体该怎么做却一点都不了解。经过老员工的一点点讲解,慢慢的对配置有了初步了解,对自己所在的岗位也慢慢的了解。
做了一年的配置管理给自总结下:
1.改变
从一个以前对配置毫无
- 对“带条件选择的并行汇聚路由问题”的再思考
comsci
算法工作软件测试嵌入式领域模型
2008年上半年,我在设计并开发基于”JWFD流程系统“的商业化改进型引擎的时候,由于采用了新的嵌入式公式模块而导致出现“带条件选择的并行汇聚路由问题”(请参考2009-02-27博文),当时对这个问题的解决办法是采用基于拓扑结构的处理思想,对汇聚点的实际前驱分支节点通过算法预测出来,然后进行处理,简单的说就是找到造成这个汇聚模型的分支起点,对这个起始分支节点实际走的路径数进行计算,然后把这个实际
- Oracle 10g 的clusterware 32位 下载地址
daizj
oracle
Oracle 10g 的clusterware 32位 下载地址
http://pan.baidu.com/share/link?shareid=531580&uk=421021908
http://pan.baidu.com/share/link?shareid=137223&uk=321552738
http://pan.baidu.com/share/l
- 非常好的介绍:Linux定时执行工具cron
dongwei_6688
linux
Linux经过十多年的发展,很多用户都很了解Linux了,这里介绍一下Linux下cron的理解,和大家讨论讨论。cron是一个Linux 定时执行工具,可以在无需人工干预的情况下运行作业,本文档不讲cron实现原理,主要讲一下Linux定时执行工具cron的具体使用及简单介绍。
新增调度任务推荐使用crontab -e命令添加自定义的任务(编辑的是/var/spool/cron下对应用户的cr
- Yii assets目录生成及修改
dcj3sjt126com
yii
assets的作用是方便模块化,插件化的,一般来说出于安全原因不允许通过url访问protected下面的文件,但是我们又希望将module单独出来,所以需要使用发布,即将一个目录下的文件复制一份到assets下面方便通过url访问。
assets设置对应的方法位置 \framework\web\CAssetManager.php
assets配置方法 在m
- mac工作软件推荐
dcj3sjt126com
mac
mac上的Terminal + bash + screen组合现在已经非常好用了,但是还是经不起iterm+zsh+tmux的冲击。在同事的强烈推荐下,趁着升级mac系统的机会,顺便也切换到iterm+zsh+tmux的环境下了。
我为什么要要iterm2
切换过来也是脑袋一热的冲动,我也调查过一些资料,看了下iterm的一些优点:
* 兼容性好,远程服务器 vi 什么的低版本能很好兼
- Memcached(三)、封装Memcached和Ehcache
frank1234
memcachedehcachespring ioc
本文对Ehcache和Memcached进行了简单的封装,这样对于客户端程序无需了解ehcache和memcached的差异,仅需要配置缓存的Provider类就可以在二者之间进行切换,Provider实现类通过Spring IoC注入。
cache.xml
<?xml version="1.0" encoding="UTF-8"?>
- Remove Duplicates from Sorted List II
hcx2013
remove
Given a sorted linked list, delete all nodes that have duplicate numbers, leaving only distinct numbers from the original list.
For example,Given 1->2->3->3->4->4->5,
- Spring4新特性——注解、脚本、任务、MVC等其他特性改进
jinnianshilongnian
spring4
Spring4新特性——泛型限定式依赖注入
Spring4新特性——核心容器的其他改进
Spring4新特性——Web开发的增强
Spring4新特性——集成Bean Validation 1.1(JSR-349)到SpringMVC
Spring4新特性——Groovy Bean定义DSL
Spring4新特性——更好的Java泛型操作API
Spring4新
- MySQL安装文档
liyong0802
mysql
工作中用到的MySQL可能安装在两种操作系统中,即Windows系统和Linux系统。以Linux系统中情况居多。
安装在Windows系统时与其它Windows应用程序相同按照安装向导一直下一步就即,这里就不具体介绍,本文档只介绍Linux系统下MySQL的安装步骤。
Linux系统下安装MySQL分为三种:RPM包安装、二进制包安装和源码包安装。二
- 使用VS2010构建HotSpot工程
p2p2500
HotSpotOpenJDKVS2010
1. 下载OpenJDK7的源码:
http://download.java.net/openjdk/jdk7
http://download.java.net/openjdk/
2. 环境配置
▶
- Oracle实用功能之分组后列合并
seandeng888
oracle分组实用功能合并
1 实例解析
由于业务需求需要对表中的数据进行分组后进行合并的处理,鉴于Oracle10g没有现成的函数实现该功能,且该功能如若用JAVA代码实现会比较复杂,因此,特将SQL语言的实现方式分享出来,希望对大家有所帮助。如下:
表test 数据如下:
ID,SUBJECTCODE,DIMCODE,VALUE
1&nbs
- Java定时任务注解方式实现
tuoni
javaspringjvmxmljni
Spring 注解的定时任务,有如下两种方式:
第一种:
<?xml version="1.0" encoding="UTF-8"?>
<beans xmlns="http://www.springframework.org/schema/beans"
xmlns:xsi="http
- 11大Java开源中文分词器的使用方法和分词效果对比
yangshangchuan
word分词器ansj分词器Stanford分词器FudanNLP分词器HanLP分词器
本文的目标有两个:
1、学会使用11大Java开源中文分词器
2、对比分析11大Java开源中文分词器的分词效果
本文给出了11大Java开源中文分词的使用方法以及分词结果对比代码,至于效果哪个好,那要用的人结合自己的应用场景自己来判断。
11大Java开源中文分词器,不同的分词器有不同的用法,定义的接口也不一样,我们先定义一个统一的接口:
/**
* 获取文本的所有分词结果, 对比
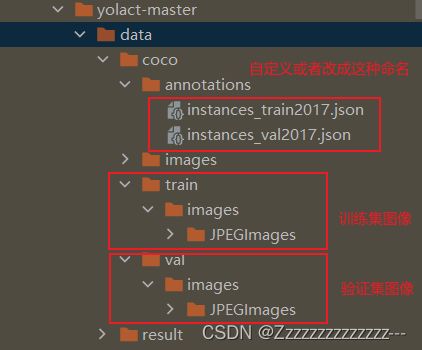
 https://github.com/dbolya/yolact