Python实现图像padding与高斯卷积等操作(不调包)
运行环境及编译工具
- Windows
- VS Code
编程语言及库版本
| 库 | 版本 |
|---|---|
| Python | 3.7.0 |
| copy | 无 |
| numpy | 1.19.2 |
| opencv | 3.4.2 |
| PIL | 8.1.0 |
| matplotlib | 3.4.3 |
问题 1 黑白图像灰度扫描 (20 分)
实现一个函数 s = scanLine4e(f, I, loc), 其中 f 是一个灰度图像,I 是一个整数,loc 是一个字 符串。当 loc 为’row’时,I 代表行数。当 loc 为’column’时,I 代表列数。输出 s 是对应的相 关行或者列的像素灰度值矢量。
程序:
# 调用工具包
import numpy as np
import cv2
from PIL import Image
import matplotlib.pyplot as plt
def scanLine4e(f,I,loc):
    try:
        # 判断I的类型,当行/列是偶数时,I为list类型,返回中间两行像素的均值
        if type(I) is int:
            if loc == "row":
                s = f[I,:]
            elif loc == "column":
                s = f[:,I]
        else:
            if loc == "row":
                s = np.sum(f[I[0]:I[1]+1,:],axis=0) / 2
                s = np.int16(s)
            elif loc == "column":
                s = np.sum(f[:,I[0]:I[1]+1],axis=1) / 2
                s = np.int16(s)

        print(s)
        return s
    except:
        print("请输入正确的参数值")
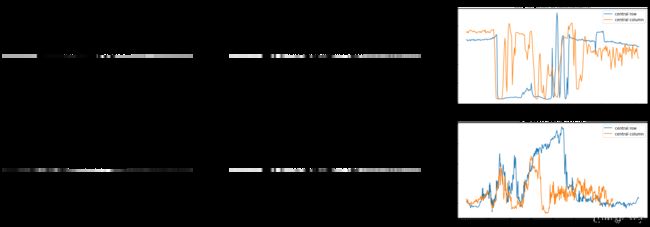
调用该函数,提取 cameraman.tif 和 einstein.tif 的中心行和中心列的像素灰度矢量并将扫描 得到的灰度序列绘制成图。
运行:
# 获取图像的中心,当图像的宽度或长度为偶数时取中间两行/列,储存为list数组,是奇数时存储为int型
def get_center(L):
    if L % 2 == 0:
        I = [int(H1 / 2) - 1,int(H1 / 2)]
    else:
        I = int(H1 / 2)
    return I

cameraman = np.array(Image.open('./cameraman.tif'))
H1,W1 = cameraman.shape
print("cameraman.tif的尺寸为({},{})".format(H1,W1))
I1_row = get_center(H1)
s1_row = scanLine4e(cameraman,I1_row,"row")
s1_row = s1_row.reshape(1,W1)
I1_column = get_center(W1)
s1_column = scanLine4e(cameraman,I1_column,"column")
s1_column = s1_column.reshape(1,H1)

einstein = np.array(Image.open('./einstein.tif'))
H2,W2 = einstein.shape
print("einstein.tif的尺寸为({},{})".format(H2,W2))
I2_row = get_center(H2)
s2_row = scanLine4e(einstein,I2_row,"row")
s2_row = s2_row.reshape(1,W2)
I2_column = get_center(W2)
s2_column = scanLine4e(einstein,I2_column,"column")
s2_column = s2_column.reshape(1,H2)

plt.figure(figsize=(30,10))
plt.subplot(2,3,1)
plt.title("central row of cameraman.tif")
plt.axis('off')
plt.imshow(s1_row,cmap='gray')

plt.subplot(2,3,2)
plt.title("central column of cameraman.tif")
plt.axis('off')
plt.imshow(s1_column,cmap='gray')

plt.subplot(2,3,3)
plt.title("Gray sequence of cameraman.tif")
plt.plot(s1_row[0,:],label = 'central row')
plt.plot(s1_column[0,:],label = 'central column')
plt.legend()

plt.subplot(2,3,4)
plt.title("central row of einstein.tif")
plt.axis('off')
plt.imshow(s2_row,cmap = 'gray')

plt.subplot(2,3,5)
plt.title("central column of einstein.tif")
plt.axis('off')
plt.imshow(s1_column,cmap = 'gray')

plt.subplot(2,3,6)
plt.title("Gray sequence of einstein.tif")
plt.plot(s2_row[0,:],label = 'central row')
plt.plot(s2_column[0,:],label = 'central column')
plt.legend()
plt.savefig("Q1.png")
plt.show()
输出:
cameraman.tif的尺寸为(256,256)
[163 164 161 161 163 164 161 164 163 164 163 165 161 163 163 162 164 163
 165 163 164 162 163 163 164 164 163 165 165 166 165 163 165 165 165 165
 167 165 167 170 167 170 170 172 177 176  22   9   9   9   9   9   9   9
   9  10  10  11  12  12  12  12  12  12  13  13  13  13  13  13  13  14
  13  14  14  13  12  12  13  13  12  13  18  24  26  21  25  29  29  36
  37  32  30  34  32  32  50  29  21  18  14  14  14  15  15  16  15  16
  15  14  13  13  12  11  10   9   9   9   8   8   8   8   9   9   9  10
  16 142  20  13  17  71  90 198 234 214  98  60  12  29  93 161 171 175
 170  41  10   9  15  65  20  99 178 171 169 169 167 167 169 167 165 165
 164 164 162 162 164 163 164 163 163 166 164 162 162 163 160 163 160 161
 162 162 160 161 158 160 162 159 160 160 160 133 172 183 184 183 184 183
 184 184 185 183 187 179 160 158 159 157 160 159 159 158 159 159 160 157
 160 159 158 157 155 157 155 155 154 155 157 154 157 153 154 152 153 153
 153 152 150 153 152 149 149 150 150 149 150 149 150 148 149 151 149 149
 147 147 145 146]
[185 182 185 182 186 188 189 188 186 186 184 187 186 184 184 181 183 183
 185 185 183 185 182 186 186 188 189 185 189 181 184 185 183 185 182 183
 篇幅有限,仅展示部分...
问题二 彩色图像转换为黑白图像(20 分)
图像处理中的一个常见问题是将彩色 RGB 图像转换成单色灰度图像,第一种常用的方法是 取三个元素 R,G,B 的均值。第二种常用的方式,又称为 NTSC 标准,考虑了人类的彩色 感知体验,对于 R,G,B 三通道分别采用了不同的加权系数,分别是 R 通道 0.2989,G 通道 0.5870,B 通道 0.1140. 实现一个函数 g = rgb1gray(f, method). 函数功能是将一幅 24 位的 RGB 图像, f, 转换成灰度图像, g. 参数 method 是一个字符串,当其值为’average’ 时,采用 第一种转换方法,当其值为’NTSC’时,采用第二种转换方法。将’NTSC’做为缺省方式。
程序:
def rgb1gray(f, method = "average"):
    R = f[:,:,0]
    G = f[:,:,1]
    B = f[:,:,2]
    try:
        if method == "average":
            # 注意题目中说的是32位的图像
            g = np.int32((R + G + B) / 3)
        elif method == "NTSC":
            g = np.int32(0.2989*R + 0.5870*G + 0.1140*B)
        return g
    except:
        print("参数错误")
调用该函数,将提供的图像 mandril_color.tif 和 lena512color.tiff 用上述两种方法转换成单色 灰度图像,对于两种方法的结果进行简短比较和讨论。
运行:
img1 = Image.open("./mandril_color.tif")
img1 = np.array(img1)
g1_average = rgb1gray(img1,"average")
g1_NTSC = rgb1gray(img1,"NTSC")


img2 = Image.open("./lena512color.tiff")
img2 = np.array(img2)
g2_average = rgb1gray(img2,"average")
g2_NTSC = rgb1gray(img2,"NTSC")

plt.figure(figsize=(10,10))
plt.subplot(2,2,1)
plt.title("mandril_color average gray")
plt.imshow(g1_average,cmap='gray')

plt.subplot(2,2,2)
plt.title("mandril_color NTSC gray")
plt.imshow(g1_NTSC,cmap='gray')

plt.subplot(2,2,3)
plt.title("lena512color average gray")
plt.imshow(g2_average,cmap='gray')

plt.subplot(2,2,4)
plt.title("lena512color NTSC gray")
plt.imshow(g2_NTSC,cmap='gray')
plt.show()
输出:
讨论两种灰度图像的不同
从结果能看出NTSC格式生成的灰度图像看起来更舒服,更光滑细腻。起初我也不知道是为什么,经过查阅资料
NTCS考虑到了人眼对不同光感知程度不同。人的眼睛内有几种辨别颜色的锥形感光细胞,分别对黄绿色、绿色和蓝紫色的光最敏感。虽然眼球中的椎状细胞并非对红、绿、蓝三色的感受度最强,但是由肉眼的椎状细胞所能感受的光的带宽很大,红、绿、蓝也能够独立刺激这三种颜色的受光体。
人类对红绿蓝三色的感知程度依次是: 绿>红>蓝,所以平均算法从这个角度看是不科学的。应该按照人类对光的感知程度为每个颜色设定一个权重,它们的之间的地位不应该是平等的。

问题 3 图像二维卷积函数 (20 分)
实现一个函数 g = twodConv(f, w), 其中 f 是一个灰度源图像,w 是一个矩形卷积核。要求输 出图像 g 与源图像 f 大小(也就是像素的行数和列数)一致。请注意,为满足这一要求,对 于源图像f 需要进行边界像素填补(padding)。这里请实现两种方案。第一种方案是像素复制, 对应的选项定义为’replicate’,填补的像素拷贝与其最近的图像边界像素灰度。第二种方案是 补零,对应的选项定义为’zero’, 填补的像素灰度为 0. 将第二种方案设置为缺省选择。
程序:
def twoConv(f,w,method = "replicate"):
    # 图像应延展的宽度
    pad_width = w.shape[0] - 1
    # 卷积核尺寸
    w_size = w.shape[0]
    pad_width_one = int(pad_width / 2)
    H,W = f.shape
    # 创建padding后图像大小的零空间
    img_pad = np.zeros([H+pad_width,W+pad_width],dtype=np.int16)
    # 填充原图像的像素,padding操作在延展的那部分进行
    img_pad[pad_width_one:H+pad_width_one,pad_width_one:W+pad_width_one] = f
    if method == "replicate":
        for i in range(pad_width_one):
            # 分别填充四个边和四个角
            img_pad[i:i+1,pad_width_one:W+pad_width_one] = f[0,:]
            img_pad[H+pad_width_one+i:H+pad_width_one+i+1,pad_width_one:W+pad_width_one] = f[-1,:]
            img_pad[pad_width_one:H+pad_width_one,i:i+1] = f[:,0].reshape([H,1])
            img_pad[pad_width_one:H+pad_width_one,W+pad_width_one+i:W+pad_width_one+i+1] = f[:,-1].reshape([H,1])
        img_pad[0:pad_width_one,0:pad_width_one] = f[0,0] * np.ones([pad_width_one,pad_width_one])
        img_pad[0:pad_width_one,W+pad_width_one:W+2*pad_width_one] = f[0,-1] * np.ones([pad_width_one,pad_width_one])
        img_pad[H+pad_width_one:H+2*pad_width_one,0:pad_width_one] = f[-1,0] * np.ones([pad_width_one,pad_width_one])
        img_pad[H+pad_width_one:H+2*pad_width_one,W+pad_width_one:W+2*pad_width_one] = f[-1,-1] * np.ones([pad_width_one,pad_width_one])
    elif method == "zero":
        pass
    g = np.zeros([H,W],dtype=np.int16)
    flatten_w = w.reshape([1,w_size**2])
    # 卷积的过程先展平,在进行列行向量的内积
    for i in range(H):
        for j in range(W):
            g[i,j] = np.dot(flatten_w,img_pad[i:w_size+i,j:w_size+j].reshape([w_size**2,1]))
    return g
问题 4 归一化二维高斯滤波核函数 (20 分)
实现一个高斯滤波核函数 w = gaussKernel(sig,m),其中 sig 对应于高斯函数定义中的σ,w 的大小为 m×m。请注意,这里如果 m 没有提供,需要进行计算确定。如果 m 已提供但过小, 应给出警告信息提示。w 要求归一化,即全部元素加起来和为 1。
def gaussKernel(sig,*m):
    # 卷积核提供,判断大小是否合适 m>=6*sig+1
    if m:
        l = m[0]
        if l < (6*sig + 1) or l%2 == 0:
            print("卷积核尺寸过小或为偶,请重新输入!")
            return 0
    else:
        l = int(6*sig + 1)
        if l%2 ==0:
            l += 1
    w = np.zeros([1,l],dtype=np.float32)
    for i in range(l):
        # w[0,i] = pow(pow(2*np.pi,0.5)*sig,-1)*pow(np.e,-pow((i-int((l-1)/2))/((2**0.5)*sig),2))
        # 由于要归一化,所以正态分布关于pi的系数舍去了,不影响结果
        w[0,i] = pow(sig,-1)*pow(np.e,-pow((i-int((l-1)/2))/((2**0.5)*sig),2))
    w = np.dot(w.T,w)
    w = w / np.sum(w)
    return w
问题 5 灰度图像的高斯滤波 (20 分)
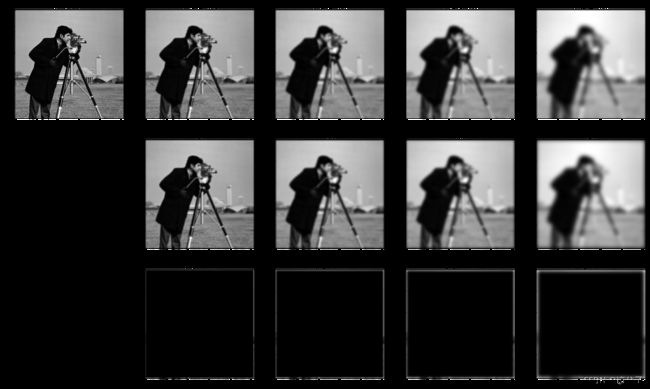
调用上面实现的函数,对于问题 1 和 2 中的灰度图像(cameraman, einstein, 以及 lena512color和 mandril_color 对应的 NTSC 转换后的灰度图像)进行高斯滤波,采用σ=1,2,3,5。任选一种像素填补方案。对于σ=1 下的结果,与直接调用 MATLAB 或者 Python 软件包相关函数的结果进行比较(可以简单计算差值图像)。然后,任选两幅图像,比较其他参数条件不变的情况下像素复制和补零下滤波结果在边界上的差别。
采用σ=1,2,3,5,像素填补方案为replicate
cameraman = np.array(Image.open('cameraman.tif'))
einstein = np.array(Image.open('einstein.tif'))
lena512color = np.array(Image.open('lena512color.tiff'))
lena512color_gray = rgb1gray(lena512color,method='NTSC')
mandril_color = np.array(Image.open('mandril_color.tif'))
mandril_color_gray = rgb1gray(mandril_color,method='NTSC')
plt.figure(figsize=(25,20))
imgs = [cameraman,einstein,lena512color_gray,mandril_color_gray]
img_names = ["cameraman","einstein","lena512color_gray","mandril_color_gray"]
sigs = [1,2,3,5]
num = 1
for img in imgs:
    plt.subplot(4,5,num)
    plt.title('{}'.format(img_names[num // 5]))
    plt.imshow(img,cmap='gray')
    num += 1
    for sig in sigs:
        w = gaussKernel(sig)
        g = twoConv(img,w)
        plt.subplot(4,5,num)
        plt.title('σ={}'.format(sig))
        plt.imshow(g,cmap='gray')
        num += 1
plt.show()
对于σ=1 下的结果,直接调用 Python opencv(3.4.2) 进行比较(可以简单计算差值图像)
plt.figure(figsize=(30,20))
num = 1
w = gaussKernel(1)
for img in imgs:
    img_pxels = img.size
    plt.subplot(4,6,num)
    plt.title('{}'.format(img_names[num // 6]))
    plt.imshow(img,cmap='gray')

    # opencv
    num += 1
    im_cv = cv2.GaussianBlur(np.int16(img), (7, 7),1,1)
    plt.subplot(4,6,num)
    plt.title('OpenCV')
    plt.imshow(im_cv,cmap='gray')

    # My method
    num += 1
    g = twoConv(img,w)
    plt.subplot(4,6,num)
    plt.title('My method')
    plt.imshow(g,cmap='gray')

    #  Pixel difference  == 0  0,or 255
    num += 1
    #  蒙版,当像素值相等时为0,图像中为黑色;像素不同时为255,图像中为白色,下同
    mask = np.where(g == im_cv,0,255)
    mask_pxels = np.sum(mask == 0)
    plt.subplot(4,6,num)
    plt.title('Pixel difference==0 ratio:{:.3f}'.format(mask_pxels/img_pxels))
    plt.imshow(mask,cmap='gray')

    #  Pixel difference  <= 1  0,or 255
    num += 1
    mask = np.where(np.abs(g - im_cv) <= 1,0,255)
    mask_pxels = np.sum(mask == 0)
    plt.subplot(4,6,num)
    plt.title('Pixel difference<=1 ratio:{:.3f}'.format(mask_pxels/img_pxels))
    plt.imshow(mask,cmap='gray')

    #  Pixel difference  <= 2  0,or 255
    num += 1
    mask = np.where(np.abs(g - im_cv) <= 2,0,255)
    mask_pxels = np.sum(mask == 0)

    plt.subplot(4,6,num)
    plt.title('Pixel difference<=2 ratio:{:.3f}'.format(mask_pxels/img_pxels))
    plt.imshow(mask,cmap='gray')
    num += 1
plt.show()
可以看出来,自己写的高斯卷积程序与OpenCV自带的卷积相比,像素完全相同的比例约为50%,并且分布散乱,看不出明显的规律。
但是当容许像素相差的1以内时,相似度达到了99%以上;容差为2以内时,两种方法基本相同了。不同的地方主要集中在边界区域。
选用cameraman.tif与einstein.tif,比较其他参数条件不变的情况下像素复制和补零下滤波结果在边界上的差别
cameraman.tif
# 更改imgs,可选择不同的图像,其余程序相同
imgs = [cameraman]
plt.figure(figsize=(25,15))
sigs = [1,2,3,5]
num = 1
replicate = []
zero = []
for img in imgs:
    plt.subplot(3,5,num)
    plt.title('{}'.format('cameraman'))
    plt.imshow(img,cmap='gray')
    num += 1
    for sig in sigs:
        w = gaussKernel(sig)
        g = twoConv(img,w)
        replicate.append(g)
        plt.subplot(3,5,num)
        plt.title('σ={},replicate'.format(sig))
        plt.imshow(g,cmap='gray')
        num += 1
    num += 1
    for sig in sigs:
        w = gaussKernel(sig)
        g = twoConv(img,w,method='zero')
        zero.append(g)
        plt.subplot(3,5,num)
        plt.title('σ={},zero'.format(sig))
        plt.imshow(g,cmap='gray')
        num += 1
    num += 1
    for i in range(len(sigs)):
        mask = replicate[i] - zero[i]
        plt.subplot(3,5,num)
        plt.title('σ={},replicate-zero'.format(sig))
        plt.imshow(mask,cmap='gray')
        num += 1

plt.show()
einstein.tif

可见,当填补方式为复制最近的像素点时,卷积之后的结果较好,而zero方式的边界由于补零后会变暗,两种方式的差值mask也体现出来了,replicate方式卷积后的图像边界比zero方式的边界亮
#### @Time    : 2021/10/8 10:49
#### @Author  : AlanLiang
#### @FileName: HW_1.ipynb
#### @Software: VS Code
#### @Github  :https://github.com/AlanLiangC