【tensorflow学习】API函数接口
学习网站源于 函数式 API
API函数接口
-
- 创建所需的结构
- 创建输入节点(样本形状)
- 层中网络的传递
- 创建模型
- 看看模型样子
- 查看各层形状
- 训练、评估和推断
- 保存模型
- 使用层堆栈来实现两个模型
- 模型嵌套
创建所需的结构
深度学习模型通常是层的有向无环图(DAG),比如说想要构建一个具有三层的基本计算图
"""
(input: 784-dimensional vectors)
↧ [Dense (64 units, relu activation)]
↧ [Dense (64 units, relu activation)]
↧ [Dense (10 units, softmax activation)]
↧ (output: logits of a probability distribution over 10 classes)
"""
创建输入节点(样本形状)
img_inputs = keras.Input(shape=(784,))
img_inputs.shape
TensorShape([None, 784])
层中网络的传递
通过在img_inputs对象上调用层,在层计算图中创建新的节点
dense = layers.Dense(64,activation="relu")
x = dense(img_inputs)
“层调用”操作就像从“输入”向您创建的该层绘制一个箭头。您将输入“传递”到 dense 层,然后得到 x。
让我们为层计算图多添加几个层:
x = layers.Dense(64, activation="relu")(x)
outputs = layers.Dense(10)(x)
创建模型
model = keras.Model(inputs=img_inputs, outputs=outputs, name="mnist_model")
看看模型样子
model.summary()

查看各层形状
keras.utils.plot_model(model, "my_first_model_with_shape_info.png", show_shapes=True)

训练、评估和推断
对于使用函数式 API 构建的模型来说,其训练、评估和推断的工作方式与 Sequential 模型完全相同。
Model 类提供了一个内置训练循环(fit() 方法)和一个内置评估循环(evaluate() 方法)。
加载 MNIST 图像数据,将其改造为向量,将模型与数据拟合(同时监视验证拆分的性能),然后在测试数据上评估模型:
(x_train, y_train), (x_test, y_test) = keras.datasets.mnist.load_data()

x_train = x_train.reshape(60000, 784).astype("float32") / 255
x_test = x_test.reshape(10000, 784).astype("float32") / 255
model.compile(
    loss=keras.losses.SparseCategoricalCrossentropy(from_logits=True),
    optimizer=keras.optimizers.RMSprop(),
    metrics=["accuracy"],
)

history = model.fit(x_train, y_train, batch_size=64, epochs=2, validation_split=0.2)

test_scores = model.evaluate(x_test, y_test, verbose=2)
print("Test loss:", test_scores[0])
print("Test accuracy:", test_scores[1])
Epoch 1/2
750/750 [==============================] - 1s 2ms/step - loss: 0.3386 - accuracy: 0.9026 - val_loss: 0.1916 - val_accuracy: 0.9444
Epoch 2/2
750/750 [==============================] - 1s 2ms/step - loss: 0.1564 - accuracy: 0.9533 - val_loss: 0.1390 - val_accuracy: 0.9601
313/313 - 0s - loss: 0.1337 - accuracy: 0.9622
Test loss: 0.13369326293468475
Test accuracy: 0.9621999859809875
保存模型
对于使用函数式 API 构建的模型,其保存模型和序列化的工作方式与 Sequential 模型相同。保存函数式模型的标准方式是调用 model.save() 将整个模型保存为单个文件。您可以稍后从该文件重新创建相同的模型,即使构建该模型的代码已不再可用。
保存的文件包括:
- 模型架构
- 模型权重值(在训练过程中得知)
- 模型训练配置(如果有的话,如传递给 compile)
- 优化器及其状态(如果有的话,用来从上次中断的地方重新开始训练)
model.save("path_to_my_model")
# Recreate the exact same model purely from the file:
#model = keras.models.load_model("path_to_my_model")
使用层堆栈来实现两个模型
在函数式 API 中,模型是通过在层计算图中指定其输入和输出来创建的。使用单个层计算图来生成多个模型
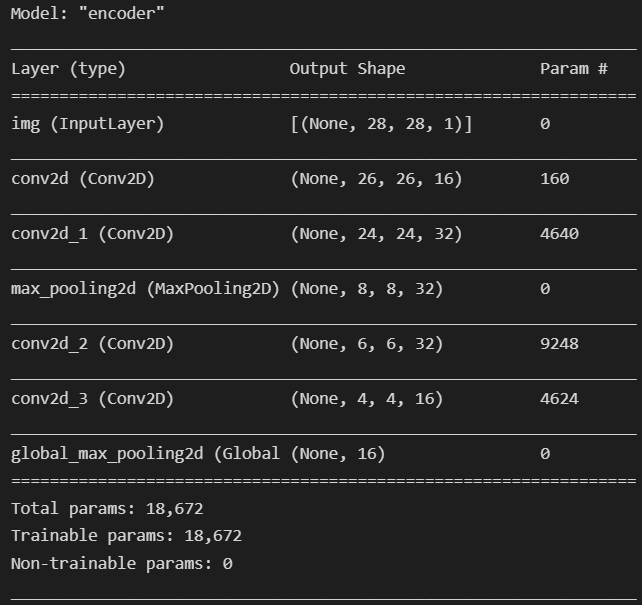
将使用相同的层堆栈来实例化两个模型:能够将图像输入转换为 16 维向量的 encoder 模型,以及用于训练的端到端 autoencoder 模型。
encoder_input = keras.Input(shape=(28, 28, 1), name="img")
x = layers.Conv2D(16, 3, activation="relu")(encoder_input)
x = layers.Conv2D(32, 3, activation="relu")(x)
x = layers.MaxPooling2D(3)(x)
x = layers.Conv2D(32, 3, activation="relu")(x)
x = layers.Conv2D(16, 3, activation="relu")(x)
encoder_output = layers.GlobalMaxPooling2D()(x)

encoder = keras.Model(encoder_input, encoder_output, name="encoder")
encoder.summary()
解码
x = layers.Reshape((4, 4, 1))(encoder_output)
x = layers.Conv2DTranspose(16, 3, activation="relu")(x)
x = layers.Conv2DTranspose(32, 3, activation="relu")(x)
x = layers.UpSampling2D(3)(x)
x = layers.Conv2DTranspose(16, 3, activation="relu")(x)
decoder_output = layers.Conv2DTranspose(1, 3, activation="relu")(x)

autoencoder = keras.Model(encoder_input, decoder_output, name="autoencoder")
autoencoder.summary()

这是一个编码和解码的过程,就是说怎么来最后又回到什么样
conv2D 层的反面是 Conv2DTranspose 层,MaxPooling2D 层的反面是 UpSampling2D 层
模型嵌套
模型可以嵌套:模型可以包含子模型(因为模型就像层一样)。
模型嵌套的一个常见用例是装配。
例如,以下展示了如何将一组模型装配成一个平均其预测的模型:
def get_model():
    inputs = keras.Input(shape=(128,))
    outputs = layers.Dense(1)(inputs)
    return keras.Model(inputs, outputs)

model1 = get_model()
model2 = get_model()
model3 = get_model()

inputs = keras.Input(shape=(128,))
y1 = model1(inputs)
y2 = model2(inputs)
y3 = model3(inputs)
outputs = layers.average([y1, y2, y3])
ensemble_model = keras.Model(inputs=inputs, outputs=outputs)

ensemble_model.summary()