K8S集群搭建及踩坑指南(VirtualBox+centos7.6)!
一、安装虚拟机及配置网络环境
1.1 virtualBox+centos7.6
virtualBox下载
centos7.6下载
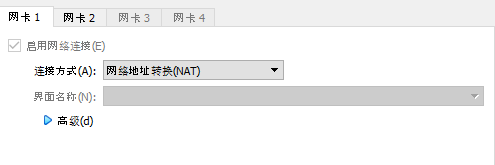
1.2 网络环境配置
Master节点:至少 2GB 内存,2 个 CPU。
Node节点:1GB 内存,1 个 CPU。
这里我们选择两个网卡(NAT+Bridge)模式,网卡的顺序不能出错,否则会导致虚拟机之间无法通信!


1.3 集群环境配置
主机名 IP
k8s-master 10.222.150.197
k8s-node1 10.222.150.173
k8s-node2 10.222.150.179
二、安装Docker和kubernetes服务
2.1 关闭防火墙、selinux、swap分区
systemctl disable --now firewalld
setenforce 0
sed -i 's/enforcing/disabled/' /etc/selinux/config`
swapoff -a
sed -i.bak 's/^.*centos-swap/#&/g' /etc/fstab
2.2配置主机名及host解析
hostnamectl set-hostname k8s-master
其他节点设置相同,主机名依次为 k8s-node1、k8s-node2(不能用大写字母)
# 编辑文件,以EOF作为结束符
cat >>/etc/hosts <# 写入文件内容
10.222.150.197 k8s-master
10.222.150.173 k8s-node1
10.222.150.179 k8s-node2
EOF
打开ipv6流量转发
cat > /etc/sysctl.d/k8s.conf << EOF
net.ipv4.ip_forward = 1
net.bridge.bridge-nf-call-ip6tables = 1
net.bridge.bridge-nf-call-iptables = 1
EOF
sysctl --system   #立即生效
2.3 安装Dokcer
- 安装所需的软件包。yum-utils 提供了 yum-config-manager ,并且 device mapper 存储驱动程序需要 device-mapper-persistent-data 和 lvm2
sudo yum install -y yum-utils \
  device-mapper-persistent-data \
  lvm2
- 配置源
sudo yum-config-manager \
    --add-repo \
    http://mirrors.aliyun.com/docker-ce/linux/centos/docker-ce.repo
- 安装 Docker Engine-Community
sudo yum install docker-ce docker-ce-cli containerd.io
- 启动docker并配置开机自启
systemctl enable --now docker
systemctl restart docker
2.3 kubernetes 服务
- 配置 kubernetes 的 yum 源
cat > /etc/yum.repos.d/kubernetes.repo << EOF
# 文件内容
[kubernetes]
name=Kubernetes
baseurl=https://mirrors.aliyun.com/kubernetes/yum/repos/kubernetes-el7-x86_64
enabled=1
gpgcheck=0
repo_gpgcheck=0
gpgkey=https://mirrors.aliyun.com/kubernetes/yum/doc/yum-key.gpg https://mirrors.aliyun.com/kubernetes/yum/doc/rpm-package-key.gpg
EOF
- 安装 kubeadm、kubelet 和 kubectl 组件最新版即可
sudo yum install -y kubelet kubeadm kubectl
- 启动服务并配置开机自启
systemctl enable kubelet&& systemctl start kubelet
三、部署Master节点
ps:node节点只需要执行到第二步 可以跳过第三步直接进行第四步
3.1 kubeadm初始化
kubeadm init \
--apiserver-advertise-address=10.222.150.197 \
--image-repository registry.aliyuncs.com/google_containers \
--kubernetes-version v1.20.5 \
--service-cidr=10.1.0.0/16 \
--pod-network-cidr=10.244.0.0/16
其中第二行为主机的IP地址,第四行是kubernetes的版本号,执行完的log如下:
W1031 23:31:04.033691   11810 configset.go:348] WARNING: kubeadm cannot validate component configs for API groups [kubelet.config.k8s.io kubeproxy.config.k8s.io]
[init] Using Kubernetes version: v1.19.3
[preflight] Running pre-flight checks
	[WARNING Firewalld]: firewalld is active, please ensure ports [6443 10250] are open or your cluster may not function correctly
	[WARNING IsDockerSystemdCheck]: detected "cgroupfs" as the Docker cgroup driver. The recommended driver is "systemd". Please follow the guide at https://kubernetes.io/docs/setup/cri/
[preflight] Pulling images required for setting up a Kubernetes cluster
[preflight] This might take a minute or two, depending on the speed of your internet connection
[preflight] You can also perform this action in beforehand using 'kubeadm config images pull'
[certs] Using certificateDir folder "/etc/kubernetes/pki"
[certs] Generating "ca" certificate and key
[certs] Generating "apiserver" certificate and key
[certs] apiserver serving cert is signed for DNS names [kubernetes kubernetes.default kubernetes.default.svc kubernetes.default.svc.cluster.local master] and IPs [10.1.0.1 10.222.150.197]
[certs] Generating "apiserver-kubelet-client" certificate and key
[certs] Generating "front-proxy-ca" certificate and key
[certs] Generating "front-proxy-client" certificate and key
[certs] Generating "etcd/ca" certificate and key
[certs] Generating "etcd/server" certificate and key
[certs] etcd/server serving cert is signed for DNS names [localhost master] and IPs [10.222.150.197 127.0.0.1 ::1]
[certs] Generating "etcd/peer" certificate and key
[certs] etcd/peer serving cert is signed for DNS names [localhost master] and IPs [10.222.150.197 127.0.0.1 ::1]
[certs] Generating "etcd/healthcheck-client" certificate and key
[certs] Generating "apiserver-etcd-client" certificate and key
[certs] Generating "sa" key and public key
[kubeconfig] Using kubeconfig folder "/etc/kubernetes"
[kubeconfig] Writing "admin.conf" kubeconfig file
[kubeconfig] Writing "kubelet.conf" kubeconfig file
[kubeconfig] Writing "controller-manager.conf" kubeconfig file
[kubeconfig] Writing "scheduler.conf" kubeconfig file
[kubelet-start] Writing kubelet environment file with flags to file "/var/lib/kubelet/kubeadm-flags.env"
[kubelet-start] Writing kubelet configuration to file "/var/lib/kubelet/config.yaml"
[kubelet-start] Starting the kubelet
[control-plane] Using manifest folder "/etc/kubernetes/manifests"
[control-plane] Creating static Pod manifest for "kube-apiserver"
[control-plane] Creating static Pod manifest for "kube-controller-manager"
[control-plane] Creating static Pod manifest for "kube-scheduler"
[etcd] Creating static Pod manifest for local etcd in "/etc/kubernetes/manifests"
[wait-control-plane] Waiting for the kubelet to boot up the control plane as static Pods from directory "/etc/kubernetes/manifests". This can take up to 4m0s
[apiclient] All control plane components are healthy after 24.008420 seconds
[upload-config] Storing the configuration used in ConfigMap "kubeadm-config" in the "kube-system" Namespace
[kubelet] Creating a ConfigMap "kubelet-config-1.19" in namespace kube-system with the configuration for the kubelets in the cluster
[upload-certs] Skipping phase. Please see --upload-certs
[mark-control-plane] Marking the node master as control-plane by adding the label "node-role.kubernetes.io/master=''"
[mark-control-plane] Marking the node master as control-plane by adding the taints [node-role.kubernetes.io/master:NoSchedule]
[bootstrap-token] Using token: wd2mox.6exqvl21i9da1h5c
[bootstrap-token] Configuring bootstrap tokens, cluster-info ConfigMap, RBAC Roles
[bootstrap-token] configured RBAC rules to allow Node Bootstrap tokens to get nodes
[bootstrap-token] configured RBAC rules to allow Node Bootstrap tokens to post CSRs in order for nodes to get long term certificate credentials
[bootstrap-token] configured RBAC rules to allow the csrapprover controller automatically approve CSRs from a Node Bootstrap Token
[bootstrap-token] configured RBAC rules to allow certificate rotation for all node client certificates in the cluster
[bootstrap-token] Creating the "cluster-info" ConfigMap in the "kube-public" namespace
[kubelet-finalize] Updating "/etc/kubernetes/kubelet.conf" to point to a rotatable kubelet client certificate and key
[addons] Applied essential addon: CoreDNS
[addons] Applied essential addon: kube-proxy

Your Kubernetes control-plane has initialized successfully!

To start using your cluster, you need to run the following as a regular user:

  mkdir -p $HOME/.kube
  sudo cp -i /etc/kubernetes/admin.conf $HOME/.kube/config
  sudo chown $(id -u):$(id -g) $HOME/.kube/config

You should now deploy a pod network to the cluster.
Run "kubectl apply -f [podnetwork].yaml" with one of the options listed at:
  https://kubernetes.io/docs/concepts/cluster-administration/addons/

Then you can join any number of worker nodes by running the following on each as root:

kubeadm join 10.222.150.197:6443 --token 1fyemr.use0p5msssd1obhm \
    --discovery-token-ca-cert-hash sha256:966bb4081f46a5877419ddd84b3050bc7dd33249fc9441d4299de1d484c1bc70
最后一行的输出是Node节点加入集群的命令 ,如果初始化过程出现errror 可以用下面的命令重新初始化
kubeadm reset
3.2 使用kubectl工具
mkdir -p $HOME/.kube
sudo cp -i /etc/kubernetes/admin.conf $HOME/.kube/config
sudo chown $(id -u):$(id -g) $HOME/.kube/config
3.3 配置flannel网络
- 在docker-hub上pull flannel的镜像
docker pull jmgao1983/flannel:v0.11.0-amd64
- 安装 wget工具(如果有则跳过)
yum install wget
- 配置github域名解析(防止SSL连接错误)
vim /etc/hosts
# 添加以下内容
192.30.253.112 github.com
199.232.28.133 raw.githubusercontent.com
- 替换 kube-flannel.yml 中的镜像名称
sed -i 's#quay.io/coreos/flannel:v0.11.0-amd64#jmgao1983/flannel:v0.11.0-amd64#g' kube-flannel.yml
- 安装flannel
kubectl apply -f kube-flannel.yml
等待一段时间后查看node 和 pod 状态,全为Running
kubectl -n kube-system get pod
# 以下为输出
NAME                                 READY   STATUS    RESTARTS   AGE
coredns-7f89b7bc75-ssfml             1/1     Running   7          8d
coredns-7f89b7bc75-t2mtb             1/1     Running   7          8d
etcd-k8s-master                      1/1     Running   7          8d
kube-apiserver-k8s-master            1/1     Running   7          8d
kube-controller-manager-k8s-master   1/1     Running   7          8d
kube-flannel-ds-6xw5z                1/1     Running   8          8d
kube-flannel-ds-t582z                1/1     Running   9          8d
kube-proxy-454rg                     1/1     Running   7          8d
kube-proxy-b77j2                     1/1     Running   7          8d
kube-scheduler-k8s-master            1/1     Running   7          8d
k8s报错:coredns的状态是pending的解决办法:
有可能的原因:master上的flannel镜像拉取失败,导致获取不到解析的IP
解决办法:
kubectl delete -f kube-flannel.yml    #先删除安装的CNI插件
kubectl apply -f kube-flannel.yml  #再次安装
kubectl get pods -n kube-system -o wide
四、Node节点加入集群
kubeadm join 10.222.150.193:6443 --token 0qfims.nkv08dazwo3uvfe0 \
    --discovery-token-ca-cert-hash sha256:9ba7773f232c764fbee63964a2c9f0ab29789738b9c7b3c3f0c609ed1eb9dbad
查看集群状态
kubectl get node
NAME         STATUS   ROLES                  AGE   VERSION
k8s-master   Ready    control-plane,master   8d    v1.20.4
k8s-node-1   Ready                     8d    v1.20.4
k8s-node-2   Ready                     8d    v1.20.4
至此 K8S集群搭建完成!