yolov5代码及原理详解
yolov5代码及原理解析
文章目录
- yolov5代码及原理解析
- 一、代码及原理解析
-
- 1、输入端
-
- (1) letterbox
- (2) Mosaic增强
- (3) anchor
-
- 1)关闭时
- 2)开启时
- 2、Backbone
-
- (1)Focus结构
- (2)CSP
- (3)SPP
- 3、Neck
- 4、输出端
-
- (1)输出通道数
- (2)损失函数计算
-
- 1)锚框选取
- 2)IoU_loss计算
- 3)BCELoss
- (3)NMS最大值抑制
- 5、评价指标
- 二、不同复杂度的yolov5模型
-
- 1.不同模型参数
-
- (1)yolov5s
- (2)yolov5m
- (3)yolov5l
- (4)yolov5x
- 2.参数影响
-
- (1)depth_multiple
- (2)width_multiple
- 主要参考文章及视频
一、代码及原理解析
1、输入端
(1) letterbox
此模块作用为将原始图片统一缩放到一个标准尺寸,再送入检测网络中。
def letterbox(im, new_shape=(640, 640), color=(114, 114, 114), auto=True, scaleFill=False, scaleup=True, stride=32):
    # Resize and pad image while meeting stride-multiple constraints
    shape = im.shape[:2]  # current shape [height, width]
    if isinstance(new_shape, int):
        new_shape = (new_shape, new_shape)

    # Scale ratio (new / old)
    r = min(new_shape[0] / shape[0], new_shape[1] / shape[1])
    if not scaleup:  # only scale down, do not scale up (for better val mAP)
        r = min(r, 1.0)

    # Compute padding
    ratio = r, r  # width, height ratios
    new_unpad = int(round(shape[1] * r)), int(round(shape[0] * r))
    dw, dh = new_shape[1] - new_unpad[0], new_shape[0] - new_unpad[1]  # wh padding
    if auto:  # minimum rectangle
        dw, dh = np.mod(dw, stride), np.mod(dh, stride)  # wh padding
    elif scaleFill:  # stretch
        dw, dh = 0.0, 0.0
        new_unpad = (new_shape[1], new_shape[0])
        ratio = new_shape[1] / shape[1], new_shape[0] / shape[0]  # width, height ratios

    dw /= 2  # divide padding into 2 sides
    dh /= 2

    if shape[::-1] != new_unpad:  # resize
        im = cv2.resize(im, new_unpad, interpolation=cv2.INTER_LINEAR)
    top, bottom = int(round(dh - 0.1)), int(round(dh + 0.1))
    left, right = int(round(dw - 0.1)), int(round(dw + 0.1))
    im = cv2.copyMakeBorder(im, top, bottom, left, right, cv2.BORDER_CONSTANT, value=color)  # add border
    return im, ratio, (dw, dh)
步骤为:
1)计算new_shape[0] / shape[0]和new_shape[1] / shape[1],选取其最小值r。
2)将原图像resize为int(round(shape[1] * r)), int(round(shape[0] * r))。
3)分别计算new_shape[1] - new_unpad[0]对stride(默认是32)取余数和new_shape[0] - new_unpad[1]对stride(默认是32)取余数的结果,记为dw和dh。
4)在resize后的图像的基础上填充dw和dh大小像素的空白边界像素。
(2) Mosaic增强
首先介绍一下load_image函数
def load_image(self, i):
    # Loads 1 image from dataset index 'i', returns (im, original hw, resized hw)
    im, f, fn = self.ims[i], self.im_files[i], self.npy_files[i],
    if im is None:  # not cached in RAM
        if fn.exists():  # load npy
            im = np.load(fn)
        else:  # read image
            im = cv2.imread(f)  # BGR
            assert im is not None, f'Image Not Found {f}'
        h0, w0 = im.shape[:2]  # orig hw
        r = self.img_size / max(h0, w0)  # ratio
        if r != 1:  # if sizes are not equal
            im = cv2.resize(im,
                            (int(w0 * r), int(h0 * r)),
                            interpolation=cv2.INTER_LINEAR if (self.augment or r > 1) else cv2.INTER_AREA)
        return im, (h0, w0), im.shape[:2]  # im, hw_original, hw_resized
    else:
        return self.ims[i], self.im_hw0[i], self.im_hw[i]  # im, hw_original, hw_resized
其类似于letterbox,只是缺少了填充边缘的步骤。此函数将图像进行resize并输出resize前后的图像大小。
接下来看一下四张图进行Mosaic增强的函数load_mosaic:
def load_mosaic(self, index):
    # YOLOv5 4-mosaic loader. Loads 1 image + 3 random images into a 4-image mosaic
    labels4, segments4 = [], []
    s = self.img_size
    yc, xc = (int(random.uniform(-x, 2 * s + x)) for x in self.mosaic_border)  # mosaic center x, y
    indices = [index] + random.choices(self.indices, k=3)  # 3 additional image indices
    random.shuffle(indices)
    for i, index in enumerate(indices):
        # Load image
        img, _, (h, w) = self.load_image(index)

        # place img in img4
        if i == 0:  # top left
            img4 = np.full((s * 2, s * 2, img.shape[2]), 114, dtype=np.uint8)  # base image with 4 tiles
            x1a, y1a, x2a, y2a = max(xc - w, 0), max(yc - h, 0), xc, yc  # xmin, ymin, xmax, ymax (large image)
            x1b, y1b, x2b, y2b = w - (x2a - x1a), h - (y2a - y1a), w, h  # xmin, ymin, xmax, ymax (small image)
        elif i == 1:  # top right
            x1a, y1a, x2a, y2a = xc, max(yc - h, 0), min(xc + w, s * 2), yc
            x1b, y1b, x2b, y2b = 0, h - (y2a - y1a), min(w, x2a - x1a), h
        elif i == 2:  # bottom left
            x1a, y1a, x2a, y2a = max(xc - w, 0), yc, xc, min(s * 2, yc + h)
            x1b, y1b, x2b, y2b = w - (x2a - x1a), 0, w, min(y2a - y1a, h)
        elif i == 3:  # bottom right
            x1a, y1a, x2a, y2a = xc, yc, min(xc + w, s * 2), min(s * 2, yc + h)
            x1b, y1b, x2b, y2b = 0, 0, min(w, x2a - x1a), min(y2a - y1a, h)

        img4[y1a:y2a, x1a:x2a] = img[y1b:y2b, x1b:x2b]  # img4[ymin:ymax, xmin:xmax]
        padw = x1a - x1b
        padh = y1a - y1b

        # Labels
        labels, segments = self.labels[index].copy(), self.segments[index].copy()
        if labels.size:
            labels[:, 1:] = xywhn2xyxy(labels[:, 1:], w, h, padw, padh)  # normalized xywh to pixel xyxy format
            segments = [xyn2xy(x, w, h, padw, padh) for x in segments]
        labels4.append(labels)
        segments4.extend(segments)

    # Concat/clip labels
    labels4 = np.concatenate(labels4, 0)
    for x in (labels4[:, 1:], *segments4):
        np.clip(x, 0, 2 * s, out=x)  # clip when using random_perspective()
    # img4, labels4 = replicate(img4, labels4)  # replicate

    # Augment
    img4, labels4, segments4 = copy_paste(img4, labels4, segments4, p=self.hyp['copy_paste'])
    img4, labels4 = random_perspective(img4, labels4, segments4,
                                       degrees=self.hyp['degrees'],
                                       translate=self.hyp['translate'],
                                       scale=self.hyp['scale'],
                                       shear=self.hyp['shear'],
                                       perspective=self.hyp['perspective'],
                                       border=self.mosaic_border)  # border to remove

    return img4, labels4
步骤如下:
1)确定拼接的四张图片的相接的点yc, xc,其为(img_size//2,3img_size//2)中的随机点。
2)随机抽取序列号为index的图片,通过load_image函数将其resize并读取resize后的h和w。
3)生成(2img_size,2*img_size)的空白图片,并将resize后的小图片复制到大空白图片中。
注意:由于yc, xc是随机的,最终填充的图片中可能存在大量空白。
由上述程序可以看到,load_mosaic函数中还存在random_perspective函数,此函数中包含了一些其它的图像增强操作,包括degrees:旋转;translate:水平和垂直转换;scale:缩放;shear:图片裁剪;perspective:透视变换。
相应程序如下所示:
def random_perspective(im, targets=(), segments=(), degrees=10, translate=.1, scale=.1, shear=10, perspective=0.0,
                       border=(0, 0)):
    # torchvision.transforms.RandomAffine(degrees=(-10, 10), translate=(0.1, 0.1), scale=(0.9, 1.1), shear=(-10, 10))
    # targets = [cls, xyxy]

    height = im.shape[0] + border[0] * 2  # shape(h,w,c)
    width = im.shape[1] + border[1] * 2

    # Center
    C = np.eye(3)
    C[0, 2] = -im.shape[1] / 2  # x translation (pixels)
    C[1, 2] = -im.shape[0] / 2  # y translation (pixels)

    # Perspective
    P = np.eye(3)
    P[2, 0] = random.uniform(-perspective, perspective)  # x perspective (about y)
    P[2, 1] = random.uniform(-perspective, perspective)  # y perspective (about x)

    # Rotation and Scale
    R = np.eye(3)
    a = random.uniform(-degrees, degrees)
    # a += random.choice([-180, -90, 0, 90])  # add 90deg rotations to small rotations
    s = random.uniform(1 - scale, 1 + scale)
    # s = 2 ** random.unifoonMatrix2D(angle=a, center=(0, 0), scale=s)
    rm(-scale, scale)
    R[:2] = cv2.getRotati
    # Shear
    S = np.eye(3)
    S[0, 1] = math.tan(random.uniform(-shear, shear) * math.pi / 180)  # x shear (deg)
    S[1, 0] = math.tan(random.uniform(-shear, shear) * math.pi / 180)  # y shear (deg)

    # Translation
    T = np.eye(3)
    T[0, 2] = random.uniform(0.5 - translate, 0.5 + translate) * width  # x translation (pixels)
    T[1, 2] = random.uniform(0.5 - translate, 0.5 + translate) * height  # y translation (pixels)

    # Combined rotation matrix
    M = T @ S @ R @ P @ C  # order of operations (right to left) is IMPORTANT
    if (border[0] != 0) or (border[1] != 0) or (M != np.eye(3)).any():  # image changed
        if perspective:
            im = cv2.warpPerspective(im, M, dsize=(width, height), borderValue=(114, 114, 114))
        else:  # affine
            im = cv2.warpAffine(im, M[:2], dsize=(width, height), borderValue=(114, 114, 114))

    # Visualize
    # import matplotlib.pyplot as plt
    # ax = plt.subplots(1, 2, figsize=(12, 6))[1].ravel()
    # ax[0].imshow(im[:, :, ::-1])  # base
    # ax[1].imshow(im2[:, :, ::-1])  # warped

    # Transform label coordinates
    n = len(targets)
    if n:
        use_segments = any(x.any() for x in segments)
        new = np.zeros((n, 4))
        if use_segments:  # warp segments
            segments = resample_segments(segments)  # upsample
            for i, segment in enumerate(segments):
                xy = np.ones((len(segment), 3))
                xy[:, :2] = segment
                xy = xy @ M.T  # transform
                xy = xy[:, :2] / xy[:, 2:3] if perspective else xy[:, :2]  # perspective rescale or affine

                # clip
                new[i] = segment2box(xy, width, height)

        else:  # warp boxes
            xy = np.ones((n * 4, 3))
            xy[:, :2] = targets[:, [1, 2, 3, 4, 1, 4, 3, 2]].reshape(n * 4, 2)  # x1y1, x2y2, x1y2, x2y1
            xy = xy @ M.T  # transform
            xy = (xy[:, :2] / xy[:, 2:3] if perspective else xy[:, :2]).reshape(n, 8)  # perspective rescale or affine

            # create new boxes
            x = xy[:, [0, 2, 4, 6]]
            y = xy[:, [1, 3, 5, 7]]
            new = np.concatenate((x.min(1), y.min(1), x.max(1), y.max(1))).reshape(4, n).T

            # clip
            new[:, [0, 2]] = new[:, [0, 2]].clip(0, width)
            new[:, [1, 3]] = new[:, [1, 3]].clip(0, height)

        # filter candidates
        i = box_candidates(box1=targets[:, 1:5].T * s, box2=new.T, area_thr=0.01 if use_segments else 0.10)
        targets = targets[i]
        targets[:, 1:5] = new[i]

    return im, targets
除了上述的四张图像的Mosaic增强外,程序中还有九张图像的Mosaic增强函数load_mosaic9:
def load_mosaic9(self, index):
    # YOLOv5 9-mosaic loader. Loads 1 image + 8 random images into a 9-image mosaic
    labels9, segments9 = [], []
    s = self.img_size
    indices = [index] + random.choices(self.indices, k=8)  # 8 additional image indices
    random.shuffle(indices)
    hp, wp = -1, -1  # height, width previous
    for i, index in enumerate(indices):
        # Load image
        img, _, (h, w) = self.load_image(index)

        # place img in img9
        if i == 0:  # center
            img9 = np.full((s * 3, s * 3, img.shape[2]), 114, dtype=np.uint8)  # base image with 4 tiles
            h0, w0 = h, w
            c = s, s, s + w, s + h  # xmin, ymin, xmax, ymax (base) coordinates
        elif i == 1:  # top
            c = s, s - h, s + w, s
        elif i == 2:  # top right
            c = s + wp, s - h, s + wp + w, s
        elif i == 3:  # right
            c = s + w0, s, s + w0 + w, s + h
        elif i == 4:  # bottom right
            c = s + w0, s + hp, s + w0 + w, s + hp + h
        elif i == 5:  # bottom
            c = s + w0 - w, s + h0, s + w0, s + h0 + h
        elif i == 6:  # bottom left
            c = s + w0 - wp - w, s + h0, s + w0 - wp, s + h0 + h
        elif i == 7:  # left
            c = s - w, s + h0 - h, s, s + h0
        elif i == 8:  # top left
            c = s - w, s + h0 - hp - h, s, s + h0 - hp

        padx, pady = c[:2]
        x1, y1, x2, y2 = (max(x, 0) for x in c)  # allocate coords

        # Labels
        labels, segments = self.labels[index].copy(), self.segments[index].copy()
        if labels.size:
            labels[:, 1:] = xywhn2xyxy(labels[:, 1:], w, h, padx, pady)  # normalized xywh to pixel xyxy format
            segments = [xyn2xy(x, w, h, padx, pady) for x in segments]
        labels9.append(labels)
        segments9.extend(segments)

        # Image
        img9[y1:y2, x1:x2] = img[y1 - pady:, x1 - padx:]  # img9[ymin:ymax, xmin:xmax]
        hp, wp = h, w  # height, width previous

    # Offset
    yc, xc = (int(random.uniform(0, s)) for _ in self.mosaic_border)  # mosaic center x, y
    img9 = img9[yc:yc + 2 * s, xc:xc + 2 * s]

    # Concat/clip labels
    labels9 = np.concatenate(labels9, 0)
    labels9[:, [1, 3]] -= xc
    labels9[:, [2, 4]] -= yc
    c = np.array([xc, yc])  # centers
    segments9 = [x - c for x in segments9]

    for x in (labels9[:, 1:], *segments9):
        np.clip(x, 0, 2 * s, out=x)  # clip when using random_perspective()
    # img9, labels9 = replicate(img9, labels9)  # replicate

    # Augment
    img9, labels9 = random_perspective(img9, labels9, segments9,
                                       degrees=self.hyp['degrees'],
                                       translate=self.hyp['translate'],
                                       scale=self.hyp['scale'],
                                       shear=self.hyp['shear'],
                                       perspective=self.hyp['perspective'],
                                       border=self.mosaic_border)  # border to remove

    return img9, labels9
(3) anchor
yolov5中具有autoanchor功能,在设置时默认关闭:
parser.add_argument('--noautoanchor', action='store_true', help='disable AutoAnchor')
若想启用,可设置为True。
下面介绍一下此功能开启和关闭时yolov5都是怎样训练锚框的。
1)关闭时
在\yolov5-master\models\内有yolov5系列模型的yaml参数文件,以yolov5s为例,其关于anchor的描述为:
anchors:
  - [10,13, 16,30, 33,23]  # P3/8
  - [30,61, 62,45, 59,119]  # P4/16
  - [116,90, 156,198, 373,326]  # P5/32
其中有三行,每行有三个anchors,每行代表不同尺度下的anchors,最终代表在三个不同尺度的特征图下的各三个anchors,其参数代表w和h。
大的特征图对应于小的anchors,小的特征图对应于大的anchors。
例:图像大小默认为640,其对应的特征图分别为:
三次下采样:640/8=80;四次下采样:640/16=40;五次下采样:640/32=20;
其anchors的描述包括:
位置:特征图中的每个网格;
大小:anchors的大小,由yaml中的预设anchors中的参数决定。
对于8080大小的特征图,其初始anchors大小即为第一行参数整体/8;
对于4040大小的特征图,其初始anchors大小即为第一行参数整体/16;
对于20*20大小的特征图,其初始anchors大小即为第一行参数整体/32;
由此,通过计算最终输出anchors和gt的差别,将其汇总在loss中,便可实现对anchors的调整,并将信息汇集在网络参数中。
2)开启时
autoanchors代码描述在\yolov5-master\utils\autoanchor.py中,其包括三个函数:
def check_anchor_order(m):
def check_anchors(dataset, model, thr=4.0, imgsz=640):
def kmean_anchors(dataset='./data/coco128.yaml', n=9, img_size=640, thr=4.0, gen=1000, verbose=True):
其中,第二、三个函数较为重要,check_anchors函数为计算生成的anchors和gt的符合程度是否高于0.98,若高于,则按生成的anchors继续进行训练,若低于,则启用kmean_anchors函数进行anchors的生成。
def check_anchors(dataset, model, thr=4.0, imgsz=640):
    # Check anchor fit to data, recompute if necessary
    m = model.module.model[-1] if hasattr(model, 'module') else model.model[-1]  # Detect()
    shapes = imgsz * dataset.shapes / dataset.shapes.max(1, keepdims=True)
    scale = np.random.uniform(0.9, 1.1, size=(shapes.shape[0], 1))  # augment scale
    wh = torch.tensor(np.concatenate([l[:, 3:5] * s for s, l in zip(shapes * scale, dataset.labels)])).float()  # wh

    def metric(k):  # compute metric
        r = wh[:, None] / k[None]
        x = torch.min(r, 1 / r).min(2)[0]  # ratio metric
        best = x.max(1)[0]  # best_x
        aat = (x > 1 / thr).float().sum(1).mean()  # anchors above threshold
        bpr = (best > 1 / thr).float().mean()  # best possible recall
        return bpr, aat

    anchors = m.anchors.clone() * m.stride.to(m.anchors.device).view(-1, 1, 1)  # current anchors
    bpr, aat = metric(anchors.cpu().view(-1, 2))
    s = f'\n{PREFIX}{aat:.2f} anchors/target, {bpr:.3f} Best Possible Recall (BPR). '
    if bpr > 0.98:  # threshold to recompute
        LOGGER.info(emojis(f'{s}Current anchors are a good fit to dataset ✅'))
    else:
        LOGGER.info(emojis(f'{s}Anchors are a poor fit to dataset ⚠️, attempting to improve...'))
        na = m.anchors.numel() // 2  # number of anchors
        try:
            anchors = kmean_anchors(dataset, n=na, img_size=imgsz, thr=thr, gen=1000, verbose=False)
        except Exception as e:
            LOGGER.info(f'{PREFIX}ERROR: {e}')
        new_bpr = metric(anchors)[0]
        if new_bpr > bpr:  # replace anchors
            anchors = torch.tensor(anchors, device=m.anchors.device).type_as(m.anchors)
            m.anchors[:] = anchors.clone().view_as(m.anchors) / m.stride.to(m.anchors.device).view(-1, 1, 1)  # loss
            check_anchor_order(m)
            s = f'{PREFIX}Done ✅ (optional: update model *.yaml to use these anchors in the future)'
        else:
            s = f'{PREFIX}Done ⚠️ (original anchors better than new anchors, proceeding with original anchors)'
        LOGGER.info(emojis(s))
def kmean_anchors(dataset='./data/coco128.yaml', n=9, img_size=640, thr=4.0, gen=1000, verbose=True):
    """ Creates kmeans-evolved anchors from training dataset

        Arguments:
            dataset: path to data.yaml, or a loaded dataset
            n: number of anchors
            img_size: image size used for training
            thr: anchor-label wh ratio threshold hyperparameter hyp['anchor_t'] used for training, default=4.0
            gen: generations to evolve anchors using genetic algorithm
            verbose: print all results

        Return:
            k: kmeans evolved anchors

        Usage:
            from utils.autoanchor import *; _ = kmean_anchors()
    """
    from scipy.cluster.vq import kmeans

    npr = np.random
    thr = 1 / thr

    def metric(k, wh):  # compute metrics
        r = wh[:, None] / k[None]
        x = torch.min(r, 1 / r).min(2)[0]  # ratio metric
        # x = wh_iou(wh, torch.tensor(k))  # iou metric
        return x, x.max(1)[0]  # x, best_x

    def anchor_fitness(k):  # mutation fitness
        _, best = metric(torch.tensor(k, dtype=torch.float32), wh)
        return (best * (best > thr).float()).mean()  # fitness

    def print_results(k, verbose=True):
        k = k[np.argsort(k.prod(1))]  # sort small to large
        x, best = metric(k, wh0)
        bpr, aat = (best > thr).float().mean(), (x > thr).float().mean() * n  # best possible recall, anch > thr
        s = f'{PREFIX}thr={thr:.2f}: {bpr:.4f} best possible recall, {aat:.2f} anchors past thr\n' \
            f'{PREFIX}n={n}, img_size={img_size}, metric_all={x.mean():.3f}/{best.mean():.3f}-mean/best, ' \
            f'past_thr={x[x > thr].mean():.3f}-mean: '
        for i, x in enumerate(k):
            s += '%i,%i, ' % (round(x[0]), round(x[1]))
        if verbose:
            LOGGER.info(s[:-2])
        return k

    if isinstance(dataset, str):  # *.yaml file
        with open(dataset, errors='ignore') as f:
            data_dict = yaml.safe_load(f)  # model dict
        from utils.datasets import LoadImagesAndLabels
        dataset = LoadImagesAndLabels(data_dict['train'], augment=True, rect=True)

    # Get label wh
    shapes = img_size * dataset.shapes / dataset.shapes.max(1, keepdims=True)
    wh0 = np.concatenate([l[:, 3:5] * s for s, l in zip(shapes, dataset.labels)])  # wh

    # Filter
    i = (wh0 < 3.0).any(1).sum()
    if i:
        LOGGER.info(f'{PREFIX}WARNING: Extremely small objects found: {i} of {len(wh0)} labels are < 3 pixels in size')
    wh = wh0[(wh0 >= 2.0).any(1)]  # filter > 2 pixels
    # wh = wh * (npr.rand(wh.shape[0], 1) * 0.9 + 0.1)  # multiply by random scale 0-1

    # Kmeans init
    try:
        LOGGER.info(f'{PREFIX}Running kmeans for {n} anchors on {len(wh)} points...')
        assert n <= len(wh)  # apply overdetermined constraint
        s = wh.std(0)  # sigmas for whitening
        k = kmeans(wh / s, n, iter=30)[0] * s  # points
        assert n == len(k)  # kmeans may return fewer points than requested if wh is insufficient or too similar
    except Exception:
        LOGGER.warning(f'{PREFIX}WARNING: switching strategies from kmeans to random init')
        k = np.sort(npr.rand(n * 2)).reshape(n, 2) * img_size  # random init
    wh, wh0 = (torch.tensor(x, dtype=torch.float32) for x in (wh, wh0))
    k = print_results(k, verbose=False)

    # Plot
    # k, d = [None] * 20, [None] * 20
    # for i in tqdm(range(1, 21)):
    #     k[i-1], d[i-1] = kmeans(wh / s, i)  # points, mean distance
    # fig, ax = plt.subplots(1, 2, figsize=(14, 7), tight_layout=True)
    # ax = ax.ravel()
    # ax[0].plot(np.arange(1, 21), np.array(d) ** 2, marker='.')
    # fig, ax = plt.subplots(1, 2, figsize=(14, 7))  # plot wh
    # ax[0].hist(wh[wh[:, 0]<100, 0],400)
    # ax[1].hist(wh[wh[:, 1]<100, 1],400)
    # fig.savefig('wh.png', dpi=200)

    # Evolve
    f, sh, mp, s = anchor_fitness(k), k.shape, 0.9, 0.1  # fitness, generations, mutation prob, sigma
    pbar = tqdm(range(gen), desc=f'{PREFIX}Evolving anchors with Genetic Algorithm:')  # progress bar
    for _ in pbar:
        v = np.ones(sh)
        while (v == 1).all():  # mutate until a change occurs (prevent duplicates)
            v = ((npr.random(sh) < mp) * random.random() * npr.randn(*sh) * s + 1).clip(0.3, 3.0)
        kg = (k.copy() * v).clip(min=2.0)
        fg = anchor_fitness(kg)
        if fg > f:
            f, k = fg, kg.copy()
            pbar.desc = f'{PREFIX}Evolving anchors with Genetic Algorithm: fitness = {f:.4f}'
            if verbose:
                print_results(k, verbose)

    return print_results(k)
总体步骤:
1)计算指标,判断其是否超过0.98,若超过,则不执行自适应anchors,若不超过,则执行2;
2)采用k_mean算法进行聚类,得到新的初始anchors的w和h;
3)采用遗传算法对w和h进行突变,执行1000次,观察其是否有优化。
此方法在yolo之前版本也存在,但是yolov5将其直接嵌入在主代码中,可自动调用。
接下来介绍一下yolov5的整体框架:
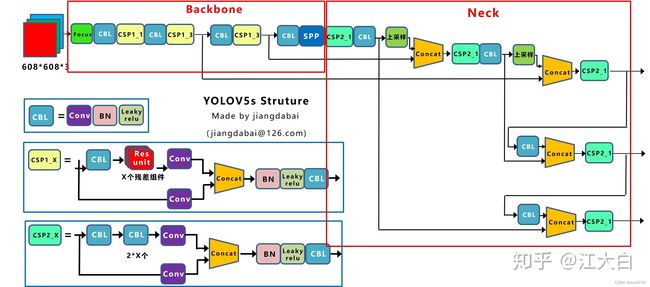
整体框架中包含了Backbone和Neck,接下来分别介绍这两部分。模型组件相关代码在\yolov5-master\models\common.py中。
2、Backbone
(1)Focus结构
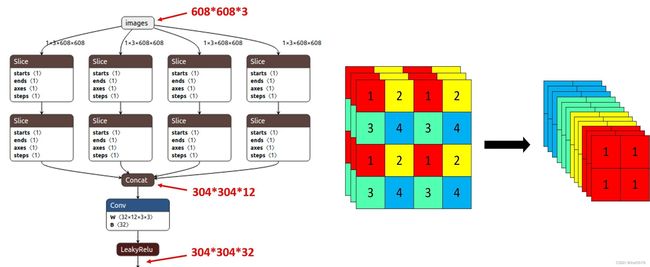
Focus模块在v5中是图片进入backbone前,对图片进行切片操作,具体操作是在一张图片中每隔一个像素拿到一个值,类似于邻近下采样,这样就拿到了四张图片,四张图片互补,长的差不多,但是没有信息丢失,这样一来,将W、H信息就集中到了通道空间,输入通道扩充了4倍,即拼接起来的图片相对于原先的RGB三通道模式变成了12个通道,最后将得到的新图片再经过卷积操作,最终得到了没有信息丢失情况下的二倍下采样特征图。
以yolov5s为例,原始的640 × 640 × 3的图像输入Focus结构,采用切片操作,先变成320 × 320 × 12的特征图,再经过一次卷积操作,最终变成320 × 320 × 32的特征图。
class Focus(nn.Module):
    # Focus wh information into c-space
    def __init__(self, c1, c2, k=1, s=1, p=None, g=1, act=True):  # ch_in, ch_out, kernel, stride, padding, groups
        super().__init__()
        self.conv = Conv(c1 * 4, c2, k, s, p, g, act)
        # self.contract = Contract(gain=2)

    def forward(self, x):  # x(b,c,w,h) -> y(b,4c,w/2,h/2)
        return self.conv(torch.cat([x[..., ::2, ::2], x[..., 1::2, ::2], x[..., ::2, 1::2], x[..., 1::2, 1::2]], 1))
        # return self.conv(self.contract(x))
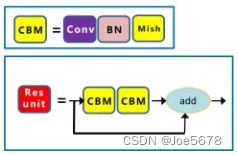
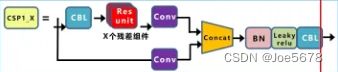
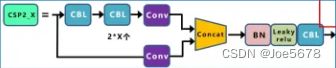
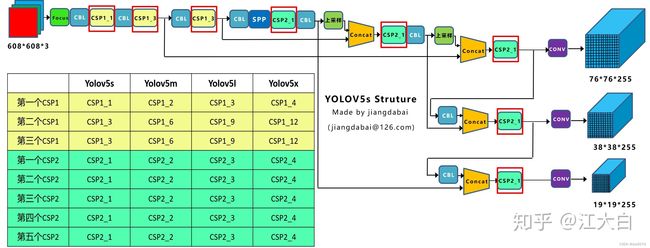
(2)CSP
Backbone采用CSP1_X,Neck采用CSP2_X,其结构如上面的结构图所示。
其中,Res unit如下图所示。
class BottleneckCSP(nn.Module):
    # CSP Bottleneck https://github.com/WongKinYiu/CrossStagePartialNetworks
    def __init__(self, c1, c2, n=1, shortcut=True, g=1, e=0.5):  # ch_in, ch_out, number, shortcut, groups, expansion
        super().__init__()
        c_ = int(c2 * e)  # hidden channels
        self.cv1 = Conv(c1, c_, 1, 1)
        self.cv2 = nn.Conv2d(c1, c_, 1, 1, bias=False)
        self.cv3 = nn.Conv2d(c_, c_, 1, 1, bias=False)
        self.cv4 = Conv(2 * c_, c2, 1, 1)
        self.bn = nn.BatchNorm2d(2 * c_)  # applied to cat(cv2, cv3)
        self.act = nn.SiLU()
        self.m = nn.Sequential(*(Bottleneck(c_, c_, shortcut, g, e=1.0) for _ in range(n)))

    def forward(self, x):
        y1 = self.cv3(self.m(self.cv1(x)))
        y2 = self.cv2(x)
        return self.cv4(self.act(self.bn(torch.cat((y1, y2), dim=1))))
(3)SPP
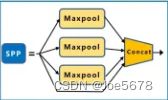
SPP的作用是得到更多不同的信息。
class SPP(nn.Module):
    # Spatial Pyramid Pooling (SPP) layer https://arxiv.org/abs/1406.4729
    def __init__(self, c1, c2, k=(5, 9, 13)):
        super().__init__()
        c_ = c1 // 2  # hidden channels
        self.cv1 = Conv(c1, c_, 1, 1)
        self.cv2 = Conv(c_ * (len(k) + 1), c2, 1, 1)
        self.m = nn.ModuleList([nn.MaxPool2d(kernel_size=x, stride=1, padding=x // 2) for x in k])

    def forward(self, x):
        x = self.cv1(x)
        with warnings.catch_warnings():
            warnings.simplefilter('ignore')  # suppress torch 1.9.0 max_pool2d() warning
            return self.cv2(torch.cat([x] + [m(x) for m in self.m], 1))
其使用填充方法,使得经过max pooling后,尺寸不变,且步长为1,且每层max pooing的大小不同,分别为5、9、13。
3、Neck
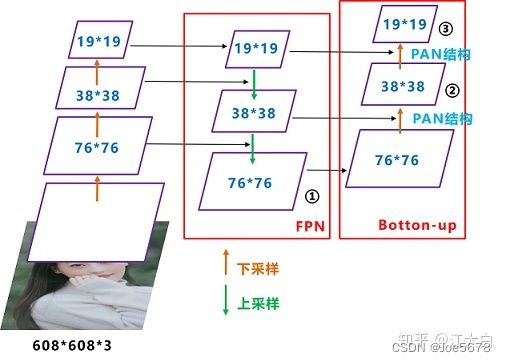
Yolov5采用FPN+PAN,整体框架图中第1、2、3、4、7、8个CBL具有下采样功能(conv步长为2),使得特征图可以按照上图所示进行concat,此种结构可以融合不同尺寸特征图的信息。
4、输出端
(1)输出通道数
每层特征图最终都会经过1乘1卷积,变成(5+分类数)乘3个通道(乘3是因为有3个anchors),分别是xywh(4个通道),置信度(存在目标的概率),分类数(每类存在的置信度)
(2)损失函数计算
yolov5中损失函数包含三项,分别为anchors和bbox的loss,classification的loss以及confidence的loss,为其加权之和(默认为0.05bbox_loss+0.5cls_loss+1*obj_loss)。下面介绍一些计算时的细节,其代码在yolov5-master\utils\loss.py中。
1)锚框选取
相关函数为build_targets:
def build_targets(self, p, targets):
    # Build targets for compute_loss(), input targets(image,class,x,y,w,h)
    na, nt = self.na, targets.shape[0]  # number of anchors, targets
    tcls, tbox, indices, anch = [], [], [], []
    gain = torch.ones(7, device=targets.device)  # normalized to gridspace gain
    ai = torch.arange(na, device=targets.device).float().view(na, 1).repeat(1, nt)  # same as .repeat_interleave(nt)
    targets = torch.cat((targets.repeat(na, 1, 1), ai[:, :, None]), 2)  # append anchor indices

    g = 0.5  # bias
    off = torch.tensor([[0, 0],
                        [1, 0], [0, 1], [-1, 0], [0, -1],  # j,k,l,m
                        # [1, 1], [1, -1], [-1, 1], [-1, -1],  # jk,jm,lk,lm
                        ], device=targets.device).float() * g  # offsets

    for i in range(self.nl):
        anchors = self.anchors[i]
        gain[2:6] = torch.tensor(p[i].shape)[[3, 2, 3, 2]]  # xyxy gain

        # Match targets to anchors
        t = targets * gain
        if nt:
            # Matches
            r = t[:, :, 4:6] / anchors[:, None]  # wh ratio
            j = torch.max(r, 1 / r).max(2)[0] < self.hyp['anchor_t']  # compare
            # j = wh_iou(anchors, t[:, 4:6]) > model.hyp['iou_t']  # iou(3,n)=wh_iou(anchors(3,2), gwh(n,2))
            t = t[j]  # filter

            # Offsets
            gxy = t[:, 2:4]  # grid xy
            gxi = gain[[2, 3]] - gxy  # inverse
            j, k = ((gxy % 1 < g) & (gxy > 1)).T
            l, m = ((gxi % 1 < g) & (gxi > 1)).T
            j = torch.stack((torch.ones_like(j), j, k, l, m))
            t = t.repeat((5, 1, 1))[j]
            offsets = (torch.zeros_like(gxy)[None] + off[:, None])[j]
        else:
            t = targets[0]
            offsets = 0

        # Define
        b, c = t[:, :2].long().T  # image, class
        gxy = t[:, 2:4]  # grid xy
        gwh = t[:, 4:6]  # grid wh
        gij = (gxy - offsets).long()
        gi, gj = gij.T  # grid xy indices

        # Append
        a = t[:, 6].long()  # anchor indices
        indices.append((b, a, gj.clamp_(0, gain[3] - 1), gi.clamp_(0, gain[2] - 1)))  # image, anchor, grid indices
        tbox.append(torch.cat((gxy - gij, gwh), 1))  # box
        anch.append(anchors[a])  # anchors
        tcls.append(c)  # class

    return tcls, tbox, indices, anch
build_ targets函数用于获得在训练时计算Loss函数所需要的目标框,即被认为是正样本
与yolov3/v4的不同: yolov5支持跨网格预测
对于任何一个bbox,三个输出预测特征层都可能有先验框anchors匹配;
该函数输出的正样本框比传入的targets (GT框) 数目多
具体处理过程:
(1)对于任何一层计算当前bbox和当前层anchor的匹配程度,不采用iou, 而是shape比例;如果anchor和bbox的宽高比差距大于4,则认为不匹配,此时忽略相应的bbox, 即当做背景;
(2)然后对bbox计算落在的网格所有anchors都计算Loss (并不是直接和GT框比较计算Loss)
注意此时落在网格不再是一个,而是附近的多个,这样就增加了正样本数,可能存在有些bbox在三个尺度都预测的情况;(最终从样本所在网格的上下左右四个网格中挑选两个网格,连同样本所在网格,共三个网格中选取anchors。
另外,yoLoy5也没有conf分支忽略阈值(ignore thresh)的操作, 而yoLov3/v4有 。
将这些anchors进行loss函数的计算。
2)IoU_loss计算
anchors和bbox的loss计算由IoU_loss得到。
各类IoU_loss的计算可以查看深入浅出Yolo系列之Yolov3&Yolov4&Yolov5&Yolox核心基础知识完整讲解4.3.4 Prediction创新
代码在yolov5-master\utils\metrics.py中。
bbox_iou用来计算IoU。
def bbox_iou(box1, box2, x1y1x2y2=True, GIoU=False, DIoU=False, CIoU=False, eps=1e-7):
    # Returns the IoU of box1 to box2. box1 is 4, box2 is nx4
    box2 = box2.T

    # Get the coordinates of bounding boxes
    if x1y1x2y2:  # x1, y1, x2, y2 = box1
        b1_x1, b1_y1, b1_x2, b1_y2 = box1[0], box1[1], box1[2], box1[3]
        b2_x1, b2_y1, b2_x2, b2_y2 = box2[0], box2[1], box2[2], box2[3]
    else:  # transform from xywh to xyxy
        b1_x1, b1_x2 = box1[0] - box1[2] / 2, box1[0] + box1[2] / 2
        b1_y1, b1_y2 = box1[1] - box1[3] / 2, box1[1] + box1[3] / 2
        b2_x1, b2_x2 = box2[0] - box2[2] / 2, box2[0] + box2[2] / 2
        b2_y1, b2_y2 = box2[1] - box2[3] / 2, box2[1] + box2[3] / 2

    # Intersection area
    inter = (torch.min(b1_x2, b2_x2) - torch.max(b1_x1, b2_x1)).clamp(0) * \
            (torch.min(b1_y2, b2_y2) - torch.max(b1_y1, b2_y1)).clamp(0)

    # Union Area
    w1, h1 = b1_x2 - b1_x1, b1_y2 - b1_y1 + eps
    w2, h2 = b2_x2 - b2_x1, b2_y2 - b2_y1 + eps
    union = w1 * h1 + w2 * h2 - inter + eps

    iou = inter / union
    if CIoU or DIoU or GIoU:
        cw = torch.max(b1_x2, b2_x2) - torch.min(b1_x1, b2_x1)  # convex (smallest enclosing box) width
        ch = torch.max(b1_y2, b2_y2) - torch.min(b1_y1, b2_y1)  # convex height
        if CIoU or DIoU:  # Distance or Complete IoU https://arxiv.org/abs/1911.08287v1
            c2 = cw ** 2 + ch ** 2 + eps  # convex diagonal squared
            rho2 = ((b2_x1 + b2_x2 - b1_x1 - b1_x2) ** 2 +
                    (b2_y1 + b2_y2 - b1_y1 - b1_y2) ** 2) / 4  # center distance squared
            if CIoU:  # https://github.com/Zzh-tju/DIoU-SSD-pytorch/blob/master/utils/box/box_utils.py#L47
                v = (4 / math.pi ** 2) * torch.pow(torch.atan(w2 / h2) - torch.atan(w1 / h1), 2)
                with torch.no_grad():
                    alpha = v / (v - iou + (1 + eps))
                return iou - (rho2 / c2 + v * alpha)  # CIoU
            return iou - rho2 / c2  # DIoU
        c_area = cw * ch + eps  # convex area
        return iou - (c_area - union) / c_area  # GIoU https://arxiv.org/pdf/1902.09630.pdf
    return iou  # IoU
3)BCELoss
计算loss时,三类loss均采用此函数:
class BCEBlurWithLogitsLoss(nn.Module):
    # BCEwithLogitLoss() with reduced missing label effects.
    def __init__(self, alpha=0.05):
        super().__init__()
        self.loss_fcn = nn.BCEWithLogitsLoss(reduction='none')  # must be nn.BCEWithLogitsLoss()
        self.alpha = alpha

    def forward(self, pred, true):
        loss = self.loss_fcn(pred, true)
        pred = torch.sigmoid(pred)  # prob from logits
        dx = pred - true  # reduce only missing label effects
        # dx = (pred - true).abs()  # reduce missing label and false label effects
        alpha_factor = 1 - torch.exp((dx - 1) / (self.alpha + 1e-4))
        loss *= alpha_factor
        return loss.mean()
(3)NMS最大值抑制
NMS的原理可以查看NMS原理大总结,其中yolov5将IoU进行了变换。
代码在yolov5-master\utils\general.py中:
def non_max_suppression(prediction, conf_thres=0.25, iou_thres=0.45, classes=None, agnostic=False, multi_label=False,
                        labels=(), max_det=300):
    """Runs Non-Maximum Suppression (NMS) on inference results

    Returns:
         list of detections, on (n,6) tensor per image [xyxy, conf, cls]
    """

    nc = prediction.shape[2] - 5  # number of classes
    xc = prediction[..., 4] > conf_thres  # candidates

    # Checks
    assert 0 <= conf_thres <= 1, f'Invalid Confidence threshold {conf_thres}, valid values are between 0.0 and 1.0'
    assert 0 <= iou_thres <= 1, f'Invalid IoU {iou_thres}, valid values are between 0.0 and 1.0'

    # Settings
    min_wh, max_wh = 2, 7680  # (pixels) minimum and maximum box width and height
    max_nms = 30000  # maximum number of boxes into torchvision.ops.nms()
    time_limit = 10.0  # seconds to quit after
    redundant = True  # require redundant detections
    multi_label &= nc > 1  # multiple labels per box (adds 0.5ms/img)
    merge = False  # use merge-NMS

    t = time.time()
    output = [torch.zeros((0, 6), device=prediction.device)] * prediction.shape[0]
    for xi, x in enumerate(prediction):  # image index, image inference
        # Apply constraints
        x[((x[..., 2:4] < min_wh) | (x[..., 2:4] > max_wh)).any(1), 4] = 0  # width-height
        x = x[xc[xi]]  # confidence

        # Cat apriori labels if autolabelling
        if labels and len(labels[xi]):
            lb = labels[xi]
            v = torch.zeros((len(lb), nc + 5), device=x.device)
            v[:, :4] = lb[:, 1:5]  # box
            v[:, 4] = 1.0  # conf
            v[range(len(lb)), lb[:, 0].long() + 5] = 1.0  # cls
            x = torch.cat((x, v), 0)

        # If none remain process next image
        if not x.shape[0]:
            continue

        # Compute conf
        x[:, 5:] *= x[:, 4:5]  # conf = obj_conf * cls_conf

        # Box (center x, center y, width, height) to (x1, y1, x2, y2)
        box = xywh2xyxy(x[:, :4])

        # Detections matrix nx6 (xyxy, conf, cls)
        if multi_label:
            i, j = (x[:, 5:] > conf_thres).nonzero(as_tuple=False).T
            x = torch.cat((box[i], x[i, j + 5, None], j[:, None].float()), 1)
        else:  # best class only
            conf, j = x[:, 5:].max(1, keepdim=True)
            x = torch.cat((box, conf, j.float()), 1)[conf.view(-1) > conf_thres]

        # Filter by class
        if classes is not None:
            x = x[(x[:, 5:6] == torch.tensor(classes, device=x.device)).any(1)]

        # Apply finite constraint
        # if not torch.isfinite(x).all():
        #     x = x[torch.isfinite(x).all(1)]

        # Check shape
        n = x.shape[0]  # number of boxes
        if not n:  # no boxes
            continue
        elif n > max_nms:  # excess boxes
            x = x[x[:, 4].argsort(descending=True)[:max_nms]]  # sort by confidence

        # Batched NMS
        c = x[:, 5:6] * (0 if agnostic else max_wh)  # classes
        boxes, scores = x[:, :4] + c, x[:, 4]  # boxes (offset by class), scores
        i = torchvision.ops.nms(boxes, scores, iou_thres)  # NMS
        if i.shape[0] > max_det:  # limit detections
            i = i[:max_det]
        if merge and (1 < n < 3E3):  # Merge NMS (boxes merged using weighted mean)
            # update boxes as boxes(i,4) = weights(i,n) * boxes(n,4)
            iou = box_iou(boxes[i], boxes) > iou_thres  # iou matrix
            weights = iou * scores[None]  # box weights
            x[i, :4] = torch.mm(weights, x[:, :4]).float() / weights.sum(1, keepdim=True)  # merged boxes
            if redundant:
                i = i[iou.sum(1) > 1]  # require redundancy

        output[xi] = x[i]
        if (time.time() - t) > time_limit:
            LOGGER.warning(f'WARNING: NMS time limit {time_limit}s exceeded')
            break  # time limit exceeded

    return output
5、评价指标
以下三个链接既包含了原理介绍又包含了训练结果的解析:
YoloV5相关性能指标解析
YOLOv5基础知识点——性能指标
深度学习评估指标之目标检测——(yolov5 可视化训练结果以及result.txt解析)
二、不同复杂度的yolov5模型
不同模型区分的点为depth_multiple和width_multiple这两个参数。
1.不同模型参数
(1)yolov5s
depth_multiple: 0.33  # model depth multiple
width_multiple: 0.50  # layer channel multiple
(2)yolov5m
depth_multiple: 0.67  # model depth multiple
width_multiple: 0.75  # layer channel multiple
(3)yolov5l
depth_multiple: 1.0  # model depth multiple
width_multiple: 1.0  # layer channel multiple
(4)yolov5x
depth_multiple: 1.33  # model depth multiple
width_multiple: 1.25  # layer channel multiple
2.参数影响
(1)depth_multiple
将上面的CSP1和CSP2结构单独放在下面
depth_multiple这个参数影响的便是CSP1和CSP2的深度,即CSP1中的残差组件的数量和CSP2中的CBL数量。
而这个数量是如何计算得到的呢?
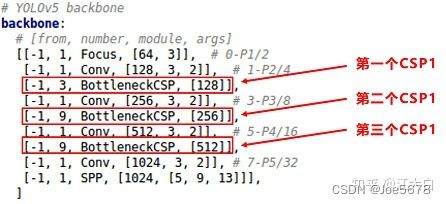
上图为yolov5s的backbone参数,图中红圈圈起来的变为CSP1的参数,其每个CSP1的残差单元数量便为第二个数字乘以depth_multiple。
例:其第一个CSP1中的残差组件数量为3depth_multiple=1,第二个CSP1中的残差组件数量为9depth_multiple=3,第三个CSP1中的残差组件数量为9*depth_multiple=3;
CSP2同样如此:
# YOLOv5 v6.0 head
head:
  [[-1, 1, Conv, [512, 1, 1]],
   [-1, 1, nn.Upsample, [None, 2, 'nearest']],
   [[-1, 6], 1, Concat, [1]],  # cat backbone P4
   [-1, 3, C3, [512, False]],  # 13

   [-1, 1, Conv, [256, 1, 1]],
   [-1, 1, nn.Upsample, [None, 2, 'nearest']],
   [[-1, 4], 1, Concat, [1]],  # cat backbone P3
   [-1, 3, C3, [256, False]],  # 17 (P3/8-small)

   [-1, 1, Conv, [256, 3, 2]],
   [[-1, 14], 1, Concat, [1]],  # cat head P4
   [-1, 3, C3, [512, False]],  # 20 (P4/16-medium)

   [-1, 1, Conv, [512, 3, 2]],
   [[-1, 10], 1, Concat, [1]],  # cat head P5
   [-1, 3, C3, [1024, False]],  # 23 (P5/32-large)

   [[17, 20, 23], 1, Detect, [nc, anchors]],  # Detect(P3, P4, P5)
  ]
其CSP2中的CBL数量均为2*3depth_multiple=2个。
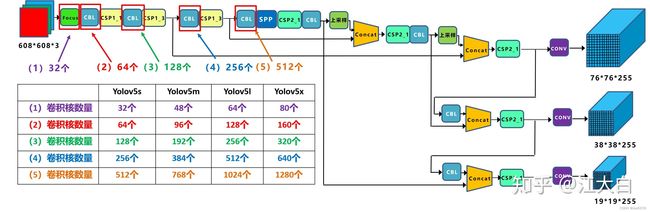
(2)width_multiple
此参数影响的是backbone中Focus结构和CBL结构中的卷积核个数。
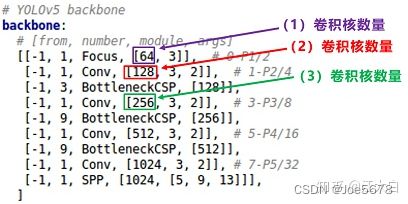
卷积核数量为上图中框中所示的数字乘以width_multiple。
主要参考文章及视频
深入浅出Yolo系列之Yolov5核心基础知识完整讲解
【最适合新手入门的【YOLOV5目标实战】教程!基于Pytorch搭建YOLOV5目标检测平台!环境部署+项目实战(深度学习/计算机视觉)-哔哩哔哩】