前言
Stripe 是一家国外的提供支付服务的平台,可以让商户在自己的应用和网站方便快捷地集成信用卡支付、第三方(Apple Pay、Alipay、微信pay、三星pay、微软pay 等)支付方式等服务,具体参考官网介绍。
本文主要记录总结一下在 iOS 平台如何集成 Stripe 相关的服务。主要包含一下内容:
- 申请账号,获得测试秘钥和生产秘钥
- 信用卡支付
- 简单支付
- 绑卡支付
- Apple Pay
- 模拟测试
- 提现
- Stripe 管理后台介绍
- 注意事项
申请账号
Stripe 官网 -> 管理平台 -> 注册账号 -> 登录 -> 获得测试秘钥和生产秘钥
信用卡支付
集成 Stripe iOS SDK ,参考 github 上的项目 https://github.com/stripe/stripe-ios 和支付文档 https://stripe.com/docs/connect/creating-a-payments-page
pod 'Stripe'
简单支付
简单支付直接可以使用 Stripe 封装好的一个 STPPaymentCardTextField 输入框,添加支付页面的 UI 上,Stripe 处理好了信用卡格式校验,安全传输敏感数据等事情。
参考 https://github.com/stripe-samples/accept-a-card-payment,有两种模式,带 webhook 的和不带 webhook 的,区别如下:
// 1. 初始化填写信用卡的输入框
lazy var paymentCardTextField: STPPaymentCardTextField = {
    let textField = STPPaymentCardTextField()
    textField.isHidden = false
    textField.delegate = self

    // 可定制 TextField 的主题外观
    textField.backgroundColor = STPTheme.default().secondaryBackgroundColor
    textField.textColor = STPTheme.default().primaryForegroundColor
    textField.placeholderColor = STPTheme.default().secondaryForegroundColor
    textField.borderColor = UIColor.gxd_themeColor()
    textField.borderWidth = 1.0
    textField.textErrorColor = STPTheme.default().errorColor
    textField.postalCodeEntryEnabled = true

    return textField
}()

// 2. 设置可发布的秘钥:从 Stripe 管理后台拿到,也可以又服务器保存,然后下发到客户端
Stripe.setDefaultPublishableKey("\(PublishableKey)")

// 3. 向服务端发起一个预支付请求,服务端通过调用 Stripe 的 API 生成 paymentIntent对象,下发 paymentIntentClientSecret 到客户端
func startCheckout() {
    // Create a PaymentIntent by calling the sample server's /create-payment-intent endpoint.
    let url = URL(string: BackendUrl + "create-payment-intent")!
    let json: [String: Any] = [
        "currency": "usd",
        "items": [
            ["id": "photo_subscription"]
        ]
    ]
    var request = URLRequest(url: url)
    request.httpMethod = "POST"
    request.setValue("application/json", forHTTPHeaderField: "Content-Type")
    request.httpBody = try? JSONSerialization.data(withJSONObject: json)
    let task = URLSession.shared.dataTask(with: request, completionHandler: { [weak self] (data, response, error) in
        guard let response = response as? HTTPURLResponse,
            response.statusCode == 200,
            let data = data,
            let json = try? JSONSerialization.jsonObject(with: data, options: []) as? [String : Any],
            let clientSecret = json["clientSecret"] as? String,
            let publishableKey = json["publishableKey"] as? String else {
                let message = error?.localizedDescription ?? "Failed to decode response from server."
                self?.displayAlert(title: "Error loading page", message: message)
                return
        }
        print("Created PaymentIntent")
        self?.paymentIntentClientSecret = clientSecret
        // Configure the SDK with your Stripe publishable key so that it can make requests to the Stripe API
        // For added security, our sample app gets the publishable key from the server
        Stripe.setDefaultPublishableKey(publishableKey)
    })
    task.resume()
}

// 4. 收集用户输入的信用卡信息,客户端拿到这个 clientSecret,发起支付请求
guard let paymentIntentClientSecret = paymentIntentClientSecret else {
    return;
}

// Collect card details
let cardParams = cardTextField.cardParams
let paymentMethodParams = STPPaymentMethodParams(card: cardParams, billingDetails: nil, metadata: nil)
let paymentIntentParams = STPPaymentIntentParams(clientSecret: paymentIntentClientSecret)
paymentIntentParams.paymentMethodParams = paymentMethodParams

// Submit the payment
let paymentHandler = STPPaymentHandler.shared()
paymentHandler.confirmPayment(withParams: paymentIntentParams, authenticationContext: self) { (status, paymentIntent, error) in
    switch (status) {
    case .failed:
        self.displayAlert(title: "Payment failed", message: error?.localizedDescription ?? "")
        break
    case .canceled:
        self.displayAlert(title: "Payment canceled", message: error?.localizedDescription ?? "")
        break
    case .succeeded:
        self.displayAlert(title: "Payment succeeded", message: paymentIntent?.description ?? "", restartDemo: true)
        break
    @unknown default:
        fatalError()
        break
    }
}

// 有些卡需要用户二次验证授权,提供一个代理,弹出让用户确认验证的控制器
extension CheckoutViewController: STPAuthenticationContext {
    func authenticationPresentingViewController() -> UIViewController {
        return self
    }
}
绑卡支付
绑卡支付要必要每次用户都需要输入一遍卡号的问题,就是记录用户之前支付过的卡,和某个具体用户关联起来,以后该用户发起支付时候就可以选择自己以前绑定过的卡。通过 Stripe 提供的 API,用户可以对信用卡做新增、删除、修改等操作。
这些在 Stripe iOS SDK 提供的 UI 素材里面已经默认实现了。服务端借助 heroku ,可以将 https://github.com/stripe/example-mobile-backend/tree/v18.1.0 后端服务替换我们自己在 Stripe 上新建的账号秘钥,部署运行。
我们设置的 key 将会在服务端代码里面用来调用 Stripe 的 API。实例代码服务端是用 Ruby 写的,代码在这里:https://github.com/stripe/example-mobile-backend/blob/v18.1.0/web.rb, 服务端可以参考一下里面的逻辑。
客户端集成流程如下:
一、向服务端请求用户的绑卡信息
// 请求服务端,查询这个用户是否有创建过 Stripe Customer 用户,如果有,返回该 Stripe Customer 用户的绑卡信息(绑了多少张卡,选中的支付方式是哪个),没有就创建一个新的
// 这是个代理方法,是由 Stripe 代理
func createCustomerKey(withAPIVersion apiVersion: String, completion: @escaping STPJSONResponseCompletionBlock) {
    let url = self.baseURL.appendingPathComponent("ephemeral_keys")
    var urlComponents = URLComponents(url: url, resolvingAgainstBaseURL: false)!
    urlComponents.queryItems = [URLQueryItem(name: "api_version", value: apiVersion)]
    var request = URLRequest(url: urlComponents.url!)
    request.httpMethod = "POST"
    let task = URLSession.shared.dataTask(with: request, completionHandler: { (data, response, error) in
        guard let response = response as? HTTPURLResponse,
            response.statusCode == 200,
            let data = data,
            let json = ((try? JSONSerialization.jsonObject(with: data, options: []) as? [String : Any]) as [String : Any]??) else {
            completion(nil, error)
            return
        }
        completion(json, nil)
    })
    task.resume()
}
通过向服务端拿到的 Stripe iOS SDK 能识别的用户信息,就能够获取该用户所关联的支付方式相关信息(包含绑定的卡和其他第三方支付方式)
二、客户端发起预支付请求
func createPaymentIntent(products: [Product], shippingMethod: PKShippingMethod?, country: String? = nil, completion: @escaping ((Result) -> Void)) {
    let url = self.baseURL.appendingPathComponent("create_payment_intent")
    var params: [String: Any] = [
        "metadata": [
            // example-mobile-backend allows passing metadata through to Stripe
            "payment_request_id": "B3E611D1-5FA1-4410-9CEC-00958A5126CB",
        ],
    ]
    params["products"] = products.map({ (p) -> String in
        return p.emoji
    })
    if let shippingMethod = shippingMethod {
        params["shipping"] = shippingMethod.identifier
    }
    params["country"] = country
    let jsonData = try? JSONSerialization.data(withJSONObject: params)
    var request = URLRequest(url: url)
    request.httpMethod = "POST"
    request.setValue("application/json", forHTTPHeaderField: "Content-Type")
    request.httpBody = jsonData
    let task = URLSession.shared.dataTask(with: request, completionHandler: { (data, response, error) in
        guard let response = response as? HTTPURLResponse,
            response.statusCode == 200,
            let data = data,
            let json = ((try? JSONSerialization.jsonObject(with: data, options: []) as? [String : Any]) as [String : Any]??),
            let secret = json?["secret"] as? String else {
                completion(.failure(error ?? APIError.unknown))
                return
        }
        completion(.success(secret))
    })
    task.resume()
}
就是客户端简单支付里面服务端下发的 paymentIntentClientSecret,客户端拿到这个,就可以发起支付请求了。
// 1.-------------------------- 初始化 STPPaymentContext 上下文 --------------------------

// 设置服务端的请求的地址
MyAPIClient.sharedClient.baseURLString = self.backendBaseURL


// 设置可发布的秘钥
Stripe.setDefaultPublishableKey(self.stripePublishableKey)

// 支付相关配置
let config = STPPaymentConfiguration.shared()
// 设置 Apple Pay 配置的商户 ID
config.appleMerchantIdentifier = self.appleMerchantID

// 设置支付方式额外选项,是一个选项枚举,指定支付方式包含哪些(只是信用卡、还是既有信用卡还宝行 Apple Pay)
// 注意的是:就算这里制定了 Apple Pay,如果 Apple Pay 的相关配置没有检测通过,真实出现的时候也是没有 Apple Pay 这种支付方式的
config.additionalPaymentOptions = settings.additionalPaymentOptions
// 是否支持可以扫描添加卡
config.cardScanningEnabled = true

// 支付的币种
self.paymentCurrency = settings.currency

let customerContext = STPCustomerContext(keyProvider: MyAPIClient.sharedClient)
let paymentContext = STPPaymentContext(customerContext: customerContext,
                                       configuration: config,
                                       theme: settings.theme)

paymentContext.paymentCurrency = self.paymentCurrency


// 2.------------------ 发起支付 ------------------------------------
self.paymentContext.requestPayment()


// 3. -- ------------------------- STPPaymentContextDelegate 回调 -----------------
func paymentContext(_ paymentContext: STPPaymentContext, didCreatePaymentResult paymentResult: STPPaymentResult, completion: @escaping STPPaymentStatusBlock) {
     // Create the PaymentIntent on the backend
     // To speed this up, create the PaymentIntent earlier in the checkout flow and update it as necessary (e.g. when the cart subtotal updates or when shipping fees and taxes are calculated, instead of re-creating a PaymentIntent for every payment attempt.


}

// 支付完成回调
func paymentContext(_ paymentContext: STPPaymentContext, didFinishWith status: STPPaymentStatus, error: Error?) {

}

// 支付上下文发生改变回调
func paymentContextDidChange(_ paymentContext: STPPaymentContext) {

}

// 支付错误回调
func paymentContext(_ paymentContext: STPPaymentContext, didFailToLoadWithError error: Error) {

}
Apple Pay
Apple Pay 只是支付方式的一种,Stripe 和绑卡支付封装在一起,只需要做一些相关的配置。参考 https://stripe.com/docs/apple-pay,相关需要配置的地方如下:
一、Stripe 后台下载 cert 文件
下载完:
二、苹果开发者网站,新建 Merchant IDs 类型 Identifiers
上传第一步中从 Stripe 后台获取到的 certSingingRequest 文件
下载下来:
三、上传上一步中下载好的证书
四、Xcode -> workspace -> project -> target -> Singing & Capabilities 中新增 Apple Pay
五、Apple develop 后台,将需要支持 Apple pay 的应用 ID,编辑勾选 Apple Pay 能力,将第二步中新增的 Merchant ID 编辑进去
注意事项:
- 测试模式下(即 Stripe 后台使用的是测试模式可发布的秘钥),需在沙盒环境下模拟,添加沙盒测试员;
- 如果配置的支付环境证书是在国外,那么测试的时候需要将测试手机的手机 Region 设置成该国家,不然会一直 processing 转圈支付失败;
提现
提现是商户平台的客户向该商户发起提现申请,商户通过 Stripe 提供的 API 从商户账户里面的钱转账到商户平台的客户,但是客户也需要有一个 Stripe 的账号。流程大概如下:
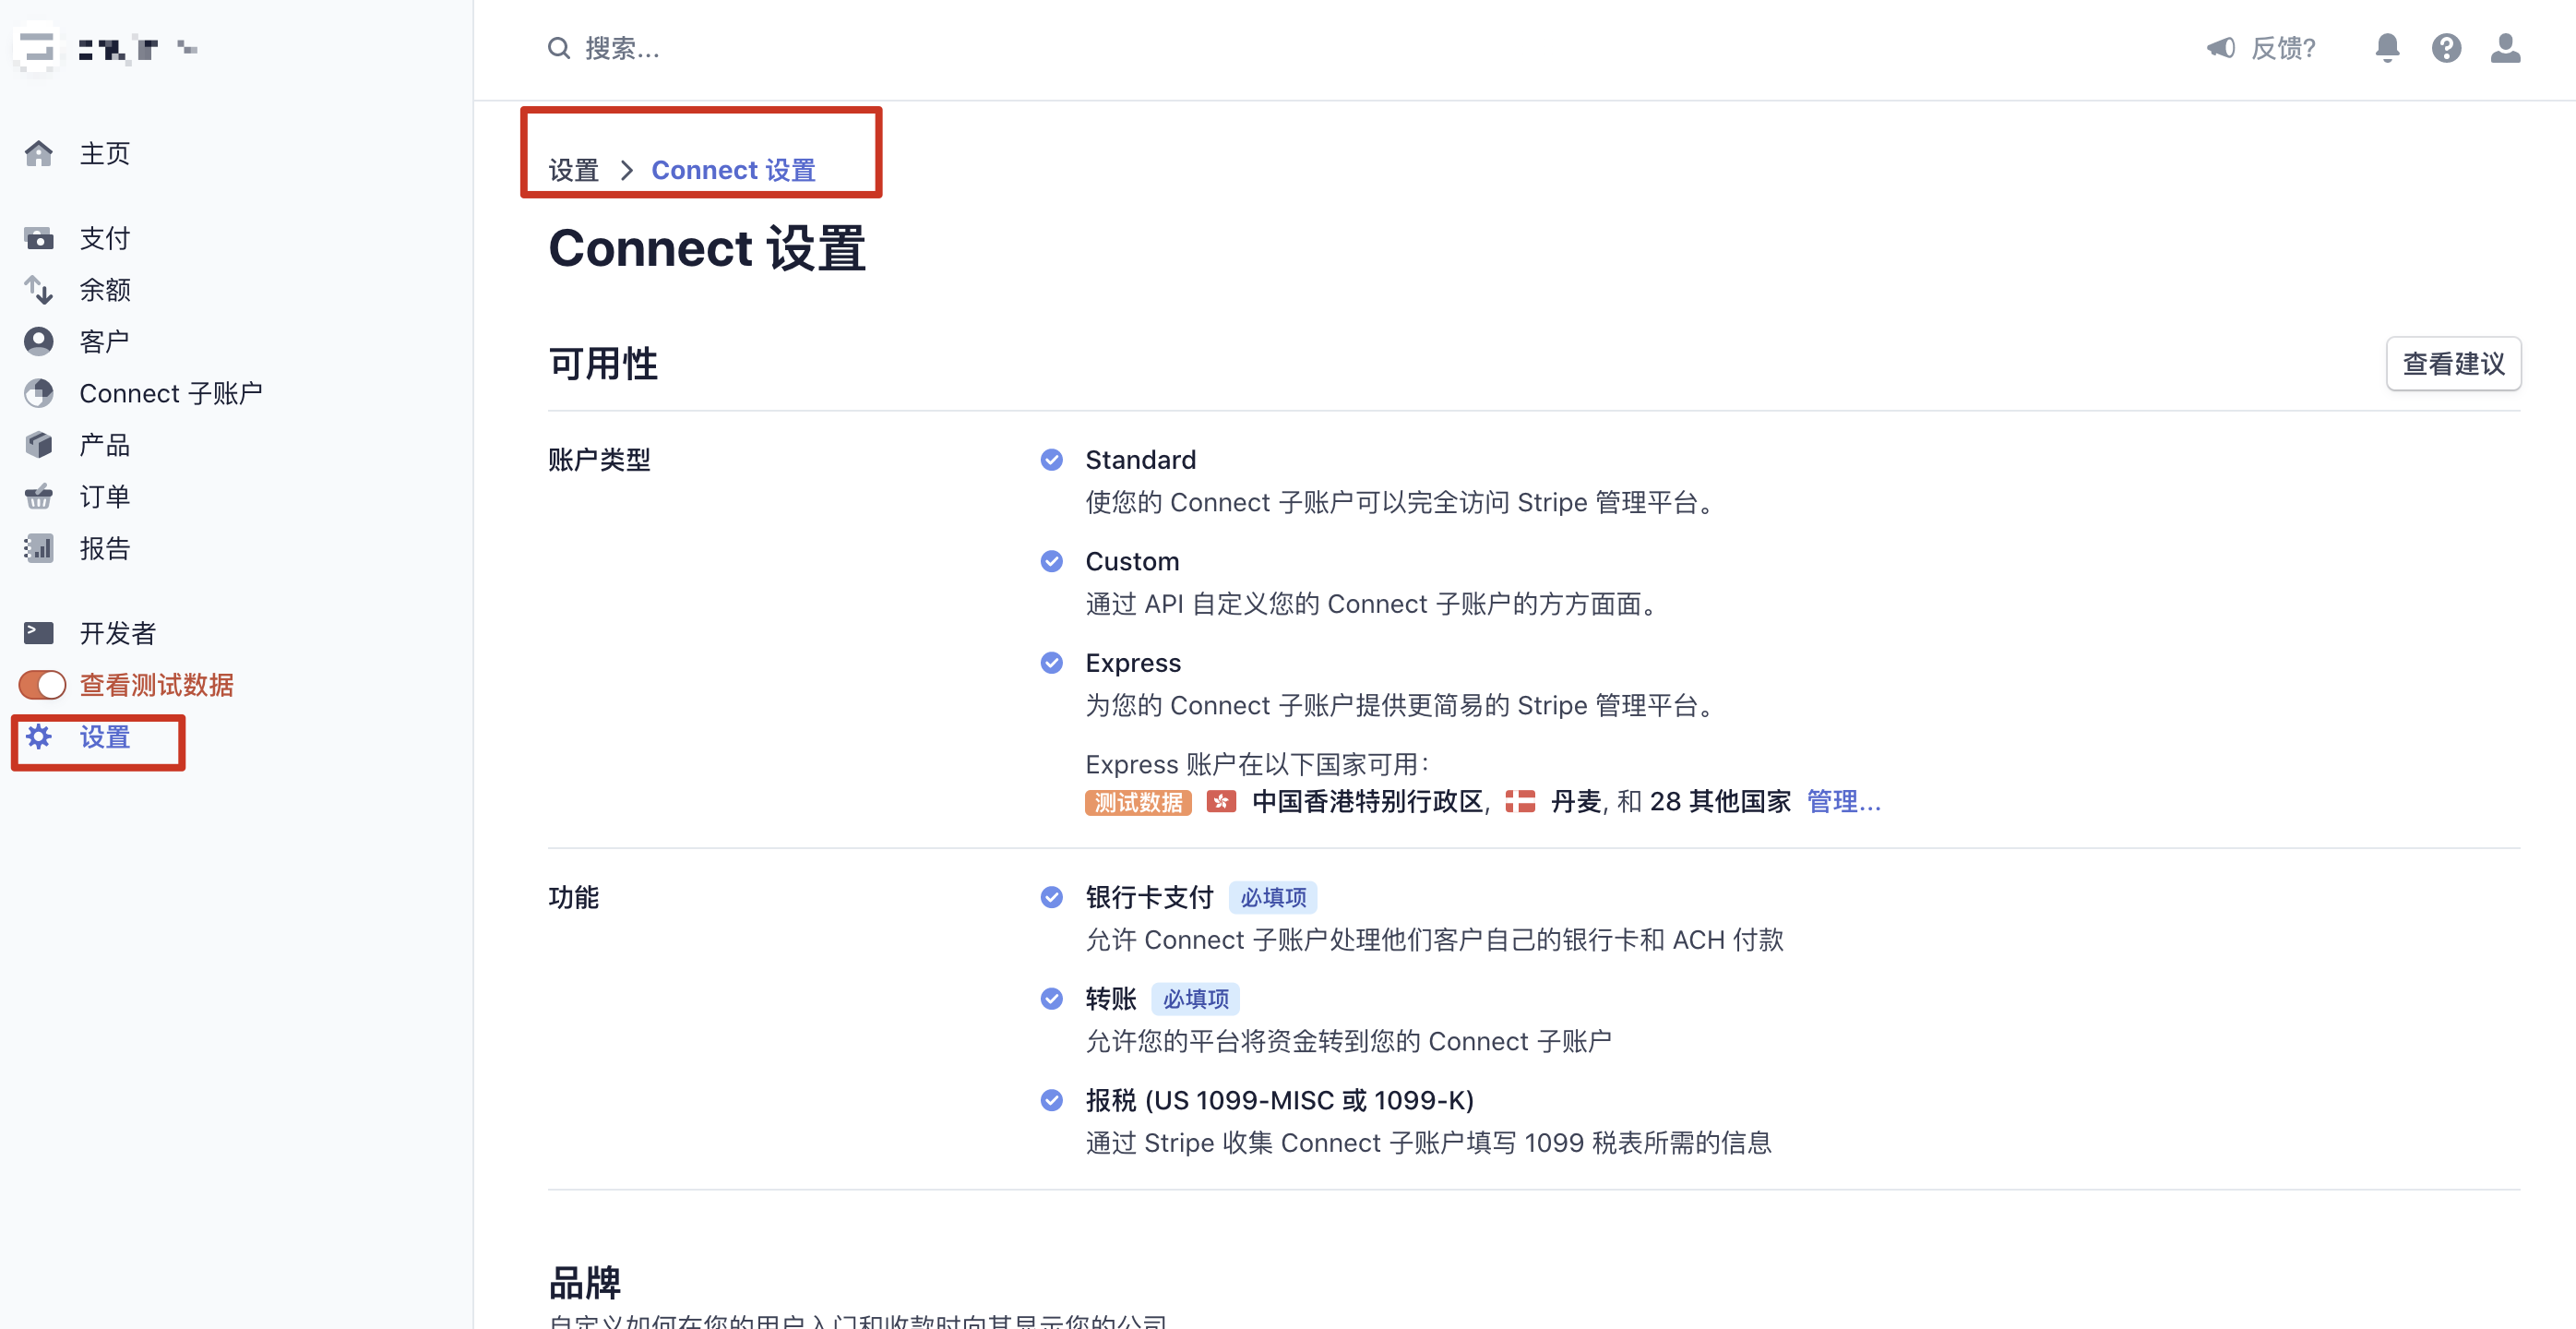
一、商户去到 Stripe 管理后台设置账号类型
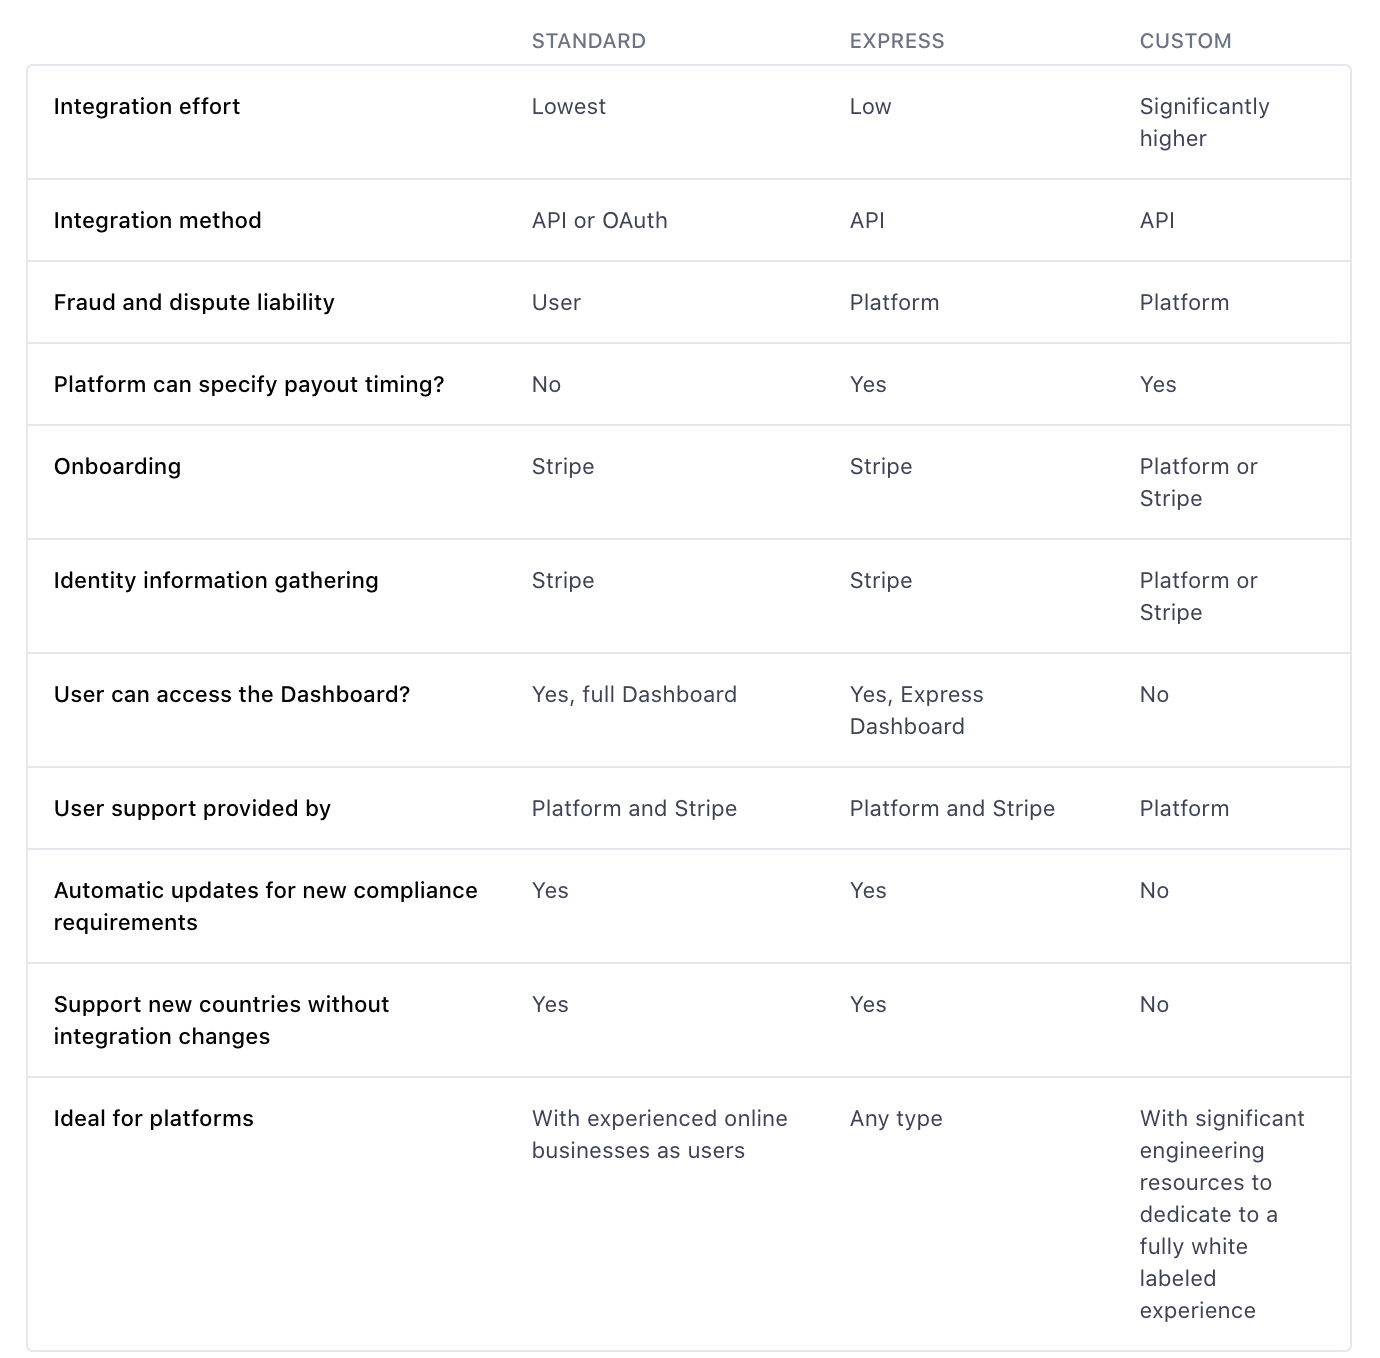
有三种类型:标准版、Express、Custom,不同的账号类型区别如下:


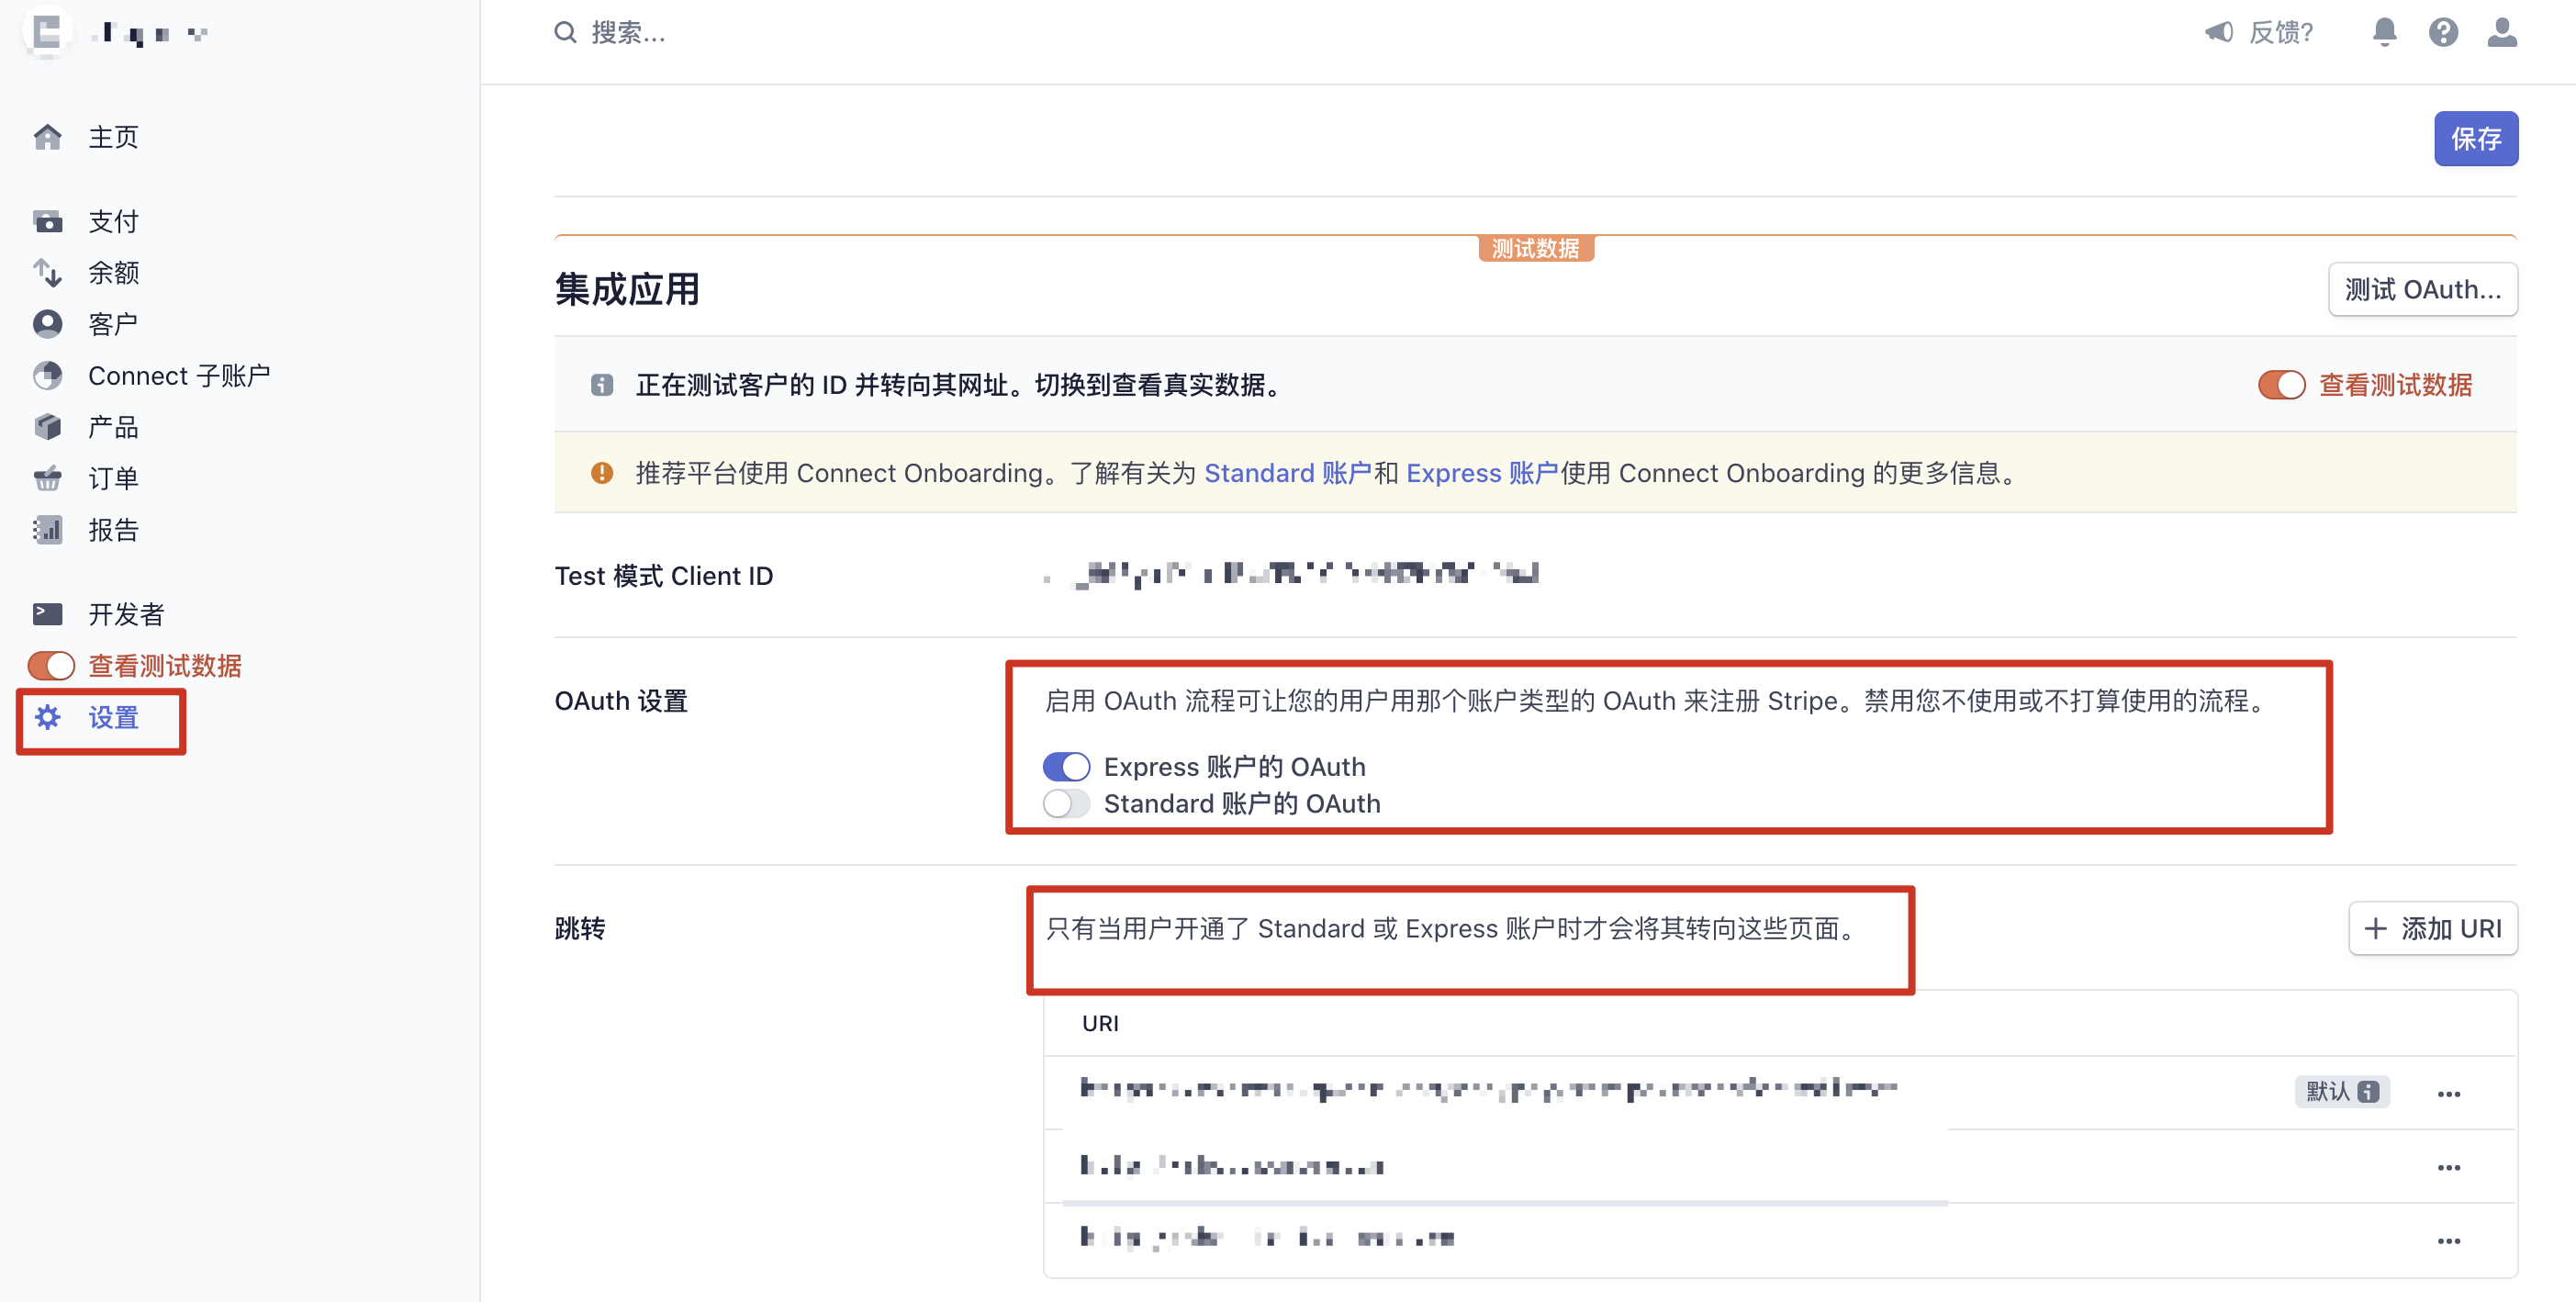
二、商户去到 Stripe 管理后台设置用户注册 Stripe 的 OAuth 账户类型和重定向地址

三、客户端向服务端发起提现请求
- 判断用户是否已经授权过,如果已经授权过,就已经存在 Stripe Account,直接将需要提现的金额上报给服务端,由服务端直接向该 Stripe 账户转账就行;
- 如果用户没有授权,用户需要走 OAuth 授权注册流程,弹出授权网页,让用户去注册 Stripe 账号,绑定自己需要提现的信用卡信息;
- 用户注册完成后会回调之前在 Stripe 管理后台配置的重定向地址,并携带回到参数 code 和 state;
- 客户端拿到重定向地址后面回调回来的参数 code 和 state,上报给服务端,服务端就能通过 code 查到刚才注册用户的 Stripe 账号信息,服务端向该用户转账,即用户完成提现;
// 1. 拼接授权 URl
// clientId 是商户在 Stripe 管理后台的唯一 id,和 redirectUri 一样都是在商户 Stripe 管理后台可以查到的
let authorizeURL = "https://connect.stripe.com/express/oauth/authorize" + "?" + "redirect_uri=\(redirectUri)&" + "client_id=\(clientId)&" + "state=\(state)&" + "stripe_user[business_type]=individual"


// 2. 根据WebView对于即将跳转的HTTP请求头信息和相关信息来决定是否跳转,获取用户注册授权完成回传的 code 和 state
func webView(_ webView: WKWebView, decidePolicyFor navigationAction: WKNavigationAction, decisionHandler: @escaping (WKNavigationActionPolicy) -> Void) {
    guard let urlString = navigationAction.request.url?.absoluteString,
        let redirectUrl = model?.redirectUri else {

        decisionHandler(WKNavigationActionPolicy.cancel)
        return
    }

    if urlString.hasPrefix(redirectUrl) {
        print("发生重定向请求:\(urlString)")

        // 截取出回调后面的参数 code,state
        guard let queryParames = navigationAction.request.url?.queryParameters else {
            decisionHandler(WKNavigationActionPolicy.cancel)
            return
        }

        let code = queryParames.filter{ $0.key == "code" }.first?.value ?? ""
        let state = queryParames.filter{ $0.key == "state" }.first?.value ?? ""

        decisionHandler(WKNavigationActionPolicy.cancel)
    } else {
        decisionHandler(WKNavigationActionPolicy.allow)
    }
}
Stripe 后台
支付记录,查看详细的支付信息
参考链接
- https://stripe.com/docs/apple-pay
- https://developer.apple.com/apple-pay/sandbox-testing/
- https://github.com/stripe/example-mobile-backend/tree/v18.1.0
- https://github.com/stripe/stripe-ios
- https://github.com/stripe-samples/accept-a-card-payment
- https://stripe.com/docs/connect/express-accounts