python:dlib在视频流中提取面部特征点
下载dlib库
这个库下载起来巨巨巨巨巨麻烦(当然不排除你运气比较好,一下子就成功了),具体下载方式请参考别的文章。
视频流中提取面部特征点
写在主循环之前:
import numpy as np
import cv2
import dlib

cap = cv2.VideoCapture(0)
detector = dlib.get_frontal_face_detector()  # 创建一个容器
predictor = dlib.shape_predictor('D:/shape_predictor_68_face_landmarks.dat')  # 加载一个自带的分类器
其中,shape_predictor_68_face_landmarks.dat文件是一个已经训练好的分类器,获取方式如下:
shape_predictor_68_face_landmarks.dat-Python文档类资源-CSDN下载
主循环:
while cap.isOpened():
    success, img = cap.read()
    if not success:
        print("camera frame is empty!")
        continue

    img_grey = cv2.cvtColor(img, cv2.COLOR_BGR2GRAY)  # 使图片转化为灰度图片
    person = detector(img_grey, 0)  # 返回信息
    for i in range(len(person)):
        landmarks = np.matrix([[p.x, p.y] for p in predictor(img_grey, person[i]).parts()])  # 获取点的坐标
        for idx, point in enumerate(landmarks):
            pos = (point[0, 0], point[0, 1])
            cv2.circle(img, pos, 2, (0, 0, 255), 2)  # 画圈圈,(255,0,0)是圈圈的颜色

    cv2.imshow("img", img)  # 展示
    if cv2.waitKey(10) & 0xFF == 27:
        break
cv2.destroyAllWindows()
cap.release()首先使用person = detector(img_grey, 0)得到一些信息,其实我们只需要知道,len(person)是表示视频中有多少个人;
predictor(img_grey, person[i]).parts()])表示预测第i个人的面部特征点,坐标存储在landmarks中;
最后使用enumerate函数得到每个点的坐标与其对应的序号,此函数用法参照,此处只使用到的每个点的坐标,没有用到序号,按道理,每个面部特征点对应的序号是固定的,共68个:
enumerate函数:Python_独憩的博客-CSDN博客
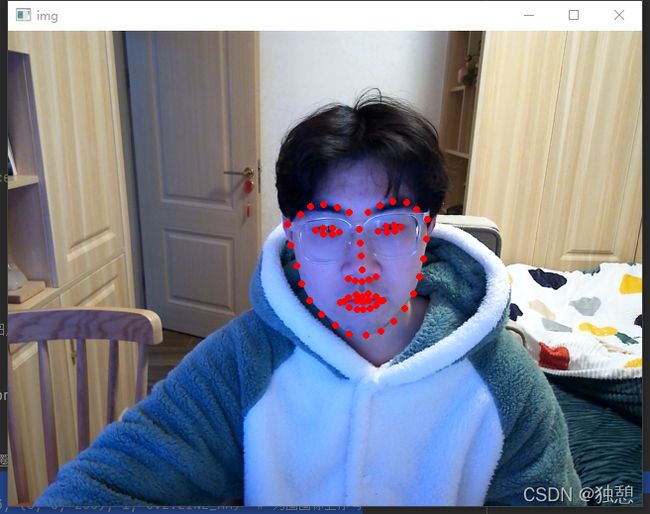
最后画出各个点就行。
结果:
全部代码:
import numpy as np
import cv2
import dlib


cap = cv2.VideoCapture(0)
detector = dlib.get_frontal_face_detector()  # 创建一个容器
predictor = dlib.shape_predictor('D:/shape_predictor_68_face_landmarks.dat')  # 加载一个自带的分类器
while cap.isOpened():
    success, img = cap.read()
    if not success:
        print("camera frame is empty!")
        continue

    img_grey = cv2.cvtColor(img, cv2.COLOR_BGR2GRAY)  # 使图片转化为灰度图片
    person = detector(img_grey, 0)  # 返回信息
    for i in range(len(person)):
        landmarks = np.matrix([[p.x, p.y] for p in predictor(img_grey, person[i]).parts()])  # 获取点的坐标
        for idx, point in enumerate(landmarks):
            pos = (point[0, 0], point[0, 1])
            cv2.circle(img, pos, 2, (0, 0, 255), 2)  # 画圈圈,(255,0,0)是圈圈的颜色
            # font = cv2.FONT_HERSHEY_SIMPLEX
            # cv2.putText(img, str(idx + 1), pos, font, 0.3, (0, 0, 255), 1, cv2.LINE_AA)  # 为圈圈标上序号
    cv2.imshow("img", img)  # 展示
    if cv2.waitKey(10) & 0xFF == 27:
        break
cv2.destroyAllWindows()
cap.release()
