基于四层神经网络的MNIST手写数字识别(GUI-tkinter)
假期学习机器学习,动手实现了一个手写数字识别程序,将一段时间的学习成果实践了一下。
程序效果演示在哔站暑假做的玩具级NN神经网络手写数字识别(源码附上)_哔哩哔哩_bilibili
这里把我的思路记录一下。
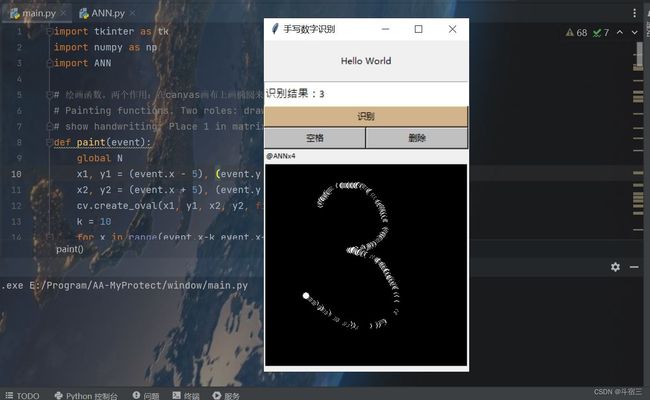
本项目主要分为两个程序:1.神经网络训练程序 2.将网络部署到GUI中的运行程序
目录
一、神经网络训练程序
1.神经网络类的定义
2.神经网络类实例化并训练
二、将神经网络部署到有GUI的程序中人机交互识别数字
1.定义神经网络类并提供接口
2.创建窗口并实现人机交互
三. 项目github地址
一、神经网络训练程序
1.神经网络类的定义
首先,我们需要构造一个神经网络类。这里用到了两个库numpy和scipy。包括三个函数:构造函数_init_ 、训练函数train 、查询函数query。类的基本结构如下:
import numpy as np
import scipy.special as spe

class NeuralNetwork:
    def __init__():
        pass

    def train():
        pass

    def query():
pass构造函数用于设定神经网络的基本数据信息。首先,传入各参数是四层各层的节点数、学习率,这是我们需要手动设定的变量。其次,还有对于三个权重向量的随机初始化。为避免过大的初始权重传递过强的信号给激活函数而使其饱和,最终使整个网络失去很好的学习能力(sigmoid函数在x过大时导数趋于0,无法很好的通过反向传播修改权重),这里使用numpy.random.normal,即采用正态分布采样。这里几个参数的意义是:以0.0为中心,方差为下一层节点数的平方根的倒数,最后一个参数是矩阵的形态。最后,调用scipy.special库,使用lambda匿名函数定义了我们的激活函数(采用了sigmoid函数)
    def __init__(self,inputnodes,hiddennodes_1,hiddennodes_2,outputnodes,learning_rate):
        # 设置节点数
        self.inodes = inputnodes
        self.hnodes_1 = hiddennodes_1
        self.hnodes_2 = hiddennodes_2
        self.onodes = outputnodes
        # 设置学习率
        self.lr  = learning_rate
        # 初始化权重
        self.w_ih = np.random.normal(0.0,pow(self.hnodes_1,-0.5),(self.hnodes_1,self.inodes))
        self.w_hh = np.random.normal(0.0,pow(self.hnodes_2,-0.5),(self.hnodes_2,self.hnodes_1))
        self.w_ho = np.random.normal(0.0,pow(self.onodes,-0.5),(self.onodes,self.hnodes_2))
        # 激活函数
        self.active_fun = lambda x: spe.expit(x)
pass查询函数的内部是正向传播。每一层的操作都是相同的:上一层传来的矩阵点乘当前层的权重矩阵,然后结果输入激活函数,最后得到输出矩阵再传递给下一层。拓展到n层也是这个规律进行下去的。
    def query(self,inputs_list):
        # 把输入转换成二维矩阵
        inputs = np.array(inputs_list,ndmin=2).T
        # 正向传播计算
        hidden_1_inputs = np.dot(self.w_ih,inputs)
        hidden_1_outputs = self.active_fun(hidden_1_inputs)

        hidden_2_inputs = np.dot(self.w_hh,hidden_1_outputs)
        hidden_2_outputs = self.active_fun(hidden_2_inputs)

        out_inputs = np.dot(self.w_ho,hidden_2_outputs)
        out_outputs = self.active_fun(out_inputs)
return out_outputs训练函数包括正向传播和反向传播更新权重两部分。正向传播基本与query函数是一直的,只是多了一个和target对照获得误差的部分(所以把查询函数的部分写在前面)。
反向传播先通过损失函数(就是targets - out_puts)得到误差的大小,根据权重分配误差,最终得到每一层的误差。然后对激活函数求导(这里是提前求好的sigmoid函数表达式),梯度下降,调整权重不断趋于误差更小的反向变化。
    def train(self,inputs_list,targets_list):
        # 把输入转换成二维矩阵
        inputs = np.array(inputs_list,ndmin=2).T
        targets = np.array(targets_list,ndmin=2).T

        # 正向传播计算
        hidden_1_inputs = np.dot(self.w_ih,inputs)
        hidden_1_outputs = self.active_fun(hidden_1_inputs)
        hidden_2_inputs = np.dot(self.w_hh,hidden_1_outputs)
        hidden_2_outputs = self.active_fun(hidden_2_inputs)
        out_inputs = np.dot(self.w_ho,hidden_2_outputs)
        out_outputs = self.active_fun(out_inputs)

        # 反向传播计算
        output_errors = targets - out_inputs
        hidden_2_errors = np.dot(self.w_ho.T,output_errors)
        hidden_1_errors = np.dot(self.w_hh.T,hidden_2_errors)
        # 更新权重
        self.w_ho += self.lr * np.dot((output_errors * out_outputs *(1.0-out_outputs)),np.transpose(hidden_2_outputs))
        self.w_hh += self.lr * np.dot((hidden_2_errors * hidden_2_outputs * (1.0-hidden_2_outputs)),np.transpose(hidden_1_outputs))
        self.w_ih += self.lr * np.dot((hidden_1_errors * hidden_1_outputs *(1.0-hidden_1_outputs)),np.transpose(inputs))
        pass
2.神经网络类实例化并训练
现在我们到了main.py文件中,import上面写的神经网络类的文件,实例化一个神经网络对象net,然后导入训练集和测试集,进行训练。
先定义了两个函数,用于保存效果最好的权重数据。
#先定义了两个读写权重数据的函数
import pickle

def save_w(w,name):
    f = open(name+'.pkl', 'wb')
    # 待写入数据
    datas = w
    # 写入
    data = pickle.dump(datas, f, -1)
    # 关闭文件
    f.close()
def load_w(name):
    f = open(name+'.pkl', 'rb')
    # 使用load的方法将数据从pkl文件中读取出来
    w = pickle.load(f)
    # 关闭文件
    f.close()
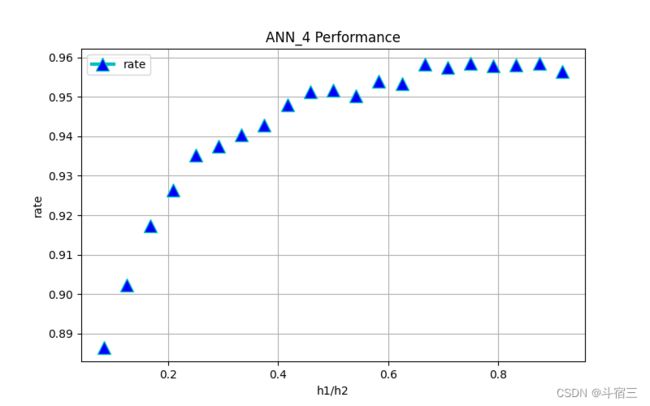
return w实例化网络。为了找到效果最好的隐藏节点数搭配,我设置hidden_nodes_1 + hidden_nodes+2的总节点数为120,多次循环,每次调整节点数的搭配,训练&测试三次取识别争取率的平均值。最终用matplotlib库画出了这个数据的折线图。横坐标是h1/h2。最终决定取前80后40的节点搭配。
import numpy as np
from ANN import NeuralNetwork as Net

input_nodes = 784
hidden_nodes_1 = 80
hidden_nodes_2 = 40
output_nodes = 10

# learning rate
learning_rate = 0.1

# create network
net = Net(input_nodes, hidden_nodes_1, hidden_nodes_2, output_nodes, learning_rate)
读入训练集并训练。这里用了两层循环:外层循环是训练世代,一个世代是把训练集跑一次;内层循环是读入数据、处理数据、调用net的train函数。这里加了两处输出语句来显示训练进度。
# load the mnist training data CSV file into a list
training_data_file = open("mnist_train.csv", 'r')
training_data_list = training_data_file.readlines()
training_data_file.close()

# train the network
epoch = 1  # 设置训练世代
i = 0
for e in range(epoch):
    for record in training_data_list:
        # 处理输入数据
        all_values = record.split(',')
        inputs = (np.asfarray(all_values[1:]) / 255.0 * 0.99) + 0.01
        # 创建target
        targets = np.zeros(output_nodes) + 0.01
        targets[int(all_values[0])] = 0.99
        net.train(inputs, targets)
        i+=1
        print("e{}-training {}".format(e + 1, i))
        pass
    pass
print("----train over----")
读入测试集并测试,并输出正确率。
# load the mnist test data CSV file into a list
test_data_file = open("mnist_test.csv", 'r')
test_data_list = test_data_file.readlines()
test_data_file.close()

# test the network
print(" ---Testing--- ")
scorecard = []
for record in test_data_list:
    all_values = record.split(',')
    correct_label = int(all_values[0])
    inputs = (np.asfarray(all_values[1:]) / 255.0 * 0.99) + 0.01
    outputs = net.query(inputs)
    label = np.argmax(outputs)

    if label == correct_label:
        scorecard.append(1)
    else:
        scorecard.append(0)
        pass
    pass

scorecard_array = np.asarray(scorecard)
rate = scorecard_array.sum() / scorecard_array.size
print("正确率为:", rate)
最终取最高成绩,保存权重数据。涉及四个文件:MaxRate.txt存历史最高分,w_ih w_hh w_ho三个是.pkl文件,用于保存对应的权重参数。
try:
    f = open("MaxRate.txt", "r")
    max_rate = float(f.read())
    f.close()
except:
    max_rate = 0.0

if max_rate < rate:
    f = open("MaxRate.txt", "w")
    f.write(str(rate))
    save_w(net.w_ih, "w_ih")
    save_w(net.w_hh, "w_hh")
    save_w(net.w_ho, "w_ho")
    print("max_rate saved\n")
最后是一个简单的发声语句块,我把它放在程序最后,当程序跑完的时候发出提示音,这样就可以在跑数据的时候放心的把程序放到后台。
# 程序跑完提示音
import winsound
duration = 1000 # milliseconds
freq = 440 # Hz
winsound.Beep(freq, duration)
二、将神经网络部署到有GUI的程序中人机交互识别数字
本程序依然是分为两个文件,ANN.py和main.py,一个是定义的神经网络类,并定义了几个函数作为访问的接口;另一个就是main.py利用tkinter创建窗口并实现人机交互的功能。
1.定义神经网络类并提供接口
第一部分与上一个程序定义的神经网络类基本一致,去掉了train函数,因为这个实际部署的程序是运用训练好的参数数据直接实现识别的功能。
# 神经网络类的定义
# neural Network class definition
import numpy as np
import scipy.special as spe  #用于设置激活函数 / using to set the activation function
import pickle                #用于读取权重文件 / using to read the weights file

class NeuralNetwork:
    #构造函数
    #Constructor
    def __init__(self,inputnodes,hiddennodes_1,hiddennodes_2,outputnodes,learning_rate,w_ih,w_hh,w_ho):
        # 设置节点数 / set nodes numbers
        self.inodes = inputnodes
        self.hnodes_1 = hiddennodes_1
        self.hnodes_2 = hiddennodes_2
        self.onodes = outputnodes
        # 设置学习率 / set learning rate
        self.lr  = learning_rate
        # 初始化权重 / set weights
        self.w_ih = w_ih
        self.w_hh = w_hh
        self.w_ho = w_ho
        # 激活函数 / set the activation function
        self.active_fun = lambda x: spe.expit(x)
        self.inverse_activation_function = lambda x: spe.logit(x)
        pass

    #查询函数。传入输入变量,输出识别结果
    #Query functions. input variables and outputs are recognition results
    def query(self,inputs_list):
        # 把输入转换成二维矩阵 / Converts the input to a two-dimensional matrix
        inputs = np.array(inputs_list,ndmin=2).T
        # 正向传播计算 / Forward propagation calculations
        hidden_1_inputs = np.dot(self.w_ih, inputs)
        hidden_1_outputs = self.active_fun(hidden_1_inputs)
        hidden_2_inputs = np.dot(self.w_hh, hidden_1_outputs)
        hidden_2_outputs = self.active_fun(hidden_2_inputs)
        out_inputs = np.dot(self.w_ho, hidden_2_outputs)
        out_outputs = self.active_fun(out_inputs)
        return out_outputs
第二部分是定义了几个函数供我们在main.py中访问调用神经网络。
首先我们需要一个函数读取权重文件,初始化神经网络并返回一个神经网络对象。
# 读取权重文件
# read weights file
def load_w(name):
    f = open(name+'.pkl', 'rb')
    # 使用load的方法将数据从pkl文件中读取出来
    w = pickle.load(f)
    # 关闭文件
    f.close()
    return w

# 初始化神经网络
# initialize a nerwork
def InitializeANN():
    # number of inputnodes,hiddennodes_1,hiddennodes_2outputnodes
    input_nodes = 784
    hidden_nodes_1 = 80
    hidden_nodes_2 = 40
    output_nodes = 10
    # learning rate
    learning_rate = 0.1
    # 读取各层的权重矩阵
    # load Weights from file
    w_ih = load_w("w_ih")
    w_hh = load_w("w_hh")
    w_ho = load_w("w_ho")
    # 生成神经网络实例
    # create network
    net = NeuralNetwork(input_nodes, hidden_nodes_1,hidden_nodes_2, output_nodes, learning_rate, w_ih,w_hh,w_ho)
    return net
然后需要定义一个函数,接受手写板传来的数据,调用神经网络的查询函数,返回识别结果。注意手写板的大小是280*280,所以传入的矩阵N的大小也是280*280,而我们神经网络接收的输入是28*28,这是就需要缩小图像信息。这里采用的是将280*280矩阵划分成多个10*10的小方格,对每个小方格取平均值,这样得到的小方格就组成了28*28的矩阵。
# 识别函数
# recognise function
def Recognize(N,net):
    # 输入的矩阵N是一个280x280的大矩阵,这里将其划分为100个28x28的区域,对每个区域求平均值,实现缩小图像以匹配神经网络
    # The input matrix N is a large matrix of 280x280. So I divide it into 100 28x28 regions,
    # averaging each region to achieve a zoomed-out image to match the neural network
    N_image = np.zeros((28, 28))
    for i in range(0, 280, 10):
        for j in range(0, 280, 10):
            x, y = i, j
            sum = 0
            for k in range(x, x + 10):
                for l in range(y, y + 10):
                    sum = sum + N[k, l]
            x_, y_ = int(i / 10), int(j / 10)
            N_image[x_, y_] = (sum / 100)
    # 将N_image转化为行向量
    # Converts N_image to row vectors
    N_image = np.reshape(N_image,(1,784))
    # 调用神经网络,返回识别结果
    # The neural network is invoked to return the recognition result
    outputs = net.query(N_image)
    result = np.argmax(outputs)
    return result
以上就是神经网络类ANN.py文件的全部。
2.创建窗口并实现人机交互
用tkinter很简单的实现了一个简单的GUI界面,基本思路和Qt差不多但简单很多。下面是分部分的代码实现。
首先是导入的三个库,然后做一些初始化。
import tkinter as tk
import numpy as np
import ANN

# 创建矩阵N来存储手写图形的数据。空白为0,有图像置0.99
# Create a matrix N to store the data for the
# handwritten graph. The blank is 0, and the image is set to 0.99
N = np.zeros((280,280))
result = -1
# 初始化神经网络
# Initialize the neural network
net = ANN.InitializeANN()
1.创建一个主窗口,作为其他所有控件的父窗口。
# 创建窗口
# Build the main window
root = tk.Tk()
root.geometry("285x460+700+100")
root.title("手写数字识别")
2.创建Label标签控件,可以显示文本,这里也用来界面留空白(因为用了grid表格布局,没有控件的表格大小就是0,会使许多控件挤在一起)。
# 创建标签1
label_1 = tk.Label(root,text="Hello World",height=3)
label_1.grid(row=0,column=0,columnspan=2,sticky="EW")

# 创建标签2
label_2 = tk.Label(root,text="@ANNx4",font=("Calibri",8),height=1)
label_2.grid(row=4,column=0,columnspan=2,sticky="W")
3.创建canvas画布,用于做手写板。设置画布大小280*280,背景颜色为黑色。用bind方法关联鼠标左键按下事件和自定义的paint函数。
# 创建画布
# Build the canvas
cv = tk.Canvas(root, width=280, height=280,bg="black")
cv.grid(row=5,column=0,columnspan=2)
cv.bind("", paint)
下面是paint函数。我们的思路是在画布上鼠标点击的地方画点、在矩阵对应的位置置“1”来记录笔记。tkinter的canva画布没有画点的命令,所以用画椭圆的代替。最终,画布上由小椭圆显示了笔记,而图形信息存储在矩阵N中。
# 绘画函数。两个作用:在canvas画布上画椭圆来显示笔迹;在矩阵N中置1来保存图片数据
# Painting functions. Two roles: draw an ellipse on the canvas to
# show handwriting; Place 1 in matrix N to save the picture data
def paint(event):
    global N
    x1, y1 = (event.x - 5), (event.y - 5)
    x2, y2 = (event.x + 5), (event.y + 5)
    cv.create_oval(x1, y1, x2, y2, fill="white")
    k = 10
    for x in range(event.x-k,event.x+k):
        for y in range(event.y-k,event.y+k):
            if 0<=x and x<280 and y<280 and 0
4.我使用了Entry控件来显示识别结果的信息。因为str类型不能直接在Entry中使用,所以这里先声明了一个StringVar类型的变量,这是tkinter中用于存储文本的数据类型。使用txt.set(str())来设置StringVar的内容。
# 创建Entry控件,用于输出识别结果
# Build an Entry control that outputs recognition results
txt = tk.StringVar()
txt.set("识别结果:")
output= tk.Entry(root,textvariable=txt,font=("Calibri",11))
output.grid(row=1,column=0,columnspan=2,sticky="EW",ipady=6)
5.然后我们需要几个按钮。方法和上面的label、canva一样。Button的构造函数中command参数传递一个函数,用来将点击按钮与自定义的函数关联。
# 创建按钮
# Bulid Buttons
b_recgonize = tk.Button(root,text="识别",command=Recgonize,bg="#D2B48C")
b_recgonize.grid(row=2,column=0,columnspan=2,sticky="EW")

b_blank = tk.Button(root,text="空格",command=Blank,bg="#C0C0C0")
b_blank.grid(row=3,column=0,sticky="EW")

b_delete = tk.Button(root,text="删除",command=Delete,bg="#C0C0C0")
b_delete.grid(row=3,column=1,sticky="EW")
我们定义了识别、空格、删除三个按钮,下面是实现他们功能的函数:
识别函数调用神经网络对象的识别函数,并把结果输出到Entry控件中。需要注意的是,每次识别之后要刷新画布和图片矩阵。每次识别先把Entry中的文本txt用get函数读出来,然后把结果result追加到其后,再用set更新显示文本。这样就可以实现连续的输入。
# 识别函数。将矩阵N传入net得到识别结果,并更新结果到Entry控件。最后刷新笔迹
# Identify function. Pass the matrix N into net to get the
# recognition result and update the result to the Entry control.
# Finally refresh the Canva and matrix N
def Recgonize():
    global N
    global net
    global result
    global txt
    # 如果N为空矩阵,则输出空格/If N is an empty matrix, a space is output
    if N.sum()==0:
        result=" "
    else:
        result = ANN.Recognize(N,net)
    N = np.zeros((280,280))  # 重新初始化数组N
    cv.delete(tk.ALL) #清空画布上所有元素
    s = txt.get()     #先读取Entry控件的文本,然后在尾部追加最新结果
    s += str(result)
    txt.set(s)
    print(s)
空格和删除的原理与上面对txt的操作类似,都是先get得到字符串,对字符串进行操作,再set更新。
# 空格按钮的对应函数
# The corresponding function of the space button
def Blank():
    global txt
    s = txt.get()
    s += " "
    txt.set(s)
# 删除按钮的对应函数
# Deletes the corresponding function of the button
def Delete():
    global txt
    s = txt.get()
    new_s = s[:-1]
    txt.set(str(new_s))
main.py完整代码如下:
import tkinter as tk
import numpy as np
import ANN

# 绘画函数。两个作用:在canvas画布上画椭圆来显示笔迹;在矩阵N中置1来保存图片数据
# Painting functions. Two roles: draw an ellipse on the canvas to
# show handwriting; Place 1 in matrix N to save the picture data
def paint(event):
    global N
    x1, y1 = (event.x - 5), (event.y - 5)
    x2, y2 = (event.x + 5), (event.y + 5)
    cv.create_oval(x1, y1, x2, y2, fill="white")
    k = 10
    for x in range(event.x-k,event.x+k):
        for y in range(event.y-k,event.y+k):
            if 0<=x and x<280 and y<280 and 0", paint)

root.mainloop()

# 这个是调用反向查询的语句。将前面窗口部分代码全部注释掉即可使用
# This is the statement that calls the BackQuery method.
# Comment out all the code in the previous window and use it

#ANN.showBackQuery(net,9)
三.项目github地址
https://github.com/Eurekasky/MNIST-Handwritten-digit-recognition.git
包括以上所有代码和训练好的权重数据。
欢迎指正和交流。
提前感谢您的点赞、star!


