一、概念
CoreAnimation框架是基于OpenGL(ios13开始为metal)与CoreGraphics图像处理框架的一个跨平台的框架,在CoreAnimation中大部分的动画都是通过Layer层来实现的,通过CALayer,我们可以组织复杂的层级结构。在CoreAnimation中,大多数的动画效果是添加在图层属性的变化上,例如改变图层的位置、大小、颜色、圆角半径等。Layer层并不决定视图的展现,它只是存储了视图的几何属性状态。
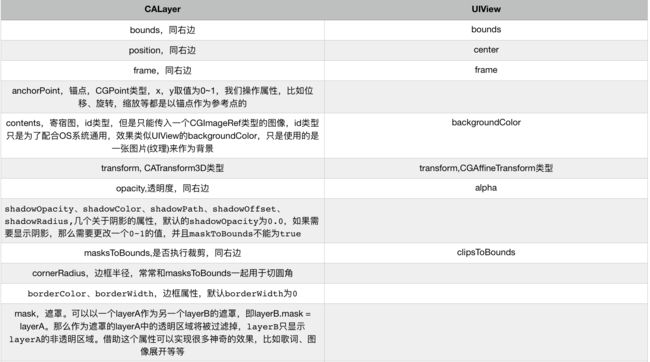
二.CALayer与UIView
CALayer:继承于NSObject,所以不具备响应,负责绘制、渲染图形
UIView : 继承于UIResponder,所以可以进行事件响应,属性CALayer负责图形绘制与渲染
三.CoreAnimation类结构
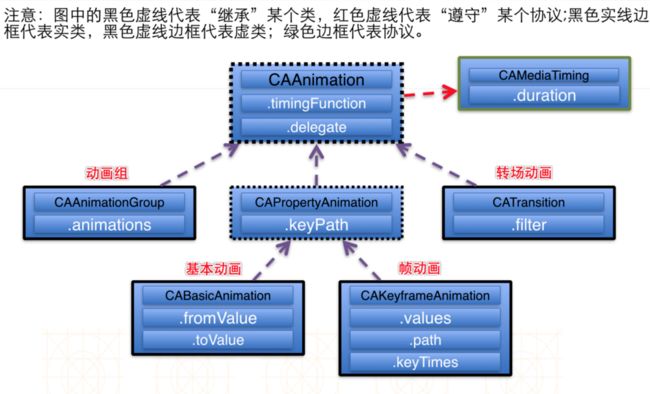
四、CAAnimation
动画的父类(抽象类,虚类),拥有timingFunction属性,并且直接遵守CAMediaTiming协议与CAAction协议
1.timingFunction
动画的节奏,即动画的快慢交替,有以下几个选项:
- kCAMediaTimingFunctionLinear//线性节奏,就是匀速
- kCAMediaTimingFunctionEaseIn//淡入,缓慢加速进入,然后匀速
- kCAMediaTimingFunctionEaseOut//淡出,匀速,然后缓慢减速移除
- kCAMediaTimingFunctionEaseInEaseOut//淡入淡出,结合以上两者
- kCAMediaTimingFunctionDefault//默认效果
timeFunction在swift中被定义为类型属性,如下所示
public struct CAMediaTimingFunctionName : Hashable, Equatable, RawRepresentable {
    public init(rawValue: String)
}
extension CAMediaTimingFunctionName {
    /** Timing function names. **/
    @available(iOS 2.0, *)
    public static let linear: CAMediaTimingFunctionName
    @available(iOS 2.0, *)
    public static let easeIn: CAMediaTimingFunctionName
    @available(iOS 2.0, *)
    public static let easeOut: CAMediaTimingFunctionName
    @available(iOS 2.0, *)
    public static let easeInEaseOut: CAMediaTimingFunctionName
    @available(iOS 3.0, *)
    public static let `default`: CAMediaTimingFunctionName
}
OC方法设置timeFunction:
CAAnimation *ani = [CAAnimation animation];
    ani.timingFunction = [CAMediaTimingFunction functionWithName:kCAMediaTimingFunctionLinear];
swift设置timeFunction:
let animation = CAAnimation()
        animation.timingFunction = CAMediaTimingFunction(name: .linear)
2.delegate:CAAnimationDelegate
有以下两个方法:
optional func animationDidStart(_ anim: CAAnimation)

optional func animationDidStop(_ anim: CAAnimation, finished flag: Bool)
前者为动画的开始,后者为动画的结束
在动画结束代理animationDidStop中,有一个flag,为true表示动画正常完成,为false的话表示没有播放完成或被移除
3.isRemovedOnCompletion(OC中为removedOnCompletion)
isRemovedOnCompletion(OC中为removedOnCompletion) 是否在播放完成后移除,默认为true.有的时候我们希望动画播放完成,但是保留最终的播放效果时,这个属性一定要改为false,否则无效。
4.CAMediaTiming协议:一个处理时间的协议
public protocol CAMediaTiming {

    var beginTime: CFTimeInterval { get set }

    var duration: CFTimeInterval { get set }

    var speed: Float { get set }

    var timeOffset: CFTimeInterval { get set }

    var repeatCount: Float { get set }

    var repeatDuration: CFTimeInterval { get set }

    var autoreverses: Bool { get set }

    var fillMode: CAMediaTimingFillMode { get set }
}
CAMediaTiming协议中的时间处理都是基于父对象,由于CALayer与CAAnimation都遵守了CAMediaTiming协议,所以他们都可能是CAMediaTiming协议中属性的父对象,如果是将动画设置到动画组(CAAnimationGroup)中,那么父对象是CAAnimation,可以直接使用Double类型值进行赋值,如 animation.beginTime = 1.0;如果是将动画直接添加到一个CALayer上,那么父对象是layer,这个layer的时间线很可能是一个过去的时间。即使你添加上时间得到的仍旧是一个过去的时间。那么这个时候我们的动画就会显示在动画结束时的状态。为了避免这种状况,我们要修正我们的时间。代码如下:
let time = layer.convertTime(CACurrentMediaTime(), from: nil)
animation.beginTime = time + 1.0
CACurrentMediaTime()是马赫时间,是全局时间,也就是设备距离上次开机的时间。
convertTime是获取本地时间。该方法有两个参数,第一个是时间,第二个是时间所对应的图层。当第二个参数为nil时,则返回的就是第一个参数的值。这样我们就能得到一个绝对时间。
下面是对CAMediaTiming协议各属性的详细解释:
-
beginTime: 动画开始时间,更确切应该为滞后时间,就是当动画添加到layer中滞后多久开始播放, 默认为0.0 -
duration: 动画时长 默认为0.0 -
speed: 动画速度,默认为1.0。它是当前对象的时间流速。简单来说,如果speed是2,duration是3,那么经过1.5秒,我的动画已经播放完成了。s = v * t,s就相当于已经播放的动画,也就是长度为3个单位的动画,v相当于每秒播放多少动画,即每秒播放两个单位的动画,所以1.5秒后动画其实就播放完成了。注意:CALayer也有个speed的属性,如果layer的speed设置为2,那么所有在这个layer上的动画都将提速至两倍,如果既设置layer的speed,又设置了animation的speed,那么速度为两个值相乘。 -
timeOffset: 表示将从动画的第几秒开始播放。比如一个duration = 3的动画,timeOffset = 2,那么此时我的动画从第二秒开始播放,播放到第三秒动画结束的状态后,立即变为动画的初始状态,也就是第0秒的播放状态,继续播放至第二秒的状态,然后动画结束。形象的说就好像你绕操场跑圈,以前你都是从起点开始跑跑一圈;这回你从一半开始跑,但是同样跑一圈,过了起点就还要再跑半圈,就是这样。 -
repeatCount:重复的次数。不停重复设置为 HUGE_VALF -
repeatDuration: 设置动画重复的时间。在该时间内动画一直执行,不计次数。 -
autoreverses: 动画结束时是否执行逆动画,默认为false -
fillMode:播放结束后的状态,它有四个枚举值:
extension CAMediaTimingFillMode {

    @available(iOS 2.0, *)
    public static let forwards: CAMediaTimingFillMode

    @available(iOS 2.0, *)
    public static let backwards: CAMediaTimingFillMode

    @available(iOS 2.0, *)
    public static let both: CAMediaTimingFillMode

    @available(iOS 2.0, *)
    public static let removed: CAMediaTimingFillMode
}
(1). kCAFillModeForwards(swift中为CAMediaTimingFillMode.forwards):保持结束时状态,需要保持结束时的状态,需要将removedOnCompletion的设置为false,removedOnCompletion的为true,即动画完成后移除
(2). kCAFillModeBackwards(swift中为CAMediaTimingFillMode.backwards):保持开始时状态,设置为该值,将会立即执行动画的第一帧,不论是否设置了 beginTime属性。
(3). kCAFillModeBoth(swift中为CAMediaTimingFillMode.both):保持两者,实际使用中与kCAFillModeBackwards相同
(4). kCAFillModeRemoved(swift中为CAMediaTimingFillMode.removed):移除,默认为这个值,动画将在设置的 beginTime 开始执行(如没有设置beginTime属性,则动画立即执行),动画执行完成后将会layer的改变恢复原状。
五、CAPropertyAnimation(属性动画)
CAPropertyAnimation,属性动画,它继承于CAAnimation,也是一个抽象类,实现实际的动画是运用它的两个子类CABasicAnimation与CAKeyframeAnimation
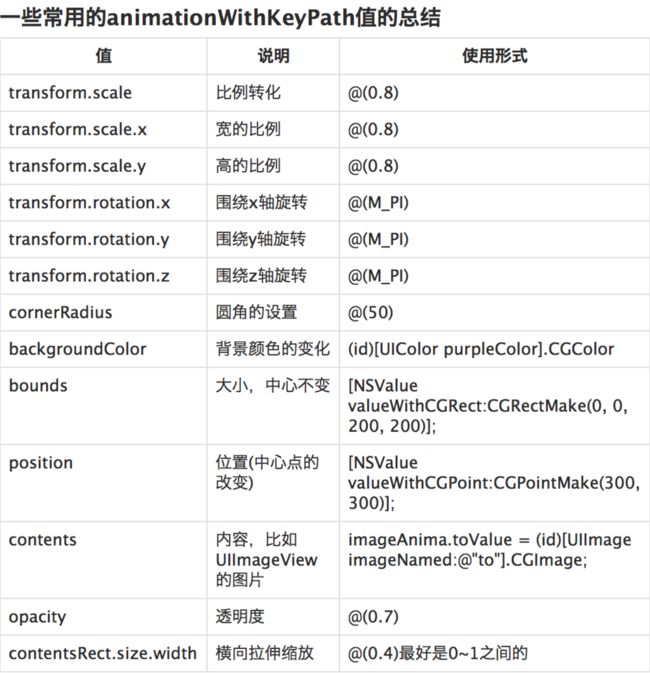
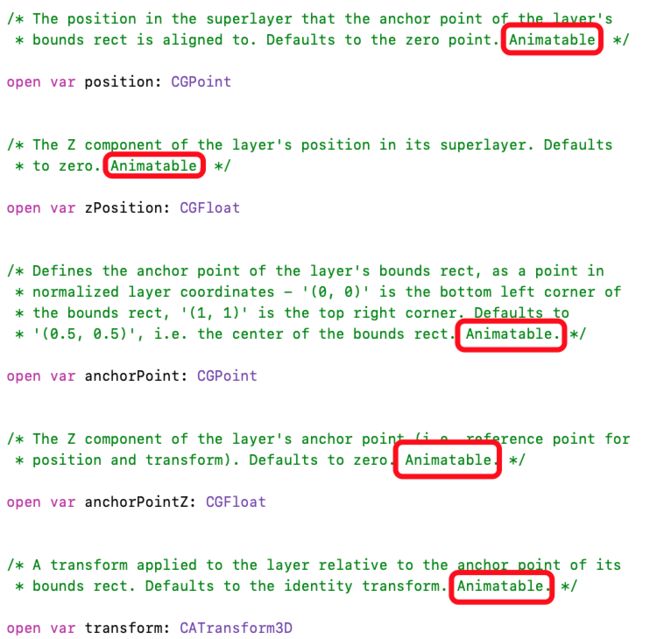
想知道CALayer的属性是否可以用于keyPath,一个很简单的办法是看Apple的注释,只要在注释最后写有Animatable的,都可以用于作动画,如图所示
六、CABasicAnimation(基础动画)
CABasicAnimation用来创建基于两个状态的动画,你只需要给出两个状态,一个初始状态一个终止状态,系统自动为你将中间的动画补全。主要用于缩放、平移和旋转等简单动画。
open class CABasicAnimation : CAPropertyAnimation {

    open var fromValue: Any?

    open var toValue: Any?

    open var byValue: Any?
}
属性:
fromValue : 动画的初始状态
toValue : 动画的结束状态
byValue : 动画状态的增量
有如下几种情况:
fromValue和toValue不为nil,keyPath属性值在fromValue与toValue之间渐变
fromValue和byValue不为nil,keyPath属性值在fromValue与(fromValue+byValue)之间渐变
byValue和toValue不为nil,keyPath属性值在(toValue-byValue)与toValue之间渐变
fromValue不为nil,keyPath属性值在fromValue与图层对应当前值之间渐变
toValue不为nil,keyPath属性值在图层对应当前值与toValue之间渐变
byValue不为nil,keyPath属性值在图层对应当前值与(图层对应当前值+byValue)之间渐变
注意:value的值可以设置为CATransform3D的对象,实现3D动画效果!
以下是一个简单的位移动画的代码:
let redView = UIView(frame: CGRect(x: 0, y: 0, width: 100, height: 100))
redView.backgroundColor = .red
view.addSubview(redView)

let animation = CABasicAnimation(keyPath: "position")
animation.isRemovedOnCompletion = false
animation.fillMode = CAMediaTimingFillMode.forwards
animation.autoreverses = true
animation.repeatCount = HUGE//OC使用MAXFLOAT 或者HUGE_VALF
animation.duration = 5
animation.fromValue = CGPoint(x: 50, y: 50)//可以使用NSValue封装,也可以不用
animation.toValue = view.center//可以使用NSValue封装,也可以不用
//add(:,forKey:)函数对动画进行了一次copy,然后把copy的这份添加在了图层上
redView.layer.add(animation, forKey: "translate")
//此处再设置延迟时间,因为之前存在layer上的animation为copy的,所以无效
animation.beginTime = CACurrentMediaTime() + 1
旋转动画:
let redView = UIView(frame: CGRect(x: 0, y: 0, width: 100, height: 100))
redView.backgroundColor = .red
redView.center = view.center
view.addSubview(redView)

//默认围绕z轴旋转,也可指定绕某个轴旋转:transform.rotation.y(围绕y轴旋转)
let animation = CABasicAnimation(keyPath: "transform.rotation")
animation.isRemovedOnCompletion = false
animation.fillMode = CAMediaTimingFillMode.forwards
animation.autoreverses = true
animation.repeatCount = HUGE//OC使用MAXFLOAT 或者HUGE_VALF
animation.duration = 5
animation.fromValue = 0
animation.toValue = Double.pi * 2.0
//add(:,forKey:)函数对动画进行了一次copy,然后把copy的这份添加在了图层上
redView.layer.add(animation, forKey: "rotation")
//此处再设置延迟时间,因为之前存在layer上的animation为copy的,所以无效
animation.beginTime = CACurrentMediaTime() + 1
缩放动画:
let redView = UIView(frame: CGRect(x: 0, y: 0, width: 100, height: 100))
redView.backgroundColor = .red
redView.center = view.center
view.addSubview(redView)

//这样设置表示x,y,z三个方向进行缩放,也可指定只缩放某个轴的方向,如transform.scale.x(缩放x轴方向的值)
let animation = CABasicAnimation(keyPath: "transform.scale")
animation.isRemovedOnCompletion = false
animation.fillMode = CAMediaTimingFillMode.forwards
animation.autoreverses = true
animation.repeatCount = HUGE//OC使用MAXFLOAT 或者HUGE_VALF
animation.duration = 3
//仅仅设置了fromValue,动画将在fromValue与图层当前值之间渐变
animation.fromValue = 0.2
//add(:,forKey:)函数对动画进行了一次copy,然后把copy的这份添加在了图层上
redView.layer.add(animation, forKey: "scale")
//此处再设置延迟时间,因为之前存在layer上的animation为copy的,所以无效
animation.beginTime = CACurrentMediaTime() + 1
transform动画:
let redView = UIView(frame: CGRect(x: 0, y: 0, width: 200, height: 200))

redView.backgroundColor = .red

redView.center = view.center

view.addSubview(redView)


//transform动画

let animation = CABasicAnimation(keyPath: "transform")

animation.isRemovedOnCompletion = false

animation.fillMode = CAMediaTimingFillMode.forwards

animation.autoreverses = true

animation.repeatCount = HUGE//OC使用MAXFLOAT 或者HUGE_VALF

animation.duration = 5

var transform = CATransform3DMakeRotation(CGFloat(Double.pi), 1, 0, 0)

//给一个透视效果,让效果更清晰
transform.m34 = -1.0/600.0

//只设置了byValue,动画将在当前状态和当前状态+byValue之间渐变
animation.byValue = transform

//add(:,forKey:)函数对动画进行了一次copy,然后把copy的这份添加在了图层上
redView.layer.add(animation, forKey: "rotation")

//此处再设置延迟时间,因为之前存在layer上的animation为copy的,所以无效
animation.beginTime = CACurrentMediaTime() + 1
七、CAKeyframeAnimation(关键帧动画)
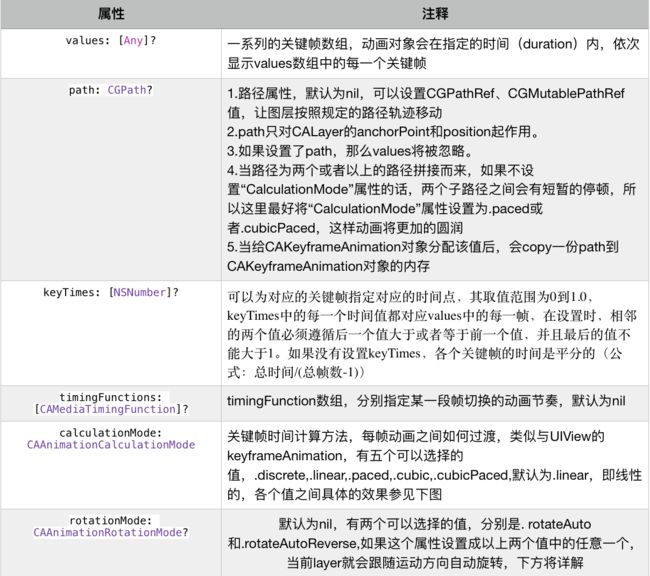

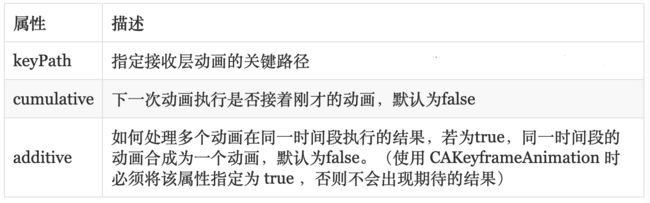
.linear为默认值,表示当关键帧为座标点的时候,关键帧之间直接直线相连进行插值计算;.discrete离散的,就是不进行插值计算,所有关键帧直接逐个进行显示;.paced使得动画均匀进行,而不是按keyTimes设置的或者按关键帧平分时间,此时keyTimes和timingFunctions无效;.cubic对关键帧为座标点的关键帧进行圆滑曲线相连后插值计算,对于曲线的形状还可以通过tensionValues,continuityValues,biasValues来进行调整自定义,这里的数学原理是Kochanek-Bartels spline,这里的主要目的是使得运行的轨迹变得圆滑;.cubicPaced看这个名字就知道和.cubic有一定联系,其实就是在.cubic的基础上使得动画运行变得均匀,就是系统时间内运动的距离相同,此时keyTimes以及timingFunctions也是无效的.
CAKeyframeAnimation还有一个独有的属性,rotationMode。这个属性的默认是一个空值nil。有两种可选值,kCAAnimationRotateAuto或者 kCAAnimationRotateAutoReverse。如果这个属性设置成以上两个值中的任意一个,当前layer都会始终保持朝向运动方向,也就是跟随运动方向自动旋转。
为什么特殊说一下这个属性呢?因为我们时常相对一个物体做旋转动画,然而我们又不单纯的想以layer的中心坐旋转,很多时候可能是layer的某个端点。这个时候你有三种选择:
更改锚点
更改你的layer层
结合移动和转动
更改锚点就是将锚点移至你想旋转的旋转中心。但是其实不建议你修改锚点。因为锚点是一个layer层的参考点。当你修改锚点以后将会影响layer的所有相关属性以至于造成一些你所不希望的后果。
更改layer层就是扩展当前layer区域,以透明区域填补空白区域,强行让你所期望的端点成为旋转中心。这个方法实在笨拙,不优雅。
结合移动和转动就是其实将以端点的转动拆分成锚点的转动及锚点的弧线运动去模拟端点的转动。这个方法是三者中最优雅的了,最起码不是那些取巧的方法。
但是有了rotationMode这个属性,这三个方法都不用了。你只需要一个锚点的弧线动画以及rotationMode = .rotateAuto就可以了,这样就大大的简化了我们的代码量。
一个简单的位移动画,说明了未设置keyTimes属性时,默认的时间点一致,那么位移距离越长的,速度就越快
let redView = UIView(frame: CGRect(x: 0, y: 0, width: 100, height: 100))

redView.backgroundColor = .red

redView.center = view.center

view.addSubview(redView)


//位移动画

let animation = CAKeyframeAnimation(keyPath: "position")

animation.duration = 5

//分别将中心点移动到这三个point
animation.values = [CGPoint(x: 100, y: 100),CGPoint(x: 300, y: 200),CGPoint(x: 100, y: 800)]

/*
由于没有设置keyTimes属性的值,从{100,100}到{300,200}和从{300,200}到{100,800}之间分配的时间一致,都为2.5秒,而第二段的距离更长,所以可以看到第二段的速度会更快
*/
animation.isRemovedOnCompletion = false

animation.autoreverses = true

animation.repeatCount = HUGE

animation.fillMode = .forwards

redView.layer.add(animation, forKey: "translate")
再添加上时间节点
let redView = UIView(frame: CGRect(x: 0, y: 0, width: 100, height: 100))

redView.backgroundColor = .red

redView.center = view.center

view.addSubview(redView)


        //位移动画

let animation = CAKeyframeAnimation(keyPath: "position")

animation.duration = 5

//分别将中心点移动到这三个point
animation.values = [CGPoint(x: 100, y: 100),CGPoint(x: 300, y: 200),CGPoint(x: 100, y: 800)]

/* 添加上时间 可以看到第一段动画速度变快了,第二段动画速度变慢了 */
animation.keyTimes = [NSNumber(value: 0.0),NSNumber(value: 0.3),NSNumber(value: 1.0)]

animation.autoreverses = true

animation.repeatCount = HUGE

animation.isRemovedOnCompletion = false

animation.fillMode = .forwards

redView.layer.add(animation, forKey: "translate")
发现在CGPoint(x: 300, y: 200)位置稍微有个停顿,不够圆润,我们再设置animation.calculationMode = .cubicPaced,让动画更平滑
let redView = UIView(frame: CGRect(x: 0, y: 0, width: 100, height: 100))
redView.backgroundColor = .red
redView.center = view.center
view.addSubview(redView)

//位移动画
let animation = CAKeyframeAnimation(keyPath: "position")
animation.duration = 5
//分别将中心点移动到这三个point
animation.values = [CGPoint(x: 100, y: 100),CGPoint(x: 300, y: 200),CGPoint(x: 100, y: 800)]
/* 添加上时间 可以看到第一段动画速度变快了,第二段动画速度变慢了 */
animation.keyTimes = [NSNumber(value: 0.0),NSNumber(value: 0.3),NSNumber(value: 1.0)]
animation.isRemovedOnCompletion = false
animation.autoreverses = true
animation.repeatCount = HUGE
/* 添加上计算模式属性,让动画更平滑 */
animation.calculationMode = .cubicPaced
animation.fillMode = .forwards
redView.layer.add(animation, forKey: "translate")
设置path属性,跟着预定轨迹运动,设置path属性后,values自动失效
let redView = UIView(frame: CGRect(x: 0, y: 0, width: 100, height: 100))

redView.backgroundColor = .red

redView.center = view.center

view.addSubview(redView)


//围绕视图中心点转圈 使用path

let animation = CAKeyframeAnimation(keyPath: "position")

animation.duration = 5

//分别将中心点移动到这三个point

animation.values = [CGPoint(x: 100, y: 100),CGPoint(x: 300, y: 200),CGPoint(x: 100, y: 800)]

let path = CGMutablePath()

path.addArc(center: view.center, radius: 100, startAngle: 0, endAngle: CGFloat(Double.pi * 2), clockwise: true)

/*设置了path之后,values属性的值自动失效 */
animation.path = path

animation.isRemovedOnCompletion = false

animation.repeatCount = HUGE

/* 添加上计算模式属性,让动画更平滑 */
animation.calculationMode = .cubicPaced

animation.fillMode = .forwards

redView.layer.add(animation, forKey: "rotate")
摇一摇动画
let redView = UIView(frame: CGRect(x: 0, y: 0, width: 100, height: 100))
redView.backgroundColor = .red
redView.center = view.center
let label = UILabel(frame: redView.bounds)
label.textAlignment = .center
label.textColor = .white
label.text = "摇一摇"
redView.addSubview(label)
view.addSubview(redView)

//摇一摇动画
let animation = CAKeyframeAnimation(keyPath: "transform.rotation")
animation.duration = 0.3
let angle = Double.pi/6.0
animation.values = [angle,-angle]
animation.isRemovedOnCompletion = false
animation.repeatCount = HUGE
animation.autoreverses = true
/* 添加上计算模式属性,让动画更平滑 */
animation.calculationMode = .cubicPaced
animation.fillMode = .forwards
redView.layer.add(animation, forKey: "rotation")
设置rotationMode画M
let redView = UIView(frame: CGRect(x: 0, y: 0, width: 100, height: 100))

redView.backgroundColor = .red

redView.center = view.center

let label = UILabel(frame: redView.bounds)

label.textAlignment = .center

label.textColor = .white

label.text = "画M"

redView.addSubview(label)

view.addSubview(redView)


//使用rotationMode

let animation = CAKeyframeAnimation(keyPath: "position")

animation.duration = 5

let path = CGMutablePath()

path.move(to: CGPoint(x: 40, y: 300))

path.addLine(to:CGPoint(x: 80, y: 150))

path.addLine(to:CGPoint(x: 120, y: 300))

path.addLine(to:CGPoint(x: 160, y: 150))

path.addLine(to:CGPoint(x: 200, y: 300))

animation.path = path

animation.isRemovedOnCompletion = false

animation.repeatCount = HUGE

animation.autoreverses = true

//使用rotationMode
animation.rotationMode = .rotateAuto

/* 添加上计算模式属性,让动画更平滑 */
animation.calculationMode = .cubicPaced

animation.fillMode = .forwards

redView.layer.add(animation, forKey: "translate")
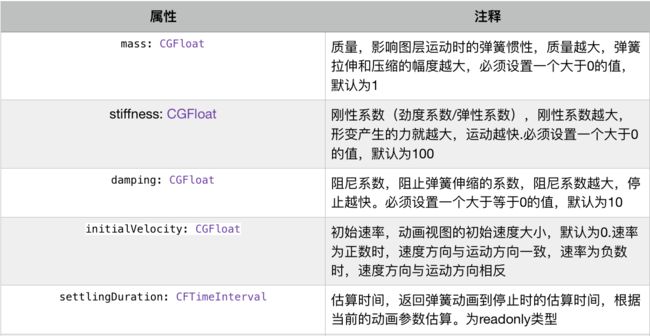
八、CASpringAnimation(弹簧动画)
CASpringAnimation继承自CABasicAnimation,iOS9新出,专用于解决开发者关于弹簧动画的这个需求而封装的类
使用UIView的方法实现弹簧动画
let redView = UIView(frame: CGRect(x: 0, y: 0, width: 100, height: 100))
redView.backgroundColor = .red
redView.center = view.center
view.addSubview(redView)
//放缩动画
UIView.animate(withDuration: 2, delay: 1, usingSpringWithDamping: 0.6,         initialSpringVelocity: 0.3, options: [.autoreverse,.repeat], animations: {
   redView.transform = CGAffineTransform(scaleX: 2, y: 2)
}) { (finished) in

}
使用CASpringAnimation实现弹簧动画
let redView = UIView(frame: CGRect(x: 0, y: 0, width: 100, height: 100))
redView.backgroundColor = .red
redView.center = view.center
view.addSubview(redView)

let animation = CASpringAnimation(keyPath: "transform.scale")
animation.beginTime = CACurrentMediaTime() + 3
animation.mass = 0.1 //设置质量,质量越大,惯性越大
animation.damping = 1//设置阻尼系数,阻尼系数越大,停止越快
animation.stiffness = 100 //设置刚性系数,刚性系数越大,运动越快
animation.initialVelocity = 0.3 //初始速率
animation.toValue = 2.0
animation.isRemovedOnCompletion = false
animation.repeatCount = HUGE
animation.autoreverses = true
animation.fillMode = .forwards
animation.timingFunction = CAMediaTimingFunction(name: CAMediaTimingFunctionName.easeInEaseOut)
animation.duration = animation.settlingDuration//设置动画时长
redView.layer.add(animation, forKey: "scale")
九、CATransition(转场动画)
CATransition是CAAnimation的子类,用于做转场动画,能够为层提供移出屏幕和移入屏幕的动画效果。iOS比Mac OS X的转场动画效果少一点。它通常用于通过CALayer来控制UIView内部子控件的过渡动画,比如删除子控件、添加子控件、切换两个子控件等。
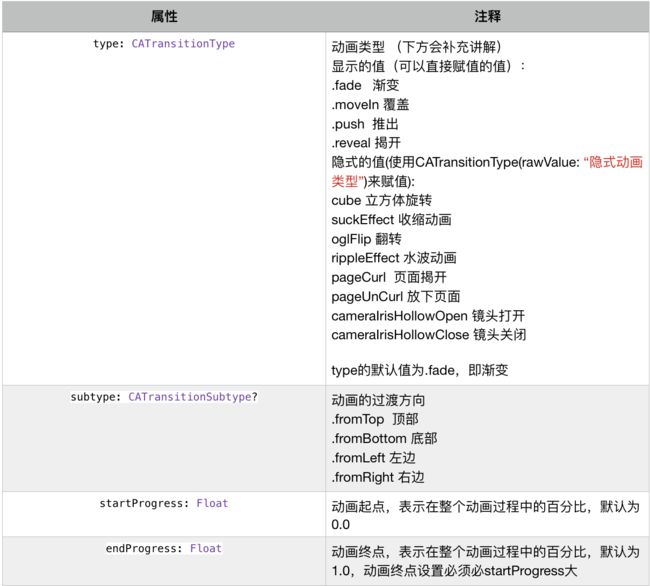
转场动画的过渡方式:
在OC中,因为type是一个NSString 类型的别名,可以用常量如kCATransitionFade给type赋值,也可以直接字符串如"fade"来赋值,swift中也可以使用CATransitionType(rawValue: "rippleEffect")来赋值
-
fade:默认,交叉淡化过渡,不支持过渡方向,OC中对应的常量为kCATransitionFade -
push:新视图把旧视图推出去,OC中对应的常量为kCATransitionPush -
moveIn:新视图移到旧视图上面,对应的常量为kCATransitionMoveIn -
reveal:将旧视图移开显示下边的新视图,对应的常量为kCATransitionReveal -
cube:立方体反转效果 -
oglFlip:上下左右反转效果 -
suckEffect:收缩效果,如一块布被抽走,不支持过渡方向 -
rippleEffect:滴水效果,不支持过渡方向 -
pageCurl:向上翻页效果 -
pageUnCurl:向下翻页效果 -
cameraIrisHollowOpen:相机镜头打开效果,不支持过渡方向 -
cameraIrisHollowClose:相机镜头关闭效果,不支持过渡方向
如果不需要动画执行整个过程(动画执行到中间部分就停止),就可以指定startProgress,endProgress属性。一般我们不设置,startProgress默认为0.0,endProgress默认为1.0,即执行整个动画过程
示例1:一个简单切换图片的水波动画
class ViewController: UIViewController {
    let imageView = UIImageView()
    override func viewDidLoad() {
        super.viewDidLoad()
        configUI()
    }
    private func configUI() {
        imageView.frame =  CGRect(x: 0, y: 0, width: 100, height: 100)
        imageView.center = view.center
        imageView.image = UIImage(named: "chb_meiqian")
        view.addSubview(imageView)

        let btn = UIButton(type: .custom)
        btn.frame = CGRect(x: 0, y: view.bounds.height-150, width: 50, height: 40)
        btn.center = CGPoint(x: view.bounds.width/2.0, y: view.bounds.height-150+20)
        btn.backgroundColor = .green
        btn.setTitleColor(.white, for: .normal)
        btn.setTitle("切换", for: .normal)
        btn.addTarget(self, action: #selector(transtion(_:)), for: .touchUpInside)
        view.addSubview(btn)
    }
    @objc private func transtion(_ sender : UIButton) {
        //转场动画
        let animation = CATransition()
        animation.type = CATransitionType(rawValue: "rippleEffect")
        //水波动画不支持过渡方向,所以设置了过渡方向是无效的
        animation.subtype = .fromTop
        animation.fillMode = .forwards
        animation.duration = 5
        imageView.layer .add(animation, forKey: "transition")
        imageView.image = UIImage(named: "chb_tc_bg")
    }
}
示例二:子控件交换
class ViewController: UIViewController {

    let containerView = UIView()

    let imageView1 = UIImageView()

    let imageView2 = UIImageView()

    override func viewDidLoad() {

        super.viewDidLoad()

        configUI()

    }

    private func configUI() {

        containerView.frame = CGRect(x: 0, y: 0, width: 100, height: 100)

        containerView.center = view.center

        view.addSubview(containerView)

        imageView1.frame =  containerView.bounds

        imageView1.image = UIImage(named: "chb_meiqian")

        containerView.addSubview(imageView1)

        imageView2.frame = containerView.bounds

        imageView2.image = UIImage(named: "chb_tc_bg")

        containerView.addSubview(imageView2)


        let btn1 = UIButton(type: .custom)

        btn1.frame = CGRect(x: 0, y: view.bounds.height-150, width: 50, height: 40)

        btn1.center = CGPoint(x: view.bounds.width/2.0, y: view.bounds.height-150+20)

        btn1.backgroundColor = .green

        btn1.setTitleColor(.white, for: .normal)

        btn1.setTitle("覆盖", for: .normal)

        btn1.addTarget(self, action: #selector(moveIn(_:)), for: .touchUpInside)

        view.addSubview(btn1)


        let btn2 = UIButton(type: .custom)

        var rect = btn1.frame

        rect.origin.x = btn1.frame.minX - 30 -  50

        btn2.frame = rect

        btn2.backgroundColor = .green

        btn2.setTitleColor(.white, for: .normal)

        btn2.setTitle("旋转", for: .normal)

        btn2.addTarget(self, action: #selector(cube(_:)), for: .touchUpInside)

        view.addSubview(btn2)


        let btn3 = UIButton(type: .custom)

        rect = btn1.frame

        rect.origin.x = btn1.frame.maxX + 30

        btn3.frame = rect

        btn3.backgroundColor = .green

        btn3.setTitleColor(.white, for: .normal)

        btn3.setTitle("揭开", for: .normal)

        btn3.addTarget(self, action: #selector(pageCurl(_:)), for: .touchUpInside)

        view.addSubview(btn3)

    }

    @objc private func moveIn(_ sender : UIButton) {

        //覆盖动画

        let animation = CATransition()

        animation.type = .moveIn

        animation.subtype = .fromBottom

        animation.fillMode = .forwards

        animation.duration = 5

        containerView.layer .add(animation, forKey: "moveIn")

        containerView.exchangeSubview(at: 0, withSubviewAt: 1)

    }


    @objc private func cube(_ sender : UIButton) {

        //立方体旋转动画

        let animation = CATransition()

        animation.type = CATransitionType(rawValue: "cube")

        animation.subtype = .fromBottom

        animation.fillMode = .forwards

        animation.duration = 5

        containerView.layer .add(animation, forKey: "cube")

        containerView.exchangeSubview(at: 0, withSubviewAt: 1)

    }


    @objc private func pageCurl(_ sender : UIButton) {

        //页面揭开

        let animation = CATransition()

        animation.type = CATransitionType(rawValue: "pageCurl")

        animation.subtype = .fromBottom

        animation.fillMode = .forwards

        animation.duration = 5

        containerView.layer .add(animation, forKey: "pageCurl")

        containerView.exchangeSubview(at: 0, withSubviewAt: 1)

    }

}
转场动画有个特点是必须和转场代码写在一起,官方并没有给出转场的概念到底是什么,一般来讲,有如下三个是转场代码:
- UIImageView切换图片,如示例一
- UIViewController的push和modal
- UIView对象调用exchangeSubview(at index1: Int, withSubviewAt index2: Int)方法,如示例二
十、CAAnimationGroup(动画组)
动画组是CAAnimation的子类,动画组的特点是可以保存一组动画对象,将CAAnimationGroup加入图层后,组中对象可以同时并发运行
CAAnimationGroup只有一个专有属性animations,用来保存一组并发执行的动画
案例:旋转+位移+放缩
class ViewController: UIViewController {
    let imageView = UIImageView()
    override func viewDidLoad() {
        super.viewDidLoad()
        configUI()
    }
    private func configUI() {
        imageView.frame =  CGRect(x: 0, y: 0, width: 100, height: 100)
        imageView.center = view.center
        imageView.backgroundColor = .green
        view.addSubview(imageView)

        let btn = UIButton(type: .custom)
        btn.frame = CGRect(x: 0, y: view.bounds.height-150, width: 50, height: 40)
        btn.center = CGPoint(x: view.bounds.width/2.0, y: view.bounds.height-150+20)
        btn.backgroundColor = .green
        btn.setTitleColor(.white, for: .normal)
        btn.setTitle("切换", for: .normal)
        btn.addTarget(self, action: #selector(animationGroupBegin(_:)), for: .touchUpInside)
        view.addSubview(btn)
    }
    @objc private func animationGroupBegin(_ sender : UIButton) {
        sender.isSelected = !sender.isSelected
        if sender.isSelected {
            //位移动画
            let transition = CABasicAnimation(keyPath: "position")
            transition.isRemovedOnCompletion = false
            transition.toValue = CGPoint(x: 50, y: 50)
            transition.autoreverses = true

            //旋转动画
            let rotation = CABasicAnimation(keyPath: "transform.rotation.z")
            rotation.fillMode = .forwards
            rotation.fromValue = 0
            rotation.toValue = Double.pi * 2.0
            rotation.beginTime = 1

            let scale = CABasicAnimation(keyPath: "transform.scale")
            scale.toValue = 0.1
            scale.beginTime = 1.5


            let group = CAAnimationGroup()
            group.animations = [transition,rotation,scale]
            group.fillMode = .forwards
            group.repeatCount = HUGE
            group.autoreverses = true
            group.duration = 3
            imageView.layer.add(group, forKey: "group")
        } else {
            imageView.layer.removeAllAnimations()
        }

    }
}