语义分割结果图
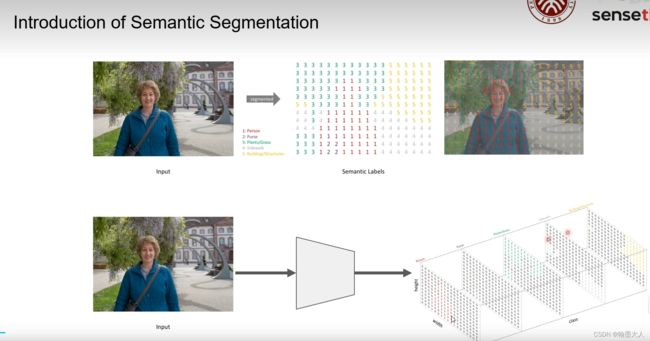
语义分割将每个像素分配类别,而每个类别在调色板中对应一种颜色,所以最终的输出分割图就是含有不同颜色块的一张图。
这里引用B站立夏之光的一张图,我们可以看到与图片中人,树木,地面等不同的类别分配了不同的标签。对应到网络框架图中,输入一张图片,最终输出一张含有numer_class个通道的分割图,每个通道都包含一个类别,其他的类别像素都为0。
关于预测图也踩了不少坑,因此来记录一下:
首先分析一下代码:
def _load_img(fp):
    img = cv2.imread(fp, cv2.IMREAD_UNCHANGED)
    if img.ndim == 3:
        img = cv2.cvtColor(img, cv2.COLOR_BGR2RGB)
    return img


if __name__ == '__main__':
    # arguments
    # 1:
    parser = ArgumentParserRGBDSegmentation(
        description='',
        formatter_class=argparse.ArgumentDefaultsHelpFormatter)
    parser.set_common_args()
    parser.add_argument('--ckpt_path', type=str,
                        required=True,
                        help='Path to the checkpoint of the trained model.')
    parser.add_argument('--depth_scale', type=float,
                        default=1.0,
                        help='Additional depth scaling factor to apply.')
    args = parser.parse_args()

    # dataset
    # 2:
    args.pretrained_on_imagenet = False  # we are loading other weights anyway
    dataset, preprocessor = prepare_data(args, with_input_orig=True)
    n_classes = dataset.n_classes_without_void

    # model and checkpoint loading
    # 3:
    model, device = build_model(args, n_classes=n_classes)
    checkpoint = torch.load(args.ckpt_path,
                            map_location=lambda storage, loc: storage)

    weights = checkpoint['state_dict']
    for key, value in list(weights.items()):
        if key == 'encoder_rgb.first_conv.0.weight' and 'encoder_rgb.first_conv.0.bias' and\
            'encoder_depth.first_conv.0.weight' and 'encoder_depth.first_conv.0.bias':
            del weights['encoder_rgb.first_conv.0.weight']
            del weights['encoder_rgb.first_conv.0.bias']
            del weights['encoder_depth.first_conv.0.weight']
            del weights['encoder_depth.first_conv.0.bias']

    model.load_state_dict(weights)
    print('Loaded checkpoint from {}'.format(args.ckpt_path))
	# 4:
    model.eval()
    model.to(device)

    # get samples
    # 5:
    basepath = os.path.join(os.path.dirname(os.path.abspath(__file__)),
                            'samples')
    rgb_filepaths = sorted(glob(os.path.join(basepath, '*_rgb.*')))
    depth_filepaths = sorted(glob(os.path.join(basepath, '*_depth.*')))
    assert args.modality == 'rgbd', "Only RGBD inference supported so far"
    assert len(rgb_filepaths) == len(depth_filepaths)
    filepaths = zip(rgb_filepaths, depth_filepaths)

    # inference
    # 6:
    for fp_rgb, fp_depth in filepaths:
        # load sample
        img_rgb = _load_img(fp_rgb)
        img_depth = _load_img(fp_depth).astype('float32') * args.depth_scale
        h, w, _ = img_rgb.shape

        # preprocess sample
        # 7:
        sample = preprocessor({'image': img_rgb, 'depth': img_depth})

        # add batch axis and copy to device
        image = sample['image'][None].to(device)
        depth = sample['depth'][None].to(device)

        # apply network
        # 8:
        pred = model(image, depth)
        pred = F.interpolate(pred, (h, w),
                             mode='bilinear', align_corners=False)
        print(pred,pred.shape)
        pred = torch.argmax(pred, dim=1)
        print(pred,pred.shape)
        pred = pred.cpu().numpy().squeeze().astype(np.uint8)

        # show result
        # 9:
        pred_colored = dataset.color_label(pred, with_void=False)
        fig, axs = plt.subplots(1, 3, figsize=(16, 3))
        [ax.set_axis_off() for ax in axs.ravel()]
        axs[0].imshow(img_rgb)
        axs[1].imshow(img_depth, cmap='gray')
        axs[2].imshow(pred_colored)

        plt.suptitle(f"Image: ({os.path.basename(fp_rgb)}, "
                     f"{os.path.basename(fp_depth)}), Model: {args.ckpt_path}")
        plt.savefig('result18.jpg', dpi=150)
        plt.show()
1:我们首先看一下模型的载入权重,这里是自己指定的,可以在命令行输入,注意这里不是预训练权重,是自己模型训练后生成的一个整体权重,包括你模型可学习的每一层参数。
2:这里我们不使用预训练权重,首先根据指定的args(包括数据集),我们调用prepare_data函数,生成加载数据集和图像预处理方法。
3:我们调用build_model函数,生成模型和device,接着我们加载权重,对于生成的checkpoint与我们自己的model在RGB和Depth处理第一层不匹配,即我们要把checkpoint的第一层的key删除掉。遍历权重,取第一层删除掉,这个地方的修改与否因人而异。根据load_state_dict函数载入到模型。
4:设置模型为eval格式,这样参数就不会更新。将模型输入到cpu中。
5:我们要测试的图片在同级目录下的sample文件下,因此我们进入到sample文件,然后首先获得里面的rgb图和depth图的文件路径。
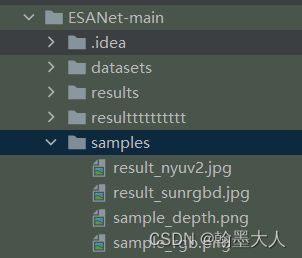
6:根据路径我们载入图片,调用load_iamge函数,这里使用CV2读入图片,读入图片如果输入图片为RGB格式,那么读入后就会转换为RGBA格式,我们再通过cv2.COLOR_BGR2RGB转换为RGB格式,深度图像转换为float32格式。然后我们获得图片的尺寸。
7:对原始图片进行预处理,包括剪切等,然后我们获得处理后的rgb和depth图像输入进cpu。
8:将获得的图像输入进model中,最终产生pred图,如果在预处理的时候模型剪切的话,再插值到原图像大小。这里有一个重要的函数:torch.argmax单独拎出来。
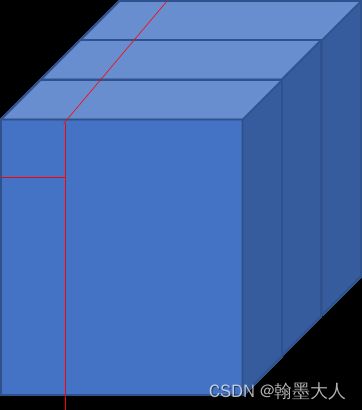
torch.argmax:argmax就是得到最大值的序号索引,dim维度会消失。
import torch
a = torch.rand(1,3,5,5)
d = torch.argmax(a,dim=1)
print(a)
print(d)
>>tensor([[[[0.8310, 0.2641, 0.0662, 0.5209, 0.5820],
          [0.9279, 0.0181, 0.2884, 0.0868, 0.1850],
          [0.8663, 0.2634, 0.6466, 0.1811, 0.4308],
          [0.7977, 0.3112, 0.8195, 0.1770, 0.8979],
          [0.7221, 0.7158, 0.8026, 0.4323, 0.1791]],

         [[0.0059, 0.8631, 0.5339, 0.1972, 0.8890],
          [0.9717, 0.0761, 0.0586, 0.9758, 0.4805],
          [0.5699, 0.4786, 0.3796, 0.2667, 0.8614],
          [0.9389, 0.0759, 0.3525, 0.9239, 0.0511],
          [0.7317, 0.0068, 0.0467, 0.8078, 0.4566]],

         [[0.7090, 0.0295, 0.1542, 0.5324, 0.3847],
          [0.3697, 0.8804, 0.2011, 0.3973, 0.3391],
          [0.6311, 0.5887, 0.5226, 0.4300, 0.5799],
          [0.6617, 0.3518, 0.2108, 0.4398, 0.8466],
          [0.7448, 0.6519, 0.9463, 0.3043, 0.8522]]]])
tensor([[[0, 1, 1, 2, 1],
         [1, 2, 0, 1, 1],
         [0, 2, 0, 2, 1],
         [1, 2, 0, 1, 0],
         [2, 0, 2, 1, 2]]],size=(1,5,5))
用图片表示为:相当于第一个像素的三个通道中取最大的像素。我理解为相当于第一张图片,获得每个通道的最大值,即每个类别,然后将图片融合在一起。
我们打印一下输出:
		......
         [[ 0.6421,  0.8464,  0.7549,  ...,  0.7195,  0.8326,  0.6720],
          [ 0.8218,  1.0655,  0.9332,  ...,  1.0818,  1.2544,  1.0042],
          [ 0.7314,  0.9370,  0.8340,  ...,  1.1342,  1.3296,  1.0622],
          ...,
          [ 1.1216,  1.6263,  1.7507,  ...,  0.9624,  1.1260,  0.9196],
          [ 1.1373,  1.6308,  1.7334,  ...,  1.0439,  1.1897,  0.9226],
          [ 0.7911,  1.1276,  1.1937,  ...,  0.7642,  0.8346,  0.6164]]]],
       device='cuda:0', grad_fn=<UpsampleBilinear2DBackward1>) torch.Size([1, 40, 424, 512])
tensor([[[37, 37, 37,  ..., 37, 37, 37],
         [37, 37, 37,  ..., 37, 37, 37],
         [37, 37, 37,  ..., 37, 37, 37],
         ...,
         [ 5,  5,  5,  ..., 38, 38, 38],
         [ 5,  5,  5,  ..., 38,  1,  1],
         [ 1,  1,  1,  ...,  1,  1,  1]]], device='cuda:0') torch.Size([1, 424, 512])
回到代码中,将数据转换成numpy格式,压缩第一个维度,即删除掉batch维度。
9:我们将图片进行上色,对应txt文件下的颜色索引。
    def color_label(self, label, with_void=True):
        if with_void:
            colors = self.class_colors
        else:
            colors = self.class_colors_without_void
        cmap = np.asarray(colors, dtype='uint8')

        return cmap[label]
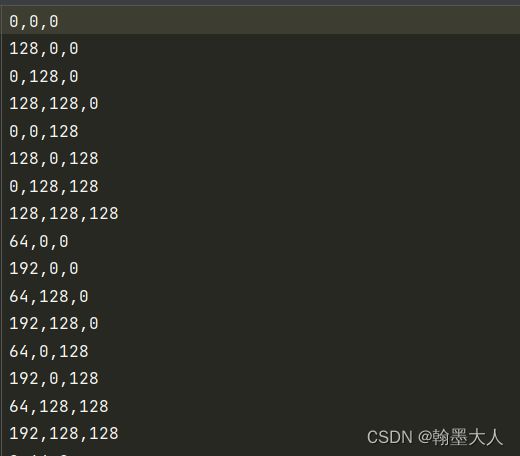
下面就是imshow画图了,最后设置一个产生图片的保存路径。
下面是产生错误语义分割的踩坑经历,真的是错误的理由各有不同,正确的理由千篇一律:
1:sample分割图,产生的分割图全部一种颜色。

2:在数据集的采样图,产生的几乎只有一种颜色。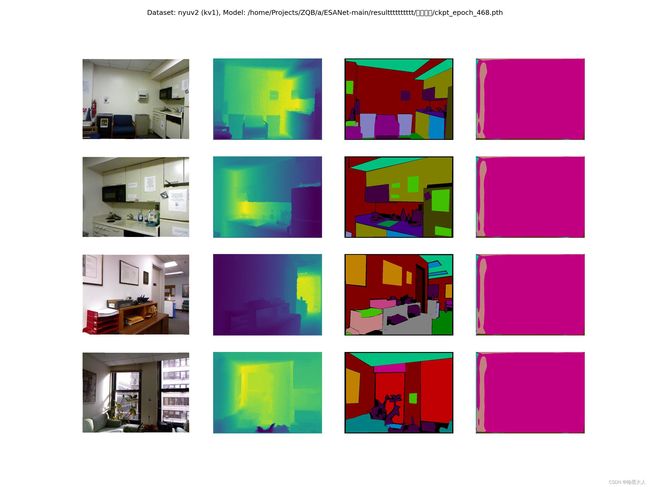
原因分析:究其原因只有一个,权重载入错误!!!!!!!!!!!!
我当时载入的时候,因为出现了模型与权重的key不匹配,报错,没有修改权重的key,而是直接在load_state_dict函数后面加了strict = False,因此他没有载入你训练的参数,而是自己随机初始化的参数。所以当我修改权重后,模型与参数一一对应,问题就迎刃而解了。
下面是正确的分割图:
1:论文中的sample分割图:

2:虽然不好看,但至少不是只有一种颜色了。
3:数据集采样。

完结撒花❀❀❀。