STM32RTC秒中断--基于HAL库(第九届蓝桥杯嵌入式省赛)
文章目录
- 前言
- 一、CubeMX配置(第九届真题完整版)
- 二、代码相关定义、声明
-
- 1.函数声明
- 2.宏定义
- 3.变量定义
- 三、主要函数
-
- 1.按键扫描
- 2.Setting模式
- 3.RTC秒中断
- 4.Main函数
- 四、实验结果
- 五、源码(转载请注明出处)
- 总结
前言
相关说明:
开发板:CT117E-M4(STM32G431RB 蓝桥杯嵌入式比赛板)
开发环境: CubeMX+Keil5
涉及题目:第九届蓝桥杯嵌入式真题
题目难点:在保证按键反应高效的情况下解决LED灯闪烁与LCD显示冲突
有关RTC秒中断详情请看STM32RTC-秒中断-基于HAL库(一文看懂如何配置并使用)
CubeMX配置、主要函数代码及说明:
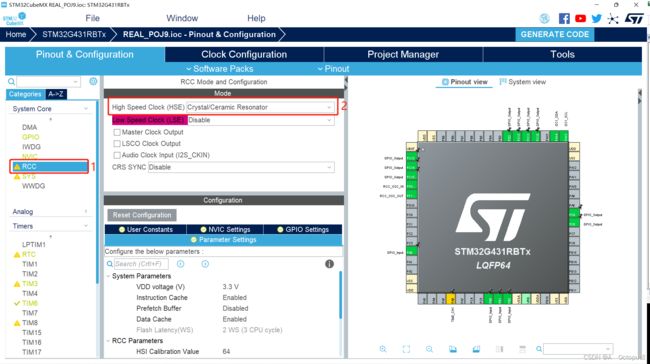
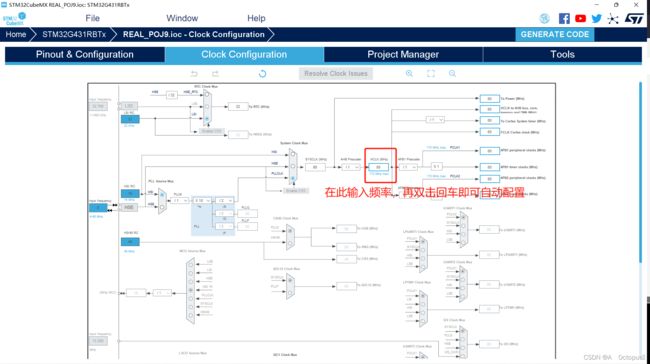
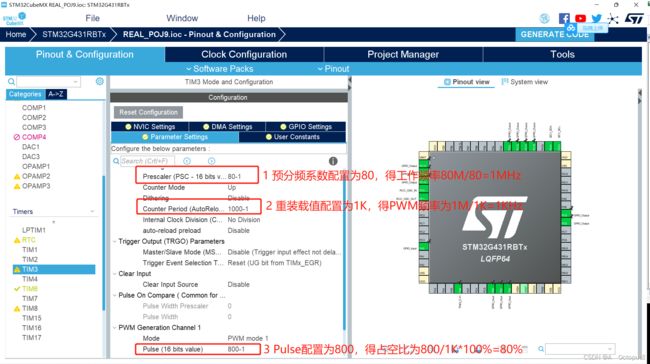
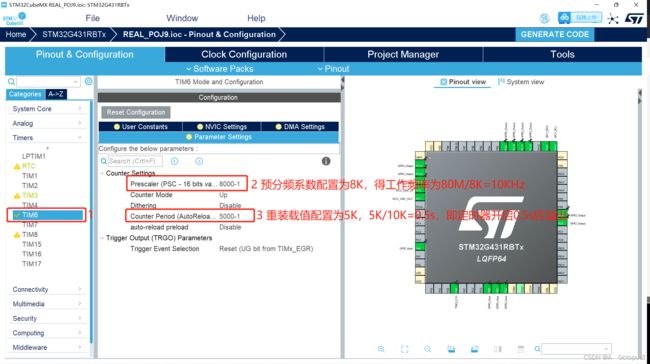
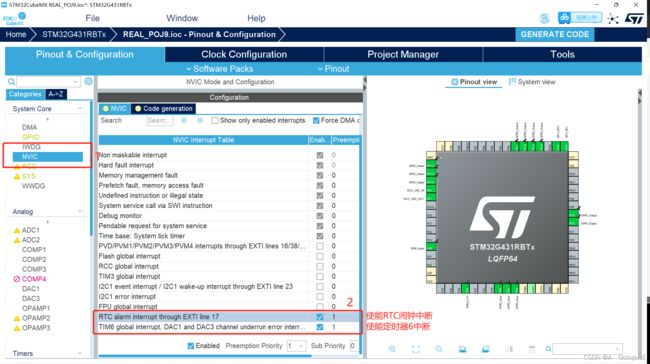
一、CubeMX配置(第九届真题完整版)

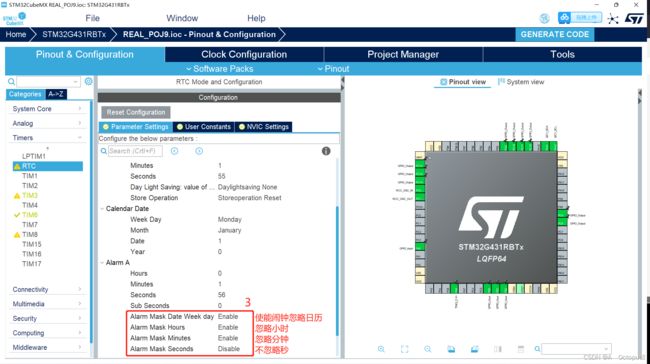
4.RTC(除了图中配置,其他均默认即可):
 初始时间、日期、闹钟时间可以不用配置,需要配置的有闹钟中断发生时忽略日期,忽略小时,忽略分钟,不忽略秒(秒中断)。
二、代码相关定义、声明
1.函数声明
main.c
void EEPROM_WriteBuff(uint8_t addr,uint8_t *writeBuff,uint8_t numByteToWrite);	//EEPROM写函数
void EEPROM_ReadBuff(uint8_t addr,uint8_t *ReadBuff,uint8_t numByteToRead);		//EEPROM读函数
void HAL_RTC_AlarmAEventCallback(RTC_HandleTypeDef *hrtc);						//闹钟中断函数
void LCD_InitShow(void);//LCD初始化
void LCD_Refresh(void);	//LCD更新显示

gpio.h
void KEY_Scan(void);					//按键扫描
void LED_AllClose(uint8_t *LED_Close);	//LED更新函数

rtc.h
void Set_Time(uint8_t *Buff);	//设置RTC当前时间
void Get_Time(void);			//获取RTC当前时间
void Set_Alarm(void);			//配置下一秒的闹钟
void Show_Now_Time(void);		//显示当前时间
2.宏定义
#define LED_GPIO_PORT	GPIOC
#define LED1_GPIO_PIN	GPIO_PIN_8
#define LED2_GPIO_PIN	GPIO_PIN_9
#define LED3_GPIO_PIN	GPIO_PIN_10
#define LED4_GPIO_PIN	GPIO_PIN_11
#define LED5_GPIO_PIN	GPIO_PIN_12
#define LED6_GPIO_PIN	GPIO_PIN_13
#define LED7_GPIO_PIN	GPIO_PIN_14
#define LED8_GPIO_PIN	GPIO_PIN_15

#define ON	GPIO_PIN_RESET
#define OFF	GPIO_PIN_SET

#define LED1(a) HAL_GPIO_WritePin(LED_GPIO_PORT,LED1_GPIO_PIN,a)
#define LED2(a) HAL_GPIO_WritePin(LED_GPIO_PORT,LED2_GPIO_PIN,a)
#define LED3(a) HAL_GPIO_WritePin(LED_GPIO_PORT,LED3_GPIO_PIN,a)
#define LED4(a) HAL_GPIO_WritePin(LED_GPIO_PORT,LED4_GPIO_PIN,a)
#define LED5(a) HAL_GPIO_WritePin(LED_GPIO_PORT,LED5_GPIO_PIN,a)
#define LED6(a) HAL_GPIO_WritePin(LED_GPIO_PORT,LED6_GPIO_PIN,a)
#define LED7(a) HAL_GPIO_WritePin(LED_GPIO_PORT,LED7_GPIO_PIN,a)
#define LED8(a) HAL_GPIO_WritePin(LED_GPIO_PORT,LED8_GPIO_PIN,a)


#define KEY1_GPIO_PORT 	GPIOB
#define KEY1_GPIO_PIN	GPIO_PIN_0
#define KEY2_GPIO_PORT 	GPIOB
#define KEY2_GPIO_PIN	GPIO_PIN_1
#define KEY3_GPIO_PORT 	GPIOB
#define KEY3_GPIO_PIN	GPIO_PIN_2
#define KEY4_GPIO_PORT 	GPIOA
#define KEY4_GPIO_PIN	GPIO_PIN_0
3.变量定义
main.c
uint8_t No=1;		//No值(存储序号)
uint8_t No_step=1;	//No值每次改变量
uint8_t No_max=5;	//No值上限
uint8_t No_min=1;	//No值下限

uint8_t page=1;		//LCD显示页(时间--1,Setting--2)

uint8_t Time_addr_now=0x00;		//当前时间地址
uint8_t Time_addr_step=0x08;	//时间地址改变量

uint8_t Statue_change=0;		//定时器状态改变标志位
char *Tim_Statue="Running";		//定时器状态

RTC_TimeTypeDef	Now_Time;		//当前时间
RTC_DateTypeDef	Now_Date;		//当前日期
RTC_TimeTypeDef Setting_Time;	//设定时间

uint8_t WriteBuff[10];			//写数据数组
uint8_t ReadBuff[10];			//读数据数组
char str[30];					//用于组合字符串
uint8_t LED_Close[2];			//LED关闭数组(值为1则表示下标对应LED关闭)

gpio.c
const uint16_t Y_beg=14*16;	//初始Y坐标(小时对应Y坐标)
const uint16_t Y_end=8*16;	//末尾Y坐标(秒对应Y坐标)
const uint16_t Y_step=16;	//相邻字符间Y坐标差值
uint16_t Y_now=14*16;		//当前Y坐标

const uint16_t hour=Y_beg;			//小时对应Y坐标
const uint16_t min=Y_beg-3*Y_step;	//分钟对应Y坐标
const uint16_t sec=Y_end;			//秒对应Y坐标

rtc.c
RTC_AlarmTypeDef sAlarm = {0};		//重新用MX配置时删除生成函数中的这行代码 并将其配置为全局变量
三、主要函数
尽量将按键实现的功能都封装为函数,降低函数耦合。
存储位置切换键实现分为五步:
1.按键1按下后读地址改变。
2.从EEPROM中重新读取数据。
3.将RTC当前时间配置为EEPROM中读取的时间。
4.LCD更新显示当前时间。
5.根据当前时间配置下一秒中断。
1.按键扫描
void KEY_Scan()//按键扫描
{
	uint32_t press_time=0;//按下时间
	if(HAL_GPIO_ReadPin(KEY1_GPIO_PORT,KEY1_GPIO_PIN)==GPIO_PIN_RESET)//更改读EEPROM位置
	{
		HAL_Delay(10);
		if(HAL_GPIO_ReadPin(KEY1_GPIO_PORT,KEY1_GPIO_PIN)==GPIO_PIN_RESET)
		{
			while(HAL_GPIO_ReadPin(KEY1_GPIO_PORT,KEY1_GPIO_PIN)==GPIO_PIN_RESET);
			Time_addr_change();//地址改变
			EEPROM_ReadBuff(Time_addr_now,ReadBuff,sizeof(ReadBuff[0]*3));//读时间
			Set_Time(ReadBuff);//改变RTC当前时间
			Show_Now_Time();//显示当前时间
			Set_Alarm();//重新设置闹钟
		}
	}

	else if(HAL_GPIO_ReadPin(KEY2_GPIO_PORT,KEY2_GPIO_PIN)==GPIO_PIN_RESET)//Setting模式
	{
		HAL_Delay(10);
		if(HAL_GPIO_ReadPin(KEY2_GPIO_PORT,KEY2_GPIO_PIN)==GPIO_PIN_RESET)
		{
			while(HAL_GPIO_ReadPin(KEY2_GPIO_PORT,KEY2_GPIO_PIN)==GPIO_PIN_RESET);
			page=2;//更改显示页为2
			Setting_Mode();//进入Setting模式
			if(strcmp(Tim_Statue,"Standby")!=0)Get_Time();//如果不为Standby模式则更新时间
			Show_Now_Time();//显示当前时间
			Set_Alarm();//重新设置闹钟
		}
	}

	else if(HAL_GPIO_ReadPin(KEY4_GPIO_PORT,KEY4_GPIO_PIN)==GPIO_PIN_RESET)
	{
		HAL_Delay(10);
		if(HAL_GPIO_ReadPin(KEY4_GPIO_PORT,KEY4_GPIO_PIN)==GPIO_PIN_RESET)
		{
			while(HAL_GPIO_ReadPin(KEY4_GPIO_PORT,KEY4_GPIO_PIN)==GPIO_PIN_RESET)
			{

				HAL_Delay(100);
				press_time++;
				if(press_time>8)//8*100=800ms 长按
				{
					Tim_Statue="Standby";//状态改变
					break;
				}
			}
			if(strcmp(Tim_Statue,"Running")==0)
			{
				Tim_Statue="Pause";//状态改变
			}
			else if(strcmp(Tim_Statue,"Pause")==0)
			{
				Tim_Statue="Running";//状态改变
			}
			Statue_change=1;//状态改变标志位置1
		}
	}
}
2.Setting模式
长按短按区分:
定义一个变量press_time,按键按下后,每延时一定时间press_time++,当延时时间×press_time>800ms的时候即为长按。
EG:
如按键按下后,进入while循环(松开按键退出循环),每次while循环执行一次10ms延时,每循环一次即10ms,令press_time++,当延时函数执行80次后(即80×10ms=800ms),这时press_time值为80,下一次循环时press_time=81,press_time>80成立,则判断为长按。
void Setting_Mode()//设置模式
{
	uint32_t press_time=0;//按下时间
	Setting_Time=Now_Time;//将“当前时间”结构体的值赋值给“设置时间”结构体
	LCD_Refresh();//LCD更新显示(第二页)
	Show_Change(Y_now);//更新显示(第五行,先将小时高亮显示)
	while(1)
	{
		if(HAL_GPIO_ReadPin(KEY2_GPIO_PORT,KEY2_GPIO_PIN)==GPIO_PIN_RESET)//change、save
		{
			HAL_Delay(10);
			if(HAL_GPIO_ReadPin(KEY2_GPIO_PORT,KEY2_GPIO_PIN)==GPIO_PIN_RESET)
			{
				while(HAL_GPIO_ReadPin(KEY2_GPIO_PORT,KEY2_GPIO_PIN)==GPIO_PIN_RESET)
				{
					HAL_Delay(10);//延时10ms使短按反应更快
					press_time++;
					if(press_time>80)//80*10ms=800ms 长按
					{
						WriteBuff[0]=Setting_Time.Hours;
						WriteBuff[1]=Setting_Time.Minutes;
						WriteBuff[2]=Setting_Time.Seconds;
						EEPROM_WriteBuff(Time_addr_now,WriteBuff,sizeof(WriteBuff[0])*3);//长按为保存
						page=1;//更改显示页为1
						LCD_Refresh();//LCD更新显示
						while(HAL_GPIO_ReadPin(KEY2_GPIO_PORT,KEY2_GPIO_PIN)==GPIO_PIN_RESET);//由于Setting模式为长按保存,LCD更新显示后加个while循环判断按键松开
						return;
					}
				}
				press_time=0;//按下时间清零
				Y_now-=3*Y_step;//短按为临时设置
				if(Y_now<Y_end)Y_now=Y_beg;//Y坐标小于末尾Y坐标值,则回到起始位置
				Show_Change(Y_now);//更新显示
			}
		}

		else if(HAL_GPIO_ReadPin(KEY3_GPIO_PORT,KEY3_GPIO_PIN)==GPIO_PIN_RESET)//add
		{
			HAL_Delay(10);
			if(HAL_GPIO_ReadPin(KEY3_GPIO_PORT,KEY3_GPIO_PIN)==GPIO_PIN_RESET)
			{
				while(HAL_GPIO_ReadPin(KEY3_GPIO_PORT,KEY3_GPIO_PIN)==GPIO_PIN_RESET)
				{
					HAL_Delay(100);
					press_time++;
					if(press_time>8)//8*10=800ms 长按
					{
						Dat_Change(Y_now);//数据改变
						Show_Change(Y_now);//更新显示
					}
				}
				press_time=0;//按下时间清零
				Dat_Change(Y_now);//数据改变
				Show_Change(Y_now);//更新显示
			}
		}

		else if(HAL_GPIO_ReadPin(KEY4_GPIO_PORT,KEY4_GPIO_PIN)==GPIO_PIN_RESET)//临时保存
		{
			HAL_Delay(10);
			if(HAL_GPIO_ReadPin(KEY4_GPIO_PORT,KEY4_GPIO_PIN)==GPIO_PIN_RESET)
			{
				while(HAL_GPIO_ReadPin(KEY4_GPIO_PORT,KEY4_GPIO_PIN)==GPIO_PIN_RESET);
				WriteBuff[0]=Setting_Time.Hours;
				WriteBuff[1]=Setting_Time.Minutes;
				WriteBuff[2]=Setting_Time.Seconds;
				Set_Time(WriteBuff);//改变RTC当前时间
				break;
			}
		}
	}
}
数据改变Dat_Change(uint8_t sel):
参数为当前Y坐标值,switch根据Y坐标值判断要更改的数据是什么,再按照规则更改对应数据。
void Dat_Change(uint8_t sel)//数据改变
{
	switch(sel)//根据Y坐标判断要修改的数据是什么
	{
		case hour:
			Setting_Time.Hours++;
			if(Setting_Time.Hours>23)Setting_Time.Hours=0;//24进制
			break;

		case min:
			Setting_Time.Minutes++;
			if(Setting_Time.Minutes>59)Setting_Time.Minutes=0;//60进制
			break;

		case sec:
			Setting_Time.Seconds++;
			if(Setting_Time.Seconds>59)Setting_Time.Seconds=0;
			break;
	}
}
数据更改显示Show_Change(uint16_t Y_pos):
1.参数为当前Y坐标,switch根据当前Y坐标判断哪个数据要高亮显示(颜色翻转),哪个数据要恢复显示(颜色恢复)。
2.调用LCD_DisplayChar函数时需注意传递参数。如第二参数为Y坐标,当前要高亮显示的是小时,要恢复显示的是秒,当前Y坐标对应的是小时的十位数据,小时的个位数据Y坐标为当前Y坐标-16,因此需要调用两次LCD_DisplayChar才能高亮显示小时;第三参数为ASCII码,数字+48即为对应的ASCII码值,如0+48,48就是0的ASCII码值。
void Show_Change(uint16_t Y_pos)//LCD更新显示(高亮/恢复/数据更新)
{
	uint8_t num1;//当前Y坐标对应数字
	uint8_t num2;//前一个数字
	switch(Y_pos)
	{
		case hour://如当前Y坐标==小时Y坐标
			num1=Setting_Time.Hours;//当前数字为小时
			num2=Setting_Time.Seconds;//上一数字为分钟
			break;

		case min:
			num1=Setting_Time.Minutes;
			num2=Setting_Time.Hours;
			break;

		case sec:
			num1=Setting_Time.Seconds;
			num2=Setting_Time.Minutes;
			break;
	}

	LCD_SetBackColor(Blue);
	LCD_SetTextColor(White);
	LCD_DisplayChar(Line5,Y_pos,num1/10+48);//当前选择高亮
	LCD_DisplayChar(Line5,Y_pos-Y_step,num1%10+48);

	LCD_SetBackColor(White);
	LCD_SetTextColor(Blue);
	if(Y_pos==Y_beg)//如果当前数字为小时,则上一数字为秒
	{
		LCD_DisplayChar(Line5,Y_end,num2/10+48);//前一个颜色恢复
		LCD_DisplayChar(Line5,Y_end-Y_step,num2%10+48);
	}
	else//否则当前Y坐标+3字符宽度就是上一数字对应Y坐标
	{
		LCD_DisplayChar(Line5,Y_pos+3*Y_step,num2/10+48);
		LCD_DisplayChar(Line5,Y_pos+2*Y_step,num2%10+48);
	}
}
3.RTC秒中断
void Get_Time()//获取RTC当前时间
{
	HAL_RTC_GetTime(&hrtc,&Now_Time,RTC_FORMAT_BIN);
	HAL_RTC_GetDate(&hrtc,&Now_Date,RTC_FORMAT_BIN);
}

void Set_Alarm()//配置下一秒的闹钟
{
	sAlarm.AlarmTime.Seconds = Now_Time.Seconds+1;
	if(sAlarm.AlarmTime.Seconds == 60)sAlarm.AlarmTime.Seconds = 0;
	HAL_RTC_SetAlarm_IT(&hrtc, &sAlarm, RTC_FORMAT_BIN);
}

void Show_Now_Time()//显示当前时间
{
	char str[30];
	sprintf(str,"      %02d:%02d:%02d      ",Now_Time.Hours,Now_Time.Minutes,Now_Time.Seconds);
	LCD_DisplayStringLine(Line5,(unsigned char*)str);
}
实际应用:
1.初始化(让秒中断从一开始就等待执行)(主循环之前)
EEPROM_ReadBuff(Time_addr_now,ReadBuff,sizeof(ReadBuff[0])*3);//读取时间
Set_Time(ReadBuff);//更新时间
Show_Now_Time();//显示当前时间
Set_Alarm();//重新设置闹钟
2.按键切换初始时间
切换之后要读取切换后的时间,并重新设定闹钟。
Time_addr_change();//地址改变
EEPROM_ReadBuff(Time_addr_now,ReadBuff,sizeof(ReadBuff[0]*3));//读时间
Set_Time(ReadBuff);//改变RTC当前时间
Show_Now_Time();//显示当前时间
Set_Alarm();//重新设置闹钟
3.秒中断回调函数(中断函数)
在秒中断服务函数中一共做三件事:获取当前时间;根据时间设置下一秒的闹钟;更新LCD显示;
void HAL_RTC_AlarmAEventCallback(RTC_HandleTypeDef *hrtc)//闹钟中断函数
{
	/*       恭喜你发现本篇博客至宝--RTC秒中断三件套!!!      */
	Get_Time();//得到当前时间(放在回调函数的目的是读取中断后的时间)
	Set_Alarm();//设置下一秒的闹钟(如此反复)
	if(page==1)Show_Now_Time();//LCD显示页为1则更新时间(Setting模式下继续计时但不显示)
	/********************************************************/
}
4.Main函数
int main(void)
{
  /* USER CODE BEGIN 1 */

  /* USER CODE END 1 */

  /* MCU Configuration--------------------------------------------------------*/

  /* Reset of all peripherals, Initializes the Flash interface and the Systick. */
  HAL_Init();

  /* USER CODE BEGIN Init */

  /* USER CODE END Init */

  /* Configure the system clock */
  SystemClock_Config();

  /* USER CODE BEGIN SysInit */

  /* USER CODE END SysInit */

  /* Initialize all configured peripherals */
  MX_GPIO_Init();
  I2CInit();
  MX_TIM3_Init();
  MX_TIM6_Init();
  MX_RTC_Init();
  /* USER CODE BEGIN 2 */
	LCD_Init();//LCD初始化
	LCD_InitShow();//LCD初始化显示

	EEPROM_ReadBuff(Time_addr_now,ReadBuff,sizeof(ReadBuff[0])*3);//读取时间
	Set_Time(ReadBuff);//更新时间
	Show_Now_Time();//显示当前时间
	Set_Alarm();//重新设置闹钟
	HAL_TIM_PWM_Start(&htim3,TIM_CHANNEL_1);//PWM默认为开启状态
	TIM6->SR=0;//定时器中断标志位清零
	HAL_TIM_Base_Start_IT(&htim6);//开启定时器6(LED闪烁)
  /* USER CODE END 2 */

  /* Infinite loop */
  /* USER CODE BEGIN WHILE */
  while (1)
  {
    /* USER CODE END WHILE */
    /* USER CODE BEGIN 3 */
		KEY_Scan();//按键扫描
		LCD_Refresh();//更新显示
		if(Statue_change)//定时器状态改变标志位为1
		{
			Statue_change=0;//重置标志位
			Timer_Statue_Change();//改变状态
		}
		LED_AllClose(LED_Close);
  }
  /* USER CODE END 3 */
}
四、实验结果
五、源码(转载请注明出处)
总结
以上就是全部内容,如有错误请批评指正。
