DIY一个自己的C端低代码平台(1)-基础功能实现
前期回顾
组件库设计
juejin.cn/post/708911…
仓库地址
github.com/just-00/my-…
引入
这个系列,我们会带大家实现一个C端的低代码平台
整体的布局参照上图,操作的流程是从gallery-list中选择需要的组件,拖至layout,并在layout中做顺序调整,选中组件在form config中进行属性配置,整个过程中在renderer中展示效果,最后发布成为网站
这是目前的仓库设计(后面可能也会改),蓝色标为一期必做需求,黑色为二期优化需求
这一期实现的是红线框出的内容,basic-components引入基础组件和对应的schema并统一导出,platform-consumer接入basic-components和renderer,实现选取组件→配置组件→渲染组件这个通路
关于components也就是组件库的设计实现主要写在了上一篇,有兴趣的同学可以看一下最上方的前期回顾
platform-consumer技术选型
上一章说到了platform-consumer使用vite + react来搭建,在css预处理器上我们选用了less,css框架选择了tailwindcss
tailwindcss在vite上安装非常简单,按照官方给的顺序来就可以了tailwindcss.com/docs/guides…,安装完之后在css文件中会辨别不出@tailwind的指令,如果你使用的是vscode,需要同时安装一个postcss support插件
而UI框架因为我们要根据schema生成表格,所以选用了最有名的formily + antd的组合
这里可以看一下formily的设计,formily将生成一个schema受控表单分为了三步
- 使用createSchemaField挑选表单会使用到的UI组件,比较灵活的选择与antd还是fusion做结合
- 定义schema,传入SchemaField生成表单
- 是用createForm创建出表单对象,与Form绑定
import React, { useMemo, useState } from "react";
import { createForm } from "@formily/core";
import { createSchemaField } from "@formily/react";
import { Form, FormItem, Input, Select } from "@formily/antd";
import { Button, Space } from "antd";

const SchemaField = createSchemaField({
  components: {
    Input,
    FormItem,
    Select,
  },
});

export default () => {
  const current = {
    type: "object",
    properties: {
      aa: {
        type: "string",
        title: "BB",
        "x-decorator": "FormItem",
        "x-component": "Input",
      },
    },
  };
  const form = useMemo(() => createForm(), []);
  return (


  );
};
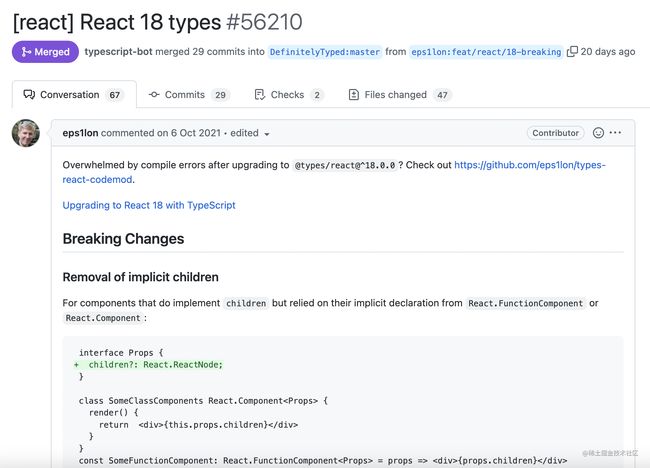
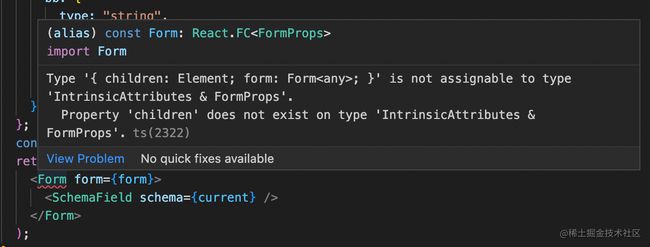
非常命运多舛的是,我们依赖的是@types/react18的类型库,他们在17⇒18时有一个breaking change
github.com/DefinitelyT…
solverfox.dev/writing/no-…
简单来说就是不支持React组件默认携带children的定义了,而lib库之类的都还没有将ts更新,所以导致会报错
我们也在@formily/react提了issue,但是如果你在使用时他们还没有fix这个问题的话,就降级到@type/react17吧,反正formily现在也不支持concurrent mode。(就算formily修了,antd和Fusion也不一定会修QAQ)
tips:过了几天看了下issue,formily已经改了这个问题,不愧是阿里(
然后我们又碰到了一个问题,是less的~alias和pnpm的相关问题
现象是在formily中的less文件使用了@import '~antd/es/style/themes/index.less',照常理来说,它应该重定向到node_modules/antd下,但是vite在解析less时,可能是跟随pnpm软链跳到了硬链的位置,由于以下原因没有找到:
1.文件夹名称不同,软链中是单纯的项目名,硬链中则带有版本号
2.文件结构不同,软链维持树状而硬链铺平的原因,导致没有找到相应的文件
解决方法是在vite中配置alias手动指定跳转位置(ps:可能还会报一个javascriptEnabled的错,配置代码也一并附上
css: {
    preprocessorOptions: {
      less: {
        javascriptEnabled: true,
      }
    },
  },
resolve: {
    alias: [
      {
        find: "~antd",
        replacement: "node_modules/antd",
      },
    ],
  },
schema相关设计
关于组件如何提供schema,我们主要考虑的还是便捷,一共有两个选择
- 指定schema文件位置
- 指定schema对象导出名
指定schema文件位置的话,默认可以和package.json同级,是一个js或者json文件都可,也可以放在其他的位置,通过在package.json中设定exports的值来进行schema模块的alias指定(相关资料可以查看这篇medium.com/swlh/npm-ne…)
而指定schema对象导出名的话,需要在组件的入口文件同时导出schema
最后我们选择了第一种方式~
而basic-components在导入schema的js文件时,会报找不到typing的错,可以在tsconfig.json中关闭noImplicitAny,也可以自己写一个typing文件declare一下schema module
为了方便起见,生成表单相关的schema我们全都参照formily的规则来
(在第一part中,我们设计了开发环境使用源码,生产环境使用dist,但是也在写schema的时候发现了一个麻烦的点,在basic-components新增对象导出时,dist中的typing.d.ts并不会联动更新,会导致编辑器报错但是程序可以正常跑起来,目前还没找到很好的解决途径)
代码结构设计
这个标题起的比较大,但我们其实就简单的讲一下basic-components怎么给出消费侧(platform-consumer、renderer)所需要的东西
首先看一下我们Widget的设计
// basic-components types
export enum ComponentType {
  PLAIN_IMAGE_COMPONENT = 'PLAIN_IMAGE_COMPONENT',
  PLAIN_QRCODE_COMPONENT = 'PLAIN_QRCODE_COMPONENT',
}
// Widget表示一种控件类型,由它的name唯一确定
export type Widget = {
  name: ComponentType;
  // 这里的类型先偷个懒
  component: any;
  schema: { [key: string]: any };
};
接下来看一下我们的统一导出
// basic-components index
import { ComponentType } from './types';
import type { Widget } from './types';
import PlainQrcodeComponent from '@my-low-code/plain-qrcode-component';
import PlainImageComponent from '@my-low-code/plain-image-component';
import PlainImageComponentSchema from '@my-low-code/plain-image-component/schema';

const PlainImage: Widget = {
  name: ComponentType.PLAIN_IMAGE_COMPONENT,
  component: PlainImageComponent,
  schema: PlainImageComponentSchema,
};
const PlainQrcode: Widget = {
  name: ComponentType.PLAIN_QRCODE_COMPONENT,
  component: PlainQrcodeComponent,
  schema: PlainImageComponentSchema,
};
const WidgetMap: Record = {
  [ComponentType.PLAIN_IMAGE_COMPONENT]: PlainImage,
  [ComponentType.PLAIN_QRCODE_COMPONENT]: PlainQrcode,
};

export { WidgetMap, ComponentType, Widget };
可以看出我们给了单独的组件包widget(包括name、组件、schema config)和WidgetMap,其实也有犹豫过WidgetMap是不是可以在消费侧自行组装,但是最终还是用了比较便利接入方的做法
数据流设计
接着简单的梳理了下,platform-consumer中几个模块之间是怎么相互影响的
上面一共是4部分-可选组件列表、组件layout调整区域、渲染器和表单配置组成了我们的C端低代码构建平台,因为是第一版,我们先不做拖动,简单的走通选取组件→配置组件→渲染组件这个链路。
ps:由于renderer会在多个场合使用,所以我们把它单独抽出一个包,再由platform-consumer接入
需要共享的数据有:
- 已选择的组件们以及它们相应的form配置
- 当前点击的组件
我们选择了使用纯的Context api+useReducer+immerjs的方式来管理数据,不用依赖外部库十分轻量,使用immer简单了写法
// context
import { createContext, Dispatch } from "react";

// type为Component type,id根据Component插入时间自动生成,formConfig为单个组件对应的参数
export type GalleryItem = {
  type: ComponentType;
  id: string;
  formConfig?: {
    [key: string]: any;
  };
};

export type HomeContextType = {
  galleryWithFormList: GalleryItem[];
  currentGallery?: GalleryItem;
};

// 子组件改变context需要靠传递下去的dispatch
const HomeContextInitValue: { state: HomeContextType } & {
  dispatch: Dispatch<{
    type: string;
    payload: any;
  }>;
} = {
  state: {
    galleryWithFormList: [],
  },
  dispatch: () => {},
};

const HomeContext = createContext(HomeContextInitValue);
export { HomeContextInitValue };
export default HomeContext;
// action
import { ADD_GALLERY_ACTION } from "./action";
import { HomeContextType } from "../context";
import produce from 'immer'

const HomeReducer = (
  preState: HomeContextType,
  action: {
    type: string;
    payload: any;
  }
): HomeContextType => {
  switch (action.type) {
    case ADD_GALLERY_ACTION:
      // 使用immer
      return produce(preState, draft => {
          draft.galleryWithFormList.push({
            type: action.payload.type,
            id: new Date().getTime().toString(),
          });
      })
    default:
      return preState;
  }
};
export { HomeReducer };
// context consumer
import React, { useReducer, useState } from "react";
import HomeContext, { HomeContextInitValue } from "./context";
import { HomeReducer } from "./reducer";

export const HomeView = () => {
	// 在context provider层useReducer,并将state和dispatch传递下去
  const [state, dispatch] = useReducer(HomeReducer, HomeContextInitValue.state);

  return (

    {/* Home view的具体实现 */}

  );
};
让我们最基础的功能work起来,一共需要三个action,具体的代码可以参考仓库
export enum HOME_ACTION {
    // 从Gallery挑选组件
    ADD_GALLERY_ACTION,
    // 在Layout中选择当前配置组件
    SET_CURRENT_GALLERY_ACTION,
    // 更新选中组件配置
    UPDATE_GALLERY_FORM_ACTION,
}
效果展示
我们最基础的C端低代码平台就跑起来啦
[外链图片转存失败,源站可能有防盗链机制,建议将图片保存下来直接上传(img-4y9JoNmq-1653445094391)(https://p3-juejin.byteimg.com/tos-cn-i-k3u1fbpfcp/56df342d14d94ccd83847e6b264a77a8~tplv-k3u1fbpfcp-zoom-in-crop-mark:1956:0:0:0.image?)]
最后记录一下我们这一part碰到的小小问题
-
组件整体会渲染多次
- 在没有任何组件的依赖项变动的情况下,组件会重复触发渲染,这个现象查了一会儿之后发现是开发环境中的React.StrictMode特性……用来检测潜在问题的,是我的无知=v=
-
type导出后在消费侧报错
-
在basic-components的index文件中统一导出了type Widget,供platform-consumer使用,但是会报Widget不存在的错,查阅后解决方式是在basic-components引入type Widget时,使用import type
- www.typescriptlang.org/docs/handbo…
import type { Widget } from './types'; -
下一篇我们会接着完成layout中的删减、移动位置,完善渲染器的C端外壳展示,以及部署一个用户已经配置生成的网站~有兴趣的话可以关注我们哦
andbook%2Frelease-notes%2Ftypescript-3-8.html%23type-only-imports-and-export “https://www.typescriptlang.org/docs/handbook/release-notes/typescript-3-8.html#type-only-imports-and-export”)
```
import type { Widget } from './types';
```
下一篇我们会接着完成layout中的删减、移动位置,完善渲染器的C端外壳展示,以及部署一个用户已经配置生成的网站~有兴趣的话可以关注我们哦


